The Grow Awards 2026 🏆 


Likes
Comments
Share
@Crashoverite
Follow
Hi everyone 😁
Welcome back in another week update!
Thank you all for this amazing support on this bananas journey💚💚💚
Uploading and updating each week content on daily bassis so please revisit this diary if week not over yet.
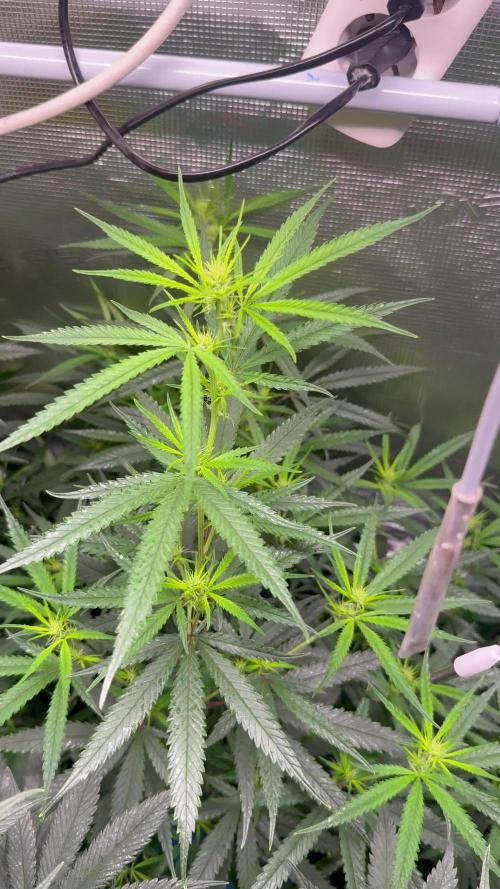
So far all going great. Girls looking very healthy and happy. Due to my short trip had to leave my 🍌💜👊 girls unsupervised for 3 days. Was stunned when opened my cabinet on the Dec 5th. Athena stretched like crazy. Good 3 inches. She better slow down as not much roof space left for her. May tie some taller branches to netting if necessary. Introducing blooming nutes for the first time this week on December 6th at smaller dosage and on the second watering as listed.
Week 8
Dec 4 - Dec 10
Dec 5
Leaves tucking
Dec 6
Heavier selective defoliation on both girls. Athena fully lolipopped and Xena at 75%. Watered with 8 ltr beetwen both with perfect runoofs PH 6.4. Girls were very thirsty 🤤
Dec 7-8
Just enjoying how my girls developing. Frost has landed and they are start showing colours. All is looking great.
Dec 9
Second watering for this week 7 ltr beetwen both. Runoffs PH 6.4
Even with so much difrence in size of my 🍌💜👊 girls it seems that they are drinking my juice almost equally.
Dec 10
Applied selective defoliation and tied 3 tallest branches of Athena to netting to avoid any potential burns on these beautiful baby colas.
It's the end of the week!
Thank you all again for such a great support, all the likes, dm's, comments and follows 💚💜💚💜
Stay tuned for coming week update 😁✌️💚

Likes
115
Share
@DogDoctorOfficial
Follow
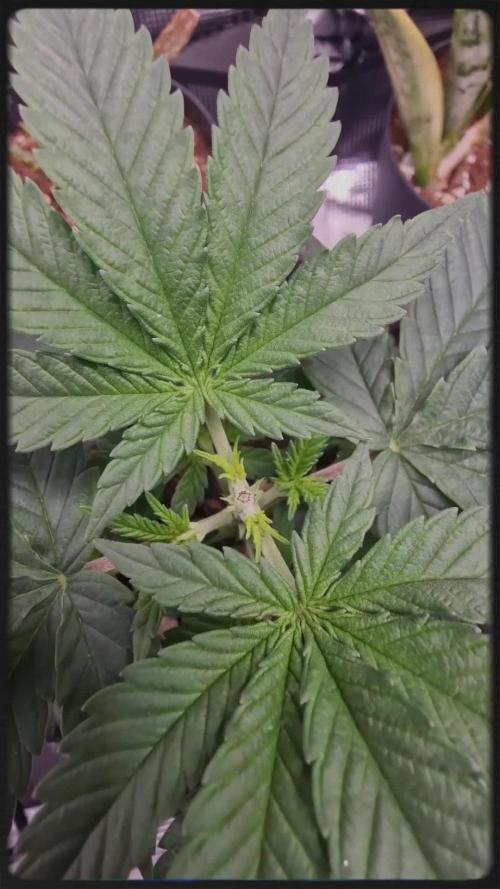
Greetings, fellow cultivators! We've officially crossed into the much-anticipated flowering stage with our beloved Cherry Cola Auto, and let me tell you, it's nothing short of a horticultural fiesta! The transformation over the past week has been nothing short of magical, with our once lush bush evolving into a budding beauty.
Last week was a game-changer as I bid farewell to the training supports that have guided our Cherry Cola through her bushy phase. Now, she's free to express herself, growing wild and embracing her natural beauty. The transition from veg to flower has been seamless, and I'm witnessing a symphony of bud formation that's simply breathtaking.
One of the marvels of autoflowers is their ability to veg and preflower simultaneously. It's like witnessing two acts of a play at the same time – the plant is reaching for the stars while also gearing up for the grand flowering spectacle. Cherry Cola's growth rate is nothing short of impressive, and I find myself in awe of this dynamic phase.
With the shift into flowering, I've made some adjustments to our nutrient regimen. The Start Booster has gracefully bowed out, making way for two new players on the stage – P-Boost and Topbooster. P-Boost, a phosphorus booster, is a soluble wonder that not only enhances blooming but also contributes to improved water pH. It's like giving our Cherry Cola a backstage pass to a nutrient orchestra.
Meet the New Stars: P-Boost and Topbooster:
P-Boost, with its organic acids and phosphorus punch, is playing a vital role in stimulating protein, hormone, and vitamin production. It's a symphony conductor orchestrating the blooming processes. Meanwhile, Topbooster, the dynamic duo partner, is enhancing the flowering response, producing larger fruits with more fibers, resins, and sugars. It's like a magical potion for quality and flavor enhancement.
Oh, did I mention that our Cherry Cola looks perfect to my eyes? She's a vision of green excellence, and I'm captivated by the flawless symmetry of her growth. Every day, she inches taller, embracing the flower formation with grace and poise.
As we wrap up this Week 1 Flower report, I'm left in amazing of the beauty unfolding before us. Cherry Cola Auto, with her wild growth and budding allure, is a testament to the marvels of cultivation. Stay tuned, green enthusiasts, for the next thrilling installment as the floral overture continues!
Genetics Cherry Cola Auto @Fast_Buds @fastbuds_genetics_official @fastbuds_official @fastbuds_espana
Nutrition: @aptusholland @aptus_world @aptus_
Love, Care, and Attention: @dogdoctorofficial
As always, thank you all for joining me on this journey, for your love, and for it all. My horticultural odyssey would never be the same without you. Your love and support are cherished, and I feel both honored and blessed to have you in my life <3 <3 <3
#aptus #aptusplanttech #aptusgang #aptusfamily #aptustrueplantscience #inbalancewithnature #trueplantscience #dogdoctorofficial #growerslove #fastbuds #specialplants #homegrown #fastbuds #cherrycola #CultivatingBeauty #NatureArtistry #HomegrownMagic #GreenPassion #JourneyWithPlants
With true love comes happiness. Always believe in yourself and always do things expecting nothing in return, with an open heart. Be a giver, and the universe will respond in ways you can't even dream off.
Friendly reminder: all you see here is pure research and for educational purposes only.
Growers Love to you all <3 <3 <3
Likes
2
Share
@igrowcan
Follow
[Week 8 - Flowering Stage]
The plant is in full bloom, with buds growing larger and more potent within the minigrow box. We ensure optimal lighting levels to support flowering.

Likes
29
Share
@CanadianFillmore
Follow
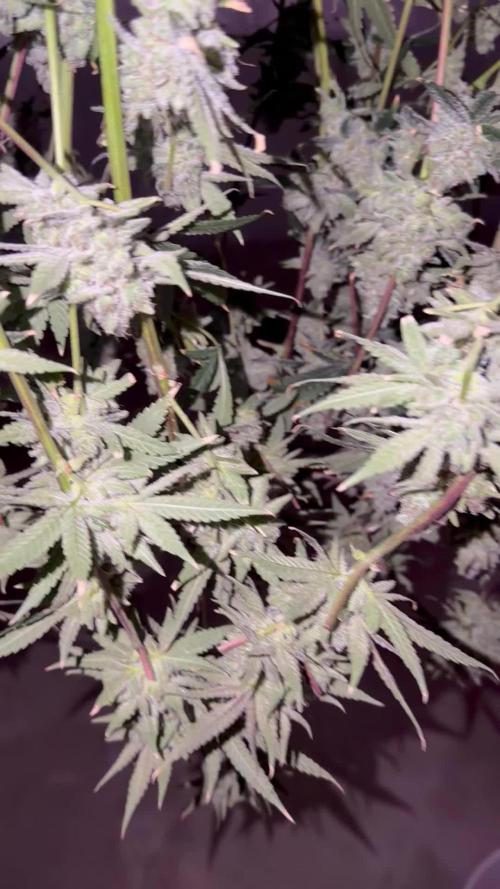
The flush begins for super lemon haze! What an awesome grow this lady has been. Running nutes at half the dosage compared to my previous grows and this lady was pretty happy. She did show some deficiency throughout the grow, but she did much better overall with less nutes, compared to my previous SLH grows. She's got about 5-10% amber, 20-30% cloudy and the rest are clear. She also has a moderate lemon aroma. Buds are very dense and larger than any previous SLH buds I've grown. So pumped to get this lady chopped, dried and cured, that lemon haze flavor just blows my mind and taste buds away!
Thank you for taking a look 👽🌳


Likes
25
Share
@Jessemon1106
Follow
She smells so sweet I can't wait to try her. I've stretched her out a bit more and top dressing. She is getting so frosty.

Likes
112
Share
@PEAKYPLANTERS
Follow
welcome back, fantastic friends of the weed
Welcome to Queen Peakyplanters Gardens
these splendid sweets have great vigor and are in great shape
Changing the light at the right time has made them much happier, and it seems that the relationship between light and plant is quite favorable
Soon we will also receive the automated dimmer for a more complete spectrum experience suitable for simulating sunset and sunrise😜
Kiss Kiss

Likes
18
Share
@birdmountain
Follow
The plants look a bit damaged and need some care as I was on holiday for a couple of weeks. They were watered every 2-3 days but not looked after any further, yet they have grown quite a bit. The smaller Fractal has already started to flower. They have lost a bit of colour, I hope to be able to fix that.
Fractal 1 120 cm
Fractal 2 100 cm

Likes
Comments
Share
@mihixd
Follow
D29
Topped all her main node sites, going from 4 to 8 branches. Defoliated canopy to reduce overlap and promote airflow since I saw minor bites in my leafs.
D31
ALL my new growth looked brown? This combined with the increasing biteholes in my leafs told me I had to act.
I suspected the brown growth to be a root/overwatering issue so made sure to hold off on watering for now.
For the bugs I used a 3% hydrogen peroxide dilluted 1:10 in a spray bottle with water. Sprayed leafs bottom and top till drenched, kept coming back every day to spray whenever i felt like it.
D34
No increase in any signs of bugs, all new growth was completely green, new branches growing out. Seems like the treatment worked and decided to feed again since soil 10cm deep was dry.
4L with 0.5:1000 calmag 1.5:1000 grow and 1:1000 PR. Watering slowly to ensure even distribution of water throughout soil, want that rootmass to grow huge!
D35
Weather forecast for upcoming weeks looks amazing, moved her outside again.
Since the autos im currently running need light priority for early vigorous growth, my Frisian lady had to make do with very low PPFD levels (80-250). All things considered she performed really well this week recovering from bugs, root issues and very low light intensity.

Likes
6
Share
@Targona
Follow
I'm sorry I broke one of the main branches at the beginning. Otherwise it grew nicely, it just flowed quite late into the flower 😉

Likes
18
Share
@DjDaveAtHome
Follow
Nov 9, 2019
Orange Juice (1) – Day 42 Veg/Day 0 Flower
(30% Indica/70% Sativa)
(63-70 days)
Blueberry Headband (2) – Day 42 Veg/Day 0 Flower
(70% Indica/30% Sativa)
(65-70 days)
Cheese (1) – Day 42 Veg/Day 0 Flower
(60% Indica/40% Sativa)
(50-60 days)
Plants got a strong tea as well as a final leaf strip and tie down to spread the canopy. Flipping today. 12/12. Drying the medium more. Day and night temps will go down by 5°F to 70°F at night/75°F during the day.


Likes
8
Share
@Alkaline_Water
Follow
Last watered on dec 10;
I eased up on the LST angle on the Larry OG. She’s looking a lot better than a couple of weeks ago. Although growth has been stunted substantially, I’ll try to nurse her back to the best of my abilities;
We’ll see if the coffee grounds cause nitrogen toxicity, or if it pays off;
The bud sites on the Mandarin Cookies have grown at least an 1 1/2in in the last week and seem to be doing well, There’s some very faint tip yellowing on the new growth so I think I’ll water with some plain ph’ed tap water and perhaps some molasses;


Likes
23
Share
@Puraweeda
Follow
J'ai arrêté l'ajout de super vite de hesi et du power feeding booster. Comme vous pouvez le voir les plantes les plus développées aux niveaux des buds ont subit un excès de nutriments.
En espérant que cette phase de rinçage de fin de floraison va stopper les dégâts des excès.
Likes
10
Share


Likes
21
Share
@Big0zGrower420
Follow
Hey everyone, hope everything is going well for you all. Plants have been doing good since the last time posted, all three are working on their flowers. One CBD is purple, other is going to be green. Got the humidifier out of there for more space which has made things a lot easier. Need to supplement some P&K for the Colorado cookies, showing a little deficiencies. Other than that see you all next week.

Likes
9
Share
@Brocolis_Grow_Br
Follow
PORTUGUÊS / BRASIL
Deixei ela meio largada, vivendo por conta no sol. Ela tem pegado tempo forte, chuva forte, sol forte, frio e segue firme. Ainda estou com o mesmo problema das moscas brancas. Elas não param. Tenho pulverizado um pouco de agua com vinagre e sabão para eliminar, mas me sinto mal de estar jogando sabão. Não sei se o sabão ou o vinagre reagem com os tricomas. se você sabe, me avisa por favor.
Uma coisa que tenho achado incrível dela (a primeira que plantei não ficou assim, e nem um terceira que foi plantada junto desta), ela ficou com um roxo escuro bonito demais e está começando a ficar mais densa, pesada.
Nas fotos e vídeos dá pra ver as cores bem, assim como as marcas das moscas brancas em todas as folhas.
Uma coisa que fiz foi adicionar um pouco de NPK 4 14 10. O motivo é que tenho outra de mesma idade e que passou por uns sufocos no início (nasceu de raiz pra cima e depois o cachorro ainda arrancou, milagre estar viva), como a colheita tava prejudicada, fiquei com menos medo e dó de testar então aqui eu adicionei bastante NPK mesmo em cima do meu solo super rico. A planta não reclamou, não torceu folhas e nem mudou coloração. Entendi como uma aprovação de que ainda posso adicionar NPK mesmo em cima do meu solo e que preciso revisar a mistura da próxima vez para colocar ainda mais nutriente.
Acho que ela ainda tem fácil mais de 30 dias pela frente.
Ela está com 68 dias
ENGLISH
I left her a bit abandoned, living on her own in the sun. It has been experiencing strong weather, heavy rain, strong sun, cold and is still going strong. I still have the same problem with whiteflies. They don't stop. I have been spraying some water with vinegar and soap to eliminate it, but I feel bad about throwing soap. I don't know if soap or vinegar react with trichomes. If you do, PLEASE let me know!
One thing I've found incredible about it (the first one I planted didn't look like this, nor did a third one that was planted at the same time as this one), it turned a really beautiful dark purple and is starting to get denser, heavier.
In the photos and videos you can see the colors well, as well as the whitefly marks on all the leaves.
One thing I did was add a little NPK 4 14 10. The reason is that I have another girl of the same age who went through some hardships at the beginning (she was born with the roots going up and then the dog took it from the pot, it is a miracle that she's alive). My thought was that since the harvest was affected, I was less afraid and worried about testing things. So I added a lot of NPK even on top of my super rich soil. The plant did not complain, did not twist leaves or had color changes. I took it as an approval that I can still add NPK even on top of my soil and that I need to revise the mixture next time to add even more nutrients.
I think she still has easily more than 30 days to go.
She is 68 days old
Dia 30 de janeiro 2024


Likes
16
Share
@Comfrey
Follow
Unfortunately I found bud rot, so I had to harvest without leaving the plant 2-3 days in the dark.
I‘m satisfied with the harvest but I lost something like several grams at the end because of bud rot in two dense flowers.