The Grow Awards 2026 🏆 


Likes
Comments
Share
@The_Stoned_Samurai
Follow
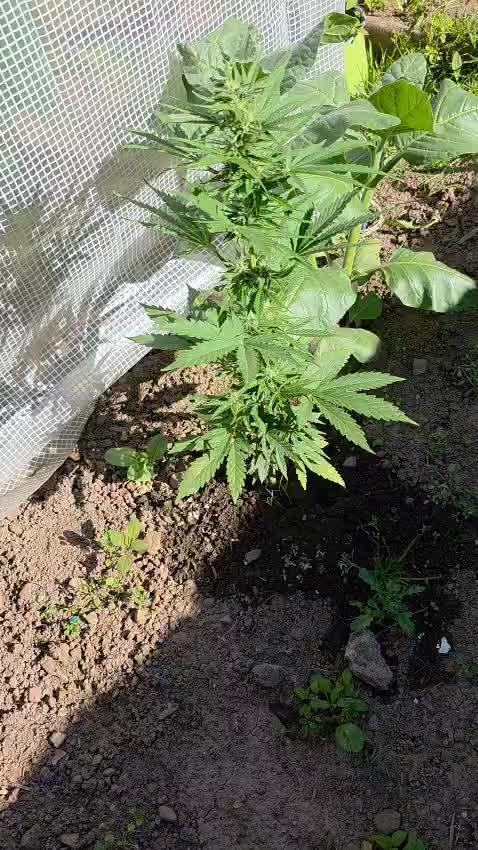
A bit frustrated that I don’t see flowers yet :( I defoliated quite a bunch of leaves that were taking all the space (see pictures). I hope flowers will appear soon after it!


Likes
508
Share
@Legendaryseedthumb
Follow
Well the harvest was good still the best fricking smoke ever! So much crystals and so much keif and hasch from the leaves.
Will grow it again soon! I’m going to move soon so i have to plan my next grow for some weeks before I start a new one!
Love growing Sannie’s seeds with marshydro, it’s the best!
Drying day 4: everything is going well! Smells so good in tent and super sticky crystals! Will give it 4-5 more days of drying 😁
Likes
14
Share
@9LittleGrow
Follow
Week -3 of flowering Stage
91 Octane is massive and looking the forming of her pistals and trichromes is very satisfying.
Banana Daddy is also starting her blooming phase you can see her pistals in the video.
The last Sugae Cane lates in flowering. She still doesn’t sign or start to see no pistals but she grow healthy and happy.


Likes
4
Share
@TKCS_Pinoy
Follow
🌸 Woche - Week 11 Review
🌡️ Wetter: Wechselhafter geht’s kaum – Regen, Sonne, Regen, Sonne … typisches deutsches Wetter eben 🌧️🌞.
📈 Wachstum: Höhe bleibt gleich, ganze Energie fließt in die Blüten.
💡 Licht & Energie: Trotz grauer Tage keine Spur von Stress.
🌿 Blattgesundheit: Gesund, sattgrün, wirkt robust.
💧 Wasser & Nährstoffe: Regen nimmt mir das Gießen fast ab, nur Nährstoffe gezielt gegeben.
🔄 Entwicklung: Blütenstrukturen werden dichter, erste Harzschichten sind sichtbar – Vorblüte stabil und schön ✨.
✅ Fazit: Erste Pflanze, dauert länger, aber ich bin echt zufrieden – auch wenn sie mehr Regen als ich verträgt 😅.
------------------------------------------------------------------------------------------------------------------
🌡️ Weather: Rain, sun, rain, sun … classic German weather 🌧️🌞.
📏 Growth: Height steady, all energy into flowers.
💡 Light & Energy: No stress despite cloudy days.
🌿 Leaf Health: Healthy, deep green, very robust.
💧 Water & Nutrients: Rain almost does the watering for me, nutrients added carefully.
🔄 Development: Flower sites denser, resin starting – pre-flowering steady and nice ✨.
✅ Overall: First plant, taking longer, but very happy – she handles the rain better than I do 😅.

Likes
6
Share
@Muybien
Follow
Dont know why one of them is 1.75 m.
In the description they say BB Kush will only grow up to 0.70 m or 1.00 m max.

Likes
20
Share
@adam_pawloski87
Follow
We are in Flush !! Was giving them GH Flora series + rapid start + cal mag
Likes
24
Share
@nonick123
Follow
Día 44 (15/07) Wow! No hay shock de trasplante! 😍💥😁
Todas las ramas se han estirado hacia arriba tras el ajuste de LST y se están formando nuevos nodos rápidamente
Esta combinación de nutrientes de Lurpe + substrato de PRO-MIX HP es una maravilla 😍
Día 45 (16/07) Ayer tuvimos ola de calor (37 ºC) y han aguantado muy bien!
A última hora de la tarde (cuando ya no había sol directo) les apliqué H2O en spray foliarmente para refrescar los estomas
Hoy parece que vuelven las temperaturas estándar para esta época del año: 29 - 30 ºC en las horas centrales del día
Riego con 1 litro de H20 pH 6,5
Día 46 (17/07) Pequeños ajustes de LST
Hay algunas ramas inferiores que no se han formado / estirado mucho
Lo más probable es que haga una buena limpieza este domingo, 7 días después del trasplante, para dejar solo los brotes por encima del 4º nudo
Día 47 (18/07) Riego con 0,5 litro de H20 pH 6,5
Este domingo (día 50) haré limpieza de partes bajas y tal vez también de nuevo topping en las 4-6 ramas principales 😁
Día 48 (19/07) Día de muchísimo calor con 37 ºC. A ver como lo llevan!
Riego con 0,5 litro de H20 pH 6,5
Día 49 (20/07) Para ayudarles a llevar mejor el calor de las horas centrales del día, coloca una malla de sombreo (70%) sobre el invernadero
Lo cierto es que se nota que baja mucho la temperatura debajo de la malla! Van a estar más fresquitas! 😍
Riego con 0,5 litro de H20 pH 6,5
Día 50 (21/07) Training session!
Hago limpieza del tercio inferior de la planta, de todas las ramas y nudos que no superan la línea del dosel marcada por el 4º nudo (1er topping)
También hago topping (2º) a todas las ramas principales
La idea es tener 12 ó 14 colas principales para que no se hagan muy altas
De paso saco unos cuantos clones de las ramas inferiores eliminadas 😁💥
Para superar el estrés, hago las siguientes aplicaciones y riego:
- Riego con 1 Litro de Té Vegetativo de Lurpe Solutions. Preparación: 24 horas con bomba de aire (oxigenación) con ingredientes:
Green Sunrise 8 ml/L + Insect Frass 16 ml/L + Hummus Lombriz 8 ml/L + Melaza 1 ml/L + Kelp Hidrolizado 0,25 g/L
- Aplicación foliar Kelp hidrolizado de Lurpe Solutions a 0,25 ml/l
💦Nutrients by Lurpe Solutions - www.lurpenaturalsolutions.com
🌱Substrate PRO-MIX HP BACILLUS + MYCORRHIZAE - www.pthorticulture.com/en/products/pro-mix-hp-biostimulant-plus-mycorrhizae

Likes
142
Share
@MadeInGermany
Follow
Hey everyone 🤗.
This week was harvested properly 😍.
All of them are harvested, except for the two Tropicanna Banana (they will be on tomorrow).
All finished crop images follow little by little as soon as they have dried enough and have got their actual bud structure 😃.
I wish you much fun with the diary, stay healthy Ges and let it grow 🌱


Likes
1
Share
@BunnyBud
Follow
I noticed that the drainage EC exceeded 2.6. I'll have to correct that. 🙊


Likes
5
Share
@Bread_n_Buds
Follow
Merry Christmas and happy holidays to everyone, and above all, a fantastic new year of growth with monsters, plants, unicorns, and all the magical beings we love.
** This week, mostly just grow tent photos, so you don't miss any updates over the holidays.
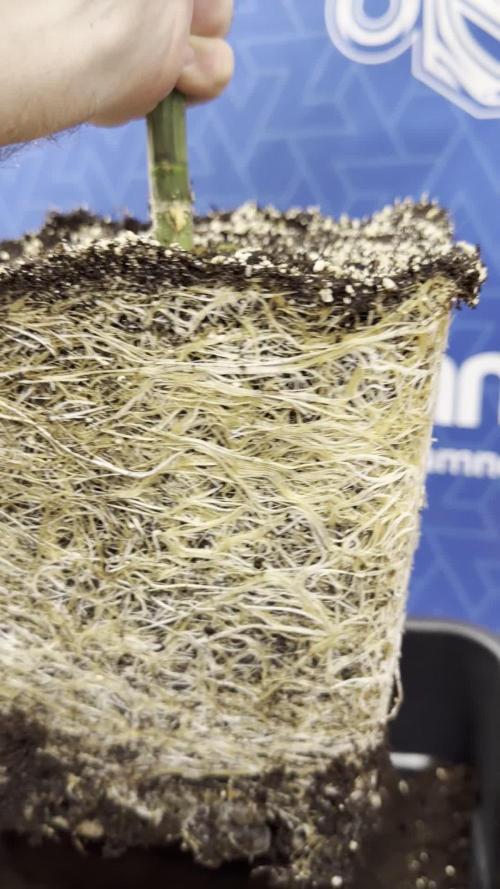
Our Tropicana Cookies #2 was transplanted from 6.5 to 20 liters into a larger pot just after I finished taking the photos, and she's already enjoying it. She was starting to feel a bit cramped, the vegetative stage is producing a lot of roots, and I could see her wanting a new home, so this time, the photoperiod-trained plants will all be in 20-liter or 15-liter Zamnesia pots.
Selected techniques - I was thinking of topping this plant repeatedly with a mainfold of 16 branches, but I think I'd like to get to 32, perhaps by trimming off any that are at risk of remaining low.
We're 100% organic and 1000% Plagron, as always.
We've chosen the recently launched Plagron Bio LightMix soil, which will allow us to get off to a smoother and more reliable start, without the sudden changes that liquid fertilizers can cause. A week is more than enough, so don't overdo it.
We're in the early stages of the vegetative stage, but we're well equipped with fertilizers and additives. We've added:
- Power Roots 1 ml/l
- Pure Zym 1 ml/l
- Silic Rock 1 ml/l
- CalMag Pro 1 ml/l
- Sugar Royal 1 ml/l
- Alga Grow 3 ml/l (Let's go easier on the topping)
Foliar spray only once a week
- Vita Race 5 ml/l
Choose your preferred style and calculate your results on the website:
www.plagron.com
Our new 720W Spider King lamp from Vanguard Hydroponics is still on its lowest setting. Visit the new Growshop area on the Zamnesia website:
Z - https://www.zamnesia.io/en/531-growshop
Our Tropicana Cookies is now in great shape, give it a try!
Z - https://www.zamnesia.io/en/10921-zamnesia-tropicana-cookies-semi.html
Z - The award-winning Girl Scout Cookies is a cannabis strain that lends itself very well to breeding projects. That's why we boldly experimented by combining its genetics with a fruity Tangie. The result is Tropicana Cookies, a fast and potent hybrid with 22% THC. This strain is highly productive, and its buds are not only rich in sweet and spicy terpenes but also covered in a layer of sticky trichomes (which facilitate the extraction of high-potency concentrates). Tropicana Cookies' genetic makeup is 60% sativa and 40% indica, a blend that produces a balanced and euphoric effect.
Although easy to grow both indoors and outdoors, Tropicana Cookies thrives outdoors in warm climates. If you have enough space and good sunlight, the plants can reach heights of 180 cm. Wait until mid-October and, in optimal conditions, you can harvest a whopping 700 g/plant. A result well worth the effort. This strain also impresses indoors, reaching heights of 150 cm and producing 500 g/m². Tropicana Cookies also stands out for its rapid flowering. After just 7-8 weeks of indoor flowering, it will be ready for harvest.
You know it, but I recommend it: here you can find so many beautiful things, essentially "the best that nature has to offer."
Z - www.zamnesia.com
Music //
www.radionula.com
+ Feng Shui Music
+ 432 Hz Frequencies


Likes
12
Share
@Machamp
Follow
9th week:
Wedding Cake auto:
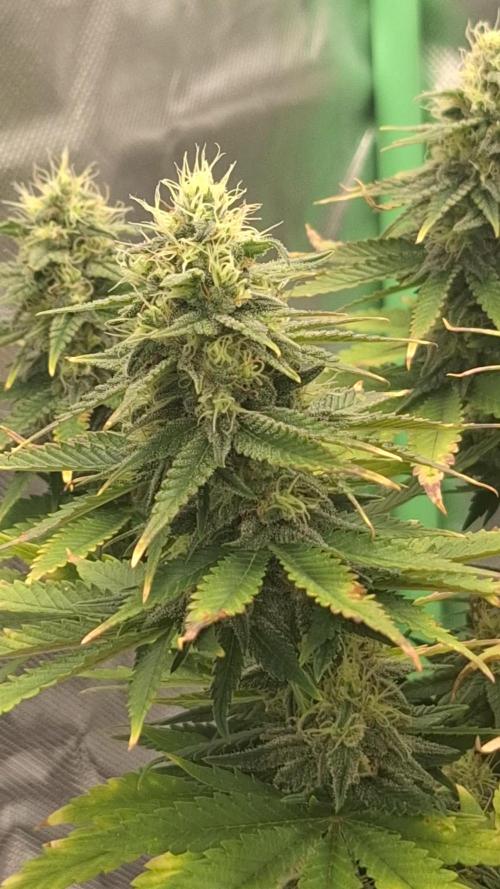
I am happy with my grow. She is looking great. I had never seen anything like that. She is 124 cm tall and full of trichomes as you can see in the picture.
As advised by an experienced user, i defoliated the damaged leaves. She is looking way cleaner now. I also added Big One as advised
I can see some brown trichomes appearing. I hope to see more brown trichomes in the end of this week.
Godzilla Cookies auto:
She is 76 cm tall and still under growing process. She has way less damaged leaves and is greener than Wedding Cake but way smaller tho.
------------------------
Smell: Strong, If i open the door of my room and keep it opened for a while, anyone in the house will detect it.


Likes
14
Share
@eldruida_lamota
Follow
Vamos familia cuarta de floración de estás Punch Pie de RoyalQueenSeeds .
Que ganas tengo de ver el progreso de esta variedad, las plantas están sanas, se ven con buen color.
La cantidad de agua cada 48h entre riegos, nutrientes de la gama Agrobeta.
Esperaremos que no me suba mucho la temperatura , por el momento se mantiene entre 25-26 así que lujo.
Esta vez me pasé un pelín con los productos pero echaré agua destilada y en unos días apañamos.
Estas próximas semanas veremos cómo avanzan y progresan estas flores.
Mars hydro:
Code discount: EL420
https://www.mars-hydro.com/
Agrobeta:
https://www.agrobeta.com/agrobetatiendaonline/36-abonos-canamo
Hasta aquí todo, Buenos humos 💨💨.


Likes
36
Share
@Ganjagrandaddy
Follow
Day 14 : Hi all , hope we are well and healthy.
The new Exotic girls are doing their breeder very proud. All have settled in to their pots and are on their 3rd nodes now with upright and straight out leaves.
They are all in a good position directly under the sp3000. inhave kept them at a good 24 inches away so far and will see how they reach up during this week. I plan to top them to encourage a wider plant each pot dependant on how they grow. If they stay smaller in height then I may pull them over to create a 5-way manifold for chunky mains.
All in all a nice steady week
I will be starting to feed them Mega crop in a day or two to get their leaf colour to the most energising I can. I am watering on the outer edges mainly, this should encourage the roots to spread to the whole pot and give a strong foundation for big buds hopefully.
Be safe folks.

Likes
10
Share
@carjos
Follow
48 hours in wet paper towel, after to the coco peat pellet.
the pellets really expand, hydrate them first.
I am not trying to be an example of coco medium, this is my first time working with it, diary for documentation.
Once I had a good menu of nutrients I started to look at the coco. spent a good couple of weeks with free time to read about the coco, not as easy as prepared potting soil but a few have said it is good results once you get the hang of it. so i am set to go.
I also have one seed from a retail cannabis package. It is from GAGE - Strawberry fire OG, Packaged AUG 2020, Purchased Sept 2021. One seed inside. I will see, it is in the wet paper towel at the moment.
thanks and best to you's'
day 7 from number one sprout: I am omitting the pH down 2 feedings now, little yellow tone in the first two seedling, going to balance straight forward from now on. number one seedling has now pushed up, ready for calmag tomorrow , number two is 7 days on thursday but looking like a good push start still a bit tall although straight. i will be rotating calmag - root booster for the first week of feeding. the pH down is a powerful concentrate, 6.5 to a hard 4 with a few drops in a 4L. wow! so I am using one 4L as a pH down to get a rusty orange (that is on pH water drops for the feedings). I have not tested but I think the root booster and calmag will pH down as is, so I am looking to pre-mix each in separate 4L. (20-12-21 4:20PM)
** interesting observation - I am used to wet paper towel to (as some say ) "pop the seed" which in my experience results in a tail like growth, (that is a few drops of water on seed between paper towel between saucers). but with a cup of slightly warmer than room temperature water covered in foil, the result was a seed split down the middle like a clam looks. ok thanks! - number three was germinated in cup of water.
Likes
6
Share
@emeraldlabs
Follow
Noticed some leaf discoloration on one plant this week. Assumed a deficiency of some sort. Now doing 1/2 strength fox farm trio with a tsp of calmag. Also been watering with a higher pH as runoff was noticeably low previous watering.
Night humidity is a lil higher than I’d like but the airflow is great.
All in all, everything seems good at the moment.
Photos/video are day 64 since breaking the soil (except leaf deficiency pictures).


