


Likes
Comments
Share


@D1hunned
Follow
Took advantage of their fast grow and top the 5th node and defoliated the first and all baby leaves below it. I've got very good results out of autoflower by doing this throughout my learning experience. Plant #5 wasn't ready for toppin for some reasons.

Likes
7
Share


@Growbody
Follow
Herzlich Willkommen zu meinem Growbericht der Membrana Hyper Autofem von VIP Seeds.
Die URL für den Strain findet Ihr hier:
https://www.vip-seeds.com/membrana
Für den Grow verwende ich den großen 15 Liter WideVersion Stofftopf von ROOTIES. Bei meinem ersten Grow mit den ROOTIES kam nur die 9 Liter Version zum Einsatz, da haben die sich gut bewährt.
Auch die Smart Start Plugs von Zamnesia werden wieder verwendet, dieses Mal ohne den Samen vorher einzuweichen.
Und die Erde und der Dünger von BioBizz findet wieder Verwendung.
Tag 51: Die Membrane Hyper Autofem von VIP-Seeds steckt noch immer in der Vegetationsphase..
Schön, dass du dir mein Tagebuch angesehen hast. Bis bald. ✋😎

Likes
12
Share


@KannaGrowing
Follow
Semana de transición entre el abono para el periodo vegetativo (Bio Vega) y el abono que utilizaremos durante el periodo de floración (Bio Flores). El primero más rico en nitrógeno y el segundo, en fósforo, magnesio y potasio.
Mezclo Bio Rhizotonic + Bio Vega + Bio Flores y riego con 50 litros de agua, todo el cultivo... Alterno riegos cada tres días, unos con abono y otros con agua.
La próxima semana, elimináremos Bio Vega.

Processing
Likes
20
Share


@PureMedicin
Follow
They are growing really well. Added a humidifier at day 9. I have a seedling in rockwool still it is growing super slow. Root still not sticking out even tho it have been in the cube for 7 days now. Im feeding very light 40% strenght. I see how light green the leafs are and thats what im going for. I will up the strenght abit the following days. I been watering almost everyday. Started the first week with 0.1 liter now upped it to 0.2 liters per plant. I had the HPS light just a bit too close to the plants so i have some very slight curling on a few of the leafs. No problem i just move the light up 5cm. So far im very pleased with the growth rate


Likes
27
Share


@GreenFingeredLT
Follow
Day 28: Last night I had a real scare, I watered and by the end of the day she was drooping and looking very sick, there was no runoff at water so I feel I overwatered the little thing, thankfully this morning she has bounced back with great strength and this morning is looking healthier than ever!
I'm noticing a few holes in leaves, a few spots on the leaves and a few very fine silk trails on the leaves, so I'm thinking she's got thrips 😣 next to impossible to get any pictures of the damage I'm talking about because I think I've caught the infection incredibly early, so today I'm picking up some Neem oil and I'll spray her completely at lights out , hopefully it is thrips and not spider mites because thrips this late in the grow wouldn't be too bad! If it's spidermites I'll be in a bit more trouble, thankfully flower has only JUST begun so I'm not so worried about a neem oil application at this time
I'm going to let the soil dry out completely before watering again, I was dubious whether it was needed yesterday but the top inch was dry, I think I'll just wait until it's a couple of inches moving forwards
Day 29: last night I drenched the leaves in diluted neem oil, I'm not seeing a lot of pest activity but there is some level, so since we're just starting to flower I decided now was the time just to blast anything that might be floating around, In ten days I'll do it again, maybe sooner if the buds are really getting going in that time
Because of my overwatering scare the other day, I'm giving her another 24 hours to dry out deep into the pot, there's still a level of moisture in there and as of this morning the plant looks really healthy, really happy with how shes looking today, got 5 exposed tops which I believe will become the colas, 2 are the apex and on the same level and 3 lower ones are all on the same level. There are other potential Colas but they're hidden under the plant, I'll probable defoliate that side once the times right, unless they can break through in the next couple of days, which would be nice
Day 29 update: (7 hours after lights on) opened the cabinet to find temps of 29 degrees c wasn't running extraction, soil is dry, but most importantly I noticed the top leaves praying for rain, I gave the soil a small amount (300ml) of distilled water and tap water , just to wet the soil enough to give another reason for the roots to spread through the pot, tomorrow I'll give another small water with feed and Humic acid just to top up her nutes and give her one last big hit of growth before she starts flowering properly, if we can trigger another growth spurt whilst she's still inbetween veg and flower, this is looking like a good first harvest!
Day 29 Update (6 hours until lights off) following the water the plant has done her best to expose every inch of her leaves in light, she's bushier than ever and presumably getting ready to have a serious growth spurt, I watered around the far edge of the pot and let this pull through the soil, no run off because it was so little but, possibly a small feed of 1:1:1 tomorrow to top up nitrogen for any growth spurts planned ;)
Day 29 Update (lights out) Today was an exceptional day for this girl, over the course of the day there's been some real developments! This evening she was foliar fed a mixture of 1:1:1 nutes and fulvic acid, a single drop in around 400ml of water, she should bounce back with an extra growth spurt with the extra nitrogen, on day 31 I will most likely be watering again with the same mixture to help push one last growth spurt before a flip to flower occurs and we move onto bloom nutes for the rest of the grow
In 24 hours the fulvic acid should kick in and give one last growth spurt hopefully adding another node or two to the plant at the vest last moment, next photos i'm hoping will be a significant growth period if todays behaviour was anything to go by
Day 31: Yesterday I squeezed in one last round of LST, the main stem cola was rising quite high above the rest of the canopy, I pulled that down out of the way and by the end of the day It had sorted itself out, I also spread out some of the other new cola sites to expose deeper into the plant to more light
Yesterday I also watered with NPK 1:1:1 and Humic acid solution, as well as foliar fed with Bloom nutes and Humic acid again, this should help the plant through it's last growth spurt whilst allowing it to start creating flowers, today the soil will be left without water, possibly the next day too but I think it is ready for flowering to begin so I'm looking forwards to watering her with Bloom Nutes to get that process started well! Now that she's turning to flower i'm noticing the stems of each top are quite thin, I have a small fan on them constantly keeping them moving but I'm expecting to have to SCROG to provide all the support she needs, even if the stems thicken up in flower like I'm expecting, this will support the big buds I'm hoping for!
Lot's a vertical growth starting the insides of the plant are starting to open up and there's very little leaf growth below the main canopy
Day 31 - Whilst I watered yesterday with Nutes and Humic Acid, I'm spotting some very early signs of some flowering deficiencies, this isn't really a surprise as there has been hardly any nutrients added to the soil over the whole grow, so I've sprayed with the nutrient solution listed a move, the top of the soil was getting dry but not ready for a full water yet, just wet the topsoil through to help her transition to a higher quality nutrient, should start seeing some fairly decent growth from here on out!
Day 32 - Today the soil was getting pretty dry, I diluted down my foliar feed mix a little and watered around 400ml of water with Humic, Fulvic, Bio Bloom and a few drops of 1:1:1, may have been a little too early but she's slightly showing some signs of deficiencies, foliar feeding has helped a little to keep these back but today I gave her the first feeding of specific bloom nutrients, should see her return to a healthy colour soon! She's starting to get quite tall as well, I think next few days we'll have some serious growth ongoing (as has become tradition)
You can see from the images how her colour has gotten a bit lighter over the past few days, Foliar feeding has definitely slowed this and hopefully prepared her for a bigger dose of Nutrients, in 48 hours I'll be ready to water again this time with a heavier balance of nutes to really get things started for a healthy harvest
Today or tomorrow she needs respraying with insecticides just to make sure nothing survived the early infestations and do ensure a pest free grow until the very end!
Day 32 update: Today the flowers on what I expect will be the main 2 Colas have started forming, There's around 7 potential colas but 2 will be substantial if they're left long enough, hopefully tonight the nutrients kick in, but I'm considering another decent hit of nitrogen and bloom fert together, then water till flush, I think that will be 2-3 days off though,
day 33: today she's looking all round healthier, the colours were good yesterday but today she's a much healthier shade of green for sure :D giving a decent feeding regime of flower nutes seems to have balanced her out nicely, I'm gonna leave watering today and let her dry out to give the roots another big push to grow, the other day I was digging down into the soil on the opposite side of the pot to the plant and found roots there, I'm really excited to see this girls root ball! Flowering is well on the way, HOPING for a Christmas harvest but I think it's going to be more new year when she's fully ready to be chopped, can't wait!
I have pulled off 2 leaves today, they were starting to turn brown, I think the plant has cannibalised them, not because of a nutrient issue, because of a light issue, these leaves were completely shaded by the whole plant
Likes
11
Share


@Joni2017
Follow
Hello everybody 👋🏻 today full moon 🌕. I put the seed in a tupper on top of the router where it gives a good temperature😊. I will put the led at half power (400W) during vegetation and at full power (800W) in flowering.
Blue Cheese Auto
Blue Cheese Auto from Barney's Farm is a variety classified as indica / autoflowering, it will take longer to make more than the other cars in the catalog but it will surprise us when we finish its cultivation for its incredible quality.
In an interior it is a large producer and not only a central truncheon, but it will have multiple satellites surrounding it with bright and compact buds. Putting 4 plants per focus we will extract the maximum potential, which we will have to tutor so that they do not double the weight; get ready to see 500g dry when doing a manual job.
In outdoor crops it is ideal for hot climates, where we will get the best harvests when there is the strongest summer sun. The size that usually reaches is good, up to the meter; production is also reflected in the high compaction of this genetics, up to 50-80g dry for each car. It has average resistance to the attacks of pests and fungi so it is better to perform biological preventive treatments during the first 20 days.
Type: Feminised
Photoperiod: Autoflowering
Cultivation INTERIOR / EXTERIOR
Genetics Blue Cheese x Ruderalis
Indoor Productivity (g) 500 gr / m²
Productivity Average (g) 500
Autoflowering Harvest Time from Seed (days) 70 - 75
Height (cm) 80 / 100cm
Height in Interior (cm) 100cm
% Indica 80%
% Sativa 20%
Indica / Sativa Mostly Indica
Medical No
Mold Resistance (5 = Maximum) 4
Resistance to Botrytis (5 = Maximum) 5
Resistance to the cold (5 = Maximum) 5
Oidium Resistance (5 = Maximum) 4
Resistance to Red Spider (5 = Maximum) 4
Warm weather
% Stable Stability
Difficulty of Growth (5 = Difficult) 1
Bio Tabs
Now fertilizing your plants will be much easier; we only have to add the Bio Tabs and the other components that are included directly in the pot when we plant, and the rest of the crop will only add water to our pots.
In the middle of the crop you have to apply an irrigation with Orgratrex and Bactrex to reinforce the biological activity and that's it. We will have plants as always, the most productive and tasty, totally organic and without having to worry about excess nutrients or fertilize them.
Dosage and how to use the Starter Pack of Bio Tabs step by step:
Fill our pots to about 3/4 and add 3g of Mycotrex for each pot, no matter the size. More or less are 3 tablespoons of coffee rasas.
Then we add another 25g of Startrex (which comes to be 2 tablespoons) every 5L of soil, so if we have 10L of pot then 50g and so progressively.
We stir well to mix with our substrate and just fill the pot of earth.
Then we make the hole to transplant our plant to the final pot, and in that hole you have to throw another 2g of MycoTrex into the hole itself and we can now transplant our plants.
Then we have to add your Bio Tabs tablets, every 5L of earth a tablet on the substrate, if we have 10L then two tablets ... You have to bury them closer to the edge of the pot than in the center. They are buried about 5 cm deep in the substrate and we will have our plants fertilized for weeks.
We make a mixture with the last component that remains when we plant, Bactrex. Add 1g to a liter of water and give the first watering with that mixture.
From now on, you only have to water with water until the 5th week.
At the 5th week, we will have to contribute a new help to our plants, we will add 20ml of Orgatrex and 1g of Bactrex in 500ml of water and stir well. Water only with that half a liter a plant and only once.
Add water until the end of the crop, that's that easy.😋👏🏻👏🏻
Biobizz light mix
With Light Mix of BioBizz we will be 100% sure of having bought one of the best lands available for your seeds. Saving on the ground is one of the worst mistakes we can make, since we are starting a job that the final result is to seek the highest quality and production. To think that is where the plant will have to live all its days of life so it will have to be of the best possible quality.
With Light Mix you will have an excellent substrate, as each land has a different formula and composition, we will find out who will best resist this substrate, according to the climatic conditions where we are going to plant. It is characterized by its high proportion of water / oxygen retention, this soil pulls more towards water retention so it will be perfect for all those who live in warmer areas avoiding having to water the pots so often, it retains a lot of humidity. We will have to be careful with the first days of our plants so as not to soil the land too much, otherwise the roots will not shoot as they should and you could even drown your plants, this advice is worth all the autoflowering genetics that are more sensitive to root problems and excess irrigation.
This sack of earth comes very light of nutrients, so this substrate should provide practically nutrients in all phases of the crop from the second week.
Composition:
Peat moss
Perlite
Ec: 1.2
Ph: 6.2


Processing
Likes
2
Share


Likes
16
Share


@Naujas
Follow
116 days!!!!! and here she is ready to reveal her inner beauty, taste, smell, and effect :)It was an amazing journey with @Weedseedsexpress, the girl was just amazing throughout her growth, she was satisfied with everything I gave her :) This is my first girl with such beautiful colors of leaves and flowers, she is simply unique :) Her smell is so strong that a day after she was cut and now, as I write this comment, I can still smell her aroma in my house, it is amazing, it reminds me of a big "party" :D So thank you @Weedseedsexpress for the opportunity, I will be open to your suggestions in the future - you are amazing :) and now I can't wait to taste her :) then I will provide her dry weight, stay tuned :) good luck to everyone :).

Likes
2
Share


@MistaOC
Follow
18.05. 🌿 Day 18 – Smooth Progress & Transplant + Feeding
Everything is progressing nicely!
All four plants are looking healthy and strong, with compact growth, well-spaced nodes, and no signs of stress. The early vegetative stage is going very well so far.
🌱 Transplanting:
Today, all four plants were transplanted from their 0.2L starter pots into 19L final containers filled with CANNA Terra Professional soil. The roots were well developed and ready for more space — perfect timing.
🌿 Feeding Update:
During transplant, each pot was amended with 60g of Green House Feeding BioGrow, mixed into the soil to provide a slow-release organic nutrient base. This should support strong vegetative growth over the coming weeks without the need for frequent liquid feeding.
The plants have settled in well and are showing no signs of transplant shock. With plenty of room and nutrients now available, they’re expected to really take off soon.


Processing
Likes
1
Share


Processing
Likes
10
Share


@CityFarmer
Follow
Hello everyone,
Now that I can tell the difference I split these apart, this is my Pineapple Kush, grown outdoors this time, shes smelling really fruty and I even seen some lilac hairs, lets see how she goes...
See you guys next week🤘🤘🤙🤙✌️✌️✌️
Likes
62
Share


@Reyden
Follow
La SF2000 spinge al massimo da qualche giorno e si vede che c’è una bella copertura nella tenda (4x4) cerchiamo di farle stare bene perché le 4 gorilla 🦍 hanno avuto carenze importanti perché ho fatto dei pasticci verso la 4 settimana, speriamo che riescano a riprendere il meglio possibile…le altre tre piante più giovani invece vanno che è una meraviglia 🤩, ora iniziano a mangiare come si deve


Likes
9
Share

@Grow4ever
Follow
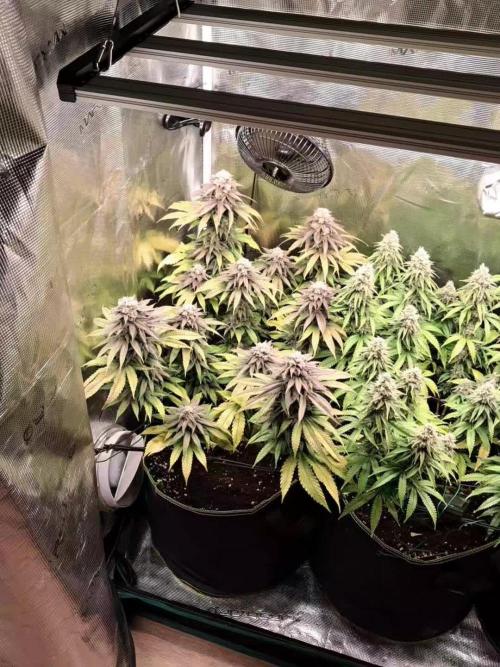
Ende Blütewoche 8.
Duft ist krass, ist mein zweiter Phäno der Pineapple Express. Der Duft ist fast identisch. Wuchs war etwas unterschiedlich, die Buds werden fetter und fetter. Zudem hat Sie eine dunkle lila/schwarze Farbe angenommen. Auch hier Ernte in circa 2 Wochen.
Likes
35
Share


@Hiroots420
Follow
09/07/2021 (F DAY 42)
El olor es sumamente intenso, todo marcha muy bien!
13/07/2021 (F DAY 46)
Continuo con los dos riegos semanales de 3 litros de te y las plantas están super contentas, Sweet cheese ya está amarillentando y es sin dudas la mas rápida.
Pomelo Haze es la mas lenta y espero tenerla 1 a 2 semanas mas dentro del indoor luego del corte de las damas.
Likes
62
Share


@DudeGrowsWeed
Follow
January 16, 2019
Everything is moving along nicely now. Bud sites on the photos are building day by day, and the autos are just about done. This week I fed some Recharge and some Espoma Organic Bloom (available at most big box stores). I’ve had it kicking around since last season and figured I should use it up before it goes bad. I’m looking into more organic nutrient options for the future. I’m not sure I’m ready to start making my own organic compost teas yet. But BioBizz seems like they will take care of what I’m looking to accomplish without needing to make my own teas (fingers crossed).
I removed the house plant that brought in the bugs and everything is back to normal now, no new bug damage.
I finally received and read “True Living Organics” by The Rev. Its a good book, but growing the “TLO” way is vastly different from other growing methods I’ve read. I’m going to have to read this one again before making any comments.
Thanks to all of the answers on CO2. Seems like its more valuable with larger setups than I’m running.


Likes
7
Share

@CannaArchive
Follow
Environment:
Temperature: ~26 °C
Humidity: ~60 % RH
Light intensity: increased to ~850 PPFD. ☀️
Watering / Feeding:
Watered every 2–3 days, based on pot weight, using RO water + CalMag. 💧
Additionally, 1x BioTabs Bio PK was applied during this week.
Observations:
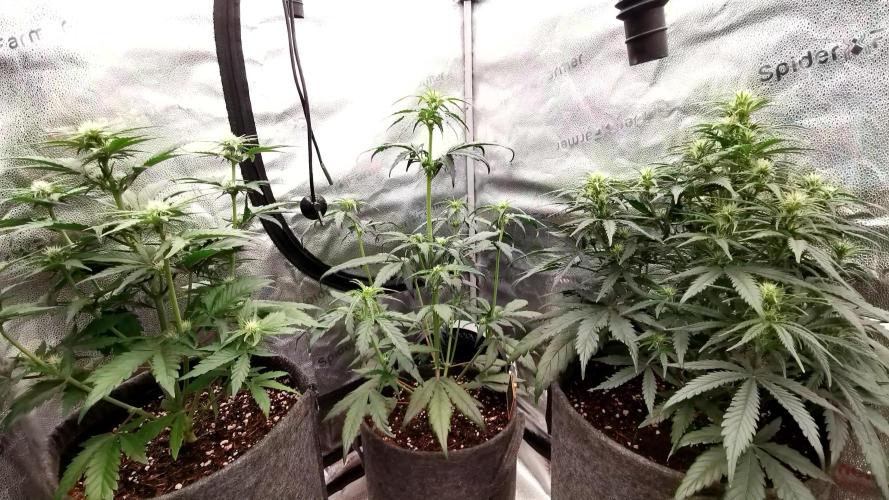
Week 5 marked the clear stretch phase for Amnesia Skittlez. 🌿
The plant began elongating, although it remained more compact in structure compared to the Apricot Autos.
The first proper bud sites are forming, and pistil production increased noticeably. 🌸
Overall plant health looks stable and clean. Leaf color remains a healthy green, with no visible deficiencies or stress reactions. 🙂
Training / Work Done:
No training or defoliation was applied.
The plant was left untouched to allow a natural stretch and smooth transition into flower.
Notes:
Week 5 shows a solid progression into flowering. While stretch is visible, the structure remains relatively compact. The plant is now clearly entering the main bud development phase. 🌱💪