The Grow Awards 2026 🏆
Likes
Comments
Share
@valiotoro
Follow
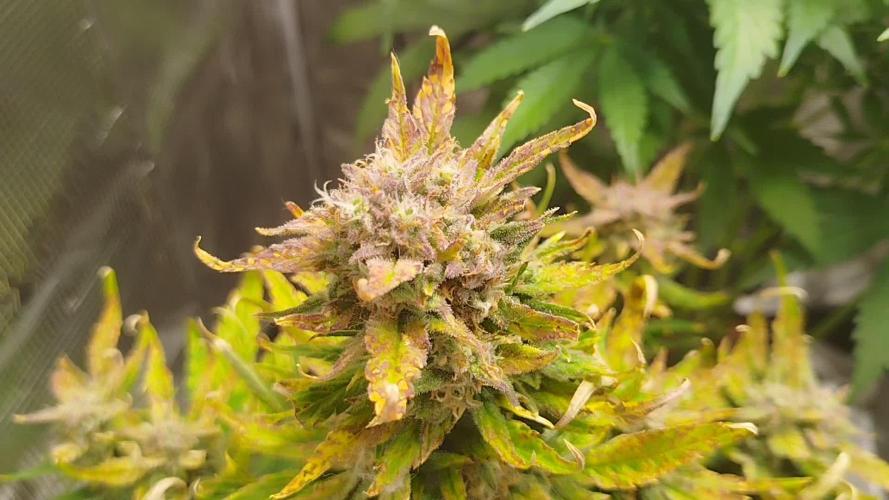
Hello everyone week 8 of flower has passed for this Mint Jelly auto ❄️ She’s ready ! For the feeding schedule i stopped feeding Power Roots and Pure Zym and started feeding Green Sensation 0,5/l Mars hydro FC-E6500 75% have a great day and wish you all happy growing 😎
Likes
25
Share
This strain is just incredible, perfect indica high with a sativa sidenote It grows strong and is quite resistent to mold. All plants were done after about 60 days of flowering. First time i used a tumble trimmer and it works perfectly. I didn't check PH or EC at all
Processing
Likes
12
Share
So last summer a friend of mine grow a Dark Angel Fem seed from Crop King outdoors and turned out the harvest was full of seeds...so I saved 9 of these seeds and germinated to do an outdoor grow this season. I know chances are I will get hermies just like my friend did but since I have these seeds laying around why not? Germination: 13h on water cup and 24h later tap roots were screaming to be put on soil... impressive. Once put n soil seedlings popped out the morning after, seedlings are under a 25w Sunblaster for now, I have been using tap water on a spray bottle to water them. Thats all for now, stay lit folks! Follow me on Instagram @GirlGoneWeed
Likes
81
Share
Hey! Welcome to week 9 for Karen! Week 8 is now complete so please go and check it out 🙏. Big week last week... massive. Day 57: Fertigated 6l. Height 40cm. Day 58: Scent has stepped up again and I'm noticing some of bud sites starting to develop frost. Day 58.5 Flushed with 20l of PH & CalMag. Day 59: reorganised tent Day 60: Fertigated 3l. Karen has put on a load of frost in the last 24h. I mean seriously. Smell stepped up again. Height 44cm. Day 60.5: I have had a really good look at other KKA grows. I think Karen is going to need a few extra weeks. I think she will be ready for harvest in about week 14. So I think we have about another 4-5 weeks to go. Day 61: Adjusted the LST a bit. She's frosting rapidly now. 😍😍🤩 Height 45cm. Width: 60cm x 70cm Day 61.5: It is only 8 days since I *heavily* defoliated and I think I probably should do it again already. Things are progressing well at the moment though so I am trying to resist doing it too soon. She is still stretching. Day 61.75: Right, I have done some research and I have made a decision,. I'm going to give Karen 2 full weeks from the last defoliation on day 53, so on day 67 (i.e half way through next week) I will defoliate and perform final LST just to space out the colas a bite more at the "top" of the plant. Incidentally, Nesia is now easily the same spread as Karen.. Nesia is going to be much bigger than Karen. Check out Nesia here: https://growdiaries.com/diaries/161801-grow-journal-by-unorthodoxdude If you are interested in the stunted Big Bang Auto - Bertha - who is 2 days younger than Karen, check her out here: https://growdiaries.com/diaries/158111-grow-journal-by-unorthodoxdude - in the current week I have added various photos of the non-cannabis plants in my tent. Who knew basil flowers were so pretty? 😊 Day 62: Fertigated 3l Day 63: Height 47cm width 65cm x 75cm Week Summary: Another big week with a plant barely recognisable from herself a week ago. As well as the ongoing stretch she has started to frost over this week and I am hoping this continues because more and more is appearing all over the place.
Likes
2
Share
@Borberad
Follow
1Woche Blüte Umstellung auf 12/12 an Tag 44 beginnenden mit 20h Nacht.
Likes
33
Share
@BudXs
Follow
Just starting to see the autos flower today, so the stretch is on. All topped and lst except for 2. Photo veg is on, waiting on some clones to root. Room will be filled with 3 top cultivars: 1) Pink Sugar Breath by Visions (GD growmies, top cross, check him) 2) cactus breath by Barrie Grower. Amazing cut 3) Slurricane by Inhouse. If you know you know Special appearance in a scrog net made by Peanut Butter OGKB gifted to me by Original Sensible Seeds. These are one of the very few breeders here on GD that I will sprout. Amazing every time Hope everyone has a good week, except you bots. Bots go fuck yourself
Likes
18
Share
Seedsman Seeds Germination Report - Run 01: The White OG Journey Kickoff to Germination: The Start of Something Great! Welcome to the beginning of this adventure with The White OG feminized seeds from Seedsman Seeds. Excitement is in the air as we’re searching for strong, resilient plants, and this journey has all the best tools and tips. Starting with five seeds, we’re aiming for a solid beginning and maximum potential. Let’s explore every step in detail to make this grow as robust as it can be! Germination Process: Tools of the Trade TheCannaKan: The Ultimate Germination Gadget I’m thrilled to share my love for TheCannaKan, a little germination wonder! This tool is essential for any grower who wants to start their seeds with precision and care. I noticed rapid results in just 24 hours, with the seeds showing signs of life. At about 32 hours, I transferred them to the Root Riots, which brings us to the next exciting stage. Why I Love TheCannaKan: • Quick Results: Seeds sprouted rapidly, minimizing wait time. • Consistency: Keeps moisture levels optimal for uniform germination. • User-Friendly: Simple yet effective for both new and experienced growers. Root Riots and Their Role in Root Development After sprouting, I placed the seedlings into Root Riot cubes under a dome. Root Riots are fantastic for stabilizing young plants, providing an airy and nutrient-friendly environment that promotes robust root growth from the start. Benefits of Root Riots: • Root Aeration: Soft yet structured, these cubes support root expansion. • Moisture Retention: Holds just the right amount of water for growing seedlings. • Enhanced Root Health: The cubes are ideal for preventing damping-off and ensuring healthy, white roots. Nutrients to Kickstart Growth: Aptus Holland Regulator and Startbooster To give the seedlings a perfect start, I added Aptus Holland’s Regulator and Startbooster (1ml/L each). This mix promotes early root and stem strength, giving seedlings the ability to absorb light and nutrients more efficiently. • Aptus Regulator: Enhances plant resilience, aids in nutrient absorption, and promotes early vitality. • Aptus Startbooster: Adds a balanced mix of growth hormones and nutrients that are ideal for the early stages, encouraging healthy roots and faster seedling growth. Light and Environment: Future of Grow FOG LED with TrolMaster Tent X Controller I’m using a Future of Grow (FOG) LED at 600W, but keeping it dimmed down to around 200 PPFD. This setting is controlled by the TrolMaster Tent X Controller to give the plants the perfect start without overwhelming them with intense light. Controlled lighting helps seedlings to develop without stress, encouraging healthy growth and internode spacing. Shoutouts: • Future of Grow LED: High-quality, efficient LED light that adapts well to seedling and veg stages. • TrolMaster Tent X Controller: Reliable and intuitive control over light, humidity, and more. Perfect for a hands-off, efficient environment setup. Observations: One Seedling Takes the Lead At the end of this germination stage, it looks like one seedling has emerged as the strongest, while the others may need a few more days. Patience and observation are key; some seeds naturally take a bit more time to sprout. I’ll keep monitoring these with hope, allowing each seedling its own rhythm. Grower’s Notes and Tips • Consistency Matters: Germination is all about steady conditions—consistent moisture, gentle nutrients, and stable lighting make all the difference. • Document Everything: Keeping a log of each step (like this one!) helps track growth patterns and provides valuable insights for future grows. • Stay Positive and Patient: Not every seed will sprout at the same rate. Trust the process and remember each plant is unique. Community Shoutouts Thank you to everyone who makes this process smoother and inspiring—TrolMaster, Aptus Holland, Future of Grow, and Seedsman Seeds for amazing genetics and tools, as well as the growers’ community who share insights, tips, and encouragement along the way. Next Steps Now that we’re through germination, we’ll move into the early growth phase. I’ll keep documenting the lighting adjustments, nutrient changes, and growth patterns of each plant, especially that eager seedling leading the way! Growers Love, and here’s to a strong start for the future of this grow! 🌱 DISCOUNT CODE - SeedsmanSeeds - DOGDOCTOR 10% off As always thank you all for stopping by, for the love and for it all , this journey of mine wold just not be the same without you guys, the love and support is very much appreciated and i fell honored and so joyful with you all in my life 🙏
 With true love comes happiness 💚🙏 Always believe in your self and always do things expecting nothing and with an open heart , be a giver and the universe will give back to you in ways you could not even imagine so 💚

 Friendly reminder all you see here is pure research and for educational purposes only 💚Growers Love To you All and remember to keep that smile big and alive 💚
Likes
7
Share
Doing very well after repotting her 😍❤️ Very good and strong quality seeds by @supersativa seed club Try them outt
Likes
33
Share
@Ferenc
Follow
Hi, I will grow 5 Cup Winner Auto Feminized Strains in this diary, mostly Indica dominant strains. LSD-25 Auto Feminized Seeds By FastBuds: LSD-25 Auto Feminized Seeds are another addition to FastBuds ever-growing range of automatic genetics. A cross of LSD and FastBud’s own in house Ruderalis, creating another high THC and low CBD automatic purple strain. This indica dominant hybrid has strong scents of earthy pine and wood. A short life cycle of only 8 weeks makes this genetic one of the quickest flowering seeds by FastBuds, without compromising in yield size. This strain can be treated with no extra care so can be great for beginners, but if trained correctly yields can improve massively. Auto Glueberry OG Feminized Seeds by Dutch Passion: Auto Glueberry OG Feminized Seeds are another cup winning genetics, awarded 3rd Prize Autoflower Highlife Cup Netherlands 2017. This strain stems from Dutch Passions Glueberry OG, a cross of (Gorrila Glue x OG) x Auto Blueberry, to ensure the same attributes as her photoperiod sister. This versatile Sativa dominant hybrid can be used for SOG as well as SCROG. Due to the Sativa dominance, you can expect large yields whatever climate with a flowering period of 77 days. Another great automatic strain from Dutch Passions USA Special Range. Northern Light Automatic Seeds By Royal Queen Seeds: Northern Light Automatic Seeds are a great strain for growing both indoors and outdoors in most climates. A mostly Indica strain due to its Afghani genetics. A nice, sweet taste with a comfortable physical effect, a great strain for medicinal uses. Ready for harvest in only 9 to 10 weeks the plant starts growing and producing flowers almost immediately. Northern Light Automatic has a very generous harvest and may be one of the highest-yielding autoflowering strains available today. Growing to a height of around 90-120 cm, it is quite a large plant for an autoflowering variety. Auto Colorado Cookies Feminized Seeds By Dutch Passion: Auto Colorado Cookies Feminized Seeds are a high yield, indica dominant Automatic hybrid. An original fruity USA flavor with a Dutch Passion yield in automatic form. A cross of the sought after Auto blueberry by Dutch Passion and an exceptional Girl Scout Cookie from Colorado. This strain has some incredible aromas as well as strength to match. With a complete life cycle of 70 to 77 days you can gain as much as possible when it comes to yield. This amazing Automatic Hybrid is yet another great addition to Dutch Passion’s collection in collaboration with USA Genetics. Auto Blackberry Kush Feminized Seeds By Dutch Passion: Auto Blackberry Kush Seeds are another cup winning genetic by Dutch Passion, placing 2nd in Autoflowers, Highlife Cup, Netherlands 2018. A cross between Dutch Passions Original Blueberry and a Kush Hash-Plant has created an indica dominant hybrid with a sweet fruity taste. Dominance from the Blueberry tends to give to a sweeter characteristic, combined with an indica dominance from the Kush. Expect Vigorous growth as well as great dark purple hues from this hybrid later in flower. Average height of 0.75-1m when on 20/4 and all complete within 70 days from sprout. 24 hours light schedule, 90 percent humidity, trigger spray, no fertilization. 15th of August: I prepared the seeds and tonight I will place them to be in water for at least 12 hours. 15th of August: I placed them to the water. Auto BlackBerry Kush straight submerged. Wao....:D 16th of August: I placed them between damp paper towel. Northern Light Auto is the quickest she has already sprouted out.:) 17th of August 2019: All of them are fine the LSD-25 was the slowest and the Northern Light is the fastest seed that germinated. They are ready to be planted tomorrow ;) Day 1: I have planted them. 60 W LED for 5 plants 98 percent humidity, daily water 5ml per plant plus a lot of triggering to keep the humidity very high all the holes are closed, 24 hours light schedule. I just need to wait to them to be out :) Day 2: The winner is Blackberry Kush she is the first out. :) Rest of them still not out but I think by tomorrow most of them will be. Day 3: Super Skunk is not viable. The seed isndead all were out I checked she stopped growing but I didn't not find any broken part or the seed was not even dried or something like that. It has never happened to me the seed just stopped its life:( I will grow this strain next time. I replaced with Glueberry OG. All out by the way :)❤️ Day 5: All of them grow quick, 4-5 cm already, they are so fragile ❤️ Day 6: LSD-25 and BlackBerry Kush is 10 cm long they are the tallest gamers. Rest of them are fine with 6-7cm.
Likes
19
Share
After germinating on a wet paper towel inside a hanging plastic baggie for 48 hours, all 6 seeds have opened up. The 3 ZHEETOS (=ZKITTLES X CHEESE) and the 3 BADAZZ-CHEESE (=BADAZZ-KUSH X CHEESE) seeds, which I received directly from Milo from BIG BUDDHA SEEDS have a 100% germination result, I love it. The seeds are then carefully (with gloves on and a tweezer) transplanted into small pots (0,25 liter) filled with PLAGRON Grow-Mix. You can see how its done in the video and pics above. I fill the pot with soil and water it a little bit. Then I make a small hole with a finger in the center of the soil. I take the seed off the wet paper towel with a tweezer and put it onto the side-wall of the small hole. I position it right at the edge with the white tap-root pointing down and the seed-shell laying on the edge of the hole. Then i push the soil from the other side-wall towards the seed, so it is enclosed with soil from all sides and the top of the seed shell still peaks out of the soil. This way the seedling does not have to fight its way to the surface, but can grow out right away. Within 24 hours I can see the small seedlings rise and push out of the soil. Some with the seed-shells still on them other without the seed-shell, depending if they were able to shed them in the soil already. The first ones to rise are ZHEETOS #1 and #2 together with BADAZZ-CHEESE #1 and #2, both #3-plants are one day later out of the soil. During week 1 I only gave them little water (0,1 liter per plant every 2nd day) and on day 7 I add BIONOVA ROOTS to the water (0,5 ml/l) to enhance the growth of the roots of the seedlings. After a few days all 6 seedlings have surfaced and then shed their seed shells and unfolded their Cotyledons (=first round leaf). They grow quick and healthy in the first week inside my GrowforLife-Coset and start to develop the first sets of real leaves. This closet is THE MOST BEAUTIFUL and MOST SILENT stealth-grow-cabinet EVER! (check them out: www.growforlife.com ) I loved my first round in it and cant wait for this one. The plants LOVE the spectrum and light-intensity of the two 50 watts SANlight-LED modules built into the closet. The 100 watts of light are plenty for the small grow-surface (45x45cm) of the closet. This round I will try the whole line of BIONOVA nutrients from the Netherlands, since I have only heard good things about them.
Likes
56
Share
@valiotoro
Follow
Nice buds very sticky 💥 The smell its not a cheese in particular its the whooole plate of cheese with the jam & the dried fruits & earthy its delicious!🧀🍇
Likes
9
Share
Day 44: Starting to see some preflower signs and man guys this girl is stunning.. Everything is growing perfect 👌 😌. Leaves and color are beautiful and she takes feedings like a beast. I'm really impressed so far 👏. It is almost 19 inches tall now and I'm thinking shes got another foot to go lol. Will keep everyone posted and thanks to everyone that checks out and likes my grows please comment with your input as I always like constructive criticism.
Likes
6
Share
@Fikoo
Follow
the plant has grown very well and its growth has accelerated
Likes
2
Share
@Luram
Follow
Starting week 6 , going full force with the nutrient dosages for the next 2 weeks and getting them ready after for their final flush week Problems i had to deal with but i didnt was clearly the defoliation as i got a bit lazy start dealing with that twice, i ll just leave them as they are and see how their final development is
Likes
17
Share
Hello Growers & Tokers! Check out the leaves on these ladies! 😍 Super duper healthy they are and that's why they got topped this week. I highly doubt they'll suffer any stress from being topped. My plan is to have as an even canopy looking to have about 6-10 colas per plant. They got some chunky leaves on them which will be taken off next week before switching them to flower. These ladies are gonna get big! 😍 😍 Can't wait to have that lovely lemony aroma flowing in the mix. Take care out there and happy growing!
Likes
16
Share
@Ensign420
Follow
Introduction - Week 14|07 Summary - Ensign's log, stardate 9437.65, Great week of growing! Wow what a good week! Growth in the main tent has all around been incredible! Submitted my first submission to the Global Grow Cup! Filmed a video of the solo cup container (marked with the ticket/order number) that will be used for the competition. Also had to fill and prove the solo cup holds 2 cups of soil. Now I need to root a clone (for the first time), transplant her into this cup, and submit my 2nd entry before the 30th of this month. As far as my first attempt at cloning, have already begun the rooting process! Managed to take cuttings from 3 out of the 6 phenos in the main tent (the first cutting was also my first time topping). Soaked the cuttings for two days before planting them into Coco Coins. So far everything has gone surprisingly well! The clones are now rooting under the propagation dome with the vents fully closed. Will check for roots soon! At the end of the week, growth was just raging! Was planning on flipping to flower in a week, but decided to begin the first week of flower next week! Thus this is the last week of veg. Plan to flip to 12/12 next Monday! Onwards to next week! [START OF WEEK 14|07] ========================================================== Garlic Budder #1 - WEEK 14|07 - Full Veg Wk5 Garlic Budder #2 - WEEK 14|07 - Full Veg Wk2 Garlic Budder #3 - WEEK 07 - Full Veg Wk5 Garlic Budder #4 - WEEK 06 - Full Veg Wk4 06/03/24 → 06/09/24 This Week's Estimated Goals ---------------------------------------------------------------------------------------------- DLI: ~26 mol/m²/d PPFD: ~400 μmol/m²/s VPD: ~1.0 kPa This Week's Meter Readings & Averages [Lights On: 16:00 - 10:00] ---------------------------------------------------------------------------------------------- DLI: 24.56 mol/m²/d PPFD: 379 μmol/m²/s VPD: 0.91 kPa Soil %: [32.7, 37.6, 37.9, 34.1] ========================================================== Day 01 - Monday - 06/03/24 - Total Days: 098 ----------------------------------- Daily Averages [~23:00] - Temps: 80.7°F [27.1°C] - Humidity: 74.4% - VPD: 0.90 kPa - Soil %: [31, 34, 39, 35] ----------------------------------- - [09:57]: Quick morning check! --- #1 is looking a bit droopy, but almost lights off (at 10:00) so not concerned. --- Nice! Mainly wanted to check on #4 and she is looking great! She’s perked back up and looking good! - [23:08]: Evening check. --- Wow! It’s a jungle in here! --- #1 has gotten too big? Nah!? Keep on growing girl! --- #2 is growing and definitely getting bigger! Growth just looking really weird. --- #3 has continued to get larger and is looking quite uniform in growth! --- #4 is growing and looking perky again! --- Even the original #1 and #2 phenos (in the back) are looking good! --- Wow! #4 is really getting close to the light. - [23:14]: Checked down both fill tubes. --- Both reservoirs were completely dry! - [23:27]: Checked the Ecowitt soil moisture sensor data: --- 30% - [CH01 EB1 - Garlic Budder #1] --- 34% - [CH02 EB2 - Garlic Budder #2] --- 39% - [CH03 GFP - Garlic Budder #3] --- 32% - [CH04 FPT - Garlic Budder #4] - [23:32]: Poured 4 cups of distilled water down EB1’s fill tube. --- Poured 2 cups of distilled water down EB2’s fill tube. - [23:38]: Checked the humidifiers. --- Refilled the 4X4’s humidifier with distilled water. --- Tomorrow, plan to defoliate and start cloning for the first time! --- Going to take multiple cuttings from both #1 and #4 for sure, but still deciding on the rest. --- Getting hyped! Day 02 - Tuesday - 06/04/24 - Total Days: 099 ----------------------------------- Daily Averages [~23:00] - Temps: 81.4°F [27.4°C] - Humidity: 74.3% - VPD: 0.93 kPa - Soil %: [29, 35, 38, 32] ----------------------------------- - [11:59]: Time to film the first entry for the Global Grow Cup! --- Going to be using BuildASoil 3.0 potting soil. --- Filming the video using a stand and my phone. --- This video is mainly to establish the container that the plant will be grown in. Also to prove that the container is a 16oz container and that it can hold 2 cups of soil. --- The ticket (order) number also had to be written on the cup. - [12:36]: Done! --- The video had to be done in one continuous shot with no edits (my original submission does not have the logo). --- There was also a photo that needed to be shot which shows the cup filled with 2 cups of soil (just like the video, the original image submission did not have the logo). --- I think I did everything correctly, but also sent an email for verification of submission and validation. --- Getting hyped! --- [*smokes a bowl] --- Going to defoliate today along with for the first-time, going to take cuttings for clones! --- After a bit of online research, decided to split the cloning process into two days. --- Today going to take cuttings and will soak them in a solution of aloe for 24hrs. Afterwards will change the water out and use straight distilled water. --- Then in a couple days, plan to transplant into coco plugs (Coco Coins) for rooting. --- For optimal results, also be using a rooting hormone (Clonex). --- Well.. Here goes nothing! - [17:01]: Evening check. --- Wow! #1 is looking huge! Her main top is stretching above the lower canopy which is continuing to bush out. --- #2 is growing along. Growth is gnarly and a bit droopy, but she’s getting taller! --- #3 is looking great! Still a bit small, but she is continuing to get larger. --- #4 looks like she needs a watering. --- Both plants in the back are also looking surprisingly great as well! - [17:05]: Checked down both fill tubes. --- Both reservoirs were completely dry! --- As far as today's defoliation, going to leave #2 and #3 alone and will focus my defoliation and cloning on the rest of the plants. --- This will be my first attempt at cloning, also going to try topping for the first time today. --- No pressure Ensign. What can possibly go wrong right? - [17:27]: Time to start the cloning and defoliation process! --- Filled a measuring cup with 3 cups of distilled water. ------ Added 3/4tsp of Horticultural Aloe ------ Added 1 more cup of distilled water --- Mixed the solution and poured an even amount into three separate solo cups. --- Made sure to mark two of the cups (#1 and #4). The unmarked one will be for any other clones from amongst the 6 phenos (if any at all). - [17:43]: Time to top and defoliate #1! --- Using a pair of brand new trimmers (AC Infinity), --- Gently cut the main stalk to even out the canopy. --- Then trimmed and cleaned most of the nodes leaving the top node or two. --- Also trimmed the leaf fingers a bit before placing the top cutting into the cup of aloe solution. --- Now for the rest of the cuttings! --- [~45 minutes later] - [18:32]: Managed to finish defoliating and cutting the rest of the clones. --- Took two more lower cuttings from #1 (3 clones total). --- Took 3 lower cuttings from #4 --- While defoliating, decided to try and clone the original #2 pheno as well. Took 4 small cuttings. --- Similar to the top cutting, trimmed and cleaned each lower node for each cutting before placing them into the cups. --- Before finishing up the 2nd cutting, I noticed the first cutting (the top cut that was also trimmed) was drooping. --- So I did not trim and the leaf fingers for the other cuttings. --- In total there were 10 cuttings taken for potential clones. --- My main focus was to take cuttings and to clean up all the lower growth from both #1 and #4. --- Defoliated and cleaned up the back original phenos as well (also trimmed back the cover crop). - [18:35]: Temporarily placed the cuttings onto the floor of the 4x4 tent. --- Took the trimmings (about 3 cups) and spread them onto the top mulch of #1 and #2. --- Time to set the environmental controls for the 3x3 veg tent. - [18:43]: Within the AC Infinity App, --- For the Veg Tent [3x3] controller, --- Adjusted the 'Vegetative [18/6]' Schedule for the grow light. ------ Set the Mode to ‘On Mode’ ------ Set the START/END times to 04:00PM/10:00AM ------ Set the MAX to 1 --- The IonBoard S33 is now utilizing around 60.8W (at intensity 1 out of 10). --- Adjusted the 'Vegetative [18/6]' Schedule for the exhaust fan. ------ Increased the Humidity’s HIGH trigger value from 81% to 87% --- Adjusted the 'Vegetative [18/6]' Schedule for the humidifier. ------ Decreased the VPD target value from 1.5kPa to 0.8kPa - [18:52]: Moved the cuttings into the 3x3 veg tent. --- It begins! I think. --- Going to let these cutting drink some aloe for a day before switching to straight distilled water. --- Hmm. Could be the white floor of the 3x3 veg tent, but have noticed the S33 has a whiter spectrum whereas the FC-6500 seems to be warmer in color. --- Anyways, - [18:58]: Poured 4 cups of distilled water down EB1’s fill tube. --- Poured 2 cups of distilled water down EB2’s fill tube. - [19:06]: Filled a pump sprayer with 5 cups of distilled water. --- Focused mainly on the straw mulch of #4. --- But also misted the straw mulch for the rest of the plants a bit. - [19:12]: Checked the humidifiers. --- Refilled the humidifiers with distilled water. - [19:44]: Going to be using Clonex rooting gel before planting the cuttings into Coco Coins (pre-soaked with microbes and aloe). But before that begins, going to transfer the Clonex gel into a squeeze bottle. --- Gently peeled back the seal on the original Clonex bottle. Just enough make a tiny opening, --- Then slowly and carefully poured the gel into an empty squeeze bottle. --- Also removed the sticker from the original bottle and placed it onto the new one. - [19:54]: Perfect! --- Instead of applying the gel to the cutting, going to be applying the gel to the Coco Coin. --- This squeeze bottle will make applying the gel a lot easier. --- Will take PPFD readings tomorrow. --- Also will change out the aloe solution to distilled water. --- I really hope I didn’t screw things up before they could even begin. --- Don’t die on me ladies! --- Please. Day 03 - Wednesday - 06/05/24 - Total Days: 100 ----------------------------------- Daily Averages [~23:00] - Temps: 81.9°F [27.7°C] - Humidity: 75.5% - VPD: 0.90 kPa - Soil %: [29, 36, 38, 36] ----------------------------------- - [09:40]: Quick morning check! --- #1 is looking a bit droopy, but looking okay. Topping is a high stress technique so going to take some time to recover. Don’t plan on flipping the main 4x4 tent to flower for a good week or so which should be enough time. --- #4 looks great! The defoliation seems to have no effect on growth. Nice! - [09:41]: Also quickly checked on the 3x3 veg tent, --- Nice! The cuttings are looking great! --- No yellowing and they all seemed to have turned up towards the light. --- So far so good! - [22:53]: Evening check. --- #1 is continuing to dominate this grow! She has spread wide and looking incredible! --- #2 is looking gnarly, but getting there. --- #3 is getting larger! But still a runt. By far, her leaves are the darkest of the bunch, but she is still growing! --- #4 looks happy and growing along beautifully! Wow! - [22:55]: Checked down both fill tubes. --- Both reservoirs were completely dry! - [22:59]: Poured 5 cups of distilled water down EB1’s fill tube. --- Poured 2 cups of distilled water down EB2’s fill tube. - [23:05]: Checked on the 3x3 veg tent. --- Ooo yea! The cuttings are still green! Nice! - [23:07]: Took PPFD readings. --- The cuttings were around 121 μmol/m²/s which gives a DLI of 7.84 mol/m²/d --- Nice! These levels are on the lower range for seedlings (~100-300), perfect! I think. - [23:14]: Swapped the aloe water out to straight distilled water. --- Going to let these cuttings soak for one more day before planting. --- Please don’t die girls! - [23:15]: Checked the humidifiers. --- Refilled the humidifiers with distilled water. --- Ooo yea! --- Tomorrow is the big rooting day! Day 04 - Thursday - 06/06/24 - Total Days: 101 ----------------------------------- Daily Averages [~23:00] - Temps: 81.9°F [27.7°C] - Humidity: 75.2% - VPD: 0.91 kPa - Soil %: [32, 38, 38, 34] ----------------------------------- - [16:20]: Evening check. --- #1 is a bit droopy, but growth is looking green and healthy. --- #2 is looking bigger! She’s also looking sort of droopy. --- #3 is growing along nicely! Looking good girl! --- #4 is looking great! A bit droopy but plan to water today. - [16:23]: Checked down both fill tubes. --- EB1's reservoir still has some water. --- EB2's reservoir was completely dry! - [16:23]: Checked the Ecowitt soil moisture sensor data: --- 28% - [CH01 EB1 - Garlic Budder #1] --- 36% - [CH02 EB2 - Garlic Budder #2] --- 37% - [CH03 GFP - Garlic Budder #3] --- 30% - [CH04 FPT - Garlic Budder #4] - [16:30]: Using a pump sprayer, --- Misted the straw mulch of #4 with 6 cups of distilled water. --- Focused mainly on the straw mulch. --- Also misted the straw mulch of #3 (in the grassroots fabric pot) a bit. - [16:43]: Poured 5 cups of distilled water down EB1’s fill tube. --- Poured 3 cups of distilled water down EB2’s fill tube. - [16:52]: Checked the Ecowitt soil moisture sensor data: --- 56% - [CH01 EB1 - Garlic Budder #1] --- 44% - [CH02 EB2 - Garlic Budder #2] --- 40% - [CH03 GFP - Garlic Budder #3] --- 45% - [CH04 FPT - Garlic Budder #4] - [17:01]: Took general PPFD readings. --- #1 was around 379 μmol/m²/s which gives a DLI of 24.56 mol/m²/d --- #2 was around 333 μmol/m²/s which gives a DLI of 21.58 mol/m²/d --- #3 was around 293 μmol/m²/s which gives a DLI of 18.99 mol/m²/d --- #4 was around 378 μmol/m²/s which gives a DLI of 24.49 mol/m²/d - [17:09]: Took the weekly height and light distance measurements. --- #1 was about 21" tall. --- #2 was about 13.5" tall. --- #3 was about 9.5" tall. --- #4 was about 19.25" tall. --- Hmm.. - [17:19]: Adjusted the right oscillating fan a bit. --- Re-angled the CloudRay S6 oscillating fan upwards. Been noticing that the air has been hitting the tops of the plants so easing off a bit (#1 is still getting hit, but she’s huge so not too worried). - [17:23]: Back to the measurements! --- #1 was about 9.5" away from the grow light. --- #2 was about 17" away from the grow light. --- #3 was about 17.5" away from the grow light. --- #4 was about 11.5" away from the grow light. - [17:46]: Checked on the 3x3 veg tent. --- Cuttings are still green! They do look a bit droopy but no signs of yellowing. --- Okay! - [17:55]: Time to begin the rooting process! --- For my first attempt at rooting, going to be using Coco Coins pre-soaked in saponins, microbes and aloe. --- To further help with rooting, going to also be using Clonex rooting gel. --- Filled a measuring cup with 4 cups of distilled water. ------ Added half of 1/64tsp of Quillaja Saponaria Extract [60] ------ Added 1/16tsp of Horticultural Aloe ------ Added 1/8tsp of Mycrobe Complete --- Mixed the solution thoroughly. --- Time for the Coco Coins! --- 10 cuttings means 10 Coco Coins. - [18:09]: Dropped 10 Coco Coins into the measuring cup. --- The coins immediately started to expand. --- A bit too much.. Oops! --- Poured the solution and Coco Coins into a pitcher. --- Added 2 cups of distilled water to the solution (now at 6 cups). --- Great! The coins are pretty much fully expanded, but going to wait a bit longer to fully saturate each coin. --- [~20-30 minutes later] - [18:42]: Great! --- Took the seedling and flood tray from the AC Infinity propagation dome and placed all 10 Coco Coins into the slots. --- Gave each Coco Coin a quick shake to remove excess solution. The coins were not dripping with solution but still pretty saturated. --- Arranged them into 3 groups with the cuttings in mind. --- Also tried to keep the pre-made holes intact. --- Time to inoculate the Coco Coins! - [18:54]: Using a squeeze bottle, --- While keeping the nozzle from making contact with the coco, gently filled each pre-made hole with Clonex rooting gel. Just enough gel to fully cover the hole of each coco coin. - [19:00]: Time to plant the cuttings! --- Gave each cup a misting of distilled water. Focused on wetting the top growth with water. --- Okay! --- To avoid mixing cuttings up. - [19:01]: Starting with the original #2 pheno cup, --- For each cutting, --- Using a pair of clean trimmers, made a final 45° cut about 1/2" from a bottom node. --- Then stripped away and scared the protective membrane below the node before planting. --- Made sure the node was about 1/2" below the surface of the coco. --- To help with planting, while inserting each cutting, gave the Coco Coin a gentle squeeze to loosen the coco. This also helped to ensure the coco and gel was in good contact with the cutting. --- Once the cutting was planted into the Coco Coin, made sure to place back in the same spot (made sure to keep the cuttings in their groupings). --- Once a cup was complete, made sure to keep the label with the group. --- Re-misted the top growth as needed to keep it wet. --- Also wiped the trimmers with isopropyl alcohol in between cuttings (plan to use 10% bleach solution for next time). --- Repeated this process until all 10 cuttings were cut, planted, and in the tray. --- The coco coins fit perfectly into the tray and don’t reach the bottom. Nice! --- The bottom air gap is important. --- Poured a bit of distilled water through one of the empty slots into the bottom of the tray. Just enough to fill the bottom of the tray, but not enough to reach any of the Coco Coins (~1/4cup). - [19:35]: Placed the propagation tray with cuttings into the 3x3 veg tent. --- Placed the first layer of the propagation dome on before giving the sides a misting of distilled water. --- Also sprayed the top of the propagation dome before covering the cuttings. --- Vents are all fully closed. - [19:40]: Placed the bar lights onto the top of the dome before configuring the controller. ------ Set the START/END times to 04:00PM/10:00AM ------ Set the bar light’s intensity to 2 (out of 10). --- Also made sure the propagation light controller’s time was in sync with the Controller 69 Pro. - [19:47]: Took PPFD readings. --- The cuttings were around 136 μmol/m²/s which gives a DLI of 8.81 mol/m²/d --- The PPFD levels are similar to the floor. --- Perfect! --- Going leave the IonBoard S33 on during this rooting process. --- Will check back tomorrow to cycle the air under the dome. - [19:56]: Checked the humidifiers. --- Refilled the humidifiers with distilled water. - [20:17]: Quick night check! --- Ooo yea! Growth is raging and looking perky! --- Mainly checked on #1 and #4 which were looking incredible! --- Keep on growing ladies! Day 05 - Friday - 06/07/24 - Total Days: 102 ----------------------------------- Daily Averages [~23:00] - Temps: 82.7°F [28.2°C] - Humidity: 76.2% - VPD: 0.89 kPa - Soil %: [37, 40, 38, 35] ----------------------------------- - [10:03]: Decided to increase the ambient temp in the 3x3 veg tent. --- Within the AC Infinity App, --- For the Veg Tent [3x3] controller, --- Adjusted the 'Vegetative [18/6]' Schedule for the heater. ------ Increased the Temp target value from 78°F to 82°F --- Hopefully this will help to keep the veg tent at a more consistent temp. - [22:26]: Evening check. --- Ooo yea! The garden is looking incredible! --- #1 is looking perky and just bushing out! Wow! --- #2 is getting big! Growth is weird and leaf fingers are huge! Just going to let her grow. --- #4 is looking happy and growing along like a champ! Nodes are starting branch out and she is turning into a bush! - [10:28]: Checked down both fill tubes. --- Both reservoirs were completely dry! - [22:33]: Poured 5 cups of distilled water down EB1’s fill tube. --- Poured 3 cups of distilled water down EB2’s fill tube. - [22:40]: Checked on the propagation dome (inside the 3x3). --- Ah yea! Looking great ladies! --- Lifted the top of the dome to let some fresh air in for a bit. --- Wow! --- Leaves still look nice and green! --- So far everything looks great! --- Just going to continue on! - [22:53]: Checked the humidifiers. --- Refilled the humidifiers with distilled water. - [11:01]: Decided to adjust the humidifier for the 3x3. --- Within the AC Infinity App, --- For the Veg Tent [3x3] controller, --- Adjusted the 'Vegetative [18/6]' Schedule for the humidifier. ------ Increased the VPD target value from 0.8kPa to 1.5kPa --- The higher VPD level will essentially turn the humidifier off. --- I won’t be needing the humidifier for a good week so might as well save the water. Day 06 - Saturday - 06/08/24 - Total Days: 103 ----------------------------------- Daily Averages [~23:00] - Temps: 81.6°F [27.6°C] - Humidity: 74.9% - VPD: 0.91 kPa - Soil %: [35, 40, 37, 31] ----------------------------------- - [07:40]: Quick morning check! --- #1 and #4 are looking perky and happy! --- Also checked on the propagation dome, --- All cutting still look green! Hyped! - [20:02]: Evening check. --- Wow the garden is raging with growth! --- #1 has blown up! She has clearly recovered and growth is ramping up again! --- #2 is stretching upwards! --- #3 is now the smallest of the 4, but still getting larger! --- #4 is looking incredible! Wow! Growth looks perky and happy! - [20:05]: Checked down both fill tubes. --- Both reservoirs were completely dry! - [20:10]: Poured 6 cups of distilled water down EB1’s fill tube. --- Poured 2 cups of distilled water down EB2’s fill tube. - [20:16]: Checked the Ecowitt soil moisture sensor data: --- 35% - [CH01 EB1 - Garlic Budder #1] --- 40% - [CH02 EB2 - Garlic Budder #2] --- 36% - [CH03 GFP - Garlic Budder #3] --- 27% - [CH04 FPT - Garlic Budder #4] - [20:19]: Using a pump sprayer, --- Misted the straw mulch of #4 with 5 cups of distilled water. --- Focused mainly on the straw mulch. --- Also misted the mulch of #3 a bit (in the fabric pot). - [20:27]: Checked propagation dome (in the 3x3), --- To cycle the air under the dome, lifted the top off for a bit. --- Ooo yea! Everything is still green and looking great! --- Keep on rooting ladies! --- Oops! - [21:45]: Checked the humidifiers. --- Refilled the humidifiers with distilled water. Day 07 - Sunday - 06/09/24 - Total Days: 104 ----------------------------------- Daily Averages [~23:00] - Temps: 81.5°F [27.5°C] - Humidity: 74.8% - VPD: 0.91 kPa - Soil %: [36, 40, 37, 36] ----------------------------------- - [08:18]: Quick morning check! --- Nice! The main tent is looking great! #1 and #4 are both raging with growth! --- Checked on the propagation dome (inside the 3x3) and the clones are still looking green! --- Wow! Everything is going almost too well! Just keep on growing! - [19:08]: Evening check. --- Garden is just exploding with growth! Seems everyone has fully recovered from the defoliation and topping! --- Wow #1 is bushed out and looking incredible! --- #2 is growing really starting to get large! Growth still is funky, but stoked none-the-less. --- #3 is starting to fill in the pot! Getting larger! --- Wow! #4 is getting taller and looks healthy and green! - [19:12]: Checked down both fill tubes. --- Both reservoirs were completely dry! --- Wow the canopy is really starting to get taller and closer to the light. May need to raise it up soon. --- Absolutely surprised how low the light levels have been throughout this entire cycle. Barely moved the light and have not increased the intensity past 2 (out of 10). Less is really more. --- Anyways! - [19:18]: Checked the Ecowitt soil moisture sensor data: --- 36% - [CH01 EB1 - Garlic Budder #1] --- 41% - [CH02 EB2 - Garlic Budder #2] --- 37% - [CH03 GFP - Garlic Budder #3] --- 34% - [CH04 FPT - Garlic Budder #4] - [19:19]: Poured 6 cups of distilled water down EB1’s fill tube. --- Poured 3 cups of distilled water down EB2’s fill tube. - [19:24]: Checked propagation dome (in the 3x3), --- To refresh the air, lifted the top off for a bit. --- Sweet! Still green! Wow! --- Using a spray bottle, misted the top growth with distilled water. - [20:35]: Checked the humidifiers. --- Refilled the humidifiers with distilled water. --- Wow what a week! --- Growth has been just insane in the 4x4 tent! All plants have fully recovered and have just exploded with growth. --- I think it’s time to flip to flower! --- Also, I’m absolutely baffled about how well the cloning process has been going. --- So far no issues! --- Not complaining, but just surprised. Keep on growing ladies! --- If all goes well, should have fully rooted clones soon ready for transplanting (into solo cups of course). --- Absolutely hyped for next week! --- Maximum warp Ensign, Engage! [END OF WEEK 14|07]
Likes
7
Share
@kizdog
Follow
Phew!!! Not going to lie I’m really glad the week is over. After chopping on Friday, the wet trim race was on. My girlfriend and I were stuck inside until 4am Monday morning getting Blueberry OG trimmed! Sooo grateful for her help though. It was long, but well worth it. Set up an AC Infinity 2x2 with a drying net and my AC unit kept the room at about 17c for most of the time. Friday (yesterday), after a week in the net, the smaller buds were feeling a little crispy so I knew it was time and after checking the other buds and doing some other finishing touches I threw them into some grove bags to cure. Now I can finally relax ☺️ Have a great day everyone! You mean so much to me, it’s great to have a community on here. Although I’m terrible at posting about my issues or openly asking questions, I’m glad I know where to come to when I need some inspiration. Thanks so much! Another harvest, I’m infinitely proud :)
Likes
5
Share
@gerrypom
Follow
idk if I can defoliant the plant, if I can write a comment