
Likes
Comments
Share


@Tropicannibis_Todd
Follow
👉Alrighty Then👈
( 👉Bonus Video Showcases Everything I Have Going on in TropiCannibis HQ 👈)
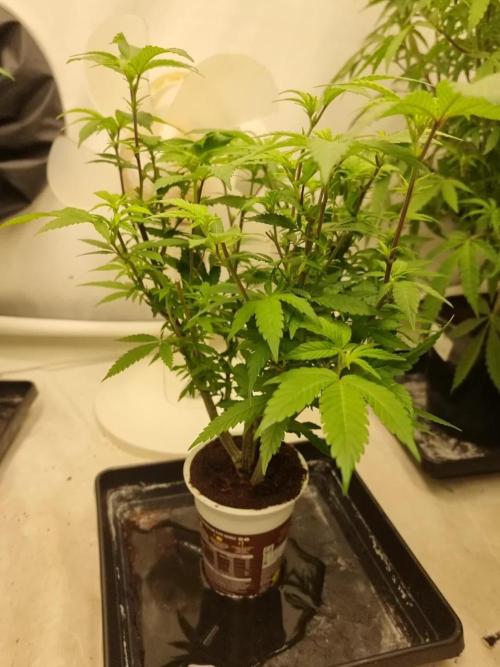
So we are at DAY 54 of Flowering with the Sugar Larry 👈 And she's doing fantastic 👍
😀 decided to showcase pheno #2 , definitely has different traits then #1 very interesting 😀 thoe both are killing it 👈
So just waiting on alittle more amber to show before we do the chop 👌
👉I had to Top her during the middle of 4th week 👍 Happy Growing
👉Soil Provided by ProMix.ca
👉Nutrients Provided by Agrogardens
👉Lighting Provided by MarsHydro.ca
Thanks my friends for the great support over the years 🙏 Happy Growing

Likes
5
Share

@LittleBigTrees
Follow
One week of flower and the fan leaves are growing back fast.
I will defoliate again in around a weeks time.
I started giving them green sensation, sugar royal, and power buds this week to see if there's any chasms from starting wrong week 3-4.

Likes
11
Share


@BruWeed
Follow
🍀21/07 - Ya se encuentra en etapa de secado.
🍀El lunes le agregue 30L de agua y 10ml de Top Wash.
🍀Esta planta se encuentra mas resinosa y densa que la otra que también cultive.
🍀Todo fue perfecto desde el momento uno, no tuvo ningún problema en toda su etapa de vida.
🍀Tiene mucho olor, a caramelo o crema, todos sus cocos son densos y gordos.
🍀En total dio 163g.
🍀En estos días seguiré subiendo mas imágenes de como viene.
😶🌫️🇦🇷🍀Podes seguirme en Insta gram como @bruweed_arg🍀😶🌫️🇦🇷


Likes
32
Share


@Platinouuu
Follow
El secado fgue bantante rapido, olorosas, sabrosas al comsumo y asotan como toda una verdadera indica. la cosecha es poca, pero la sepa es exotica. Muchos terpenos, los colores de la sepa son violetosos y verde flourecente. La recomiendo altamente, solo que su cosecha por planta es poca.

Likes
126
Share


@WhiteWidow
Follow
You can find tbe first week of all girls on my profile, second week is missing coz its just boring and now i start week 3 so its day 15 today from placing seeds to germination.
Uploaded a video of their habitat, i still wont name each one indifidually coz i still didnt choose winners / keepers.
Unfortunatelly i have a bit low RH for this stage of growth but they obviously dont mind, i spray them twice a day, no burns from spraying with lights on, no electroshocks caused by spraying so all good now.
I tried it all enough to be able to say i cant be assed anymore :D
Since @growdiaries are not keen on resolving a problem with uploading each pic individually on androids, i will keep one diary for all girls, dont even mind not being able to compete in dom.
Stay tuned these girls will rock.


Likes
22
Share


@Fatnastyz
Follow
Day 44
10-8
Tea and slight defol. Shes got a tall branch!
Look at it go! 😱😁🤘
10-9
Water, leaf removal.
10-11
Water yucca cal/mag. Tea soon.
10-12
Day 48
Well her head was way above the rest, so she got bent down.
Personalsmokes talked me into. He said, go for it! So I did! 😂
Hopefully i didn't F her up. No clue how she got away from me, but this is something new for me. 😁🤘 Light is amazing on everything now!
.

Likes
48
Share


@xbrico
Follow
Evening all...back on it AGAIN!!!! Worst is, in the middle of a heat wave (Hottest day every recorded in this part of the world a couple of days in a row!!!)...still need to finish trimming my last crop!!! 😰 Will get that done over the next couple of days as these girls need rehoused!!!
So, got a cloner at the start of the year...was planning on clone a spare wedding cake I had but that sort of went to pot and life got in the way and that didn't happen. As I also got a hold of an Ultrasonic Mist Generator, I thought I'd give this "Fogponics" Germination thing a go!!! Seeing as @Sweet_Seeds donated a few Magical Beans to my cause, I thought I'd give their genetics a whirl. The Red Hot cookies looked too cool to pass up on!!!
So, got the beans popped on the 12th of July and by the Thursday, they were showing their wee heads. These are strong wee plants!!! Vigorous as you like!!!
Got them into the 'fogponics' machine and let them rip (Under 2x11W T5 Sunblaster 6400K's and a Amazon Special LED light for extra Spectrum) and they seem to be coming on grand. Noticed some yellow spots on the leaves and in 2 minds if it was:
A. calcium (As starter plugs are Coir and I didn't put calmag in the plug hydration mix - Jiffy Original plugs are supposed to be buffered for this!!!);
B. if I should have broken and washed them out of the Coir and put them into straight Hydroton (The fog could have been saturating the Coir and choking the internal roots a bit) or
C. if its just the abusive heat we've been having here (In a country where A/C is basically unheard off as heat doesn't exist outside!!! 😋).
Roots are ripping out of the net pots now so they're about as ready for transplant as can be...just wanna give a day or 2 more to see if the heat here settles as I can't adequately cool the area they're going too - but then again, under LED so heat may be good as it doesn't heat the leaf surface up as much! Plus I have a couple of plants to trim...still hanging in their humidor tent when is needed again for growing!
Think this will also be the retirement party for the Wilma. Going to build an Undercurrent Fallponics system when this run is done (Wont have time to get it setup before these girls need forever homes!!!). Have the crates bought and a bit of research done on how to DIY a build so hopefully this turns out to be a decent run. Also have a few people with building experience on hand to give advice.
Since last grow:
Lights have been upgraded to a Geekbeast 630W Pro LED (3500K Spectrum - UV 385nm and Far Red 730nm built in [won't use the 730's as they can't be run independent of the Main Lights...be wary of this if you buy one off Alibaba for the 730's built in!!!] - Will run the 385UV's though throughout the grow for more blue...will run then 3 hours after lights on to until 3hours before lights off).
Also procured an InvisibleSun LED 730nm Flower Initiator (Will use this for EOD Far Red treatment to try a 13/11 flower cycle) and a Migro UVB310 fixture - For the Trikes!!! 😝.
Have a Haliea 300A winging its way to me as we speak.
Have some Non-Stick Micro-tips flying in from the Grand old US of A
a will to get a better, more consistent yield.
Think that's about all I have for now...Happy Growing all!!! 💪

Likes
23
Share


@GrowSmith
Follow
I have been flashing for two weeks now I thought it was ready last week but this planet is slow to harvest I think a week or two it will be ready
Left in two days of darkness to encourage finish. Worked on half of the plant

Likes
1
Share

@PapaTerps
Follow
British Delight - Wizard Trees
Day 91 - Watered with 3L of RO tap water with nutrients mixed individually, in order and then pH'd to 6.3! 🚿 She was extremely bushy around her flower, so I removed a good amount of sugar and fan leaf from around her flower, to improve light penetration and airflow ✂️👍🏻 Her flower is huge and still has another week or so to bulk, so she's impressive!🌸 It smell just like a French patisserie, and has a nice light green colour with some dark purple starting to appear on her 😍🌸🙏🏻

Likes
44
Share


@Mr_und_Ms_Lue_Roots
Follow
Hallo und herzlich Willkommen
Wie zuletzt beschrieben, befinden sich aktuell beide Klone in der Wachstumsphase.
Sie im Garten hat sich gute erholt und freut sich auf die kommende Sommerzeit.
Die Dame die auf dem Balkon steht, fühlt sich sichtlich auch sehr wohl. Man merkt wie das Wachstum zurück geht.
Die Stamm- Struktur zeichnet sich schön mit der Farbe lila. Sie sieht auf jeden fall auch wirklich bemerkenswert aus.
Ein paar Entwicklungsbilder unseres Gartens sind auch anbei :-)
Auf ab in die nächste Woche, wir freuen uns und wünschen in diesem Sinne allen Growmies eine tolle neue Woche und viel Erfolg!
VG 😎

Likes
2
Share


@htd420
Follow
Buen cultivo, pero serà mejor el proximo ya que siempre hay cosas que mejorar y pulir.
Processing
Likes
3
Share


@Jl209
Follow
skipped a week of log
And decided to leave them in solo cups until this week they have flourished off of two feedings and did the third today regular sj county water in between. They are really happy and I am too!
Likes
57
Share


@ThrashedTV_BakedByGlaze
Follow
Week 1 - 01/01 to 01/08 2021
HUGE THANKS TO @MARSHYDROLED and @VIPARSPECTRALED!
New surge protectors/heavy duty timers/the good cords.
The Dark Devil by @Sweet_Seeds is right on track with the Red Poison and Purple Lemonade from my other diaries. The LSD is a little behind but the genetics seems to keep it small if you get the wrong pheno. Will give it a week or so for it to really settle in with a root base before cleaning out my 5gal RootPouch pots from the last grow and getting them transferred into their final homes.
I have all my seedlings under the P1500 from Vipar as my veg light for the first few weeks to a month. It's SO nice to not have a blurple anymore, the light is way better in my room and on the eyes. The new diodes had every single seedling grow more in 6 hours than it did in the first 7 days under the blurp LED. The Dark Devil perked right up and threw another set of leaves in the first 6 hours under the new light.
I noticed a bit of spotting on the Dark Devil in my other diary so I added some Hydrogen Peroxide to the spray bottle and it cleared up. All four have been getting constant spritzing from the spray bottle to keep humidity up.
Excited to see how big i can get the autos under the new lights, will switch over from the Vipar to the Mars by end of week 2/mid week 3 once I transfer them and give them a day or so settle in.
Thanks for stopping in! Throw down a like and/or follow so i can return the favour 🙌
--
Check out my Diary of the Year 2020 entry 🙏
https://growdiaries.com/diaries/54258-fastbuds-original-auto-sour-diesel-grow-journal-by-glazedgrow
IG: @GlazedGrow
CannaBuzz: @GlazedGrow
Processing
Likes
13
Share


@thephalanx420
Follow
Day 51 - 1F - Trimmed, LSTd, SCROGd, took a couple clones to try in m new fog cloner - no idea if this will work. Looking forward to the stretch!


Likes
8
Share


@Northstar_cannabis
Follow
LSD-25 by far my favorite plant I've ever grown. It's colors are so beautiful, it's growth is exciting to watch. Fastbuds really out did themselves on this one! I love it.

Processing
Likes
31
Share


@WeedWacker
Follow
Week 6
Dec.9 - Dec.15, 2019
Dec. 19, 2019
The girls are adapting to the new environment very well. I have noticed since being these 600w HPS lights they get a whole lot thirstier. I've up the watering to 1/2 gallon per day.
ZKZ #3 is recovering from the broken stem very well.
CS #3 is growing very lanky and taking its time producing bud sites. Not sure it likes the LST method.
I've noticed a leaf or two have some discoloring. Not all leaves on all plants. Just one or two on two separate plants. The last pic shows this.
Any experienced growers....I welcome your thoughts.
Dec. 15, 2019
Started to notice the top set of leaves showing some signs of light stress at about mid week of this week. Thought I had a nutrient problem but after further checking, I think I narrowed this down to lights being too low. They started at 18, then 24, now I have them at 28".
I also reposition all the plants that are trained the same way together so I can get the correct light distance. Tall plants at "28. The plants that were bent to the side, those lights are 24"
Likes
13
Share

@masterofsmeagol
Follow
7/20 Went over this morning to plants soaking wet and heavy rain. Went back around 4pm and plants actually look really good. The rain has stopped for a bit and the girls looked great. Apart from some septoria leaves I needed to defoliate on the first plant I treated. I also noticed a few others on other plants so it's spreading albeit slowly. I treated the three in the middle with their second dose of Plant Doctor at 3tsp/1gal. One gallon administered to each plant via root drench. I think I may treat the other plant showing signs with a diy Dr. Zymes using citric acid as the active ingredient. That way I Gould start treatment right away without having to rely fully on plant doctor. Plus it would kill any pests. Ive seen damage but the birds do a number on them. I dont want to spray my plants with a bunch of chemicals if I don't have too. I shouldve replaced the pallets and cleaned the cage better. I think I did a good job sanitizing as I have no wpm. Just this septoria I probably got when the lady mowing the lawn cut all tjis fucking grass and blew it in my pen, throwing bird seed and I'm sure tons of disease into my grow bags. I literally had to harvest a bunch if fucking sunflowers. It looked like my plants had been mulched. Just with small disease carrying shrubs. At some point some of this stuff has to be on purpose. You CAN'T be that stupid. A couple kushes in the back look hungry. I think I may need to up my feed. I've written to much. I'll keep this updated. Thanks if you made it this far.
7/21 I guess it rained last night. Oh well. It was blue skies for hours before dark. It must've rained late/early morning. I'm sure the app of plant doctor will be fine. Like I said I'm considering using citric acid as a foliar spray to help with the septoria and clean up any pests. I don't have enough pests to warrant spraying. I just don't want to put all my eggs in the plant doctor basket. Today is overcast and windy. The wind has really assisted in spreading this virus. I remove anything I see infected immediately and since these plants are reveges they have plenty of leaves. Plants are really stretching. I know I talk about the septoria a lot but realistically if someone looked through my garden they'd have a hard time spotting it. I don't want to exaggerate the problem but I don't like dealing with ANY fungus or molds.
7/22 It was 55° this morning when I went over. I defoliated some septoria leaves and a few that were fading or damaged. I saw almost a whole leaf eaten so it's probably a good idea to move forward with citric acid. I can add that to the plants I've already treated with plant doctor. This is the first year it's been so noticeable. It's the reveg 10th planet that started this off. Oh well. I've dealt with MUCH worse. Plants LOOK good (other than septoria leaves (on bottom of plant). Today is water day for me but it's been raining and it's a lot cooler today. Bags still had weight to them. I want them to have a proper wet dry cycle. Temps top out at 75° so I'll monitor during the day and if something NEEDS WATER I'll give it to it. I'm suprised I have ZERO WPM. The septoria is much more identifiable but pm is usual present in these conditions bur I don't have a spot of it. I may do some defoliation today. I also need to add supports for flowering but one thing at a time.
EDIT: Went over around noon. 70°. Bags seem to be holding weight (it was easier to tell as ONE plant was substantially lighter than the rest) so I decided to hold off on watering. At least until tonight. There are three plants (at least that are going to NEED water). They look phenomenal now though and we've had lots of rain. Plan is to go over later and get the light ones and mix the water for the others so I can administer it in the morning quickly. I have an early doctor's appointment but I don't to overwater or water unnecessarily just because. But when you grow alone sometimes you need to do things when your able. I have people there that would help if I asked. And I have before but its late . I'm very grateful. I defoliated quite a few septoria leaves. They were all from the bottom of the plant. A couole wete bottom interior. I know there are worse things to contend with but still a pain.
EDIT #2 WENT BACK AT FOUR AND PLANTS LOOKED FANTASTIC AND STILL HELD WEIGHT. THE REVEG MK ULTRA IN EARLY FLOWER "MAY" HAVE STARTED TO DROOP AND "SEEMED" LIGHT. THE LARGE SPECIAL KUSH FUETHEST IN FLOWER BY THE DOOR WAS ALSO EXRRENELY LIGHT. I HAVE AN EARLY DOCTORS APPOINTMENT BUT DONT WANT TO OVER WATER MY PLANTS JUST BECAUSE IM IN A HURRY. ITS COOLER THIS WEEK. 70 TODAY AND HIGH OF 80 TOMORROW BUT DAD SAID THATS NOT UNTIL THE AFTERNOON. I MIXED UP ENOUGH WATER TO WATER EVERYTHING IN THE MORNING IF IT NEEDS IT. I HAVE AN IMPORTANT DOCTORS APPOINTMENT EARLY THAT WILL TAKE ME AWAY AND IM FEELING A LITTLE ILL SO I WANTED TO GET DONE WHAT I COULD TODAY. WATERED THE TWO THAT NEEDED IT WITH TWO GALLONS A PIECE (30GAL REVEG MK ULTRA AND THE BIG SPECIAL KUSH IN FRONT I DIDNT TOP THATS FLOWERING THE FASTEST. EVERYTHING ELSE CAN WAIT.
7/24 Surprisingly the plants still held weight this morning! The looked pretty good too! However its going to be highs in the 80's for the next 7 days. Since the plants still had some heft to them I watered everything just a gallon. I gave the 10s a half gallon and skipped the 50gal container plant. I think this is a good happy medium. I'm still seeing random septoria leaves but still no WPM. I defoliate daily sometimes a couple times. I need to get a minute to myself and add a foliar spray. I'll start with a dih Dr. Zymes while I'm looking into other products like bicilus (i have bt but its a different bicilus) or trichodermia. I need to feed sometime this week too.
7/25 Plants looked great this morning. I watered the 10th planet on the end that hadn't been watered in forever. I think I had been overwatering during those 100° days. I didn't water today as everything looks great and they don't seem to need it. I'll check later today. I did water the pink kush beside the 50 as it was much lighter (1/2 gal) to get it on par with the others. I'm starting to see pest damage as well so I think an app of Dr. Zymes would be a good idea. Both for pests and septoria. Plants are REALLY stretching. One special Kush is far ahead of the others.
EDIT:WENT OVER AT NOON AND 4PM. PLANTS LOOKED GREAT APART FROM MIRE SEPTORIA ON THE 10TH PLANET. I NEED TO WATERING DIFFERENT IN THESE TEMPS. IT WAS BREEZY AND 80° BUT THE BAGS DIDNT FEEL TOTALLY LIGHT AND THE PLANTS LOOKED AWESOME! THE HUGE EARLY FLOWERING SPECIAL KUSH IS PRETTY DAMN LUGHT BUT ITS PRAYING AMD LOOKING GREAT. I DECIDED TO WATER AND FEED IN THE MORNING AND HOPFULLY APPLY A DR. ZYMES PRODUCT ON THE ENTIRE GARDEN IN THE EVENING. PLANTS LOOK HUNGRY AND I HAVE RANDOM PESTS. ITS MOSTLY FOR THE FUNGACIDE ASPECT. PLANT SOCTOR SEEMS TO BE WORKING GREAT ON TWO OUT OF THE THREE I USED IT ON. THE THIRD IS A REVEG AND HAS TONS OF FOLIAGE I NEED TO ADDRESS AND CLEAN OUT. IT SEEMS LIKE IT WILL SPIT OFF SOME SEPTORIA LEAVES A DAY OR TWO BEFORE ANOTHER APP IS DUE. I'M LOOKING INTO MY OPTIONS. IF ANY OF YOU HAVE A SURE DIRE WAY TO DEAL WITH LEAF SEPTORIA IN EARLY FLOWER HIT ME UP! IM NOT TOO WORRIED THOUGH. I CAN SUPPRESS IT ENOUGH IF I HAVE TO EVEN IF I GOTTA SPRAY THE LEAVES WITH THAT 9.0PH ALKALINE WATER.
7/26 Supposed to be REALLY hot with thunderstorms. I watered the two thirstiest with a gallon and a half. Everything else got a gallon (but the 10th planet on the end that was still heavy and the 50). I fed everything too. I SHOULD'VE done the DIY Dr. Zymes spray but I wanted to keep feeding and adding an unknown foliar spray seperate in case of any reactions. A day before plant doctor is due to be applied again the 10th planet in the 20 starts showing signs of septoria again. I've defoliated quite a few septoria leaves. I'm not giving up. I assume I'll do something tonight and I MAY just look to see what I can find on Amazon. Luckily my plants still look beautiful. I hope it continues and I can stay on top of it.
7/27 Wow everything looked amazing this morning. EVERYTHING. The runt in the 50 has septoria but it was such nice fine Kong branches. I haven't treated tjat plant with anything. Plant Doctor app is due tomorrow. That product is working wonders and saving my crop. I'll pull a leaf or two here or there but this keeps it suppressed at least. For the most part. I think I might just treat everything with preventative doses and ANYTHING I've seen with a spot a cure dose (even though I know it's not "cured" but it's "supressed"). Plants I think are almost over the stretch. I have one special kush pheno that is much further in flower than the others. I can't wait to see what the flowers look like.

Processing
Likes
4
Share


@Barcelona_Farmers710
Follow
Mientras yo me divertía en la spannabis las niñas se ponian cada vez mas resinosas farmers!! Solo basta ver la shining haze para darse cuenta que el mammoth p es brutal!!👌🏻