


Likes
Comments
Share


@Canna96
Follow
This week went pretty well, other than she stretched like crazy and I am now getting worried about running out of vertical space. I also had a few of my bottom leaves get a few brown and yellow spots on them. I did post some pics and asked a question, thank you for the responses, much appreciated! I am thinking about adding my Spyder Farmer LED 100 Watt light into the tent for the nebula auto because it is about 23 inches shorter than the sour diesel. I believe it would only raise my temp about 2 degrees, and possibly lower the humidity by one or two percent. I must say my dehumidifier has been a freaking stud, running 24X7 and not complaining. I should look into adding another unit, it has been in the mid 90's and muggy for about a week. So far I have to say I am super impressed and excited with this setup, the genetics, and with growing this wonderful plant in general. Already planning ahead to my next grow, and what I can do better. I have been enjoying myself and I really appreciate everyone who has taken the time to answer my questions! I am having a blast and am excited to see what this lady will give up in a few weeks!

Likes
5
Share


@HighOhioAn
Follow
Loving the buds on two of the strains I’ve only had black buds one time before, and it was some of the best, but I’ve ever had super excited for this grow🔥💯
Processing
Likes
88
Share


@No_Clout
Follow
01/08/18 - I fed them all 1 litre each, one of them seems to be praying up but the other two Seem a little bit droopy still.
02/08/18 - #3 is praying like usual and the other two are getting better Day by day I’m going to be giving them another feeding tomorrow, I have seen roots stretching out to the sides of the pots so I might saturate the whole pot.
04/08/18 - horrible sight today looks like rusty cracks in some leaves , not got a clue what this.
05/08/18 - browning has continued since last night and it’s all on the new leafs not the older ones. i fed them without any calmag , so I think it could be a deficiency of some sort (cal/mag).the mad thing is, it’s only two of the girls, one of them is completely fine nice green leaves not yellow marks that turn orange/brown. It definitely has nothing to do with my ph or all three girls would be showing some symptoms seeing as they all get fed with the same soloution.✌️🏻
07/08/18 - everything’s cleared up their was slight nute burn in the process but everything seems a lot better so I decided to start LST. all the new leaves are the colour they should be with no nute burns or calcium deficiency 🙏🏻

Likes
4
Share

@Simba247
Follow
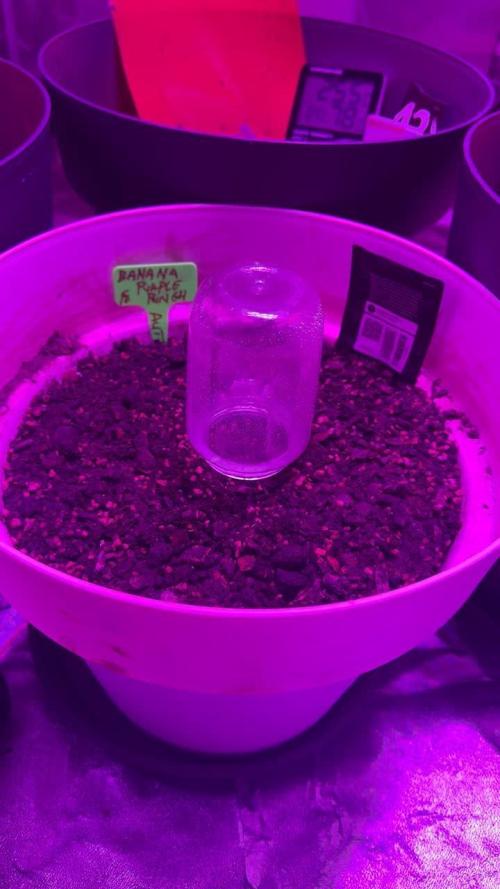
Went in a Glass of water on August 13th
Removed the next day to be transferred to paper towel
Stayed in a dark closet for 2 Days
Sent into soil on August 16th

Likes
27
Share


@TheCannaProphet
Follow
-----------------------------------------
~BARNEYS FARM DOS SI DOS 33™️~
-----------------------------------------
This strain from 'Barneys Farm’s Cali Collection gets another jolt of super power with this explosive collection of terpenes fused together from some of the world’s most astounding US cannabis phenotypes.
Dos Si Dos was developed from OG Kush Breath, a knockout Girl Scout Cookies pheno crossed with Face Off OG, then crossed again with their legendary Cookies Kush (OG Kush pheno x GSC) AND THAT’S ONLY HALF OF THE STORY.
Add in a subtle blend of Gelato #33 to the pot with its star struck Sunset Sherbet x Thin Mint GSC heritage and boom! A new champion was born: a sativa burst of euphoric energy is followed by tranquility with sedative properties capable of happily tranquilizing an elephant, if you’re overzealous or uninitiated!
DOS SI DOS 33™️ Cannabis Seeds Strain Specifications
~Type: Feminised
~Photoperiod: Normal
~Genetics: Dos Si Dos x Gelato #33
~Effect: Relaxed, Sedative, Happy
~Outdoor Yield (g): up to 2000
~Indoor Yield (g):up to 700 gr/m²
~Flowering Time (days): 60 - 65
~Feminised Outdoor Harvest Month: October
~Feminised Outdoor Harvest Month Week: 1st-2nd week
~Height Indoor (cm): 90cm
~Height: Short
~Indica %: 60%
~Sativa %: 40%
~Indica/Sativa: Mostly Indica
~Taste: Mint, Lime, Spice
~Aroma: Cookies, Sherbet, Lime
*Above information credit to Barneys Farm
__________________________________________________________________________________________________________________________________________________________________________________________________________________________________________________________________________________________________________________________________________________________________________________________________________________________________________________
THE SETUP:
~Planted into Jiffy Peat Pellets that were hydrated with de-chlorinated water with SuperThrive added then ph'd to 6.0 @ 80℉
~Grown 100% organic in 10g fabric pots with Mother Earth 70/30 Coco/Perlite medium amended with 2tbs/g of Down To Earth 4-4-4 / 2 cups/g of Earthworm Castings / 1tbs/g of Dr. Earth Flower Girl 3-9-4, 1tbs/g of Dr. Earth Bat Guano, 3/4 cup of Down To Earth Azomite and 1 tsp/g Down To Earth Fish Bone Meal.
~24hr light cycle during Germination / 19/5 light cycle for Vegetation and 12/12 for Flower
~Straight water ph'd @ 6.2-6.8 when needed and weekly Compost Tea's.
__________________________________________________________________________________________________________________________________________________________________________________________________________________________________________________________________________________________________________________________________________________________________________________________________________________________________________________
Weekly Updates:
9/13- With approx. 10 weeks of growth behind her now she's going into her 5th week of flower now and let me tell you the pictures don't do her justice... This is one phenomenal cultivar! 😍
She was given Compost Tea yesterday and today was still fairly heavy so I skipped watering and just removed a few leaves to maintain light penetration, turned her pot and sat and chatted with her awhile!
9/15- Well she really must have liked that last batch of Compost Tea as she looks exceptionally vibrant today!
She's continuing on her mission of stacking her flowers, which are developing beautifully and have a delicious sweet citrus aroma to them right now.
I did not water yesterday, so today I watered with 1.5g of straight de-chlorinated water that was ph'd to 6.5 @ 72℉ and rotated her pot... Damn she is looking great! 🤩💖
9/17- Yesterday I top dressed her with 1/2 cup of Down To Earth Bio-Fish then watered it in with 1.5g of straight de-chlorinated water that was ph'd to 6.5 @ 72℉.
Her flowering is continuing beautifully and she's smelling stronger every day it seems! I'm staying on top of tucking leaves blocking light and turning her pot daily as well.
9/19- Five weeks of flower on the books! We're halfway there now, she's stacking her flowers tightly going into Week Six and she's looking phenomenal! 🤩
When I watered her today I added 1 tbsp/g each of Kelp Extract and Fish Emulsion (both liquid) to the 1.5g of straight de-chlorinated water she received, which was ph'd to 6.2 @ 74℉.
~Thanks for stopping in! Things should be getting a lot more interesting in the coming weeks...Stay lifted and be Blessed! 😎🙏~

Likes
9
Share


@Kushizlez
Follow
Blackberry Breath #1
Yield: 57.5
Smell: 9/10 - sweet, grape, berry, gassy, earthy, hashy
Bag appeal: 8.5/10 - dense, sparkly buds
Crystal coverage: 9/10 - super impressed
Ash: 5/10 - flaky, mostly grey/blackish
Fire holding: 4/10 - stays lit for 10-30 seconds
Smoke: 5/10 - tastes like chalky shit
High: 6/10 - indica dom
Comment: looks amazing, smells amazing, tastes like shit, burns like shit.
46.5/70 = 66% 👎🗑️
Blackberry Breath #2
Yield: 76.1g
Smell: 6/10 - musky, tea, berry, herbal
Bag appeal: 8/10 - slightly leafy/stemy
Crystal coverage: 7.5/10 - very impressed
Ash: 5/10 - flaky, mostly grey/black
Fire holding: 4/10 - stays lit for 10-30 seconds
Smoke: 5/10 - taste is shit
High: 6/10 - indica dom
Comment: looks nice, smells shitty, tastes shitty, burns like shit.
41.5/70 = 59% 👎🗑️

Likes
81
Share


@MrJones
Follow
MrJones Girl Scout Cookies
╰⊰🍪╰⊰´🍪⊱╮🍪╰⊰Pre Harvest Report╰⊰🍪╰⊰´🍪⊱╮🍪╰⊰
🌱Girl Scout Cookies
@originalsensibleseeds
👨🌾🏽GD Grower: MrJones
╰⊰🍪╰⊰´🍪⊱╮🍪╰⊰🍪╰⊰🍪╰⊰´🍪⊱╮🍪╰⊰
📜Week So today I chopped the Girl Scout Cookies and put 1420 GRMS of bud into the dry tent / should be drying for about 7 to 10 days.
╰⊰🍪╰⊰´🍪⊱╮🍪╰⊰🍪╰⊰🍪╰⊰´🍪⊱╮🍪╰⊰
🔶Saturday 02.06.21 / Started drying the cookies today, environmental's locked in at 62F/58%RH
╰⊰🍪╰⊰´🍪⊱╮🍪╰⊰🍪╰⊰🍪╰⊰´🍪⊱╮🍪╰⊰🍪╰⊰🍪╰⊰🍪⊱╮


Processing
Likes
55
Share


@hawkeye_diesel66
Follow
She's growing nice and healthy. She recieved a good drink the other day. On day 33 she recieved a good cut and most of the bigger fans and keaves were removed as well as a fre lower nodes. She really didn't seem to be bothered by the cutting.
Likes
34
Share


@iLoveGoodWeed
Follow
Both laide are growing super well. One is taller but second one is more bush on sides. So far Im very happy grwoing this strain and both ladies just growing so nice
Likes
23
Share


@SonomaSungrown
Follow
Fungus gnats were in full effect here due to the Down-to-Earth potting mix. That stuff doesn't drain worth a damn!
I had just sprayed the plants with neem oil and soap in this video... and needless to say that didn't turn out well (more to follow)
In other news, the French Macaron roots were growing like crazy at this point.


Likes
11
Share


@Rko41
Follow
15 cm de circonférence de tronc 1,80 de L .
2,16 m h les branches se garnissent à fond😍



Likes
18
Share


@VI_Cannabis
Follow
June 21st - they are doing great with the newa ac unit. temps are saying around 25-26. They are just growing away. I decided this week I would swap there nutrients for transition to flower. I watered them today with the first mix of the recommended transition to flower.
June 22nd - Still growing away, they seem to be picking up growth quite a bit now!
June 23rd - Starting to explode with growth! Everything looks healthy. I have turned the lights up to about 85% now. Gave them a feeding today, again with the transition to flower recommendation.
June 24th - Still growing like crazy. They are on a 12/12 schedule and it looks like they're on there way to flower!
Junes 25th - Lots of growth in the last 5 days. They have perked up a ton, grown a ton of fan leafs and its almost time to do some more lst or defoliation. Gave them another feeding today. I have decided to just feed with every watering as it is the manufactures recommendation.
June 26th - Took the girls out and did some LST on them again as they were starting to become pretty uneven. Unfortunately I only took pictures/videos of the one plant. You can definitely see the growth since the start of this week. They seem to be getting pretty dry by the morning so I have been feeding roughly every 24-36 hours making sure not to overwater.
June 27th -They popped back up overnight and are just growing away. Another watering today. Roughly 3L per plant. Again making sure not to overwater.
Likes
Comments
Share

@ThreeLittleHerbs
Follow
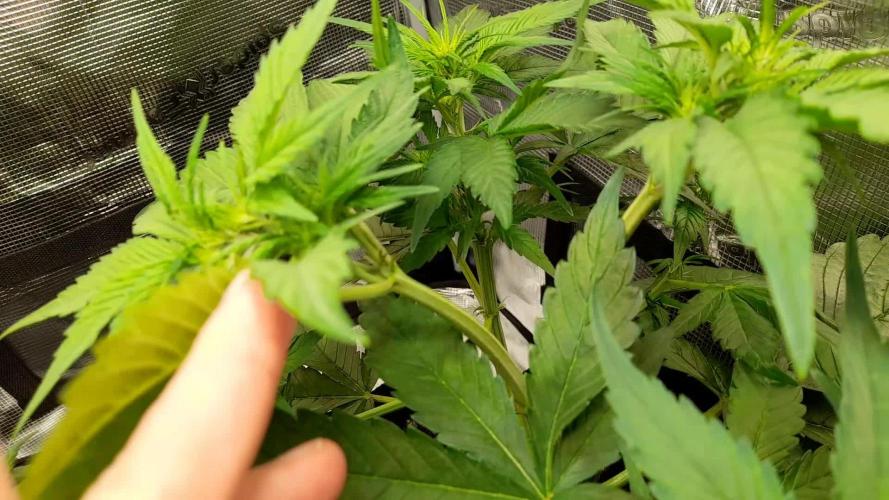
I was on a Holiday for 4 Days - when i came back, i saw that all branches with a LST-Clip completely snapped, because it grew so fast and did not resist the pressure. There was no chance to fix it, so i took these branches off, so I only had 4 of 8 mainbranches left 😣😭😭😭
I started to Scrog both plants now - especially the Lemon Cherry Cookies on the left needs more space for light. The papaya Cookies will now be tied down in all 4 directions, that the remaining 4 mainbranches can produce a lot more sidebranches and Buds in the end. I had to make the best out of it.


Likes
21
Share


@PrairieFrostGrow
Follow
*******This week will be used for 4 cuts that were taken of the seeds......Gorilla Girl from Sweet Seeds SWS74......There were three of the green pheno and the last of the purple pheno***********
********Week of June 1 to 7, 2019.
First full week of 12/12 light schedule and she is setting in her flowers.
Second SCROG put in to help with those future heavy buds😀👍
More detail coming :)
Likes
33
Share


@PEAKYPLANTERS
Follow
hi to all, brothers of the weed! Welcome to Peaky's Enchanted Gardens
this week we will get rid of all excess nutrients by rinsing the plants with only pH balanced water and push them to also get rid of accumulated reserves!
kiss kiss to all
you are the best

Likes
9
Share

@420DeepGrow
Follow
📆 Semana 8
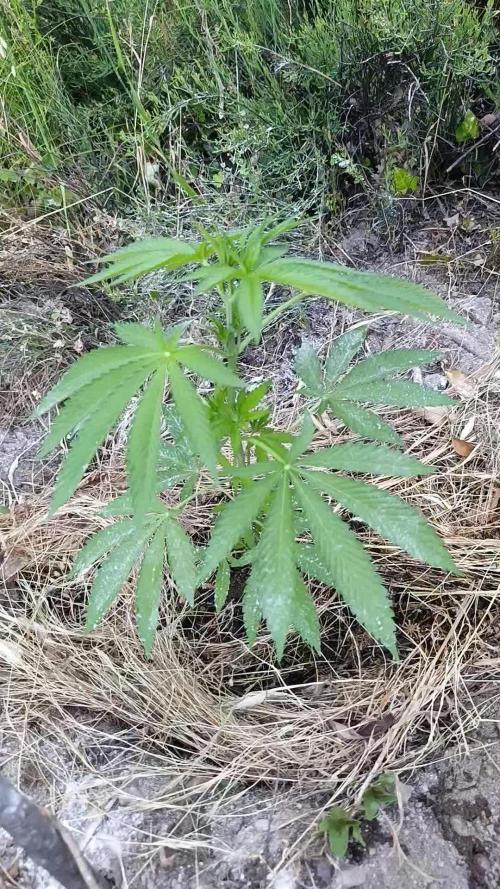
La planta continúa adaptándose al cultivo en suelo, mostrando un crecimiento constante y una buena respuesta a las condiciones de exterior. Durante la semana se aprecia un desarrollo uniforme, con nuevos brotes activos y un aumento progresivo de la masa vegetal.
El color se mantiene saludable y la estructura comienza a ganar altura y presencia, mientras el sistema radicular sigue explorando el terreno y mejorando su capacidad de absorción.
⚡ EC: 1.0–1.1
💧 pH: 6.2–6.5
🌡️ Agua: 20–22°C
🌫️ Humedad: 50–60%
💡 PPFD: luz solar exterior
🌡️ Temp ambiente: 18–26°C
🔥 Nota: La prioridad sigue siendo el desarrollo radicular y la adaptación completa al entorno. Una vez establecida en el terreno, el ritmo de crecimiento debería aumentar notablemente durante las próximas semanas.
Seguimos creciendo fuerte 💪!
Processing
Likes
3
Share


@TheGanjaGrower
Follow
Started with LST and did extreme defoliation. Plants were pretty healthy so they will recover soon.