The Grow Awards 2026 🏆 


Likes
Comments
Share


Likes
35
Share
@Laviejaescuela93
Follow
Buenas a todos perdón por no poder subir la cosecha entera ni en su orden pero me fue imposible por la covid-19

Likes
56
Share
@Wicked_Stix
Follow
Had to cull 2 plants this week. The strawberry haze x banana og was a male and the sour sorbet was a Hermie so they are gone. The remaining plants didn't take much time to fill out into the extra space they have. Been doing some defoliation but they need a lot more pretty soon. I have been spraying the sugarcane clones with colloidal silver and got all the clones out of the cloner and into soil. Hopefully will be getting some pollen in a couple weeks.


Likes
3
Share
@Shmoopy_me
Follow
Getting close to the finish and it’s very pungent smelling it’s hard to pin a nose on her! Still filling out and getting dense towards the end!


Likes
41
Share
@Santica_Garden
Follow
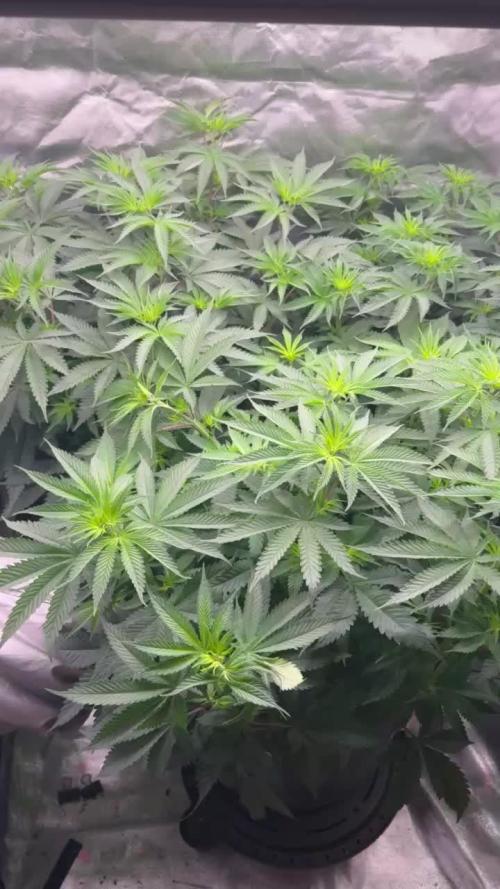
At the end of Week 1 of Flower and this is how things are looking for the Alien OG, not much to update on really, I have uploaded a video for a better look at the ladies 👍🏾🌱💚 HAPPY GROWING GUYS

Likes
13
Share
@Ghosttown
Follow
After 48 hrs darkness I've finally trimmed buds to prep for hanging.
Plant 1 .82kg wet weight
Plant 2 .88kg wet weight
Plant 3 .77kg wet weight
Total wet weight incl stems 2.47kg or 2470g
Equate to 5.438 lbs wet weight.
I can't wait to see dry weight. I'll be happy with half loss in water.
Likes
10
Share
@Prop207
Follow
This huzzy will not stretch no matter what. Maybe an inch.
Hard to reach the back side to adjust netting. 3 week defoliation to open up more bud spots to get some weight packed on em.
Weak smelling still.
30 ml PBPB
15 ml sb
15 ml Cm
Ph 6.1
Likes
16
Share
@Daddyhancocc74
Follow
I'm using a 2x2x5 spider farmer tent and technically I start germination on 1/17/23 at 9pm and in the picture I'm using Rockwool but also a small pot with fox farm soil to hold it upright

Likes
198
Share
@DevilsBud
Follow
Marshydro supported grow
Spliff Seeds
CBD Spliff Berry/Afghani Gold
Anesia Seeds
Hyper Glue/IMPERIUM X/Captain Future/Blackberry Moonrocks
All strains except imperium x/blackberry moonrock are topped and the main got LST clip on i snapped a Branch off one of the hyper glue by being to Hasty the other ones where no problem good week for the 9 plants
A update of using the new marshydro set-up
The FC-4800 is a absolute beauty of a beast the change from growing under a marshydro TS-1000 to a FC-4800 is night and day nothing bad about the TS-1000 it deliver me a great first run with 4 plants absolutely amazing lamp to start with no doubt . But since i am growing 9 now and soon maybe 12 the FC-4800 will for fill that task with no problem what so ever 💪🏻👌🏻 Marshydro gets your bud's frosty and reaching for the ✨
Also the new 120X120X200 tent
Is of class of it's own bin growing in a 100x100x180 tent and has worked fine and will stil be used for plants that are en early grow stages together with the TS-1000 . The 120x120x200 makes everything much easier for me and my back 🤣 the 2 side holes now where I can reach the back for my grow 🤘🏻🤘🏻
Also the space i have now is great for the amount of plants i will be growing i am loving it
visit www.marshydro.eu
for your best gear and use the PROMO CODE: DEVILSBUD
Some info about the Marshydro FC-4800
Superb Quality LED Chips: The whole light is composed of 1206 pcs Samsung lm301b and Osram 660nm chips. More than two times as many LEDs are used to drive the grow lights at low currents and to avoid overdrive. Quality is guaranteed and efficiency is up to 2.8 μmol/j.
Even PAR Distribution and High PPFD Output: The multi-light bar design and the densely distributed light chips enable the LED grow lights to achieve the optimum PPFD required for plant growth over the entire effective coverage area.
Specifically Designed Spectrum: To ensure even plant growth, blue and red light are enhanced on the basis of a full spectrum combination. Not only does this accelerate plant growth, but it also improves the yield and quality of the plants at the same time.
Dimming Daisy Chain Function: The dimming function saves on electricity costs and enables brightness from 10% to 100% for the different stages of plant growth. A single master light can connect up to 30 lights in a daisy-chain system.
Business LED Grow Light: The light's wavy heat sink dissipates heat quickly and the IP65 waterproof allows the light to operate in humid conditions. 180° collapsible feature for easier installation. All these features provide favorable assistance for commercial cultivation.
And some tent info
●【Lock All Light Insid】MARS HYDRO Grow Tent Interior is made of diamond mylar. Non-toxic to the environment, no harm to plants. High-quality 1680D canvas being double stitched, (ALL OTHERS BRAND grow tent is 601D canvas) which is tear-proof for perfect light locking, No light leaks or rips at all.
●【Durability Grow Tent】Stable Metal corner adapters and poles are the trustful supporters of the tent. No rusting nor paint-falling. Quick easy tool-free installation. Carries strong heavy-duty SBS zippers, double layer lining to create a light-proof seal.
●【Easy Observation of your Plants】Special peeks window made by double layers of cloths. Observe the growing conditions of your plants without opening the tent and avoid disturbing plants. The peek window also serves to dissipate heat and ventilate air.
●【Removable Tray Keep Clean】The package includes a removable waterproof floor tray to hold soil and fallen leaves. The tray can be taken out easily to wash. Removable and water-proof makes cleaning easy.
●【Good Ventilation&Fast Assembly】 Circular double-sleeved vent holes with adjustable nylon strap for air circulation by exhaust fan, ducting, carbon filter, or reflector. Better allows proper light, heat, and airflow. Quick tool-free installation. Reinforced by a sturdy metal frame to ensure security and stability, supports up to 140lb. Perfectly safeguard your plants to thrive even in winter


Likes
Comments
Share
@Decimotox
Follow
End of week 7 for DL1/2 and E4.
Start of flowering for E/1/2/3! I flipped those girls 3 days ago. Will be transplanting DL1/2 and E4 today after I post this update, so next week's update will have the start of flower for those girls as well! DL1 especially is showing her hunger, so it's definitely time to transplant! We pushed it out a few days longer than I'd have liked, but it's ok.
We're looking good overall. The Eucalypti (1/2/3 especially) are looking insanely healthy. They seem to have taken to their new soil well and are loving the silicore supplement from Solfire that I've worked into the waterings. Can't wait until I can buy more of this silicore stuff. The sample won't last me long lol.
In about 10 days, I'll do a heavy defoliation on E/1/2/3 and check for herms/sacs; then another, lighter defoliation 2 weeks later around week 4 of flower. Smooth sailing after that. Haven't seen any signs of sacs in the preflowers, but we'll see what we get in a couple weeks. I'm not even close to the best grower in the world, but I definitely feel like I've found a great recipe for success. This might've been the least amount of LST I've ever done on plants to get ~10-12 tops per plant, which is usually my goal. I would love to find a keeper pheno in a grow sometime and keep one giant mother plant, or even just train one plant in my 3x3 and fill the whole thing out. But for now, I'll keep going with three in the 3x3 lol. Should be another great harvest when all is said and done; fingers crossed no major issues. Humidity and temp will be my biggest challenges this summer. I likely will have to contend with 60+% humidity in flower. It's gonna suck. But we're going to persevere...somehow.
Processing
Likes
11
Share
@Fibro_Witch
Follow
Still looks like crap but I'm letting her do her thing. I didn't have the heart to cull it, and I wanted to see how resilient this girl could be. I top dressed her and gave her some nutes. She's looking better than she did so that's encouraging. We'll see what happens in the next couple weeks until she finishes.
Likes
12
Share
@Tazard
Follow
We’ve got her in flower now. She’s getting bushier each day. I left the damaged leaves on her so she can continue to cannibalize them if she needs.

Likes
22
Share
@SkunkyDog
Follow
Hallo zusammen 🤙.
Sie wachsen sehr schön und machen keine Probleme.
Sie fangen langsam an zu riechen 🤙

Processing
Likes
30
Share
@CBD_Sweden
Follow
2018-04-03 Week 14 Day 1
Not much to say, there isn't much drama going on in growroom 2, the only things I do is giving them water and nutes 2 - 3 times/week and making sure that the lamp don't burn the girls.
I gave them 4 liters today, and since they live in smartpots I can see when the pot gets wet when watering the girls, but you could hardly notice that. They are getting thirsty 😛
The flowers are developing very good, they look really healthy and their colors are fine.
Crazy Cookies nr 1 is 66 cm
Crazy Cookies nr2 is 52 cm
2018-04-04
Raised the lamp to it’s highest level and turned all girls 1/4 turn, it’s really hard to get in to the ladies in the back, I need to push the girls up against the walls on each side and crawl on the floor to be able to turn them and give them water/nutes.
Damn these plants, why do they have to grow and become so BIG?! 😆💪
Added a new video, enjoy my SoG 😄
-----------------------------------------------------------------------------------------------------------------------------------
Strain information:
The word synergy is a business term first quoted in the early eighties to describe mutual enhancement through interaction or cooperation, where the end result gained is greater than the sum of the parts used. What do synergy and the Crazy Cookies cannabis strain have to do with each other you may well ask?
The parents of the forthrightly indica Crazy Cookies are marijuana royalty. OG Kush and Girl Scout Cookies. These strains of contemporary legend have been combined to cerebrum shattering effect. The cured flowers deliver a mouth-watering and couchlocking 24% THC. The initial delectable spacey upbeat onrush compliments of the Durban Poison coursing through the genes of the Cookies soon becomes a lush and rich, inescapably delicious body flux.
There should be a picture of a Crazy Cookie nugget in the dictionary next to the word synergy. Crossing the OG back into the Cookies has amplified the psychoactive effects of the notorious lineage of both parents. This is an indica with a capital I.
As a breeder it would be fair to assume that injecting more OG into the Cookies would result in an OG-dominant Cookie, or even close to a pure OG, but something else has happened. Some long dormant genetic switch has been flipped and a standalone indica has emerged whose spicy notes and earthy tones, hints of grape and horny pheromone are an absolute pleasure.
Paying this breed some careful attention as it grows will reward you substantially, indoors or out. Typical hybrid vigour is shown throughout each grow phase. Stout plants to 80cm can be expected indoors and muscular examples with fluted stalks growing to two metres can be easily achieved outdoors. Good bracing is necessary as the flowers mature. With more than 500g at harvest per robust plant, colas can easily snap and twist branches.
--------------------------------------------------------------------------------------------------------------


Likes
Comments
Share
@whatsupgoodboy
Follow
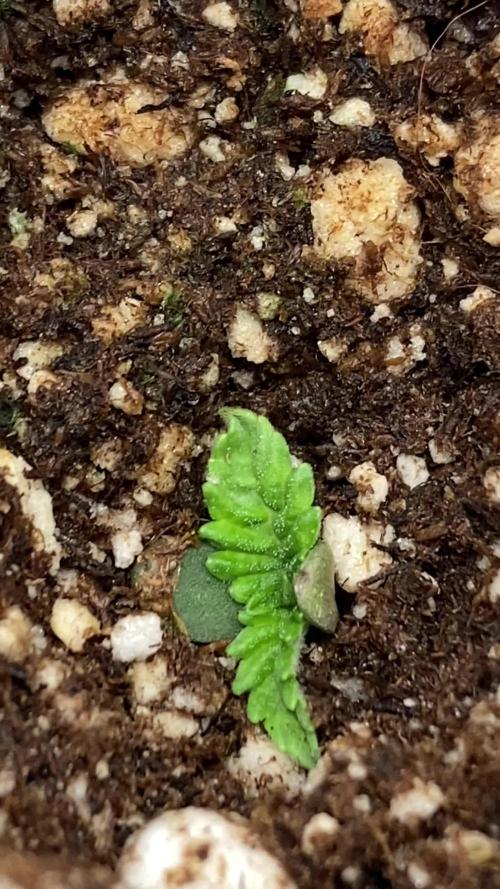
I'm bit worried about two seeds, one that seems to lose one of the Cotyledons, but aparently the leaves are sprouting. The other has Cotyledon so yellow, and one of the first leafs looks dead..


Likes
29
Share
@HotIce
Follow
Неделя прошла в болоньей с желтизной и после обрезки жёлтых листков я думал победил все проблемы но Блекберри решил начать пускать пятна бурые пытаюсь победить их! В целом неделя прошла ровно!
Чуть вывалился из дневника, но следущий гров буде вести более внимательно и разберусь с этим сайтом) а пока перейдём на следующую неделю.)

