
Likes
Comments
Share


@CANNASIM
Follow
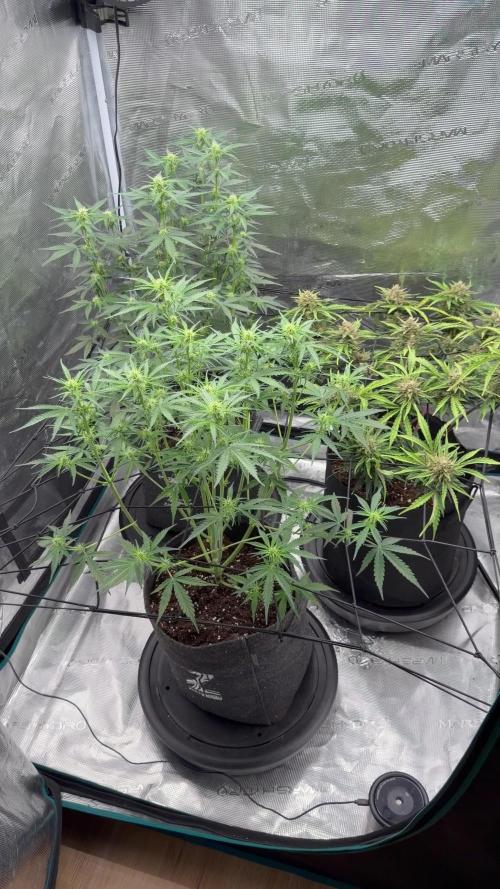
The plats are not been trained, defoliated or anything, grown naturally.
I’m blown away how fast this plants are growing. First time outdoors and the experience is very nice, I love the fact it requires little to no effort, in the setup I have chosen.
As it is raining a lot, I’m using only a dry amendment I have built to use on them periodically, this way I’m not adding more liquids to the root system that is already highly saturated, essentially I’m using the following recipe update, I don’t know if it is correct but I live it all mixed. Use about a table spoon and a half every 15 days.
- Azomite 500g
- Natural fosfate 500g
- Biochar 1kg
- Bokashi 1kg
-Kelp meal 500g
-Mamona meal 1kg
-chicken meal 1kg
-Potassium silicate 500g
-Gypsum farm 500g
-Diatomaceous earth 500g
-Bunny guano 300g
-Bat guano 1kg
-Oyster shell powder 1kg
-Cow blood meal 1kg
-Cow bones powder meal 1kg.
-Wormcastings, spare use not in the mix.
The plants are showing good coloring, no fade and no deficiencies, the green is not to deep, nor too light. As the leafs are taking a lot of water and strong sun and wind, the leafs are feeling a bit. As the wind is high since day 1 the stems are very resistant, strong.
The Fastberry Is on the smaller size if compared to the other plants, together with the Banana purple punch, then we have the Bluedream and the CBD crack on the larger sizes thriving a lot, I expect to approach the end of flowed in a few weeks, the girls are very fast indeed. I’m looking forward to collect the fruits :)

Likes
41
Share


@UnorthadoxDude
Follow
Hello and welcome to week 8. Enigma is on day 53 now and has partially recovered from the burn. Hopefully she will steady up as she goes. I thinn 3 or 4 weeks is what we can expect. Does she have to be harvested before the competition ends?
Day 55: Not much change.
Day 56: End of week. Roll on week 9!
Likes
17
Share

@cangrowz
Follow
Ende Woche 8 / Anfang Woche 9 – Runtz Zamnesia 🍬 | Erntetag
Das kleine Nebenprojekt, bei dem ich anfangs wirklich keine großen Erwartungen hatte, hat sich am Ende als richtig stabile Runde entpuppt. Die Buds sind schön kompakt und fest geworden, und auch das Trimmen lief super entspannt. Weniger Masse, dafür größere Buds – hat die ganze Ernte deutlich angenehmer gemacht.
Vom Geruch her genau das, was man sich bei Runtz wünscht: intensiv süß, fast schon wie ein fruchtiges Bonbon. Schwer genauer zu beschreiben, aber auf jeden Fall ein richtig geiles Aroma.
Über den gesamten Grow hinweg gab es keinerlei Probleme – keine Schädlinge, kein Überwässern und auch sonst kein Stress. Einzig die Luftfeuchtigkeit war zwischenzeitlich etwas zu niedrig (teilweise um die 44%), konnte aber gegen Ende mit dem Luftbefeuchter wieder gut stabilisiert werden. Vermutlich auch durch den Raumwechsel vom Zelt beeinflusst gewesen.
Danke an alle, die den Grow begleitet haben – hat auf jeden Fall Spaß gemacht, das Ganze zu teilen.
Jetzt wird noch die Mimosa von Barney’s Farm fertig gemacht, danach gibt’s erstmal eine kleine Pause von etwa einem Monat. In der Zeit wird alles gereinigt, der Filter getauscht und dann geht’s wieder fresh an den nächsten Run.
Happy Growing Growmies 🌱?💚

Likes
8
Share


@Cowboy
Follow
I over water this past week but got back on track ,it took about 2 day for her to come back around,, but a great week

Likes
14
Share


@BruWeed
Follow
🍀Estuvo bien en toda su etapa, no tuve ningún problema. Los resultados fueron muy buenos, se encuentra muy resinosa y con aroma a dulce.
🍀En total saque 143g de una sola planta.
🍀En total estuvo 105 días de vida desde su germinación.
🍀Recomiendo esta genética, por el momento son cocos Premium, ya quiero probarlo para saber que sabor tiene.
🍀Ahora se encuentra en etapa de secado, cuando ya estén para la etapa de curado subiré más imágenes.
🍀🇦🇷Podes seguirme en Instagram como @bruweed_arg🍀🇦🇷

Likes
1
Share

@Jungle_James_Grows
Follow
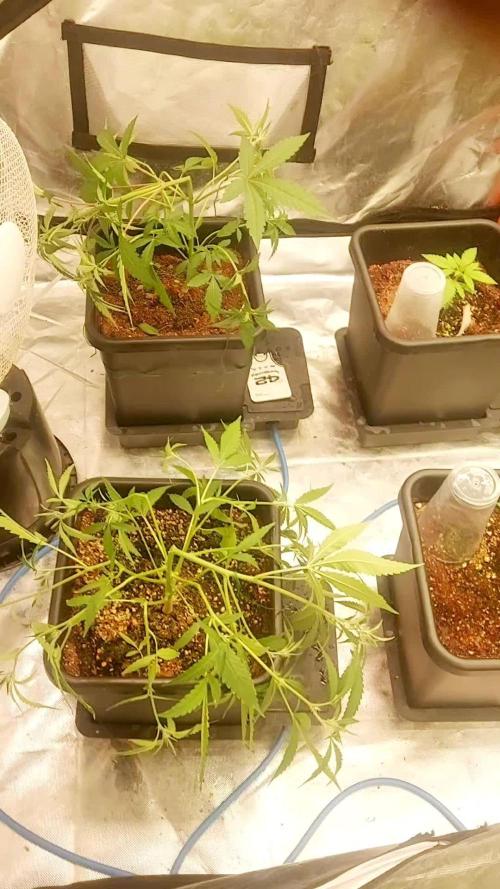
They're showing signs of early flower now, so going to get stuck in there in the next couple of days and do some lollipoping and bending.
Went in today and did a major LST/HST training and took all the small growth under and gave them a feed. So let's see how they bounce back. Which I'm almost sure they will.
Processing
Likes
70
Share


@CBD_Sweden
Follow
@MephistoGenetics,
Hi all the happy people here in GrowDiaries.
This is my second cultivation ever and it will be fun to try a bigger space than my closet grow.
First, I'm just going to say I'm done with the construction of my new growroom.
The room is 2.14 meters by 1.7 meters and has a ceiling height of 2 meters.
It provides a floor area of 3.6 square meters.
I use a 54 Watt Lightwawe T5 for germination and 2 Pcs 400 Watt HPS lamps.
I have a channel fan that replaces the room air about 40 times an hour to get a comfortable environment in the room, the air enters a fresh air intake from the outside.
The air is purified through a carbon filter to then leave the room to the rest of the basement.
Then I use that heat to heat the rest of the basement.
I will use 10 pcs 15 liter Autopots to grow with and a 100 liter water tank that supplies the pots of water and nutrition.
I will grow completely organically in soil and will watercure my buds to get the best possible medicine for me.
But there are no cultivation rooms to be displayed here, so I continue with what is most important.
Today I have put my seeds in paper towel and hope the seeds have germinated within a few days.
I am very excited to see how the new growroom will work and how this Illuminauto 21 - Sour Crinkle will turn out.
Illuminauto 21 - Sour Crinkle (Grape Crinkle x Sour Crack)
Two of our fastest and frostiest varieties collide to make a sweet and sour delight!
Expect super frosty, compact nugs that won't be a toke for novices.
Destined to be a great strain for extraction work too!
Plant size - Small - Medium
Cycle time - 60-65 days from sprout
Indica/Sativa - 80/20
Frost level - Extra Ridiculous
https://www.mephistogenetics.com/product-page/illuminauto-21-sour-crinkle
.................................................................................................................................................................................................................................................................................................................................................
2017-08-21. Started to germinate the seed.
.....................................................................................................................................................................................................................................................................................................................................................
2017-08-23. Seed germinated and put in small pot in the humidity dome.
.........................................................................................................................................................................................................................................................................................................................................................
2017-08-27. Slow and steady she grows.
---------------------------------------------------------------------------------------------------------------------------------------------------------------------------------------
2017-08-28. Transplanted in 15 liter autopot. Check the roots on this girl
-----------------------------------------------------------------------------------------------------
2017-08-29. New movie of the girl.
-------------------------------------------------------------------------------------------------------------------------------------------------------------------------------------------------------------
2017-08-29.
Hello to you who read my diary, I just want to say that I am pleased that you have chosen to check in with me and in my diary.
I just want to say that I do this for myself and for a steady flow of my medicine.
Everything you read and see in my diary is 100% honest and I will never distort or beautify anything here.
I document my crops so that I can learn from my mistakes and also to look back at those different crops.
I try to update with pictures every day and with text if something special has happened in the garden.
This is my strainhunt for the best medicine and the beginning of my journey with cannabis and the cultivation of it.
-----------------------------------------------------------------------------------------------------------------------------------------------------------------------
2017-08-30. Cleaned the room this morning, just vacuuming and cleaning with chlorine solution. Im testing the fan to control temp and humidity, it works great.
Added some pics and a movie. Everything is looking great right now.
-------------------------------------------------------------------------------------------------------------------------------------------------------------------------------
2017-08-31. 3 new pics.
---------------------------------------------------------------------------------------------------
2017-09-01. New pics and a video from the grow room today.
------------------------------------------------------------------------
2017-09-02. New pic.
----------------------------------------------
2017-09-03. New video from this morning.
---------------------------------------------------------------------
2017-09-04. Week 2 starts now, new pics.
-----------------------------------------------------------------------------------------------------------------------------------------
2017-09-05. KL 08.00. Cleaned the room this morning, just vacuuming and cleaning with chlorine solution.
KL 12.00. The girl got 2 liters of water with nutes in it, added a video.
---------------------------------------------------------------------------------------------------------------------------
2017-09-06. KL 08.00. The girls woke up after their beauty sleep, the leaves are always a bit down after 6 h of darkness, but they will stretch now when the HPS lamp starts.
Everything looks good and I keep trying to tuck the leaves so they get the maximum amount of light where needed. Added pics and video.
--------------------------------------------------------------------------------------------------------------------------------------------------------
2017-09-07. Day 17 from sprouting. I have never tested PH in my grows, when growing organic in soil iv learned that it adapt PH by it self. But im curious by nature so i had to test.
Kl 10.00 Tested PH in the soil, it was 6.9 and tested my tap water and it was 6.8. Added video of the girl.
Kl 22.30. New pics.
------------------------------------------------------------------------------------------------------------------
2017-09-08 KL 08.00. Good morning, added new video.
2017-09-08. Kl 23.50. Gave every girl 3 liters of water and nutes, added new video.
------------------------------------------------------------------------------------
2017-09-09. Kl 21.00. Defoliated a lot and added pics.
-----------------------------------------------------------------
2017-09-10. Kl 08.00. Last day of week 2. New video.
2017-09-10. Kl 23.00. 3 new videos.

Likes
69
Share


@Natrona
Follow
Fractal was harvested on Sept 12. Due to extended period of high temperatures and humidity with more rain expected every day following another hurricane. The other gals were showing disease. That was the determining factor to chop all outside girls down.
Fractal hung in the dark for 2 days. Because her grow family experienced bud rot and wilt, she was examined carefully for any disease. She was disease free.
Fractal had a long vegetative phase. Probably too long since I started my outside grow in April so they would be hardened off before I went on vacay in May. Three months of veg caused massive vegetative growth. The various breeder notes on photo period seeds indicate late September or October harvest. So that was in the back of my mind during this grow.
👉
Note for next year start seeds later in spring.
👉 Plan start date based on counting back from the vernal equinox.
👉 Based on such a long growing season, Autos may be preferable to finish quickly and not have extended vegetation phase before flower.
Thank you @DivineSeeds for the opportunity to grow your exotic strains and participate in your contest. I will definitely grow fractal again.


Likes
4
Share


@AlpAge_Cino
Follow
Still on rain water... looks better! Now in 9th week of flowering, I removed almost all big leaves from motherplant. Clones look OK, buds getting bigger and bigger.
2023/04/21 : I vaporized about 0.5g of dried popcorn buds from mother plant. I was high at the begining and stone at the end, I fell asleep watching a movie. The bad news is I found some seeds in these buds : it won't be sinsemilla! 😪


Likes
9
Share

@RBG
Follow
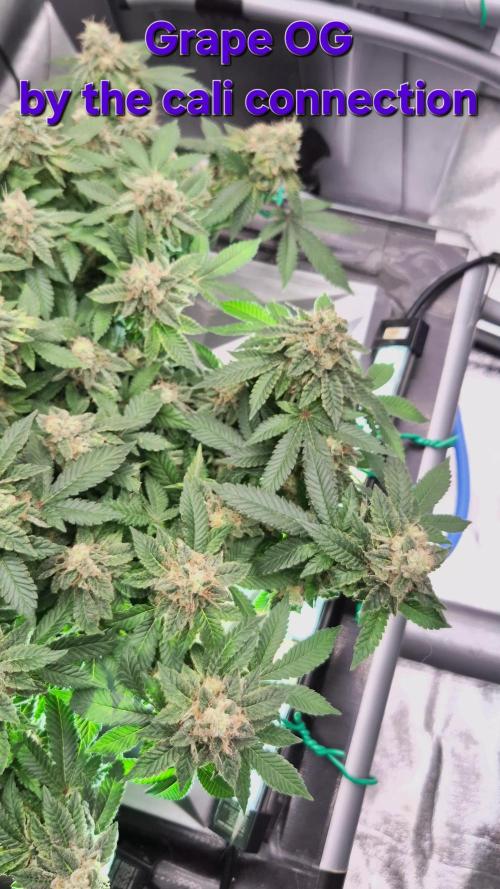
🌿 Grape OG by The Cali Connection 🌿
Week 14
Flower week 8
Flower-day 1
3/12/25
( pisitils showed 25th of October) im timing from pisitils showed but diary runs from 12/12 light flip
No nutrients change today, I'm thinking about 2 weeks or so of feeding, maybe 2 more horti rawk doses before switching out to new millennium winter frost then onto flush with plain water/ph
9/12/25
Dumped nutrients, winterfrost 500ml ( 10ml a gallon) will use for 7 days then flush for 10 or so
Not sure, not sure. Maybe even give LA and Grape an extra week to get Bellini over the end instead of pulling a little early or pulling her as shes finishing up.
Next horti rawk dose probably saturday (48hr run ) then dump then new nutrients.
This is currently week7 day 1 flower from 6/12/25 ( pisitils first shown )
8/12/25
Will be dumping nutrients tomorrow, using winter frost then onto flush

Likes
4
Share


@Zelfiris
Follow
This journal hasn’t been abandoned!! I had to travel for work so I haven’t been able to tend to this grow or update this journal as I intended to. I am fortunate enough to have someone interested and capable of taking care of my grow for me and they have been doing quite well at keeping things going. Pics from day 75 since germination start!
Maintaining weekly water changes and feeding following GH 10 part chart and ph to 5.8-6.5
Chop and update coming soon!
Likes
11
Share


@GreenHarvest_Official
Follow
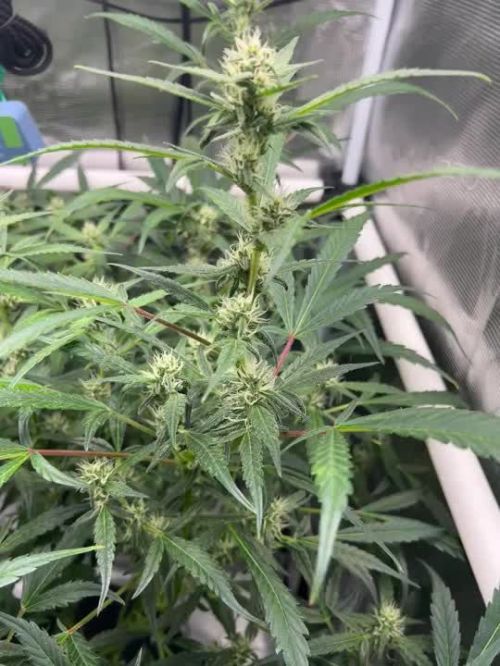
Harvest week coming up. Plant looks really good and Colas have gotten really heavy
Likes
41
Share


@Wicked_Stix
Follow
This is my favorite plant of the 16oz dutch bucket grow. She has grow fast, healthy, and has a beautiful structure. She is putting on some nice tops. She is starting to show some drooping on the top leaves in the evening since being put under the quantum boards. But she perks back up in the morning so I think she will keep chugging along. I'm thinking I will easily exceed 2 oz on harvest if I can see her to the end. Got the nutrient pumping and the lights beaming. Not much else to do from here on out

Likes
26
Share


@1Right_Angle
Follow
First pic is showing off some of the stretch that has occurred.
We start “Above the Stakes”this week.
-Sun 10th; it looks like the R plant is making a solid effort in its Stretch, which has just begun & is really happening. The L plant is flourishing and nearing the end of its own stretch. There is an image of the pair with 3’ showing on a tape measure as reference.
Jan 11 Good things are happening as the circle of branches starts fill in !
** as a side note, the Uv-B is going back on for 6hrs a cycle (3+3) after some more reading and the recent stretch action from the plant on the R. Nothing wrong with a weeks delay in nature between sisters & UV-B sounds like solid tech. Power is on again **
- Dinner-time after 4 days.
- Hole drilled in overhead corner-bracket, to help Centre the Light.
- Plants have been rotated a bit, LST (lashing-some-timber lol) re-positioned a bunch of branches/stakes, meshing the two plants together, in the middle. nuf snapshots. details as the week-ends.
-Nutrient ratios are Max’d as the volume will continue to climb for 2 more big feeds.
-rapid-start & cal/mg have already been dialed back a bit.
My watering volume per/24hr now shows my water use in metric. That # is based on the last 2 meals and I’m now looking at 5 days without nutes...
14th, Steady progress all the way round. Moving lights and supports as needed. Reach continues on the Right plant, while the Left continues to look amazing
-molasses in next feed (Sat), TDS to be updated
15th -the volume of water my plants have been receiving, has been larger each of the last 4 feedings. Extra time between feeds has been allotted and watering based on Pot weight/dryness is keeping the plants Full and Green.
-The next feed will be half the volume of the last one.
The goal tomorrow (day 5 since last feed) is to immediately satisfy the plants nutritional needs with a small meal (7 litres/2), but then it’s going to scream for more food. This time I will wait only 2 days and return to the larger volume and a 4-5 day cycle. That’s the plan.
Goal was to raise both the volume and demand for more nutrients. (Without creating a swamp) It’s been kind of patchwork getting the numbers-up, and this is the first pause in that steady climb. Both plants seem to be firing in all cylinders.
Sun Jan17
- adding Molasses to each feeding from Week 5 on in to harvest.
- 2 days since last half-feed.
Big feed tonight and 5 day gap next.
-Reached my Max H2o volume with solid Nutrition #’s. Plan is to hold levels for week 5/6 and then begin to taper nutes & volume slightly in 7/8 and hold till flush (11) & harvest (12/13)
** this grow is my best effort yet, if anybody sees or feels it’s getting “sideways”... I would love to hear about your opinion/concerns. **
The buds that are forming, actually have some substance to them. Tired of Indoor Popcorn. This grow is hapnin

Likes
24
Share


@Kirsten
Follow
24.12.24
Looking very well to me 😃 we're leaning slightly, towards the light. Otherwise I'm pleased with this one especially. I got a pack of 10 seeds, Which RQS added an extra 2 for me some seeds are very small, so I chose the biggest seed I had, of them all.
Thanks for checking out my diary 🍃 ✌️


Likes
6
Share


@nonick123
Follow
Día 44 (24/06) Riego con 250 ml H2O pH 6,5
La planta empieza a florecer de forma interesante
Día 45 (25/06) N/A
Día 46 (26/06) Riego con 500 ml H20 pH 6,5
Día 47 (27/06) N/A
Día 48 (28/06) Riego con 500 ml H20 pH 6,5
Día 49 (29/06) Riego con 500 ml Té Floración de Lurpe
Aplico Top Dress: 22 gramos de Tasty Flowers TD - Lurpe Solutions
Día 50 (30/06) N/A
💦Nutrients by Lurpe Solutions - www.lurpenaturalsolutions.com
🌱Substrate PRO-MIX HP BACILLUS + MYCORRHIZAE - www.pthorticulture.com/en/products/pro-mix-hp-biostimulant-plus-mycorrhizae
Likes
77
Share


@Basementganja
Follow
Day 14 - This girl was topped above the second node!
She's showing some variegation, but is growing very strong!
She's growing in Schultz premium potting mix, and is getting watered with de-chlorinated tap water at a dosage of 1 red solo cup every day from days 1-7, then 2 solo cups from days 7-14.
Likes
25
Share


@Joegrows
Follow
Ladies are doing ok this week. Had a heat wave with high humidity here the last few days. Been struggling to keep temps and humidity down. My Lemon AK #2 has a tad of leaf curl along the serrations, but other than that I think all is well. The frost is building nicely and the Lemon AK is getting nice and sticky. My Gorilla Glue is still a bit behind on flowering but they are making good progress. Overall I'm happy with last weeks results. Thanks for checking out my grow! 👍