
Likes
Comments
Share


Likes
Comments
Share

@HOME_GROWBOOK
Follow
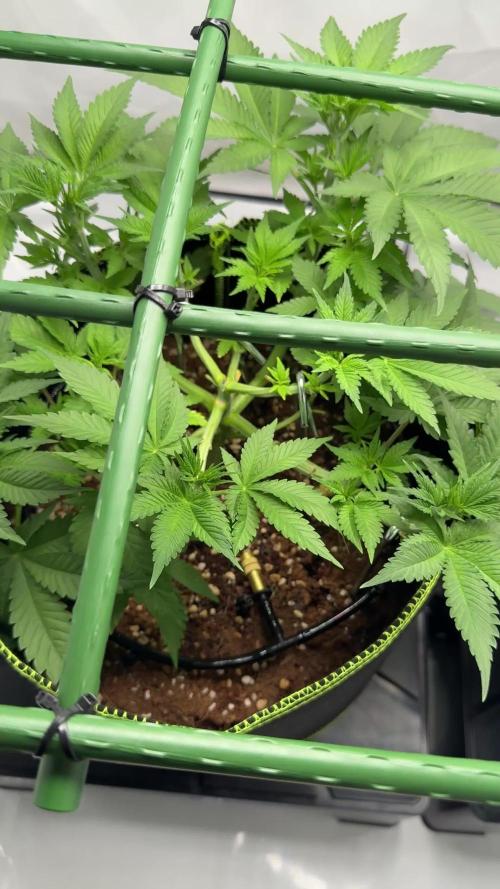
Die Pflanzen entwickeln sich prächtig und füllen nun das Netz fast vollständig aus. Beide Sorten – 24K Gold und Gelato 33 – zeigen stabiles, vitales Wachstum und reagieren hervorragend auf das strukturierte Training.
24K Gold streckt sich kraftvoll und nutzt jeden freien Platz unter dem Netz. Ihr Wuchs ist offen und energiegeladen – perfekt geeignet für die ScroG-Technik. Die Triebe wurden mehrmals umgelenkt, wodurch nun ein gleichmäßiges Blätterdach entstanden ist.
Gelato 33 wächst kompakter, mit breiten Blättern und dichter Verzweigung. Sie reagiert gut auf das horizontale Führen und bildet viele gleichwertige Triebe. Ihr buschiger Wuchs sorgt dafür, dass sich das Netz schnell und gleichmäßig füllt.
Die Tropfbewässerung läuft stabil mit mehreren kurzen Zyklen täglich.
Düngung weiterhin bei Canna Coco A + B → 4 ml/l, pH ≈ 5.8, EC ≈ 1.4.
Beide Pflanzen nehmen konstant Wasser auf und zeigen keinerlei Mangel- oder Stresssymptome.
Klimabedingungen:
🌡️ Temperatur 25–26 °C
💧 Luftfeuchtigkeit 60 %
💨 Ständige Luftbewegung für starke Stängel
Das ScroG-Gerüst ist nun vollständig installiert, die Triebe werden täglich nachjustiert.
Die Fläche ist zu rund 80 % gefüllt – in Kürze erfolgt der Wechsel in die Blütephase.
Beide Pflanzen zeigen maximales Potenzial:
• 24K Gold: explosiver, aufrechter Wuchs – perfekt für Stretch.
• Gelato 33: kompakt, dicht, extrem gleichmäßig im Aufbau.
Ein idealer Abschluss der Veg-Phase – das Training hat seine Wirkung voll entfaltet.

Likes
66
Share


@Fishcake
Follow
In total there was 160.2g.
83.5g nice prime nugs and 80g of popcorn and trim to make hash with shame I can't smoke it atm as I have a drugs test coming up

Likes
33
Share


@EeyoreTheHomie
Follow
DAY 65: Whelp, 8 weeks of shaming, abuse, experimentation, more shaming, and neglect-- the Lucky Charms plant is a f***ing female! Absolutely in-shock. I was so happy to learn she's a girl, but at the same moment was filled with so much regret, for how much better I could have treated this plant/how much larger I could have grown it. Just wow. So I took a clone cutting. It was a little small, but hopefully she takes because this plant is more resilient than a cockroach!!
The White Widow plant is steady bushin' in the veg area with the little ones. I really love how short and stocky I've managed to get this plant through all the LST. Its starting to feel. like a bonsai tree. It has certainly earned its adulthood after the catastrophe it endured in Week-5.
DAY 68: The re-potting of the Lucky Charms stunted its growth as expected, but its got a long way to stretch, so it should be able to utilize most of the new space. Itching to repot the White Widow. She's ready. Im just short on medium and space at the moment :/


Likes
15
Share


@Waveform
Follow
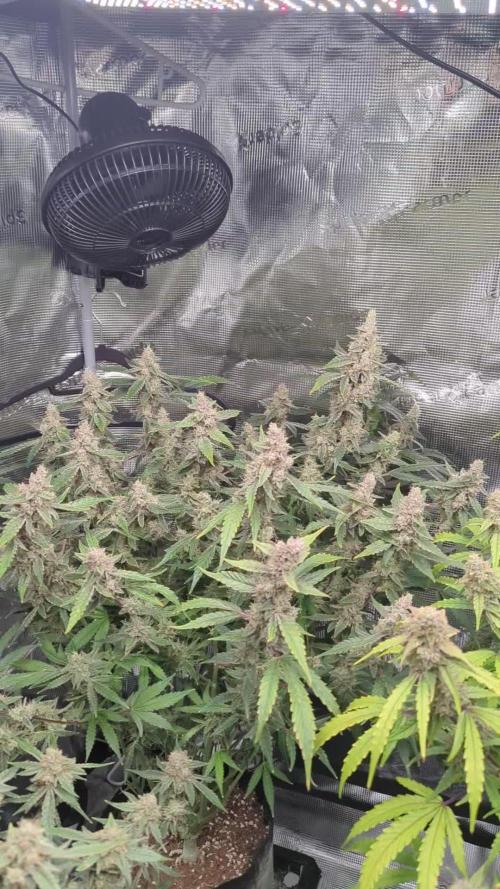
Day 60 and a new week, with lady #2 starting to show her age by getting some more yellowish fan leaves. Sugar leaves on both started to show a very lovely, deep violet color. By breeder information they should be ready in 60–63 days. I guess it will be a few more in my case.
Lady #1 is foxtailing a bit. Summer grow, definitely, and it was over 30 °C outside most of the daytimes, so I couldn’t avoid peak temperatures of more than 31 °C fully. Like every indoor grower – no restriction to this kind of plant only – I like to see self-grown green become big and bushy, but I guess with a 1,60 m tent it‘s better to stick with shorter specimen.
Even some fan leaves are getting into their autumn dress now, and wow, I like their style! Pistils are still white to more than 50%, so ne reason to check for harvest proximity or to feed them pure water only.
Day 62: With their cola foxtailing, tallest bud is now at 91 cm. Color is gaining saturation. A bit more intense leaf curl on very few of the uppermost leaves; nothing to worry about at this stage. Think I can do a microscope tour soon, even if I know it’s too early. ;)


Likes
4
Share


@DatGuyGrows
Follow
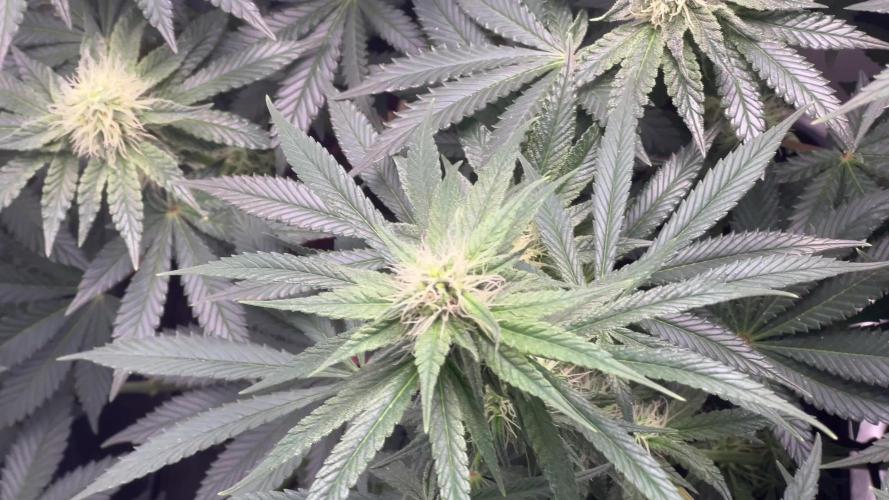
All I can say is WOW! This buds are coming in fast and strong! They are not disappointing! The smell is wonderful. Kinda smells like I opened a box of fruit loops cereal. They’ve grown a bit finally and the early flower growth spurt is finally starting. I’m hoping it picks up a bit cause I have a feeling these are gonna be some large heavy buds 😁

Likes
11
Share


@Eddjack
Follow
La pianta è carica di nutrienti sana e forte. Continua una fioritura lenta non vedo l ora che esploda ..comunque ha già un buon profumo ed è bella appiccicosa ...promette bene
Dajeforte growers

Likes
12
Share


@MadeInGermany
Follow
Harvest day 70
since time switch
to 12 / 12 h
Hey guys :-)
Finally it's time 💚
The lady is done the large leaves have been removed and hung upside down to dry in the dark drying room.
You can now stay there for 13-15 days at a temperature of 18-20 degrees and 55-62% humidity.
After 13-15 days it is neatly trimmed by hand and placed in jars with boveda packs 62.
After 4 weeks Boveda 58% come in and are ready for testing ;-).
After everything has been cut cleanly, the last update comes with the smoke report and the finished pictures.
Let's get to the plant 💚.
First of all I would like to compliment Green House for this genetics.
Unfortunately, the rating system at Growdiaries is a bit strange because I have to give the stars before the Smoke Report and in the end it might have led to more stars in terms of taste.
The growth was great from start to finish.
She had no problems at all and also had no problems with animals 👍.
I'm amazed at the great smell the beautiful buds give off😀.
Of course I cut cuttings and if the taste is as good as the smell it will be grown again ☺️.
A final report comes with the Smoke Report.
Until then, I would like to say thank you to the whole Green House team and wish you all the best fun with the diary 💚🙏🏻
Have fun and stay healthy 💚🙏🏻
👇🏼👇🏼👇🏼👇🏼👇🏼👇🏼👇🏼👇🏼👇🏼👇🏼👇🏼👇🏼
‘Powered by GreenHouse Feeding’
Copy the link for 10% off all Nutrients 👇🏼
http://shop.greenhousefeeding.com/
affiliate/madelngermany_passiongrower/
👇🏼👇🏼👇🏼👇🏼👇🏼👇🏼👇🏼👇🏼👇🏼👇🏼👇🏼👇🏼
Water 💧 💧💧
Osmosis water mixed with Cal/Mag (24 hours stale that the chlorine evaporates) to 290 ppm and Ph with Ph- to 5.8 - 6.4
MadeInGermany

Likes
2
Share


@AlpenZilla
Follow
🌸 Flowering – Week 7 | Day 48 (Day 83 overall)
Quick update focused on the Future #1 plants.
It has become quite clear by now that both Future #1 plants need more time than originally expected. In terms of development, they are still clearly behind and will very likely require at least 3 more weeks, possibly longer depending on how they progress over the final stretch.
At this stage, the plan is simply to keep the run stable, continue without unnecessary changes, and give the plants the time they need to fully mature.
Likes
4
Share


@Ryno1990
Follow
Snow Panda fast flowering photo starting veg from seedling stage she grew weird as she is missing one side of her cotyledon leafs as they did not grow
The Snow Panda is starting t9 come along good at the ending days of week 1 of veg now in a 1 gallon pot
Processing
Likes
5
Share


@Bombtofu
Follow
I need to get my l.s.t. done. Plan to this weekend. Have been alternating waterings between regular water and water with 2.5ml of fox farm grow big. Have watered all times with 200ml of water and the solution water mix. Been keeping the humidity at about 45% temp around 68. Can tell a huge difference in sizes of the plants and their container sizes. Will be going with at least 3gal pots next grow. Still using a 25w light as well. Will be upgrading that asap. Thanks for the view. And as always, stay safe.

Likes
6
Share


@Mr_nugs_lover_David
Follow
The all 5 seedlings are looking fantastic and very healthy, onenof them its a little too small I think but let's see what happens, stay tuned to see how this 5 dina cookies perform! 💛💚❤️🔝👨🌾


Likes
181
Share


@GODSGIFT_2005_JM
Follow
🍼Greenhouse Feeding BioGrow
☀️ by VIPARSPECTRA (models: P2000 & XS 2000)
⛺️MARSHYDRO
The ⛺️ has a small door 🚪 on the sides which is useful for mid section groom room work. 🤩
🌱 by ‘GARDEN OF GREEN’

Likes
7
Share

@Mr_nugs_lover_David
Follow
The plants look stunning, beautiful strain to grow and work with for sure, I cannot wait to smoke those buds, the fragrance has instantly make me want to run her again most definitely, the stretch has been really noticeable and and both phenos have a lot of flowrs, looks very productive plants, looks like a solid strain, both phenos smell the exact same, this 4th week of flower it's gonna be very exciting, I only water 💦 the medium when dry and that's it, FLO Living soil blends does a sensational performance keeping your plants well fed all the way from seed and also provides you amazing results in terms of quality of the flowers, the smell is so pure and it makes every strain perform to its best, I'm definitely in love with this living soil blend, and also in love with this couple of badazz OG cheese guys. Please stay tuned to see how this ladies keep developing! ❤️💚✌️

Likes
12
Share

@ohcibi
Follow
Approaching the finish line. Fertilizer is now at its final dose. Both plants stopped growing now and started to build thick buds. Ken in fact is way ahead in terms of buds but it might be because he Hase a little bit less in number. It’s possible that I trained Ryu too much for his pot size 😆😆. But let’s see. Both looking very good and a lot more powerful than in my first grow.
Water intake is still massive. The top soil is rock solid while draining water super fast which must mean the pots are filled with massive roots. The erected teeth came down a bit but they were never that severe in the first place so I’m still not worried about that. I skipped one day of watering to account for possible slight overfeeding but I mean, today’s watering then was with the increased dose of fert 😆😆. I know I’m pushing it a little bit but that’s deliberate. I have high demands both in mass and quality so my approach is riding the edge as good as possible from the beginning 😆
Likes
224
Share


@Hellishjam
Follow
Well I'm not really sure where to start......Got a lot of work done around the garden this week. Got the first load of boards up on the fence and I've been bracing as I go. Grass all trimmed down and some of the inside of the plants, it was a mosquito magnet in there, wasn't fit to be in, it has gotten better. I gave them what I had left of Gaia Green 4-4-4, which was 3 cups each a little shy of what I wanted to put in so I have another bag coming here very shortly and we will top it up then.So far between everything in the garden right now we have went thru 20kg of 4-4-4, minus 6 cups for the indoor peyote super soil. Also getting some trellis as I thought I had enough from last year but cant seem to find it anywhere. They're getting pretty big now kinda makes me worry a bit, never thought they would be this big.....
Purple Punch, #1: 73 inches, #2: 76 inches, #3: 78 inches
Orange Sherbert, #1: 76 inches, #2: 72 inches, #3: 69 inches
I got some lady bugs today and have released them. I'm hoping to be able to pick up enough boards next time I come home that I can finish closing it in. I won't be closing in the south side, I'm just going to be using the cage, please don't make me regret this...... I would really like to see the stretch set in like NOW but thats not going to happen, maybe next time I'm home we'll start to see flowers, if they don't get wrecked in the mean time, gotta get my wall up!!!!! I'm also going to be setting up an automated curing system this week, I'll have pictures up next week.


Likes
8
Share


@Seventease
Follow
24/3 Harvested as soon as i saw a few amber thrichs here and there. I dont like too much cbn.
I learned i need to defoliate more next run, the bottom buds seem kind off airy because of lack of light penetration. I used to grow with stronger HPS lights before and now getting into the LED game. A little switch for me but ill get the hang of it.
I dont have a hanging scale, ill put the dry weight here on my next post in a couple weeks.
1/4 shes dry and started to trim. Gotta clean the scissors every bud 😄 onto trim jail and curing. Will test a popcorn bud tonight
2/4 everything is trimmed and in grove bags. Froze the trim overnight and the popcorn buds and made dry sift hash this morning.


