


Likes
8
Share


@Silverback_Guerilla
Follow
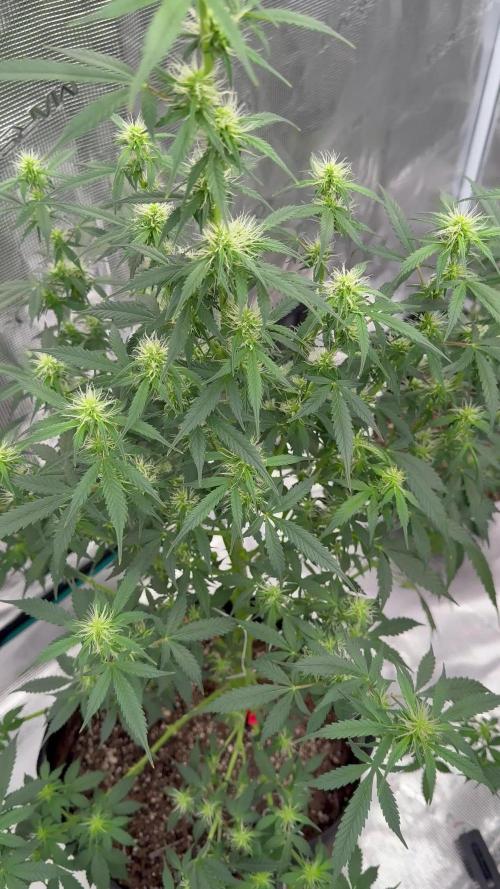
4/1:
Fed today after topdressing with guano and rock phosphate.
4/3:
Flipped to 12/12 today and started UVB stressing with 2 x 30-minute sessions a day.
4/4:
Fed today and foliar fed with Axiom harpin proteins and boom boom spray.
4/7:
Fed today..started adding a little Open Sesame and Signal to the mix along with sweet & sticky, One, silica, and calmag.

Likes
2
Share

@NAG420
Follow
Did a boat load of work on her ran out of freaking tie downs will run a garb some this week want to open her up some more. Did some l lollipop also not a lot but enough to get the energy going to the top sites for the next few weeks.
Likes
2
Share


@803AutoGrower
Follow
These ladies are huge. Buds are super dense and they are getting close. Starting flush 3 days ago. Had a little light. Stress but I think they Will be ok


Likes
2
Share


@eldruida_lamota
Follow
Venga familia que ya viene la cosecha de estas Pink Runtz de RoyalQueenSeeds , que ganas que tenia ya de darles machetazo.
No veas que pinta que tienen estas plantas.
Las flores aparte se ven bien resinosas, y con unos tonos muy llamativos.
a sido una genética con la que disfruté mucho cultivarla, es algo complicada cultivarla pero merece la pena si eres cultivador con experiencia no te será problema cosechar.
Hasta aquí es todo , espero que lo disfrutéis, buenos humos 💨💨.

Likes
29
Share


@Myrcene_Dream
Follow
Grew nicely in the chalice and needed to be watered daily. Produced some beautiful buds and a pretty fat cola. Had no issues I had to worry about and overall grew a lot better than expected!

Likes
25
Share


@pifflestikkz
Follow
Day 43
12/08/24 Monday
Feed today, it was warm again so they drank the whole 300ml each so I have topped up another 150ml to see run off to prevent salt build up.
Thriving 😍✌️💚
Day 45
14/08/24 Saturday
Another watering today using de-chlorinated tap water pH 6 only.
Day 48
17/08/24 Saturday
Another watering today using de-chlorinated tap water pH 6 only.
Picture and video update ✌️ 💚

Likes
23
Share

@eldruida_lamota
Follow
Buenos días familia, actualizamos la 5 semana de floración.
Las flores cojen forma y volumen, gran central, unificándo en toda la rama.
50% de humedad maximo y 28 grados De maxima.
Incluimos OBERDRIVE de advanced nutrients y quitamos big bud.
Desprenden un olor bastante agradable y con tonalidades cítricas.

Likes
18
Share


@BlueBroccoli
Follow
2/15 - Plants are all looking awesome. Leaves are starting to fade out a little bit. Buds are bulking up and some orange stigmas are starting to show. Also noticing some slight foxtailing in a few of the colas which I believe to be genetics and not stress related. Thinking one more week of nutrients, then a week of flushing, and then we might be ready for harvest.
Processing
Likes
57
Share

@Silverback_Guerilla
Follow
12/15:
Some plants are taking too long to transition and stretching beyond my space constraints, so I dialed the photoperiod back to 12/12.
12/16:
Fed today and rotated edge plants. Added another 150w of 3000k below the canopy.
12/17:
Worked on ventilation...no A/C necessary now, as I'm using another AC Infinity 6" fan to intake outdoor air into the closet whenever temps reach 75f..and it's been cold as hell outside.👍
The final trick will be to replace the 6" exhaust fan with an 8" so as to be able to fully exchange the closet air faster ...but that's gonna have to wait til next season.

Likes
5
Share


@Naujas
Follow
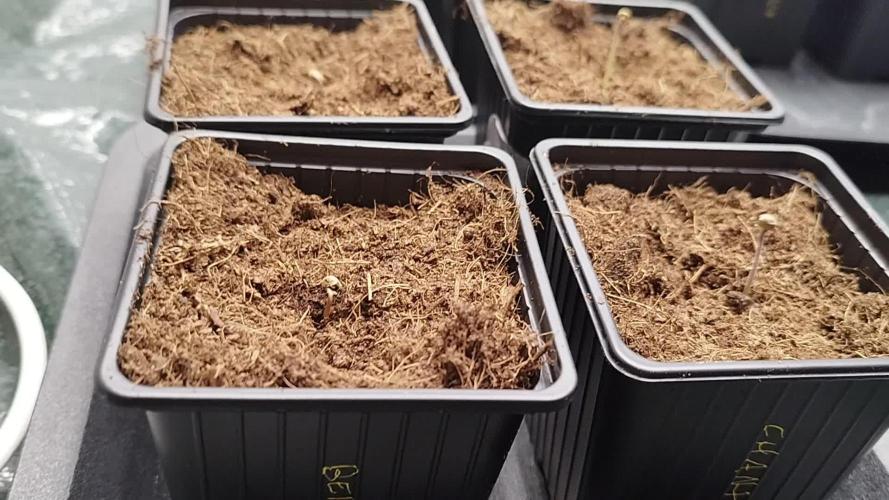
mega girl, she has already left with her friends to her permanent home:) I will visit them once a week:).
Likes
12
Share


@WulfBlud
Follow
Week 10 and I believe it is time to stop nutrients and flush with fresh PHd water at 6.1.

Likes
74
Share


@KrautFabrik
Follow
Day 60: flush 💦
Pictures are taken on day 62📸
--------------------------------------------
I found again some bud rot 😑 cutted the hole bud 😑 (last pictures)
Happy growing 🍧🌱


Likes
5
Share


@Bryankush
Follow
Molto bene le ragazze si stanno ingrassando rapidamente e mangiano bene😈, sono congelate😁
Giorno 2 annaffiata con 2L di acqua
Giorno 6 in un qualche modo sono riuscito a guadagnare quei 10 cm di altezza sulla lampada per crescere bene la cima centrale😅😁
Likes
11
Share


@StartGrowingShxt
Follow
Week 15
May 21
-ladies are still swelling all but the grapefruit pheno but she is frostier than the rest so good with the bad I guess hopefully she just takes longer to finish
-just been ferments with recharge mostly and been doing well alternating between top and bottom watering and watering every other day
-light burn and possible calcium deficiency on one plant but she’s the chunkiest girl and might finish before the rest
-smooth sailing other than that
Likes
4
Share

@eldruida_lamota
Follow
Vamos familia, actualizamos la primera semana de floración de estas Permanent Maker de Seedstockers.
La temperatura que estuvo entre los 24-26 grados y humedad dentro de los rangos correctos.
Esta semana cambiamos a 12 horas luz,12 horas de oscuridad, estiraron bien y ensancharon bastante también, el color es verde sano.
Se nota que los nutrientes de la marca Agrobeta hacen sus funciones, añadí ya las dosis de floración.
- os dejo por aquí un CÓDIGO: Eldruida
Descuento para la tienda de MARS HYDRO.
https://www.mars-hydro.com
Hasta aquí todo, Buenos humos 💨💨💨

Likes
4
Share


Processing
Likes
17
Share


@LockDownGrow
Follow
So I had absolutely no ill effect on the plants at at all moving from the green buzz veg feed too the house & garden soil a&b feeds,
I did not even given them a water only inbetween the two,
I also went straight in with 50% the recommended dose stated on the house & Gardens bottles this switched happened the day before week 5 none showed any signed of defects or deficiency intact they exploded into life over night and then every day after that, I have been using the green buzz fast buds as a folar spry appied too the leaves of the early flower formation after lights out,
They seemed too love that too and I also kept the note roots going in,
I also started too apply C-RESULT at the fullbl dose stated on the bottle,
The plants live this stuff if you have not tried it do it,
I am not sponcered by c-result I was given this by my local grow store,
It brings all the nutrients straight too the roots it states,
All I know is this stuff triggers the plants too suck the pots dry in 24 hours,
So make sure you have your feed bucket fully in order before adding this stuff as a mistake here could cost you,
But get it right and in 24 hours these little autos doubled in size,
It states too used week one of flower only and smells like a sewer lol
I have today day one of week 6
Started too add house & garden
Bud XL at half strength too increase next week and also I added there top shooter at 1ml per liter of water as 7 as I plan too removed all chemicals exactly as of day 1 of week 7 leaving me week 9 clean, I did not top any of these girls, I am training all the shooting tips too my scrog netting the best I can due too very limited space in the grow space,
And am praying for some of the promised purple leaves on the fast buds Web site,
I has on lemon pie this round that is 2 weeks behind the rest due too non germination but I am wondering if a staggered planting each plant exactly one week behind each other would give me a little more canapé space and the treat of harvesting a plant every week,
Using the skyline 1000 only
I did not too any of these autos
2 x strawberry cheese cake
2 x lemon pie
4 x fyah
Sounds like a plan too me,
Thanks for reading
Processing
Likes
46
Share


@PureMedicin
Follow
Nice growth and bud developtment. Hps still doing its thing while im sitting back and relaxing. Got to keep an hawk eye on watering. I feed full strenght going over to full canna so they were transplanted into soil. Clones doing good but the Lemon skunk clone dont feel to good. Lets see what the week will bring.
