The Grow Awards 2026 🏆 


Likes
Comments
Share
@The_Lonely_Farmer
Follow
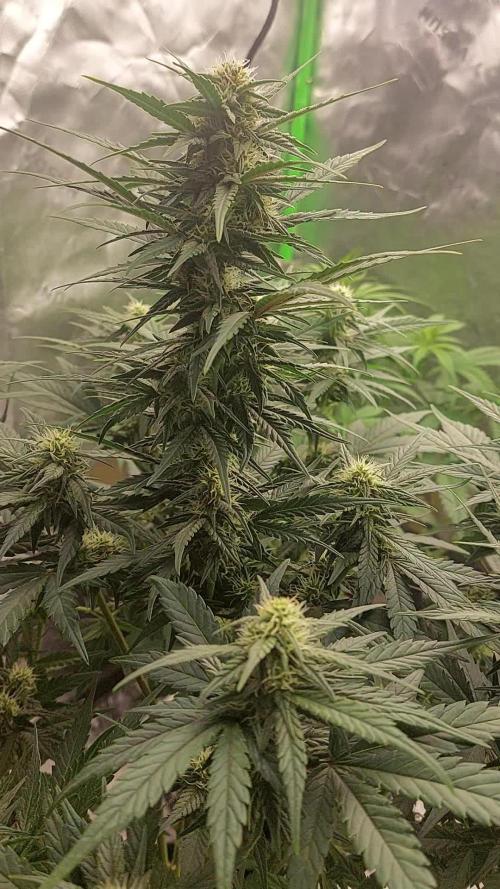
So I have decided too pot up the 3 toronjaz girls into bigger pots, 1 because the older girl needed it but 2 also because I feel they needed space and a new home too stretch their roots out 🌱
The above blend will hopefully help these girls soldier through these first crucial weeks, let's keep our fingers crossed 🤞
I'll be doing light lst over the next week for the older girl, maybe top her end of week 3 maybe 4 depending on how she grows 🌱
Light feeds slow and steady will do as new too aptus buy I hope I can do well with them as they seem really simple too use and also their website has lots of usefull info incase I'm in need 🙏👏👊
These will be tidied up and given this space too their selves once my fastbuds testers in the back there are ready for new pots and their new space I have waiting 🌱

Likes
37
Share
@DaddyPrime2
Follow
5/5/2024
Pistils pistils pistils
5/8 these plants are fucking exploding! Super exciting to see them like this. Pistils everywhere and they’re just STACKING! don’t even see budlets yet, just pistils. The structure of these plants is beautiful. They handle training fairly well. I topped one and super cropped it and did a bit of lst. I was feeling impatient so I decided to see what happened if I pushed the one a little harder and left the other to grow naturally.

Likes
20
Share
@ukterpdoc
Follow
LST DONE TODAY NEARLY ALL OF THEM 2 JUST SEEM POINTLESS TO PULL AROUND BUT

Likes
2
Share
@Lazpool
Follow
She is gorgeous. Rub a stem or lightly touch a bud and your left with a deep berry smell with a backing of the earthy kush. Hope to see the flowers put on some real mass soon

Likes
6
Share
@masterofsmeagol
Follow
4/13 10TH planet is doing phenomenal under those aerogarden lights. I'll wait a little bit then I'll bring them over with the others. I'm comparing the growth to the growth of the mk ultra and the chem dog as they are of a more similar age. I watered the 2 mk ultra and the chem dog #4. The others looked alright so I'll check later on. The three in the middle will probably be culled. The may recover but if they don't it doesn't really matter. I'll have what I need. I'm super excited for this season. I shouldve done more 10th planet. The "kush" seedlings are starting to take off. The leaves are finally starting to get bigger and they are developing new growth.
WENT BACK OVER AT 1:30. PLANTS WILL NEED TO BE WATERED IN THE MORNING. ONE PLANT WAS DOWN TO 199 GRAMS BUT IT HAS A LITTLE LESS SOIL IN THE CUP. THEY ARE GROWING AT A MORE RAPID PACE AND I DONT WANT TO INTERRUPT THAT. OTHER CUPS WERE LOW BUT NOT READY TO BE WATERED. I THINK EITHER WAY IT WOULD BE FINE BUT IM ERRING ON THE EDGE OF CAUTION. I MAYBE SHOULDVE WATERED THE DRY ONE BUT HINDSIGHT IS 20/20 AND I KIND OF WANT THEM TO BE ON A SIMILAR SCHEDULE. I GRABVED A TACK AND CHECKED THE DRAIMAGE IN THE BOTTOM. I ADDED A FEW MORE HOLES OB THE BOTTOM SIDE. I MAY JUST HAVE TO JUNK THAT MIDDLE ROW OF 3 I STRESSED BY DOING EXACTLY WHAT THE LIGHT MANUAL SAID TO DO. OH WELL I PLANNED FOR THAT WITH THE 2 MK ULTRAS AND THE CHEM DOG #4. ALL ARE DOING GREAT. SOME OF THE SOECIAL AND PINK KUSH ARE GETTING THEIR TERTIARY SET OF LEAVES SO THEY ARE PULLING OUT AND GOING TO TOWN. THE ITHER ONES (MK ULTRA, CHEM DOG, 10TH PLANET) THAT DIDNT GET STRESSED SEEM TO BE GROWING AT A FASTER RATE. I THINK I MIGHT TRY AN AUTO THIS YEAR. I HAVE A FEW BEANS. ILL THINK ABOUT IT BUT IT WOULD BE NICE TO HAVE FRESH WEED HALF-WAY THROUGH THE SUMMER.
4/14 WATERED ALL THE KUSH WITH A SHOT GLASS. THEY WERE VERY DRY. ONE WAS IN THE 180'S. I FOUND THAT ONE OF THE PLANTS THAT WAS STINTED HAS FALLEN OVER AND WAS LIMP AGAINST THE CUP. I IMMEDIATELY REMOVED TGE TWO SEEDLINGS THAT WERE BY FAR THE WORST AND I ASSUMED I WAS LOSING. I TOOK THE PEAT PELLET OUT AND THE TAPROOT HAD BARELY PENETRATED ONE AND HADN'T PENETRATED IT AT ALL ON THE OTHER ONE. IM NOT USING THOSE PEAT PELLETS AGAIN. ITS WIERD. I'VE NEVER HAD THIS PROBLEM BEFORE. PLANTS SEEM TO BE DOING GOOD. IM CONSIDERING STARTING ANOTHER SEED OR TWO. MAYBE AN AUTO.
Edit. I added mykos amd happy happy frog to the 10th planet in the solo cups. They are already to the top. I watered them with a shot glass of water amd some mykos.
4/15 I added soil to the top of the cup on kush plants and watered them with a shot glass. It seems like I may need to up the water as it's only lasting about a day. I'm seeing some slight stretching but I have no idea why. They are just seedlings and it's a 150watt hps light! Last year I used 2! I think they needed to stay under the cfl's a little longer and thatci nightve stressed them prematurelyremoving some helmet heads. Or maybe they are having problems breaking through the pear netting. I'll tell you one thing im NEVER using peat pellets again. I have other seeds and autos I could start if needed. I have what i need but if I lose a few more I'll be pissed. Maybe better to startca couole more. Those 10thvplanet are doing amazing and blowing past everything else. They look so healthy. I'm going to download a light meter on dad's iPhone and get some readings with all the different lights today.
4/16 I was able to download a FREE app for a light meter. Apple has one bit you have to pay for readings of any of the "good" lights. I had a very hurried morning and didn't take any pictures. That one special kush that was burned like the other two I threw away (or damaged when I removed the helmet head) is starting to look like it has some NEW growth. I've kept it but a little ways away from the others. I weighed all cups and they didn't seem to need water. I AGAIN packed dry soil into a cup to get a reading. Still 200. When they get within 10 grams of dry weight I'll water them. I measured and found I had the light further away than it should be. I lowered it to approx 3ft from the top of the canopy. I'll try to map the area and see what I'm getting for results. Then I'll plug in my L.E.D and see what I get. I only lowered the light because readings (that may be inaccurate) say it's not enough and two years ago when I used this light i used two. That is unnecessary I think for seedlings. I'm just trying to get them through seedling phase intact so I can move to veg and switch my light. Transplantvinto one gallons. This is where patience comes in. I'm sure everything will be fine. I just am a worrier.
4/17 I used that light meter to check the ppfd. It says it should be between 100-200 but it was only reading at like 65 and this was after I lowered the light. I'd need to go down a ways to get anywhere close. I tried to check my l.e.d and that was low so I can switch back fine. Especially with the light meter app. However the plants seem to be doing better and have tertiary leaves so I'm hesitant to change things when they seem like they are having a growth spurt. I may take the 2 mk ultras and put them with 10th planet since they are doing so good. Won't let me upload pictures. WATERED ALL THE KUSH WITH A SHOT GLASS.
EDIT: WENT BACK OVER AND USED THE PHONE APP METER ON THE LATEST IPHONE. I LOWERED THE LIGHT RO A LITTLE UNDER THREE FEET. THAT GAVE ME ABOUT 100-120 ON THE HOTTEST SPOT AND LESS FURTHER AWAY OBVIOUSLY. IM TAKING THIS WITH A GRAIN OF SALT. I MEASURED ME 100 WATT LED AND WITH BOTH SWITCHES ON I CAN REACH OVER 100 EASY FROM FAIRLY FAR AWAY. ILL BE MONITORING GROWTH AND DECIDING HOW TO MOVE FORWARD FROM THERE. I TOOK THE DOMES OFF THE 19TH PLANET BUT THE LEAF TIPS STARTED TO CURL. THE NEED TO BE HARDWNED OFF. THE CFL WAS TO CLOEE AND BRIGHT BUT MORE SO WAS THE RH OF THIS BUILDING WHICH IS PRACTICALLY NOTHING. ILL HAVE TO MOCE THEM WITH THE OTHERS. UNTIL THEN I POKED HOLES WITH A TAC ALL OVER THE DOME. THAT WAY IT CAN VENT A LITTLE BIT. I'LL SLOWLY ACCLIMATE UT TO THE LOW RH INDOORS BEFORE THE GO TO THE 100RH OUTDOORS LOL.
4/18 Didn't water this morning because things were over 20grams dry weight. Came back around one and weighed and most were within the 20 grams. One was under 200. I can see more growth since the light adjustment but I still see some stretching. But I've seen noticeable growth in a short period. I'm contemplating waiting to see what happens for a few days or to just switch to my l.e.d using my meter as a guide. Even though the box tells you how far to hang it. I'm bringing the aerogarden over to the grow tomorrow. I have a few more as well. I'm going to check that with the light meter and am considering putting the mk ultras and maybe the chem dog under that. I mean those are doing great. I poked more holes in the dome and have been exposing the plants to low rh and increased light. They don't have immediate effects anymore. I have the domes popped open too. They are gett9ng acclimated. Realistically I'm wondering if I should just pop more 10th planet or mk ultra or an auto but looking through my other diaries things will be fine. I worry to much and I usually grow clones. Outdoors. Plus most of my stuff was stolen so I'm making use of things the best I can. My money is going into good soil. I also checked the temperature at the hottest spot under the light and it was 80 degrees. This is telling my I can't really lower my light anymore. I've got some thinking to do.
EDIT: 10th Planet has done well all day without a humidity dome in this extremely low rh. I'm going to bring them and the aerogarden to the grow tomorrow. I have my l.e.d setup to test. I plan to use the light meter to see what is closest to the correct ppfd. A lot of it will be gut feeling too. I'm interested to see the reading on the new aerogarden bulbs. Those seedlings are doing awesome.
4/19 Didn't water this morning I don't think. I was hurried. Got back and found one seedling that had been growing some bigger leaves just flat on the cup. Luckily I had noticed it drooping (should've watered) and picked up a straw on the way home. It weighed 180 grams. Everything was low and I MAY have watered yesterday bit I don't think so. With this hps so close its bringing the temp up to 80. I checked the cfl aerogarden lights. Wow are those bright! I had to raise them to get in range. I put the mk ultra and chemdog under the aerogardeb light. It's about 300 bit it has a couple hot spots that bring it up to like 4k-5k. The 10th planet's loved it though and did great. I held my hand over the plants and it seemed ok. Now for the hps light and the pink kush and special kush #1. I put my tatu 100 watt (1000 watt equivelant lol) 248ns above the seedlings I had just watered. Since that hps dried everything out so much I gave them 2 shot glasses. I'll keep monitoring things. I feel like this is the best bet for me. If I fuck something up I'll have to pop more 10th planet and mk ultra ect. But I've got to make sure things are in the right range. If it stretches a little I'll just have to repot it a little sooner than the others. When they outgrow the solos they go to 1 gallon. Tomorrow I'm picking up AT LEAST a bag of fox farm ocean forest so I'll be ready for transplant when necessary. I need to get all my pots together and bring the other hps to my cousin to fix. However when they get bigger I might just use the l.e.d AND the hps if I had too.


Likes
5
Share
@HelioCentricGrows
Follow
Well got to the end with a nice harverst. smoke is good.. rosin is better!
Likes
33
Share
@Belverde
Follow
Welcome growers & co.
I have grown two specimens of this genetics.
One grew it maintaining its original structure, where a long central top prevailed .... but quite loaded even below ..
The other one I decided instead to cut the tip, making a simple topping, thus creating seven / eight main peaks
I highly recommend topping or LST with this strain as she responds very well to training and is a great producer
The aroma is also definitely 100% Blueberry

Likes
3
Share
@AndrewC
Follow
Not much to report this week. This experiment has taught me plenty of lessons about this method. I suspect this crop will be a pretty large loss. The soil is too hot given the amount of left over wash from previous grow, the new seed was doing real well early in the week, but as it reached out and grew roots it just food nutrient burn :|
One of the initial seeds (front left) has already started to enter flower phase. I suspect it will start to thrive a bit better , as it nute requirements will go up.

Likes
7
Share
@eldruida_lamota
Follow
Familia, volvemos con la Segunda semana de estas Gelato Olandese de Dutchfem.
Y menudos árboles que se han formado, no paran de crecer, y se están formando ya esas preflores que marcan ya el proceso de floración.
Estas semanas iremos viendo cómo progresan y van formándose las colas de flores.
Agrobeta:
https://www.agrobeta.com/agrobetatiendaonline/36-abonos-canamo
Mars hydro:
Code discount: EL420
https://www.mars-hydro.com/
Las maximas de temperatura no superan los 26 grados y las mínimas no bajan 20, así que no me puedo quejar.
Los niveles de humedad también son los correctos van entre 50%/65% de humedad relativa.
Por supuesto el Ph lo estamos dejando alrededor de 6.
Hasta aquí es todo, buenos humos 💨💨💨.

Likes
30
Share
@WeWantItToGrow
Follow
This week has been one of great gains in both size and vegetation we have seen a vertical leap in two plants that is astronomical almost 4 inches in a week! Had to do some pruning to expose new bud and a little bit of low stress training on to plants to see if we can expose light to the underside and perhaps get a little more love out of our lower buds The stalk size on almost all of these plants is almost as big as your thumb but on one it is actually relatively skinny that is the one we’re doing the low stress training on we just started the low stress training and it is taking very well to it One of these plants is extremely dark in color on the vegetation and has typically about 11 fingers per leaf! Not sure what that means yet

Likes
9
Share
@HIAZ_urbanbudfarmer
Follow
So far she has been going well!
Planted her into make shift Dwc set up & put her into my cloning area under a 100watt VIPER SPECTRA led grow light.
Likes
34
Share
@Fronti89
Follow
Start Woche 6
Tag 35 ein wenig Entlaubt .
Hinten Rechts ist mein Sorgenkind ...Sie hatte von Anfang an nur ein Keimblatt und war dementsprechend auch die Kleinste . Nach dem ich sie höher gestellt habe hatt Sie etwas nachgezogen , momentan ist Sie ungefähr 10cm kleiner als die anderen und dies war wohl der Grund der leichten überdüngung ! Aber alles wieder im Griff 😉😎


Likes
28
Share
@BudsBanditUK
Follow
Nothing to report. Very rapid growth this week. She is already bigger than the other plants the same age. Only feeding water, will add nutes maybe on week 3. Also start training this week.
Likes
16
Share
@Geili_Seili_fireinfireout
Follow
Beginn woche 7.
Duftet wie eine prinzessin. Nach lemon,weihrauch usw..... i love it
Ärgerlich das ich die ersten 3 wochen kleine fehler gemacht habe und sie mindestens 1 woche zu früh in 12/12 geschickt habe. Aber sie wird sicherlich öfters bei mir zu sehn sein. Da sollte ich es doch mal schaffen sie zu höchstleistungen zu treiben.
Die geilsten und saubersten stecklinge gibts wie immer bei ROOTS-FARMS. the best in austria and maybe europe👌😋🔥

Likes
18
Share
@weedacouple
Follow
this baby has had some problems growing, but she is so strong and now we cant wait to smoke her. she has a delicate smell.
Likes
120
Share
@OrganicNature420
Follow
Germination date 🌱 02/12/2021
Day 22 27/12/2021
Strain 🍁 Barneys Farm Biscotti Mintz
(Biscotti x Mintz)
THC% • 30% 🤤
💡 Mars Hydro FC-E6500
• Power draw 650W + 5%
• Max coverage 5 x 5
• LED 3978 pcs high quality chips
• Max Yield 2.5g / watt
• Noise level 0 DB
• Removable Driver & Light bars
• Daisy chain
• Fast cool system
https://marshydroled.co.uk/ 🇬🇧
PROMO CODE • (organicnature420) DISCOUNT
https://www.mars-hydro.com/ 🇺🇲
PROMO CODE • (ORG420) DISCOUNT 👍🏻
⛺ Mars Hydro 150 x 150 x 200cm
📤📥 AC infinity 6inch
💧 10lt dehumidifier
❄️ 3.1kw air con system
💉 Nutrients GreenBuzzLiquids 🇩🇪
⭐⭐⭐⭐⭐
Organic Grow Liquid • 1-4ml until 2wk flower
Organic Bloom Liquid • 2-4ml flower stage
Organic More PK • 2-4ml +wk3 of flower
Organic Calmag • 1-2ml/lt whole grow
Fast Plants Spray • first 2wks at night lights off
More Roots • 2-5ml veg +2wks flower
Fast Buds • 5ml 12days before flower until wk1
Humic Acid Plus • 2-5ml whole grow
Growzyme • 2-5ml whole grow
Big Fruits • 2-5ml flower stage
Clean Fruits • 5ml flush 1wk
Ph powder
Root Gel
Living Organics
https://greenbuzzliquids.com/
PROMO CODE • organicnature420 15% off ✌️🏼
🥥 Growing Media • Coco Coir
Notes 📝
Coming along nicely no problems. Onto a new week and the lot will get topped. Need to buy a net and I'm sorted. Deciding how long to veg for. Need to give them a proper flush this week as I've held off as of Christmas. Hope you all had a lovely holiday, I'm back to work but not really bothered. Happy holidays everyone 💚
Discount codes in bio for Mars and GreenBuzzLiquids 👍🏻
Processing
Likes
5
Share

Processing
Likes
12
Share
@2Stones1Bird
Follow
Checkout my Instagram @smallbudz to see the Small budget grow setup for indoor use, low watt, low heat, low noise, step by step.
04/01/2020 - Did the last defoliation, removed about 1/4 of plant material.
06/01/2020 - Fed her 1.5l of 6.5PH water with 0,3ml Cal Mag (Atami) 0,25ml of Grow, 0,6ml of Bloom and 0,5ml Max, and 1ml of each: Heaven, Alga-mic and Vera, noticed some run off, I use about 1/3 of the nutrient dosage on the chart, to achieve about 200/300PPM (500 scale).

Likes
17
Share
@Hashy
Follow
Week 9
Light cycle=12/12
Light Power=170w
Extractor controller settings
High temp=24c
Low temp= c
Temp step=0c
High Rh= 50%
Low Rh= %
Rh step=0%
Speed max=10
Speed min=1
Smart controller settings (during lights on).
Lights on=10.01-21.59
Radiator on= below 22.0c
Radiator off= above 23.0c
Smart controller settings (during lights off).
Lights off=22.00-10.00
Radiator on= below 18c
Radiator off= above 19c
Fri 16/2/24
💧💧💧💧💧💧💧💧💧💧💧💧💧💧💧💧
Method= automatic
Feed=bloom nutes.
Neutralise=0.1ml/L
Silicon=1.0ml/L
Calmag=0.75ml/L
Terra Bloom=4.0ml/L
Sumo Boost=2.0ml/L
Roots=0.2ml/L
Easy Ph down=0.11ml/L
Ec=1.85 PH=6.4/6.6
Time start=12.00pm
Finish time=13.45pm
(11×5 minute runs with 5 minute gaps)
Total flow rate=190ml/min
Flow rate per plant=47ml/min.
Total volume made=13L(13.5L)
Total volume left=3L
Total volume used=10.5L
Volume per plant=2.6L (Est)
Runoff.
Total runoff=1.2L
Ec=2.13 PH=6.1/6.3
💧💧💧💧💧💧💧💧💧💧💧💧💧💧💧💧
#1 (Day 57)(Day 19 flower)
📋 she is starting to show signs of light stress. Lowered light power from 180w to 170w. New DLi=65.0
Sat 17/2/24
#1 (Day 58)(Day 20 flower)
📋 H=96cm D=17cm DLI=67.8
Sun 18/2/24
#1 (Day 59)(Day 21 flower)
📋 Lowered light power again as they are showing a bit of stress from the light. Power was 170w now 160w. I'm going to have to have a think about my next grow, either I stick with this tent and hit the plants hard with light when I flip to flower to keep them small, or try and cram a slightly bigger tent in the space allocated for it. This tent is 61×76×150cm with the option to extend it to 173cm. Mine is configured to the 150cm height, but because its extendable the top 30cm is inaccessible at the best of times let alone when the plants reach a decent height. Extending this tent will be pointless because that's another 23cm of inaccessible space. Besides I only have a max head room for 160cm where the tent is.
Mon 19/2/24
#1 (Day 60)(Day 22 flower)
📋 H=96cm D=17cm DLI=67.8
HST
Tue 20/2/24
💧💧💧💧💧💧💧💧💧💧💧💧💧💧💧💧
Method= automatic
Feed=water
Neutralise=0.1ml/L
Easy Ph down=0.01ml/L
Ec=0.2 PH=6.2/6.2
Time start=12.00pm
Finish time=13.45pm
(11×5 minute runs with 5 minute gaps)
Total flow rate=190ml/min
Flow rate per plant=47ml/min.
Total volume made=13L
Total volume left=2.4L
Total volume used=10.6L
Volume per plant=2.6L (Est)
Runoff.
Total runoff=1.25L
Ec=1.33 PH=6.4/6.4
💧💧💧💧💧💧💧💧💧💧💧💧💧💧💧💧
#1 (Day 61)(Day 23 flower)
📋
Wed 21/2/24
#1 (Day 62)(Day 24 flower)
📋
Thur 22/2/24
From today I'll have to pull out the front 2 plants to get any pictures of the back 2.
#1 (Day 63)(Day 25 flower)
📋 H=97cm D=15cm DLI=67.8
Lowered runoff rack. Pots may be sat in runoff slightly.
Lowered light power from 160w to 150w.
H=97cm D=18cm DLI=60.0
She is developing quite quickly, because of the short distance between the light and the tops I'm seeing a bit of light stress, I'm going to keep my eye on that and push it as much as possible.
Back soon.
Take it easy.