


Likes
Comments
Share


@Echevarriaf
Follow
I have been having some sorr of issue and can Not figure out what is causing my leaves to yellow..? Heat stress? I am having issue with RH staying above 30. It not hot in the box but i can not make it humid in there no matter what i try. Shes still growing string and has a great root ball. She also is so compact that I can not lst her to get her side shoots out. She is thick like a pencil with at least 6 nodes at only 5 inches..?

Likes
6
Share


@wheedtobeus420
Follow
Day 33 she’s beautiful and flowering and wonderful. I’m really excited for how she’s turning out. I used recycled dirt for the first time ever because they were my last cycle for summer break. But she’s impressing me like always none the less. can’t not wait for her!

Likes
9
Share


@newenglandgrowers
Follow
First Week of Flower. Been going through some deficiencies this week still not exactly sure what it is it's either a magnesium/calcium deficiency or phosphorus deficiency. Stems turning red/purple and some leaves losing their color turning more of a dirty green/brown color with brown/orange spots on the leaves (ONLY HAPPENING ON STEMS AND LEAVES ON THE VERY TOP OF CANOPY) so it makes me feel like its a CalMag issue.

Likes
6
Share


@dank604
Follow
She's really frosting up and producing quite the smell! Definitely a lot smellier than my first grow which I appreciate :) One thing I've done is kept the light much lower than usual and while it's creating issues with temp it seems to be helping the budsites grow faster. I think it's also helped with her not stretching as much, especially that main cola which is still 5" higher than the rest of the budsites (better than my first grow where main cola was 8-9" taller). Wish I had more space, looking into a 24x24x48 tent. Happy growing everyone!!😊

Likes
10
Share


Likes
4
Share

@sellem
Follow
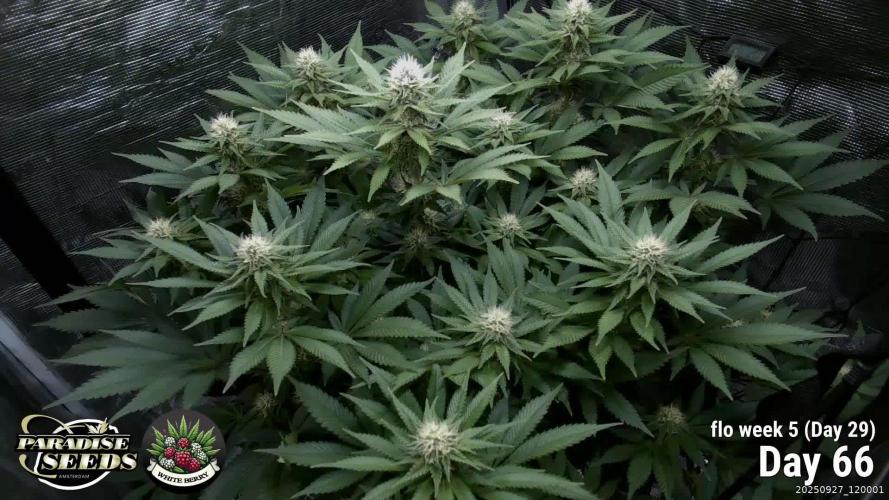
More of the same this week!
She is smelling really, really nice. Also looking healthy and happy. Scrog is back in place baby, because im nothing if not inconsistent with my goals 😂😁
Buds are also coming along nicely, i hope the scrog helps here a bit for the lower nodes since i have 5 overarching top colas, with the one in the middle getting all the love.
Watering every 3 days, ~6PH, 6L, 5ml/L Bloom, 1ml/L Green Sensation. I am really happy so far with Plagron. They seem to have their stuff dialed in 👌

Likes
14
Share


@GanjaReaper
Follow
Day 42:
Went on vacation for 3 weeks, asked a friend to take care of my plants and make pictures and videos.
He gave them feedings, did some defoliation but it is hard from a distance to guide him how to train or to defoliate.
Processing
Likes
9
Share


@High_Grade_Dadli
Follow
Growth stun abit in #1 due to snap in the stem but still manage to grow half inch. n push new growth........#2 main growth stun but directed to lower branches n still grow about 2 inch......#3 double it growth with 4.5 inch. didn't need lst was showing good growth in lower branches from early
Likes
23
Share


@eldruida_lamota
Follow
Como estamos familia, a día de hoy, viernes, llevamos exactamente 7 días en la fase de floración y todas ellas están marcadas por su sexo.
Todo va sobre ruedas, tenemos mínimas de 20,5 y maximas de 28,5 grados. la humedad no supera nunca el 60%.
Altura mínima lemon kush 25cm.
Altura maxima northern light xl 42cm.
•las power plant xl Han pegado un estirón serio, están empezando a ensanchar bastante.
•una marea verde desde semilla, con tan solo 5 semanas de crecimiento y un solo trasplante desde que se germinó, para controlar un mal crecimiento.

Likes
27
Share

@MrGrowDiarie
Follow
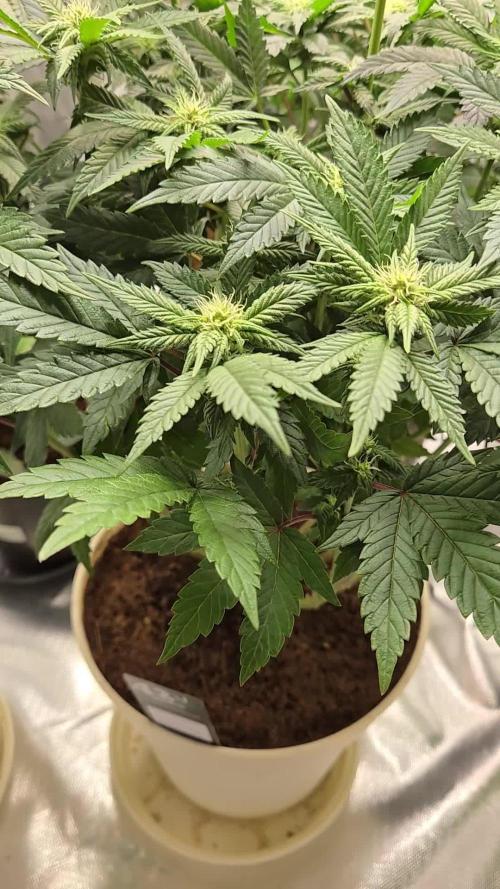
Day 84
What a transformation! At Day 84, our main plant is looking incredibly healthy and vigorous, showing all the signs of a successful transition from the vegetative stage. We're now deep into the mid-flowering phase, likely around Week 4 to 5 of bloom.
Plant Health and Structure
The plant has developed a fantastic, bushy canopy with excellent lateral branching, a clear benefit of prior training (like topping or LST). The overall color is a rich, uniform dark green, indicating optimal nutrient management, with no visible signs of deficiencies or burn. The fan leaves are large and spread out, demonstrating effective light absorption
Likes
10
Share


@AutoCrazy
Follow
Week 3 of Flower
This little lady sure is taking her time flipping to flower. Her tent mates are well into it but she is taking her time lol. Oh well she is still healthy and I can see now that she is stretching out a bit and finally bursting into flowering. She will likely take longer then the 8-9 weeks that the breeders say given her slow start to flower. But I’m ok with that. She’s healthy so things are looking up.
5.9 pH
500 ppm
65 water temp
72 tent temp
39 RH %

Likes
21
Share


@LittleBigTrees
Follow
I started Flushing two plants as there nearing the end of there days. I'll start Flushing the others this week apart from the kalimist indica pheno as it started flowering 3 or so weeks after the others even though they were all forced together. (alkward bugger)
Some of the plants are showing red /purple colours a little bit 👍
Likes
13
Share


@Canadian
Follow
This plant has been very enjoyable to grow and the smell of it is incredibly Pleasant I will update when the plants are drying and ready for curing it will take approximately between 7 and 14 days because I wait until the main stem snaps with a crunchy sound.
Day 5 of drying and they are still far away from ready but they're starting to show a nice Colours now . the smell it's becoming very powerful even without curing I know many Growers cut them down when the smaller branch are snapping off easy but I wait until the main stem I bend and a crunch very dry sound come out of it because I don't like to deal with mold and I have a very busy life can be opening curing jars every
few hours everyday that's why a good Boveda packs and a good drying are my best friends.
These are the weights for the two plants that one that was bigger #1 is 51.12 grams the second plant #2 was 36.17 grams . They smell very nice like a kiwi skunk smell to it . The high are strong and last about hour and a half to two hours. For a regular smoker I will classified as day stuff on the Stoney side. With a high THC probably what is advertised on their website . This is very good for somebody who wants to have a quick grow of very good stuff or somebody who lacks space but doesn't want to sacrifice quality. The fact that I couldn't get a large yield out of it was a bomber for me I really like plants that are capable of producing a large yield.
Taste 10 out of 10
Aroma 10 out of 10
High 8 out of 10 . day. strong THC.
Yield 6 out of 10.
Easy to grow strain.
Possible to crop in 65 days from seed at 20h lights on.32 Centigrades and 45%humidity.
Thank you for reading I will continue to update have a happy grow.
Likes
8
Share

@zenderman
Follow
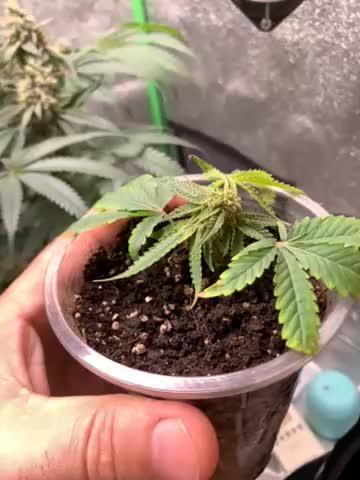
14/7/26 day 43 of flowering,beginning week 7.
second video-20 days old clone,roots forming in process,was taken bud(21 days flowering).
🌱
The clone was cut and planted directly into the soil, previously watered with Terra Vega and under a transparent dome with 18 hours of light.this method means manyfolding from one bud and ideally for scrog/LST technique.

Likes
24
Share


@rucucu94
Follow
Disculpen las fotos, es que las saque para consultar. Bueno primero que nada fue una semana de mucha tormanta, lluvias y humedad. lo peor que nos puede pasar en floracion. Segundo intente hacer supercroping ya que las ramas seguian superando el tejido y les llegaba luz en la noche. Y me salio desastrozo, mi primera vez. Pero los otros punteros que superaban la altura, los hizo mi compañero que sabia hacerlo (No tengo foto, luego actualizo). Y Tercero que debido a la humedad se ven en las fotos como aparecio hongos, por lo que pude observar era solo ese poco, lo cual ya fue removido vamos a ver como continuamos.

Likes
5
Share


@CanarianGrow92
Follow
The plants are starting to recover from the N excess 2 weeks ago, this delayed a bit the starting of flower from some plants but im sure that the rest of flowering will be ok, i gave only water this week and applied a small amount of guanokalong nutrients as these are slowly absorbed to ensure the plant continues to receive some nutrients until next 2 weeks when we will start to give some extra PK


Processing
Likes
Comments
Share


@Fergie
Follow
hey guys so here is ty f.b.t 3 girl coming along real nice . Got a little wind curl on one leaf finger but nothing worry about . IVe started to reuse my Aircon unit waste water running it through my r/o water system and adding my 5ml each of calcium and magnesium supplements to each 3 gallon bucket produced . all good so far til next week 😀
Likes
10
Share


@tontodedoverdee
Follow
31/1
So yes I've had some trouble keep this lady under control, she keep forcing again LST so to give a better light compensation at the lower branches I've cut a top leaf, now the canopy look much more uniform hope she gonna react and respond well, we'll see in the next days
4/4
So we had an amazing week, the runtz improves a lot and start to produce many withe pistils, it's gonna be the last week of vegetation so from now on i was thinking to add an extra light, the low branches are streching out and the top cola it's incrementing his yield, hope to see new nice improvement
btw Happy easter!

Likes
73
Share


@Rwein93
Follow
Ciao ragazzi e bentornati qui con me e la Mimorange 🍊
Le ragazze sono fantastiche nessun segno di stress apprte qualche puntino strano sulle foglie dovuto sicuramente a dei piccoli acari che non riesco a vedere. Ho comunque provveduto a spruzzare loro con una soluzione apposta a base di olio di Neem.🤞
La numero 3 ha raggiunto la sorella numero 2 mentre la pianta numero 1 ha superato loro di almeno 15 cm. Infatti è lei la bestia da 140 cm, con 4 belle apicali da almeno 80 cm.💪🔝
Ho defogliato loro nel giorno 58 e mantengo i nuts costanti fino alla fine👍
Eh niente ragazzi! Siamo giunti al termine della settimana 9 e siamo CAMPIONI D' EUROPA!!!🏆🥇
GRANDI AZZURRI💙
🇮🇹FORZA ITALIA🇮🇹
Grazie a tutti per aver guardato e restate sintonizzati per nuovi aggiornamenti🙏
Buona settimana e felice crescita 🌱 🌱 🌱
