
Likes
Comments
Share


@Chuckwaggon420
Follow
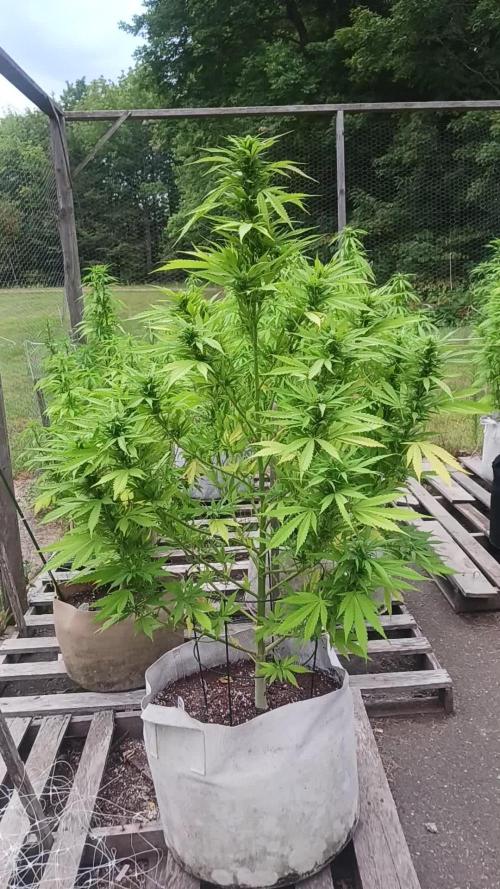
Chop time for the dry ice has came this girl got so fat even with the scrogg she fell over. When i cut her down and flipped her from the dirt was so heavy though wrist was gana break. Just like all my others i dont do wet weigh in. I dont do a wet trim so i can have that slowwwwww dry time. When flowers are dry and teimmed will do a weigh in. My dry prosses is slow trim fan leaves let hang in 60°f and 60% rh for 12 - 14 days then do a trim for smoke. This girl is amazing has a steong caryophyllene smell that overpowers everything! Very curious how that turns out. Buds are


Processing
Likes
5
Share


@Tryhard1988
Follow
She doing well and starting to show some purple coming through gg4 all over this on smells fire can't wait to try her
Just feeding water for three week now

Likes
6
Share


@Kountryboi90
Follow
So as some may have read and seen, this plant have been growing weird and crazy. But I like it! Today is day 38 of flower for the top half of the plant. If you look close, due to the extreme stretching, the bottom half(circled in blue) didn't start flowering until one and a half to two and a half weeks after the top. So that's gonna have to wait and finish(maybe). I'd be surprised to see it all finish at the same time. But she's looking good!

Likes
10
Share


@oldschoolS2
Follow
Hey bro's🤣
week 2 after flip stretching a lot already ,,950ppfd at 25 cm
next week we ll lollipop them and keep the feeding schedule ..
just trying bring humidity down at night cycle ..

Likes
13
Share


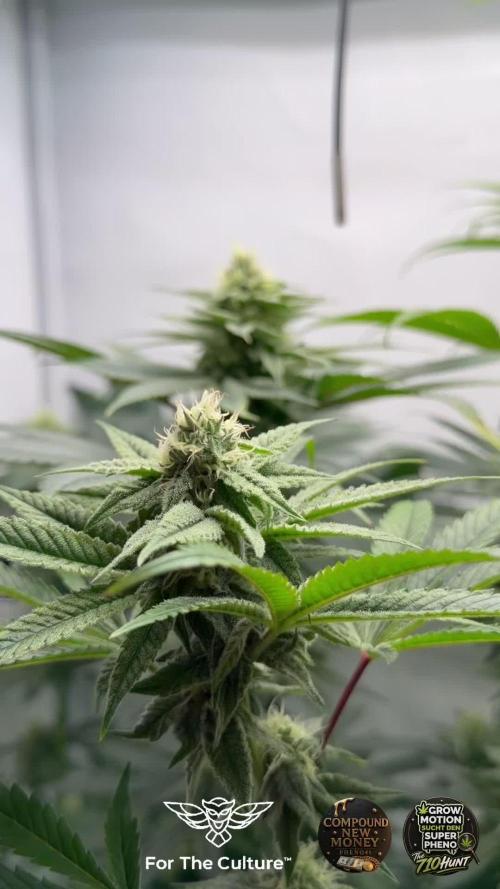
@Chubbs
Follow
420Fastbuds
FBT2311/Week8
What up grow fam. I hope all is good with everyone. Week 8 update on these absolutely stunning girls. They're definitely progressing nicely with the flower sites swelling up. Super frosty and beyond sticky when you happen to touch them. Over all Happy Growing

Likes
15
Share

@masterofsmeagol
Follow
8/10 Hurried morning. Today was water day and the hose fucked up. Dad got it working while I filled half the jugs needed with water and the requisite amount of plant doctor. I gave the preventative dose (which is 1/2 tsp per gallon but I upped it closer to 1 tsp per gallon) on the plants that have received the three full treatments, the 10th planet in the middle and the chemdog. The rest received their last full dose. I had watered the NATURAL mk ultra and other tenth planet yesterday so I'm waiting until tomorrow when the need water to give them their treatment. Other than the 10th planet I'm worried things are going pretty good. Tjat's probably tine too. I certainly wouldnt have even noticed it a few years ago. I only bought like half the amount of soil as last year and really tried keeping costs down. These aren't the biggest plants I've grown but I'm grateful for what I have. I'm working hard to get the most out of them I can. I'm planning to give it a few days and then feed later in the week.
EDIT: I THINK I got my grow question deleted. Finally. It's strange that I didn't get ONE outdoor growers response. Doesn't matter. I figured out the best course of action. I'm lucky. Or maybe I just work hard. I defoliate twice a day. I have some pruning to do on the interior of a COUPLE plants. I've cleaned them up pretty good this year. No signs of ANY wpm which is great but suprisinging considering the rh and the rolling fog most mornings.
8/11 I gave the tenth planet in the back and the mk ultra I didn't get yesterday. The mk ultra got the preventative dose (upped from 1/2tsp to 1tsp) and the 10th planet tge full dose. I'll have to check but I think this is the last cure dose for everyone. Found a pillar INSIDE a bud on the special kush that's far ahead. Then you can see on the video a HUGE cut worm or something on the branch I pull down. Luckily I saw it. Wasn't there when I got back but it took a few bites. Looked on the camera and saw a bird swoop in and grab him. Thank the lord! It's going to be 100° today and tomorrow with heat advisory in effect. I'm going to have to treat these plants for pests/pillars some how. I might just use BT and my super alkaline water. The septoria is under control and I'm just afraid spraying anything would make things worse. I'm certainly jot going to let them eat my early flowering plant. I can't apply ANYTHING in this heat. I'll research and maybe if it gets low enough tonight I might be able to do something. I'm going to go back over and check that plant going branch by branch. That one 10th planet tgat WAS the biggest plant is severely stunted amd has some "strange" looking leaves. I wasthinking about getting it off property or just chopping and burning but I figure it's been in there long enough that the others could be infected. I think it spreads through pests if that's the case then it might be better to get rid of it. I'm not sure what I'm going to do yet. I'm going to stop and try to get some mulch today.
EDIT: I found a place I can get a bale of straw and I think I'll use that to mulch. It's almost a 100°. After killing the pillar this morning and missing that cutworm I came back over to REALLY look at the special kush in later flower. I looked through every branch and every bud. I found four pillars on that plant. No REAL damage yet and extremely small. I had to pull buds apart to find them. It's like they were hiding from the heat. That was miserable hand picking them in 100° degree weather. Luckily the bird feeders are close but the bigger birds chase the smaller ones. The smaller birds have found a new food source and perch on my cage waiting. I'm leaning towards treating the flowering plant with BT-k. Seeing that tge citric acid WON'T kill fungus I'll just use OUR super alkaline water and hope for the best. Nothing will get treated during this weather.
8/12 IT reached 105° yesterday and I had a family medical emergency. Came over this morning to several plants drooped right over despite me checking MD day and them being fine. Phone dodnt charge so I couldn't get pictures. Watered everything but the ones that got it yesterday cause they looked good and still had weight. I had to leave before the ones that were down could pick back up. The kush plants seem to tolerate this heat much better. Beside the ones in the 10s tge others are taking this hear fine. I'll update when I get back.
EDIT: Went back over around 10. Another hot day. Suppised to be HOTTER than yesterday. I don't know how that's possible. both our thermometers went to 104 lately. Oh and I dont think that's beet curly top virus I think it's just great stress! I've grown this strain before and it's not the most resilient but it's other qualities make up for that. That's a loud off. I checked most buds on the plant in late flower and found a grass hopper IN the cola! No damage that I could see and I flicked him in the head which killed it. I came back to the chemdog that I didn't water drooping. I watered that and the 10th planet I didn't get this morning. The only one that hasn't got water today was the natural mk ultra and when I was there it was still heavy and looked really good so I left it. I'll have to come back around four and check things out. I'll be watering that tonight for sure. It will be hot tomorrow too then it will be better weather. I need to feed but I'm uncertain whether I should in this heat. All the kush strains I'm running are have Hindu kush as a parent and seem to be able to take the heat no problem. We don't get heat like this usually. It's different when it's 100° and 99% rh than dry heat.
Edit #2 WENT BACK OVER AROUND 3:30PM EXPECTING TO WATERING THE ONE PLANT I HADNT. THE MK ULTRA THAT I LEFT NATURAL. IT LOOKED GREAT WHEN I GOT THERE AND WAS STILL HEAVY. IT LOOKED BETTER THAN NORMAL. ONE SIDE HAD A FEW LEAVES THAT WERE STARTING TO DROOP BUT ITS RIGHT WHERE THE SUN IS HITTING IT ON TH BOTTOM. ITS JUST A LITTLE HEAT STRESS. THE 10TH PLANET ARE MORE PRONE TO HEAT STRESS. I NEED TO FEED. I DEFOLIATED QUITE A FEW LEAVES TODAY. IM RUNNING OUT OF LARGE FAN LEAVES ON MY PLANT IN MID FLOWER. EVERYTHING SEEMED TO START MAKING LITTLE ROCK HARD BUDS ALMOST OVERNIGHT AND THEY ARE STARTING TO SWELL. PLANTS NEED NITROGEN I THINK. I USED LESS SOIL AND WATERED MORE. I JUST DONT WANT TO FEED DURING THIS HOT WEATHER. TOMORROWS THE LAST OF THIS HEAT WAVE AND THEN ILL BE ABLE TO GIVE THE GIRLS A GOOD FEEDING. THE SILVER LINING TO THE PATHOGEN THING IS THAT IVE BEEN MUCH MORE COGNIZANT OF LEAFING THE PLANTS AND REMOVING DEAD AND DAMAGED LEAVES. I'VE DONE A MUCH BETTER JOB WITH THAT THIS YEAR. AFTER THE HOT SPELL ILL GET IN WITH SHEARS AND PRUNE OFF LARF. IVE GOT SOME BUT I HAVE MORE I NEED TO GET.
8/13 IT was supposed to be HOTTER yesterday than the day before bit it was the same 104°. Today is supposably the end of this ridiculous heatwave. I watered everything that needed it despite having watered deeply yesterday. I put 8 1/2 gallons into the garden where it needed it most. Chemdog and the big 10th planet I got yesterday. Soil is still wet and the bags are heavy. I can't believe how well these kush plants hold up to the heat. Hopefully better Temps tomorrow so I can feed. In other news I haven't been seeing septoria leaves. Less and less everytime I go over! Keeping my fingers 🤞.
8/14 Last of the hot days. Watered the chem dog and the big 10th planet. It's supposed to rain today. The rest of the plants are heavy amd doing good. I'll update when I can write more.


Likes
5
Share


@HighOhioAn
Follow
Loving the buds on two of the strains I’ve only had black buds one time before, and it was some of the best, but I’ve ever had super excited for this grow🔥💯


Likes
Comments
Share


Likes
112
Share


@PEAKYPLANTERS
Follow
hello everyone, fellow farmers! did you have a good holiday? we too! but now is the time to carry on our work and why not ... maybe even to reap its magnificent fruits!
Peaky returns in style just for you! I hope the contents are to your liking!
But guys ... do we want to talk about these magnificent colors of these gems? Excellent reaction to the scrog and no kind of fucking parasite to bother with its presence! Great as well! We are doing well .Please continue to support us And stay up to date


Likes
Comments
Share

@420DeepGrow
Follow
📆 Semana 7
La Mentha de Croco entra en la fase de engorde, con cogollos más compactos y resinosos que comienzan a mostrar su verdadero potencial. Los pistilos empiezan a anaranjarse poco a poco, mientras el aroma se vuelve más intenso, mezclando notas dulces, frescas y ligeramente mentoladas.
La planta mantiene un equilibrio perfecto entre vigor y madurez, con hojas sanas y una estructura abierta que favorece la ventilación y evita problemas de humedad. Los riegos se ajustan para potenciar el desarrollo de las flores sin saturar el sustrato.
🌸 La floración avanza con firmeza hacia su punto culminante, mostrando fuerza, aroma y vitalidad.
¡Seguimos creciendo fuerte 💪!


Likes
30
Share


@Hashy
Follow
📋 This Truffle gas #1 is a really good strain. She put up with some abuse to keep her as low as possible and coped well with the conditions I managed to get.
After 2 weeks drying I put the buds into terplock bags, never used these bags before so I'm hoping everything works out.
Stats for the GDG21
Truffle gas.
Dry decent buds 94g
Dry larfy buds 4g
Lemonpaya
Dry decent buds 62g
Dry larfy buds 8g
Trashed buds 21g
Total decent buds=156g
Total larf=12g
Removed because of rot 21g
Hash=7g
Total=163g
Light power=217.11 KW during the 115 days of the grow. 18hrs for 35 days=630hrs, 16hrs for 7 days=112, 12hrs for 70 days=840hrs. Total hours lights on=1582hrs
Average watt per hour lights on=137w
1.18g/w
Processing
Likes
10
Share


@CanadianFillmore
Follow
Start of week 8 (week 7 feed for the super Lemon Haze, she's going one extra week in total (9)) th blueberries are packing on serious weight, size and stickiness, while also smelling dank as hell! The Super Lemon Haze is still nutrient hungry, I continue to feed her extra each week and she's packing on serious weight and size now as she goes into the last 2 weeks of her grow. Overall the last week 7 was great and the plants are looking good, approaching the end.

Likes
Comments
Share


@TherealNICOGREEN
Follow
Dette er min stolthed pt hun har nok ca6uger igen hun bliver mere og mere fyldt med buds og masser af fimre hår!mit nye opset er det bedste jeg har gjort for mig selv og mine piger elsker det;) så keep on growing

Likes
5
Share


@UnCultivadorDeWeed
Follow
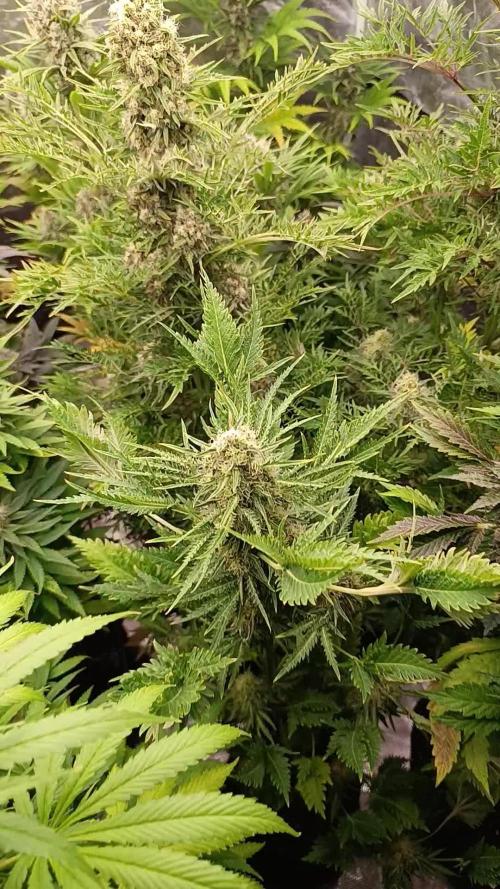
La gorila glue con sus hojas llenas de resina, he cultivado 6 semillas antes de la misma variedad y puedo ver hasta el momento una cepa estable.
Las big bud entraron en mayor observación dado a que dejaron de engordar dos.
La Mack va como avión, a pesar de todo lo que se podo al entrar a floración estiró hasta igualar a la Gorila y llenando los brotes de cogollos


Likes
24
Share


@Chumpkilla
Follow
I have had a blast growing this plant inside this LEAF unit. There was very little I had to do in order to have so much plant. I cannot wait to add another diary with some more grows. The smell of the plant is incredible and will only get better. The smoke is gentle, and it actually leaves a Minty feeling in your mouth, this was surprising but really cool given the name of the plant.
I will start my next grow in November, be on the lookout for that journal.
Final Dry bud weight 443g!
If you like this journal and would like to have a similar experience growing your own, go here. www.GetLeaf.co
