
Likes
Comments
Share


@Tetiana_Riz
Follow
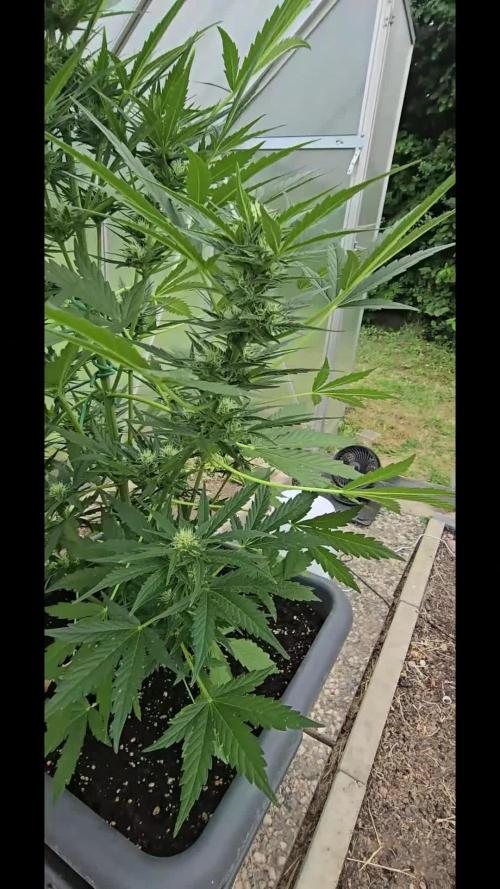
The week has passed quite normally, and our girl continues to delight us with her growth. She has already grown by a whole 10 cm, and her leaves have become even wider and greener thanks to the Xpert Nutrients fertilizers that we use with pleasure.
However, we encountered some unpleasant situations related to Sensi Seeds. We reached out to them with an issue of seed germination, not only with Skunk but also with other strains from Sensi Seeds. We provided them with all the necessary information about the purchase, although the receipt was not saved due to various circumstances. But, to our great disappointment, Sensi Seeds denied us, citing the lack of a receipt. We provided them with the date and place of purchase, videos, and photos, but it was not enough.
Honestly, we feel deep disappointment from Sensi Seeds' attitude. We were ready to immerse ourselves in the world of their genetics, knowing that many legendary strains were bred from their seeds. But now we are disappointed not only with the quality of their product but also with the lack of honesty and support. We no longer want to have anything to do with Sensi Seeds and will seek other ways to fulfill our dreams.
People, please take a look at the photos and videos and share your opinion. Did I provide enough evidence to Sensi Seeds, or should I have provided a receipt as well? I believe that integrity should come first. Sensi Seeds, you have shown your lack of integrity. People, I appeal to you: no honest and self-respecting grower can stand aside. I ask each of you to voice your opinion.

Likes
16
Share


@Symbiosis_420
Follow
Well, this strain is surely flowering for a long time, it's still stretching. I wonder if it will stop stretching and start fattening the buds this week...
Anyhow, one of the reasons why I don't defoliate much is because the plant does that by itself. When the lower leaves receive almost no light (because all the light is blocked by the thick growing canopy) they start to send their nutrients to the top. When they are donez they just fall off on their own. You see, leaves are like solar panels AND nutrient reserves!
Just make sure this process is slow and the leaves that receive light are still very healthy and green. If many leaves are falling or if they fall really fast you gotta make sure is not a deficiency or nutrient lockout!
...
Again just water your plant with bloom formula (and a bit of calmag) to an EC that allows you to maintain the plant heathly and the runoff not to high (in my case 1mS/cm). Remember to alternate nutrients and pHd tap water.
That's pretty much all left to do from here to harvest.
Obviously if you see something wrong try to correct it.
Day 66 update.
I dropped something on my plant. It bended one branch very badly and severed some leaves and a bud :(
Well, accidents happen. Luckily cannabis is a very very resilient plant, one might be surprised at how much this plants can take.
Anyhow, taped everything together loosely, pulled the most bent branches upwards with a thread and I will wait for it to heal...
If everything goes well, this branches should be even stronger than the others. Let's hope that's my fate!
Update day 69. Although I have been feeding with 1.0 mS/cm once, then pHd water then feed again, the run off from today measured 3.0 mS/cm ! It's climbing still. I flushed again, until the runoff was at 1.5 mS/cm.
I think I understand what happened, my theory is that the plant needs a lot more water now, but not as many more nutrients. So it takes the 2.5 daily liters of water, but it might only eat the nutrients in 1lt of water, so the rest stays on the roots and accumulates, raising the EC of the soil. So far, by checking EC on the soil once every week or two I have avoided nutrient toxicity and lockout.
I think there are two options, either lowering the concentration of nutrients I feed it (so 2.5 lts a day will contain less dissolved nutrients), or spacing out the feedings with more intermediate waterings of plain water.
I think I am going to go with the former, next week I will try feeding an EC of 0.8 mS/cm on 3L then tap water and so on from next week on. I prefer to underfeed than to overfeed, which is what I recommend for other boobs, it's better to have some yield than to risk killing the plant. We will get better with time...

Likes
20
Share


@TheGourmetWeed
Follow
Hey guys!
So, finally Saturday I chopped her down. She looked now ready and delicious, although I only notice yesterday how many seeds she has allover the place. She hermied in front of me without noticing, not good at all and need to start looking much better and in detail into the plants.
Feel like an idiot now.
Anyways, it was a full week!
Emptied the grinder collector and pressed it down a little, makes a very nice smoke, light but pleasant, the kind of stuff it keep you going all day without the dumb effect.
From all trimming made the bubble hash. Got a little too green as the 220micron bag's stitches slightly opened letting some contaminants in the final mix, hence the green color.
This was a hit. in opposition to the grinder stuff, this sent me straight to the moon, really heavy stone effect, even thinking was hard. Reminded me those afghan/ moroccan balls we used to get back in the early 2000's.
The weed itself it's still drying so the smoke report will be updated in there.
715g of fresh cut plant is good, let's see the potency and the seeds. Might turn it all into bubble hash, if I see it'll be an hassle to remove seeds.
On an earlier bud I've cut and dried, smoked it and you can see pure white ashes in the bong. Ain't that a beauty?


Likes
36
Share


@GYOweed
Follow
Well i broke a branch right off Bubba Cheese cake #2 stem by slightly trying to move a 3 gal pot lol ouchie
They will both need supports fyi.
Anywho, I either out did myself or these are the longest trichomes I've seen.
#2 is bigger n frostier.
#1 smells like freaken candy...and i mean the good colors you save for last lol.
#2 is more muted but creamier and maybe hopefully some cheese.
Increased exaust fan speed, Increased oscillating fan speed.
Reduced lights to 11/13.
Adjusted far red, adjusted morning to come on later at night and turned off the heat mat (yes i had a heat mat lol).
That should hopefully bring out any colors but it seems this one may stay green af.
Another grower is going to week 20 i think in flower and still no color change....in my experience that means this wont taste anything like earthy wood anthocyanins.
Likes
13
Share

@NSABND
Follow
Day 50 and a new week... the summer comes back to germany and "Hilde 2.0" goes well 🙏😀

Likes
Comments
Share


Likes
22
Share


@RDWCGrowing
Follow
1/11/2024 Vegetation Week 1 Day 1- I have a root almost in the water.. Yay!! Top feeding is almost done. she is looking a little sad as I work the transition Top feeding but once the roots are fully in the water she will start to take off. Ensured my PPFD is set between 250-300 it is set to: 258
1/12/2024 Vegetation Week 1 Day 2- I have a root in the water.... NO TOP FEED TODAY SIR!!! now that a root is touching the water and she looks stable, I am not going to topfeed, I will see how she looks tomorrow and as long as everything looks good I am going to go ahead and do a change and week 1 fill on Nutes.. I know it is a couple of days in but the same Nutes go through Week 2 and get changed at Week 3 So I should be good to go.. I will just ensure I fill to root touching the water when I change tomorrow.
1/13/2024 Vegetation Week 1 Day 3- Water Change Day!!
I added 36 Gallons of Water to the system:
Silica= .5mil/gal= 18mil
CalMag= .75mil/gal = 27mil
FloraMicro=3.0mil/gal = 108mil
FloraGro=2.0mil/gal = 72mil
FloraBloom= 2.0mil/gal = 72mil
PH DOWN= 30mil
Very important thing with this system is to now wait the 24 hours for the system to adjust.. Do not make any further adjustments to your PH up or Down for 24 hours to allow time for the system to balance.
1/14/2024 Vegetation Week 1 Day 4- Today I just adjusted the PH to ensure that it was right at 6.0
1/15/2024 Vegetation Week 1 Day 5- Today I Cleaned up the lower damaged leaves from the transition from top feeding to roots in the water. She looks good today.
1/16/2024 Vegetation Week 1 Day 6- Today I just took a picture of the beautiful lady for Log. Other than that just normal day to day operations, check the pH, check the Humidifiers and fill as necessary, check level of water in the Res. Everything looks great. onto Tomorrow!!
1/17/2024 Vegetation Week 1 Day 7- Today I filled the humidifers, checked the PH and just let her grow.. Grow baby Grow.....

Likes
25
Share


@Gardener_of_Goodness
Follow
I’m excited to see what RQS have to offer with this little Gem! I’ve been waiting to try another of Royals Automatics, Green Gelato is a strain I very much look forward to with desert strains being at the Top of my list 🥇
It’s been an eventful first few days.. (arnt they always!) she’s poked her head up yesterday so Day 1 is 30/03/20.
Let’s see how this week treats her, I plan to keep a close eye on the environmental conditions and to ensure she’s being fed some gentle nutrients, CalMag to begin with followed by some BioBizz Grow for the extra nitrogen needed at this delicate time 👌
See you all next week, I hope with more leaves to show 🌱✌️ Peace and love, stay safe
Likes
48
Share


@MadeInGermany
Follow
Info:
Unfortunately, I had to find out that my account is used for fake pages in social media.
I am only active here on growdiaries.
I am not on facebook instagram twitter etc All accounts except this one are fake.
Have fun with the update.
Flowering day 7
since time change
to 12/12 h.
Hey everyone ☺️.
This week she has developed really well.
The growth is very extreme, especially now after changing the light phase :-).
During the week I will tie the stretched shoots into the net so that they can fully develop next week :-).
I will also start with the flower fertilizer next week 👍.
Otherwise the tent was cleaned and all containers filled 😆.
Have fun with the update .
Stay healthy 🙏🏻
You can buy this Strain at
https://www.amsterdamgenetics.com/product/kosher-tangie-kush/
Type:
Kosher Tangie Kush
☝️🏼
Genetics:
Kosher Kush
X
Tangie
👍
Vega lamp: 2 x Todogrow LED CXB3590 COB 55 W
1 x Sanlight S2W 62 W
💡
Flower lamp : 2 x Todogrow LED CXB3590 COB 55 W
1 x Sanlight S2W 62 W
💡 ☝️
Grow Aero System : Growtool 0.8
☝️
Fertilizer:
Canna Aqua Vega A + B , Canna Aqua Flores A + B , Rizotonic, Cannazym, CANNA Boost, Pk 13/14, Canna Cal / Mag, Canna Ph - Grow, Canna Ph-Bloom
☝️🌱
Water:
Osmosis water mixed with normal water (24 hours stale that the chlorine evaporates) to 0.2 EG. Add Cal / Mag to 0.4 Ec Ph with ph- to 5.2 - 5.8
💦 💧

Likes
9
Share


@Budhunter
Follow
Stardawg is looking like a star ⭐️.. really happy and healthy plant.. looking at it I can confirm it will be the most yielding plant of this run.. buds are big, fat and smelling that sativa that I love.. can’t wait to finish it ✨
Likes
69
Share


@nonick123
Follow
Día 44 (15/07) Wow! No hay shock de trasplante! 😍💥😁
Todas las ramas se han estirado hacia arriba tras el ajuste de LST y se están formando nuevos nodos rápidamente
Esta combinación de nutrientes de Lurpe + substrato de PRO-MIX HP es una maravilla 😍
Día 45 (16/07) Ayer tuvimos ola de calor (37 ºC) y han aguantado muy bien!
A última hora de la tarde (cuando ya no había sol directo) les apliqué H2O en spray foliarmente para refrescar los estomas
Hoy parece que vuelven las temperaturas estándar para esta época del año: 29 - 30 ºC en las horas centrales del día
Riego con 1 litro de H20 pH 6,5
Día 46 (17/07) Pequeños ajustes de LST
Hay algunas ramas inferiores que no se han formado / estirado mucho
Lo más probable es que haga una buena limpieza este domingo, 7 días después del trasplante, para dejar solo los brotes por encima del 4º nudo
Día 47 (18/07) Riego con 0,5 litro de H20 pH 6,5
Este domingo (día 50) haré limpieza de partes bajas y tal vez también de nuevo topping en las 4-6 ramas principales 😁
Día 48 (19/07) Día de muchísimo calor con 37 ºC. A ver como lo llevan!
Riego con 0,5 litro de H20 pH 6,5
Día 49 (20/07) Para ayudarles a llevar mejor el calor de las horas centrales del día, coloca una malla de sombreo (70%) sobre el invernadero
Lo cierto es que se nota que baja mucho la temperatura debajo de la malla! Van a estar más fresquitas! 😍
Riego con 0,5 litro de H20 pH 6,5
Día 50 (21/07) Training session!
Hago limpieza del tercio inferior de la planta, de todas las ramas y nudos que no superan la línea del dosel marcada por el 4º nudo (1er topping)
También hago topping (2º) a todas las ramas principales
La idea es tener 12 ó 14 colas principales para que no se hagan muy altas
De paso saco unos cuantos clones de las ramas inferiores eliminadas 😁💥
Para superar el estrés, hago las siguientes aplicaciones y riego:
- Riego con 1 Litro de Té Vegetativo de Lurpe Solutions. Preparación: 24 horas con bomba de aire (oxigenación) con ingredientes:
Green Sunrise 8 ml/L + Insect Frass 16 ml/L + Hummus Lombriz 8 ml/L + Melaza 1 ml/L + Kelp Hidrolizado 0,25 g/L
- Aplicación foliar Kelp hidrolizado de Lurpe Solutions a 0,25 ml/l
💦Nutrients by Lurpe Solutions - www.lurpenaturalsolutions.com
🌱Substrate PRO-MIX HP BACILLUS + MYCORRHIZAE - www.pthorticulture.com/en/products/pro-mix-hp-biostimulant-plus-mycorrhizae
Likes
25
Share

@German_GrowLab
Follow
Einen wunderschönen guten Tag, liebe Grow-Community, und herzlich willkommen zur Woche 7 – Season Vol. 2 meines kleinen Outdoor-Projekts 2026.
Angefangen haben wir mit dem Etablieren einer Mulchschicht. Auf deren Vorzüge bin ich in meinem letzten Report genauer eingegangen (Woche 9). Kurz heruntergebrochen: Sie schützt vor Verdunstung, fördert das Bodenleben in den oberen Erdschichten und schafft durch ihren Schattenwurf ein deutlich angenehmeres Mikroklima. Das spielt letztendlich auch der Schädlingsabwehr in die Karten.
Der Mulch besteht aus Bio-Kleintierheu (Bio, weil pestizidfrei!). Das Heu bildet ein gutes Verhältnis aus braunem (pilzförderndem) und grünem (bakterienförderndem) Material.
Um die Aktivität der Mikroorganismen zusätzlich zu boosten, habe ich den Mulch noch einmal mit einem AACT (Actively Aerated Compost Tea) angesetzt. Auch hier verweise ich auf meinen letzten Report (Woche 5) . Neu ist allerdings, dass ich dieses Mal auf Melasse als Mikrobenfutter verzichtet und mich stattdessen für Rote-Bete-Saft entschieden habe. Dieser dient nicht nur als Nahrung für die Mikroorganismen, sondern versorgt den Tee zusätzlich mit Spurenelementen.
Leider musste ich noch einmal neues LAB ansetzen, da ich der Jauche doch nicht ganz über den Weg traue. Sie hat in den letzten Tagen einen doch sehr starken Ammoniakgeruch angenommen, was kein gutes Zeichen ist. So kann ich euch aber noch einmal zeigen, wie ich das Ganze from scratch ansetze. Also: Reis gewaschen und das Wasser anschließend für drei Tage an einem dunklen Ort stehen gelassen. Sobald es leicht süßlich riecht, wird es im Verhältnis 1:10 mit Milch vermischt und erneut stehen gelassen, bis sich der Käsebruch von der Molke trennt. Auf die Weiterverarbeitung gehe ich dann im nächsten Report ein.
Aber nun zu den Damen. Ich habe mir erlaubt, hier und da ein oder zwei Blätter zu entfernen, um den Seitentrieben etwas mehr Raum zu geben. Und es scheint die richtige Entscheidung gewesen zu sein. Der Pink-Guava-Nachzügler hat sich nun auch endlich zu den anderen gesellt – zwar in einem 75-Liter-Topf, da mein Growshop des Vertrauens leider keine 55-Liter-Töpfe mehr hatte.
Die Pflanzen machen einen super vitalen Eindruck und ich bin mehr als hyped, in welche Richtung sie sich entwickeln werden. Die Ocean Storm weist eine kleine Panaschierung auf – oder eine perikline Chimäre für euch Pflanzen-Nerds da draußen. Mal schauen, wie sie sich im Speziellen weiterentwickelt.
Soooo, wieder genug Text für drei Harry-Potter-Bücher. Das soll's für diese Woche gewesen sein.
Nächstes Wochenende wird getoppt und eventuell der ein oder andere Steckling geschnitten. Bleibt also gespannt!
Euch noch eine schöne Restwoche!
Peace


Likes
5
Share


@Jubaea
Follow
The bud's are not like I wanted it because the room temperature more than 34 degrees 4 weeks ago I think 2 0r 3 weeks flowering to harvest

Likes
3
Share

@deseed_uy
Follow
Semnas de puro crecimiento y lst luego de una ssemana acostumbrandose al exterior.
Likes
9
Share


@VIPgrower
Follow
Day 37 of flowering week six lsd look good tips a little burnt but I’m not to worried keeping nutrients low about 3/4 strength 1.4 ex 770 to 800 ppm drinking lots watering about every four days feed water feed water

Likes
2
Share


@HIAZ_urbanbudfarmer
Follow
Plant at the front #3 has had slowed growth but buds are filling out pretty well now, pretty sure she is a Orange sherbet. Back 2 are on week 3 day 17!!! & Are going Awesome, buds stacking up & down every branch! Going to get some really good Cola's of them! They are loving the 730watts!’ of light, back left plant looks like a Tropicana Cookies, going to do some defoliation on her & tie branches down a bit to open up middle of plant to allow more light & air to lower bud sites.
Likes
5
Share

@MrGrOH1008
Follow
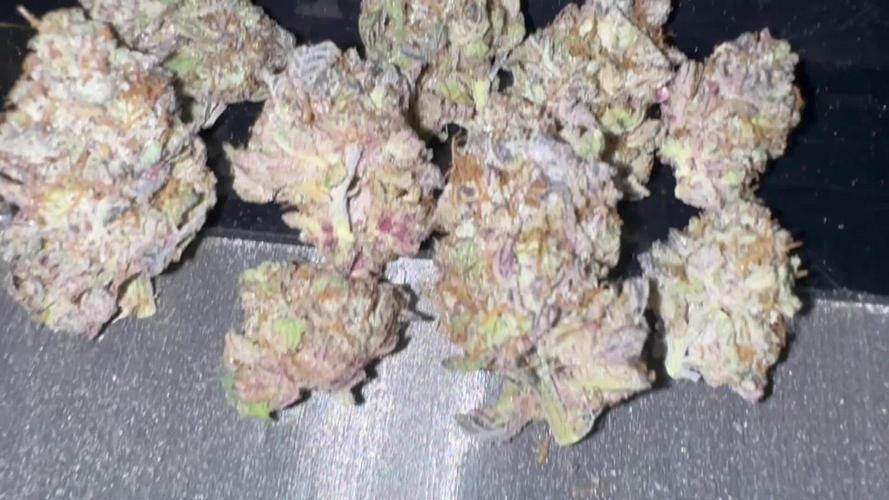
Chopped on day 62, danky, earthy, slight gassy smells. Rock solid buds.


Likes
16
Share


@Mopish
Follow
10 Jan - 16 Jan
11 Jan
Kush del Arriero: Looking good, fat buds, a lot of them.
Choco Cookies: This one has been a little too sensitive with nutrients, it only has a few small buds, the other plants overshadow it.
Banana Cake: TBH I thought this was going to be the one with the biggest buds, they look frosty tho.
15 Jan
Some fan leaves are starting to look pretty damaged by a previous nutrient lock.


Likes
21
Share


@Purplemed
Follow
D43.
First day of seventh week, I finally took out all the blumat water lines to be able to level the canopies to better perform the next four weeks.
The whole tent is full of little colas, especially the lazy seed that have the most tiny ones due to the slow growth plus that she was quite in the bottom until today but now she's finally receiving same light as her sisters 💪.
Today I watered again after three days, soil tension went from 40 to over 200 before watering that probably mean from now on will be better to stick on watering every two days instead of three.
Things are getting smelly and promising, this week I'll do another insecticide foliar spray and watering and hope for the best.
Peace ☮️
D46.
That's a lot of wild stuff going on in here and my little girls look happier than ever, all the fans around every cola turned deep purple and full of white all around and they smell so good.
I just watered 10% of the pot capacity with neem oil, calmag, higrozyme and nutrients until EC 1.9 pH 6.1 so water tension came down from over 200 to over 40mbar, also foliar sprayed again with potassic soap, neem and phyretrine since some thrip are still messing around.
Good news the lazy plant despite the little colas once started receiving same light as her sisters she strengthen production and color of the leaf, not so bad!