
Likes
Comments
Share


@Ultraviolet
Follow
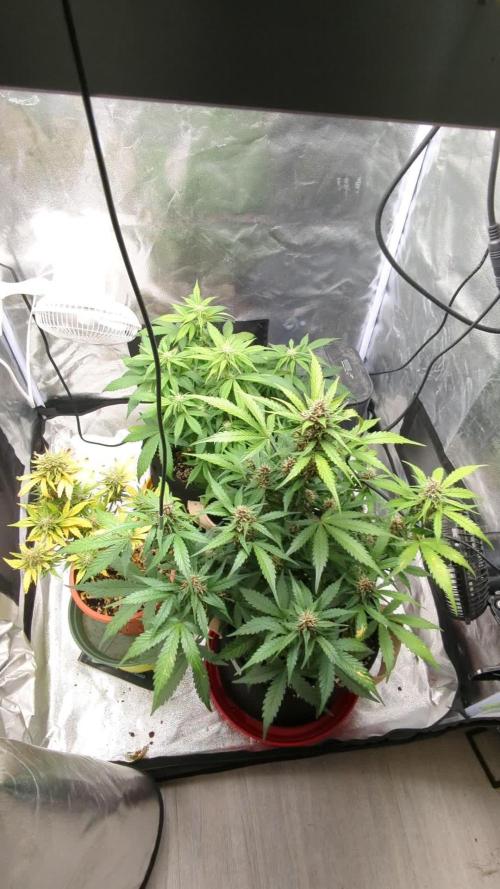
I gave Isopropyl alcohol 70% equal parts water, 1 tsp cayenne, and kept enough for multiday application, what little population of aphids is left I shall catch them the next morning, opening the tent 10 min before lights on the clovers have yet to open, all the aphids hiding on the undersides are easily visible, still none ever went near cannabis plant. Clovers are far tastier it seems.
The alcohol kills on contact, the idea was to saturate the leaves with a light foliar application, and once I was done I ran it through the canopy with my hands, making sure as much of the clover surface came in contact with the iso, once done, I turned on the fans and evaporated it quickly. The beautiful thing about Isopropyl is that it evaporates rapidly at room temperature, way below boiling point leaving behind zero residual so nothing seeps its way into root zones unless you spill it there.
It is a magical solvent that leaves no trace that it was ever there.
Resonant Frequency:
A resonant frequency is the natural vibrating frequency of an object and is denoted as ‘f’ with a subscript zero (f0). When an object is in equilibrium with acting forces and can keep vibrating for a long time under perfect conditions, this phenomenon is resonance.
In our daily life example of a resonant frequency is a pendulum. If we pull back the pendulum and leave, it will swing out and return at its resonant frequency. Objects combine to form a system, this system can have more than one resonance frequency. The resonant frequency is termed as the resonance frequency.
The phenomena of resonant frequency used in the series circuit when the inductive reactance (XL) is equal to the capacitive reactance (XC). If the value of supply frequency is changed, we can observe that the value inductive reactance (XL) and capacitive reactance (XC) is also changed.
Inductive reactance (XL) and capacitive reactance (XC) are inversely proportional to each other. When we increase the frequency, the value of XL increases, whereas the value of XC decreases. When we decrease the frequency, the value of XL decreases whereas the value of XC increases.
At series resonance, when XL = XC. The mathematical equation of resonant frequency is:
XL = 2πfL; XC = 1/2πfC
XL = XC
2π f0L = 1/ 2πf0C ; f0=1/2π sqrt{LC}
Where f0 is the resonant frequency, L is the inductance, C is the capacitance
How to Calculate the Resonant Frequency of an Object?
An object exposed to its resonant frequency can vibrate in symphony with the sound. The wavefronts pushing on the object will arrive at just the right time to push the object with greater and greater amplitude in each cycle.
To get a clear idea of this concept one of the best examples is pushing a friend on a swing. If you push the swing randomly, the swing will not move very well but if you push the swing at a specific time, the swing will get higher and higher.
Another example to find the resonant frequencies is to place the object next to a speaker and place a microphone attached to an oscilloscope next to the object. Then play the sound in the speaker at a given volume, and then without changing the volume slowly change the frequency.
Now observe the oscilloscope, you will observe that at certain frequencies the amplitude of the wave, is proportional to the volume of the sound that the microphone is able to pick up.
The frequency that is caught by the microphone will be greater than at surrounding frequencies. These are the resonant frequencies and are detectable as the sound energy absorbed by the object is re-emitted more efficiently at these frequencies. The precise moment that constructive interference happens the amplitude of the wave will spike at the precise frequency emitted.
Q: Compute the resonant frequency of a circuit whose inductance is 25mH and capacitance is 5mu F?
A: Known values are,
L = 25mH = 25 x 10-3 H
C = 5mu F = 5 x 10⁻⁶ F
Formula for resonant frequency is,
f0= 1/2π sqrt{LC}1/2π√L
f0=1/2 ͯ 3.14√ (25 ͯ 10-3 ͯ 5 ͯ 10-6)
= 450.384Hz
Why Neodymium?
Ferromagnetism is an exciting phenomenon observed in certain materials, known as ferromagnetic materials, that can retain their magnetization even after removing an external magnetic field. Ferromagnetic materials can become ferromagnets and interact strongly with other magnets and magnetic fields. A characteristic of ferromagnetic materials is their magnetization ability, distinguishing them from paramagnetic and diamagnetic materials, where weak magnetism exists temporarily.
This unique property allows for making permanent magnets widely used in various applications such as motors, generators, speakers, and data storage devices. The ability to generate and maintain a magnetic field without the need for a constant external source of power makes ferromagnets highly valuable.
An alloy of neodymium, iron, and boron discovered in the 1980s is ferromagnetic, yielding permanent magnets over 1000 times stronger than anything ever seen before.
The name neodymium comes from the Greek neos didumous, which means "new twin."
Neodymium magnets are made of an alloy of neodymium, boron, and iron. This allows them to simultaneously store impressive amounts of magnetic energy while being highly resistant to demagnetization.
Because iron oxidizes quickly, neodymium magnets are coated to prevent rust from accumulating.
The attraction between two neodymium magnets is so strong that if placed close enough together, they can collide and shatter.
Neodymium magnets have an unusually high-temperature resistance, and they can even withstand heat exceeding 200 degrees Celsius.
N50UH 1-1/2"OD x 1.065"ID x 3/8"

Likes
247
Share


@PremiumBudsEU
Follow
Hello growmies
Buds start fatten up and we like it 👆😎
This week the buds have started gaining weight.
I think it's exactly the right time because I still have a few weeks to go.
From this point on I try to keep the PK content at the same level for the next 2 weeks, then I will increase the fertilizer dose a bit and fertilize like this for another 2 weeks until flowering week 8.
What I noticed with my plants up to now is that they are very sensitive to light and that over 1000 ppfd is not possible without an additional co2 supply.
Otherwise I have only good things to say, they smell delicious, they have a very good defense against pests and mold. Sometimes the humidity was over 70 at night.
I am very excited about the result, the effect and the taste 🙂
I will post a video tomorrow
I wish my Growers Family and Sponsors a pleasant weekend without stress and hectic. Stay healthy 🙏🙏🍀

Likes
6
Share

@20SYL
Follow
Une des plantes va mal, je pense que le petit pot ne lui convient pas. J'ai observé au microscope les trichomes, ils commencent à devenir bien laiteux avec quelques ambrés, je vais la récolter d'ici 2 semaines avant que sont état s'empire.
Les deux autres vont très bien, l'une d'entre elle commence à sentir fort, et prendre une couleur de plus en plus violette. Je reste attentif car je vois des signes de carences en calcium, magnésium et en potassium.
La dernière entre dans sa troisième semaine de floraison, elle se porte bien !

Likes
28
Share


@Trickybis82
Follow
Hello growmies,
Quick update the girls are doing fine and are loving life at present everything is going well and they are starting to really bud up.
Not alot more to add at this time. :)
Adios amigo


Likes
17
Share


@RDWCGrowing
Follow
7/27/2023- Prep
Tent and system are cleaned and ready to go from my last grow. I have submitted my Journa for the Diary of the Month Competition here is to hopeing for good resutls.
7/28/2023- Germination Day 0- Seed initiation
Well lets get this new Grow started.. So My Dad Sent me a custom Strain that he wanted me to grow out and Breed for him. The Strain is Called Red Rhino:
Red Rhino is an amazing strain coming from Israel and boasts a 60% Sativa and a 40% Indica. This strian comes from crossing double gum and master kush. Effects are an increased appetite, as well as giving you ephoric feelings throughout the whole day.
RO Water Used
Added Hydrogen Peroxided
8/1/2023- Germination Achieved G-Day 1
Popped her head above the root riot today to say hello.. Woot first challenge when dealing with an unknown seed and a new Strain is getting the seed to pop and the lady to show life.
8/2/2023- Germination Day 2
Took the root riot out today and it was soaked not good plant drowing again. I am still having a hard time finding the right blance for where the water should be to keep the root riot moist and not soaked. I had to drain some of the water out of the root riot plug to help give a little oxygen. I also removed some of the water.
8/3/2023- Germination Day 3
Looking good stretching her leaves out to let in the lights
8/4/2023- Germination Day 4
Looking good a few days until I put them into the RDWC System and get this thing rocking and rolling.
8/5/2023- Germinaiton Day 5
Looking good will probably plant tomorrow if the roots are still looking good.
8/6/2023- Plant Day- Germination Day 6
Planted into the RDWC System today. Joy when they go into the system as long as we dial that in right this will now be a great grow.. Survived the hard part..
8/7/2023- Germination Day 7
Fell over today I am worried.., she is showing some damage on the lower leaves from the over watering in the cloning machine but right now I don't see any new damage.
Supported the Stems with little improvised pole to help her stand up.
8/8/2023- Germination Day 8
Added the first Nutes today, to help support root growth and to help give there first jump to growth.
TPS SILICA GOLD-.5mil/Gal
Root Drip- 1mil/Gal
GH FLoraMicro-1mil/Gal
GH FlroaGro-1mil/Gal
GH FLroaBloom-1Mil/Gal
ORCA-.5mil/Gal
8/9/2023 - Germination Day 9
Everything is looking good new growth looks like it is praying and they are looking happy. I will take off the damage leaves probably tomorrow.
8/10/2023- Germination Day 10
Everything is looking good looks like she is recoving well, with just a little bit of a delay. Cleaned up the dead leaves... Day 1 VEG tomorrow.. Water Change Day and first real meal...
Likes
41
Share


@TheBulldozerSicily
Follow
Avvio box nuovo ciclo 22 maggio 2024 "super lemon haze".
Aggiungo 75 lt demineralizzata ec 65 ph 8.7
Proviamo per la prima volta la linea completa advanced nutrient.
Aggiungo tutti i prodotti come sotto nella specifica, ottenendo ec 537 ph 6.4

Likes
17
Share


@Mr_nugs_lover_David
Follow
She's looking beautiful on her first day of life. Looks like a she's gonna be a good plant, hope to make a nice bush and fill up my room with beautiful sativa bushes in this indoor run. Let's see how she performs 💎💚👨🌾

Likes
58
Share


@MadeInGermany
Follow
Info:
Unfortunately, I had to find out that my account is used for fake pages in social media.
I am only active here on growdiaries.
I am not on facebook instagram twitter etc All accounts except this one are fake.
Flowering day 51
since time change
since 12/12 h.
Hey guys :-) .
The buds keep getting bigger and smelling better and better. Since she will be ready in the next 12-16 days, she received Clean Fruits for the first time today (see table above).
It was poured twice this week and the tent was cleaned.
Stay healthy 🙏🏻
You can buy this Nutrients at :
https://greenbuzzliquids.com/en/shop/
With the discount code: Made_in_Germany you get a discount of 15% on all products from an order value of 100 euros.
You can buy this Strain at :
www.Zamnesia.com
Type:
Banana
☝️🏼
Genetics:
OG Kush x unkown
👍
Vega lamp:
2 x Todogrow Led
Quantum Board 100 W
💡
Bloom Lamp :
2 x Todogrow Led
Cxb 3590 COB 3500 K 205W
💡💡☝️🏼
Soil :
Canna Coco Professional +
☝️🏼
Nutrients :
Green Buzz Liquids :
Organic Grow Liquid
Organic Bloom Liquid
Organic more PK
More Roots
Fast Buds
Humic Acid Plus
Growzyme Big Fruits
Clean Fruits
Cal / Mag
Organic Ph - Pulver
☝️🏼🌱
Water:
Osmosis water mixed with normal water (24 hours stale that the chlorine evaporates) to 0.2 EC. Add Cal / Mag to 0.4 Ec Ph with Organic Ph - to 5.8 - 6.4
Likes
14
Share


@Weedig_Weedigson
Follow
Es geht in Woche 4. So langsam nimmt man das Strawberry in dem Cookie wahr. 😊

Likes
6
Share


@momsbasement_exotics
Follow
little bit of nute burn but im still happy with how they look going to begin flushing them soon with just water and a little calmag every other water.


Likes
13
Share


@Happydays58
Follow
05/31 -Day 64
~650 PAR across the canopy. A & B continuing to stack.
C & D’s pistols are starting to change colors along with some swelling.
06/03 - DAY 67
(C) top nugs are feeling tight and hard. Still assuming another 2 weeks till chop.
(D) Foxtails coming out everywhere but not too extreme. Possibly another 2 weeks.
(A) & (B) slowly progressing still.

Likes
29
Share


@GrownwithLED
Follow
The 3 THE PURPS plants from BC-BUD-DEPOT grew very nice and healthy. One of the plant turned totally purple in the leaves and in the bud during flowering, she was A BEAUTY! The buds were of average size and are not too dense, but sparkling with trichomes. The FLAVOR is OUTSTANDING...she is DELICIOUS! Her grape- jolly-rancher (=hard-candy) aroma transcends directly into her flavor when smoked. VERY SMOOTH and an ABSOLUTELY DELIGHT on the inhale and the exhale. The 3 plants harvested 156,2 gram dried bud, which is a nice average yield of 52 grams per plant.


Likes
15
Share


@HisHope
Follow
Leaves leaves lots of leaves
Trim took a while so plan accordingly
Growing is easy really easy no issues
The strain does seem to be able to grow well on lower nuets than we used, maybe 10-20% less.
Bea dry yield 255 grams fixed the video
Hero dry yield 271 grams
526 total

Processing
Likes
10
Share


@JohnnyGrower
Follow
Esta semana los nutrientes siguen de la misma manera, es notorio el exceso de Nitrogeno por ende se disminuira en los próximos riegos, se realizaron podas apicales en los clones que no les hice anteriormente para que alcanzaran más altura. Dentro de esta semana instalare la malla scrog Kanovi para guiar los vigorosos brotes.
Además esta semana ya esta retomando el crecimiento la planta madre variedad Tangie la cual cumplió su ciclo de propagación por esquejes y porfin florecerá.
Leo comentarios, opiniones y recomendaciones


Likes
2
Share


@THEFROZEN710
Follow
This phenotype #4 was removed from the grow tent after 2 weeks of veg due to a deficiency I'd never seen before. From what I've researched, it could be sulfur; it didn't seem to be a disease, but it produced excessive resin.

Likes
29
Share


@JeyGanesha
Follow
Anche questa Ayahuasca purple sta venendo su bene... La piccola talea che ho messo in terra a fianco alla pianta,ha attaccato al primo colpo senza fare nulla di speciale. (Senza radicante ne altro,)😋😂💪✌️....
Da questa settimana ha iniziato a fare un profumo delizioso...i fiori li sento già belli duri,compatti...non ho più trovato nessun nannars,ne fiori maschi completi...bene bene piantine mie belle..seguite così e datemi una buona terapia...🕉️ Om namah shivaya


Likes
5
Share


@DieGrowerAG
Follow
08.14.2024 / Honey Cream Indoor
The seeds sprouted and startet to grow a had ni issues I watered 250ml each until the soil dried out again.

Likes
4
Share


@AestheticGenetics
Follow
6/4/25 been squeezing stems to strengthen them. Using tomato wire to keep her flat as much as possible
