The Grow Awards 2026 🏆 


Likes
Comments
Share
@CRiSPrGrow
Follow
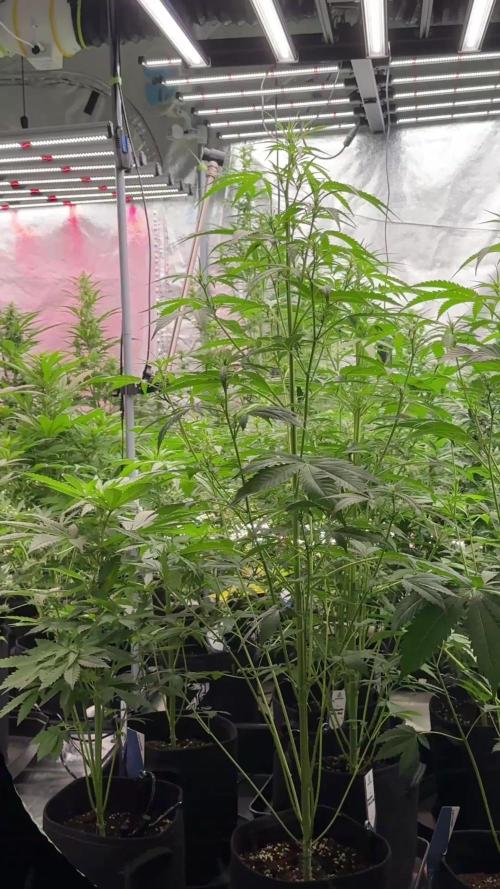
These had a pretty good life. I actually only fed NPK the one time . Germinated them in a Zambeza propagator, i really recommend getting one of those propagators, they're reusable and really take the heat off those first days when you're sweating. Pooped them into their plugs they sprouted out strong, germinated 5 kept 3. transplanted them no problem. Veged these for 4 weeks, then they shot up. during veg they stretched out a bit early on i should have been giving some specialised micro i had on had but for some reason on the other i didnt. They needed extra support for their first three weeks, so i decided to LST them around week 2. Two camping hooks one anchor for the main stem and one to keep the plant down. Once i dialed in my lamp to plant distance they benefitted by slowing down on the stretch a bit. they all took to LST extremely well, bushing out and creating an nice even canopy. They pushedout these thick indica leaves, one of my plants was a lighter colored leaf pheno, the vertafort one. The Six Shooter genetic really stretches, if just off the top of my head it seems that the plants quadrupled in size over an 8 week period, completely eclipsing their neighbours and creating a thick dense canopy throwing shade down below. Each turned into a bush with three or more mains sticking out the top by week 6. IThe results start to look real pro around week 8. Before that though I hadn't been defoliating. This and simple lack of light means that I had loads of undevellopped colas. If I'm honest I should have tried to harvest in stages but by colas. Anyway these kind of grew like a gorilla glue but with much different and much better flower structure. The plants started pushing out flowers and pistils and preflowers etc early, but then took a while to gear up towards towards getting fat. The flower branch out in a spiral pattern up and down the main and secondary colas evenly, creating this misssile shaped colas, but they branch out once sometimes twice, which means less branch to nug ratio than a gorrilla glue by a full multiple. They started smelling like lemons around the time they were fattening up. Then they started getting buff, really little by little, what did rippen rippened evenly. Some colas was basically waste especially the colas stuck on the sides of the tent and some of the colas where for some reason or another there was no light there due to the dense canopy. Truly a BEAST OF A PLANT, HIGH POTENTIAL, great BRANCHING, if you look carefully each plant has more than a dozen colas,
Timed it so the harvest was on a day the plants were chock full for plain water after ten day's worth of additive aided flushing. hung to dry slowly in the tent, got it around 55RH inside the buds over 12 days then trimmed and jarred in miron glass with boveda 62. The trim was a great experience, took a while but not that long because the flowers were so nice in the way they are. you do have to trim every sugar leaf one by one though if you're doing it by hand, broke these sizzors that @Mrs_Larimar sent me because of the resin lol. so I pull these plants out my tent and I just kinda look at them and they're basically dark green because of all the sugar leafs, i'm thinking to myself "shit i messed up this isnt even that frosty". well, what i found out is every time i clipped one of those trademark long sugar leafs off it revealed absolutely resious white frost. That's what can keep someone motivated. ! Once jared, if there's boveda in your jar, you dont really need to burp it daily, or even weekly i just let it sit there, obviously i've been smoking it and following the cure, let me tell you this one needs longer to cure than you're used to maybe, at least two more weeks of cure after a slow dry. Four weeks after the chop , it's a strong weed !
Didn't smell all that loud, but I have a 1300M3/H exhaust so... i'm not surprised. I will say though that my neihbour said she could smell weed even when I wasnt home and she could smell weed in the corridor, from the times I was trimming and basically every time I open my jar. Gonna need a new carbon filter for the next grow. I retired my lightbulb too. Hard to put my finger on the taste because the smoke is so smooth, and when i saw GD had a tag for Woody, i knew right away this was that taste i felt. I will say this though, cure this correctly, dont rush, dry it real slow, then cure it, citrussy tastes, usually those will evaporate, leaving this distinguished terpene heavy hitter much better tasting. So what can i tell you, this weed is white weed, so frosty. Bag appeal is great too, this strain pushes out pistills like no other, maybe even more than the gorilla glue. that means this is a chill weed right? One of the phenos I grew had more pistils than the other two. Mr. B's did, but i dont know if you can really tell from the close ups, i'll try to put some more pictures up. I got two maybe three phenotypes in terms of taste. Mr. B’s is much pine-ier than the others, and when the joint goes out and you light it again, it’s even more piney … I’m actually really happy about that reminds me of white rhino from the east coast back in the day but way piney-ier than that even. When you smoke the other phenos the smell is incense and the taste is really really smooth & woody. Sometimes I find different after tastes on the exhale like coffee, pepper, and maybe sweet/fruity sometimes too depends on the pheno I'm toking on. It is LOUD THOUGH, always have a spare filter on hand IT’S NOT WORTH IT get it !
Well at the end of my first grow, i'd like to quickly review all of Bulbi's own :
Bulbi"s Own Early VegMicro: Fine green powder with calcium and all the rare metals in it. I didnt use it ! Damn, next time I'll amend my soil with it like i did this time on the FBT1
Bulbi's Own Cal Mag : Organic fine white powder with calcium and magnesium, i used it in the feed and sometimes as a spray. I didnt know how much to put in because these things dont come with instructions so i ended up putting 1/4 doses most of time. The correct amount should have been 2.5G/L.
Bulbi's Own Flower Micro : Organic fine beige powder that I used mixed in with the sulfur. I think this one's a keeper, really helped my plants make it through the stress of bottom feeding and all that heat.
Bulbi's Own Mag Sulfur : Organic fine red powder that I used mixed in with the Flower Micro I used this one in my spray too , to great effect, in my opinion
Bulbi's Own Beneficials Trio : This was the base beneficials mix I had, you need to put 7.5 to 15g/l , watch out for clumps, use at the night fall, or when still dark.
Bulbi's Own Anti Afid : I threw it in there i think just in time to protect my plants when I intentionally overwatered when I went on my trip. There were some white flies that emerged, because... well that's what they do isnt it. but there were just a few of them and they ended up flying around wierdly, and within four days, no more white flies, didnt even use yellow sticky tape ! You mix this one with the trio for even more effect. I used these in a spray I think , also.
Bulbi's own Anti-Worm : This one is more directed against larvae, and can be combined with the base trio. I was weary of using it, but I'm glad i did to give my soil matrix that full spectrum of biological protection.
Bulbi's own Humic Acid : This one i loved, looking back I'm regretful not having used it more. the dry humic acid is a great experience, the quality of it was impressive, clumps would seperated into more clumps ad infitum the feed slowly turning completely ink black. definituely using this once a week from now on
Bulbi's own Amino Acids : this one is just amino acids, maybe next time I'll use it at the same time as the humic acid, but I'm not 100% on that. What i did do was spray the top layer of the soil with amino acids when I accidently ran into some issues from spraying kelp all over the place. So in that sense it's an absolute life saver and a must to have on hand.
Bulbi's Own Kelp Extract Concentrate. Loved this one too haha, so thick, and green, check out the video of when i pour it lol. Worked great, raises the pH some so be careful, i used this one as a sprat aswell to get those plant growth hormones pumping during the seeding and veg stage.
Bulbi's Own CO2 : well part of what I set out to do was to test the CO2 theory. Like roots do absorb CO2 but at a lower efficiency than leaves say 15% vs. 85% the theory being enriching your water or feed with CO2 would ultimately benefit the plant. So i enriched water with these ceramic based co2 tablets, because CO2 is a soluble gas, it stays in water. Then i fed the plants in this manner in the feed and also as a spray. The idea behind that was that co2 enriched water would come in direct contact with the plant allowing for absorption of some quantity of CO2 through the leafs. Someone explained to me that these are actually old school techniques. Well I know i started late and didnt follow a regular schedule like i wished for but the plants didn t die, or show any immediate negative upon innoculation, so what can I say? I'm doing this again, perhaps. Only problem is that these things are really a pain to pH correctly
General Hydroponics Dry pH Down : GREAT PRODUCT, hard to find but amazing – not registed on GD for some reason
I still have to make my bubble hash so any advice welcome ! 🚀

Likes
22
Share
@DogDoctorOfficial
Follow
🌸 Week 4 Flower — Permanent Marker 🌸
Here we are, my dear friends, entering the 4th week of flower and things are getting really exciting. The two phenos are now starting to show their true personalities:
• Pheno #1 — our sky-reacher, standing proudly at 2 meters tall! She’s stretching hard, aiming for the moon, and has forced me to pull the lights all the way up. Fingers crossed she slows down here, but what a presence she has in the room.
• Pheno #2 — the compact sister, sitting around 120 cm tall, balanced, and just as beautiful. Both are similar in structure and leaf formation, but their size difference makes this grow even more fascinating.
Despite the heat challenges earlier, the girls are holding strong. With the AC unit now installed, conditions are finally more under control, and I’m hopeful it will make all the difference going forward.
✨ This Week’s Focus ✨
• Height management: Lights are maxed out, now it’s all about keeping balance and preventing stress.
• Environment: Temps are more stable with the AC, giving the plants the comfort they need to keep stacking.
• Observation: These differences between phenos are a reminder of how unique each expression can be, even within the same strain.
🌱 Nutrition
Still running with the Aptus organic program: regulator, top booster, calmag when needed. The base super soil and pellets are carrying the weight beautifully. Leaves are lush, flowers forming, and energy is focused upward.
🔎 A Note on Pheno Hunting
One of the most exciting parts of growing from seed is watching the phenotypes express themselves. Even seeds from the same pack can show different growth patterns, some stretch tall like Pheno #1, others stay compact like Pheno #2. Neither is “better” or “worse”, they simply carry different traits from their genetic background. This diversity is what makes pheno hunting so magical: it gives growers the chance to select the expression that best suits their style, space, and taste.
🐝 The Dognabis Cup is ON! 🐝
This week also marks a special moment, the Dognabis Cup is officially underway! 🎉
Welcoming packs have started arriving at growers’ doors, unboxing photos and videos are already popping up, and the first diaries are live. It’s a joy to see the community coming together.
💌 Invitation
I invite everyone to check out the new Cup diaries, cheer for each other, share experiences, and most of all, have fun. Remember, the more complete and detailed the diaries are, the better your chances to win. And with both autos and photoperiods in the packs, everyone has two chances to shine.
**THE DOGNABIS CUP OFFICIALLY STARTED** ⏰
@everyone
**The Dognabis Cup** is an independent, community-driven virtual competition designed to bring people together, celebrate and share the passion for cultivation. This competition is organized by DogDoctorOfficial and is not affiliated with any of other third-party platforms.
More than 30 contenders will have to grow with the same genetics and using one of our Aptus Pograms (Premium, Clean, Super Soil).
We can follow weekly updates
***(list will be updated all the time as more growers join)***:
🌱 **Dognabis#09P** (**P**hotoperiod)
https://growdiaries.com/diaries/285981-grow-journal-by-sadhus
🌱 **Dognabis#09A** (**A**utoflower)
https://growdiaries.com/diaries/286091-grow-journal-by-sadhus
🌱 **Dognabis #16P**
https://growdiaries.com/diaries/285519-grow-journal-by-fabisfinest
🌱 **Dognabis #017P**
https://growdiaries.com/diaries/285851-grow-journal-by-highgrower0711
🌱 **Dognabis #18P **(**P**hotoperiod)
https://growdiaries.com/diaries/265751-grow-journal-by-develgrow
🌱 **Dognabis #18A **(**A**utoflower)
https://growdiaries.com/diaries/285549-grow-journal-by-develgrow
🌱 **Dognabis #21P**
https://growdiaries.com/diaries/285531-grow-journal-by-mrs-larimar
***Here are some other useful links:***
*Dognabis Cup on Instagram:*
https://www.instagram.com/dognabiscup/
*Explore Aptus Premium Programs:*
https://aptus-holland.com/premium-programs/
*Explore Aptus Clean Programs:*
https://aptus-holland.com/clean-programs/
*Explore Aptus Super Soil Programs:*
https://aptus-holland.com/super-soil-programs/
Happy growing everyone 💚
⸻
🔥 The garden is alive, the Cup is alive, and I couldn’t be more excited. Week 4 flower is just the start of the show, let’s keep pushing forward.
Good luck to all participants, and may the buds be ever in your favor! 🌿💚
📲 Don’t forget to Subscribe and follow me on Instagram and YouTube @DogDoctorOfficial for exclusive content, real-time updates, and behind-the-scenes magic. We’ve got so much more coming, including transplanting and all the amazing techniques that go along with it. You won’t want to miss it.
• GrowDiaries Journal: https://growdiaries.com/grower/dogdoctorofficial • Instagram: https://www.instagram.com/dogdoctorofficial/
• YouTube: https://www.youtube.com/@dogdoctorofficial
⸻
Explore the Gear that Powers My Grow
If you’re curious about the tech I’m using, check out these links:
• Genetics, gear, nutrients, and more – Zamnesia: https://www.zamnesia.com/
• Environmental control & automation – TrolMaster: https://www.trolmaster.eu/
• Advanced LED lighting – Future of Grow: https://www.futureofgrow.com/
• Root and growth nutrition – Aptus Holland: https://aptus-holland.com/
• Soil & substrate excellence – PRO-MIX BX: https://www.pthorticulture.com/en-us/products/pro-mix-bx-mycorrhizae
• Curing and storage – Grove Bags: https://grovebags.com/
⸻
We’ve got much more coming as we move through the grow cycles. Trust me, you won’t want to miss the next steps, let’s push the boundaries of indoor horticulture together!
As always, this is shared for educational purposes, aiming to spread understanding and appreciation for this plant. Let’s celebrate it responsibly and continue to learn and grow together.
With true love comes happiness. Always believe in yourself, and always do things expecting nothing and with an open heart. Be a giver, and the universe will give back in ways you could never imagine.
💚 Growers love to all 💚

Likes
3
Share
@BLAZED
Follow
Week 3 (1-7 to 7-7)
1-7
Temps: 22.2 to 26 degrees
Humidity: 50% to 70%
2-7
Temps: 22.2 to 25.2 degrees
Humidity: 49% to 73%
Watering: #1: 92 ml. #2: 96 ml. PH: 5.8
3-7
Temps: 21.8 to 25.3 degrees
Humidity: 52% to 78%
4-7
Temps: 22.2 to 26 degrees
Humidity: 36% to 64%
5-7
Temps: 19.7 to 24.5 degrees
Humidity: 45% to 62%
Watering: Both 1500 ml.
I transplanted the girls in the early morning to 18L AutoPots.
I use the airbases with an airdome, and a airstone connected to an airpump.
As for the soil i use Plagron Coco-Perlite 70/30.
After i transplanted them i moved them into the 100x100x180cm tent.
The light is at 40% strength with a distance of 60 cm.
Im happy they are finally transplanted into the AutoPots, My plan was to do this way sooner but i forgot to buy the root disks.
So i had to wait till they arrived, and with the legalization in Germany there is a huge delivery time.
6-7
Temps: 18.8 to 25 degrees
Humidity: 41% to 64%
7-7
Temps: 18.8 to 25.5 degrees
Humidity: 44% to 57%

Likes
3
Share
@Eauderay
Follow
This week went fast, she is flowering at a nice rate, leaves not too damaged, just the tip drying of under hot super hps and fans, so just removed all the old damaged fan leaves, cut in half those shading under growth and tucked those healthy one when possible. She looks greyish in strong light compare to the other strains, a true grey back gorilla lol, trichomes all over buds, smell is so interesting, pine, lavenders and citrus with some other terpines blend I cannot identify yet. Fed her some Epsom salt only this week.

Processing
Likes
19
Share
@GreenhouseGrowing
Follow
Auto Berryblue is going great. I am now in the stage where the buds will start fattening up. I definitely have at least four to five more weeks left. She smells amazing and growing crystals all over.
My other autos are exploding with leaves and bud sights. They are beautiful! Cant wait to see how she buds. I have lots and lots of support. She is gonna have heavy branches. Fingers crossed they continue on there gorgeous road of flowering!
https://youtu.be/UG_GNplZJts
AK74 was the only strain I did a Leaf tuck on and her canopy turned out beautiful! No trimming no training.


Likes
Comments
Share
@UrbanBoer
Follow
Since the remain plants have revegged, I will be pampering them with nutrients how 125ml once a week, I’ll be harvesting this baby in January or end of January. Loving the bud sizes… all I need is for them firm up and finish this reveg phase, I do not mind her adding more development on the existing.
Likes
4
Share
@Bbp4eva50
Follow
Plants are thriving, starting to see more and more buds. Trying to kep the humidity in the 60s seems to be the sweet spot. Have really takes down my base as have increased bloom nutrients.
Likes
8
Share
@GeoBeginner
Follow
I'm not going to use stress techniques anymore
Everything is going normally
Just a few more weeks
It's getting very hard to wait 😬
UPDATE !!! ___ Flushed on day 56


Likes
24
Share
@DeepRootsGrowTrees
Follow
COLOMBIAN JACK by KANNABIA
Week #18 Overall
Week #7 Flower
This week no major issues she's got some nice looking buds on her the aroma coming off this lady is amazing. She's dealt with the elements for the most part!!

Likes
34
Share
@PEAKYPLANTERS
Follow
Hello everyone, my friends! this week we will do more with the rinsing of the roots, waiting for these magical nuggets to swell even more 😉🍭
Likes
Comments
Share
@Nofeckingclue79
Follow
These buds are are a crazy purple colour super dense and smell lovely cannot wait to give the update on how it tastes and smokes 🤤✌️👍

Likes
24
Share
@BudMunchies
Follow
04/13/25:
The plants have now fully adjusted to their new environment, and all five are looking vibrant and happy. Leaf posture is strong, color is rich, and the canopy is filling in nicely. They’re handling the training and topping well, showing no signs of stress, and overall growth has remained consistent.
While inspecting them before today’s round of training, I noticed what appear to be early signs of male pre-flowers on PP1 and PP4. It’s still too early to be certain, but it’s looking like I may already be down to three possible females. I’ll be keeping a close eye on them over the next week—things should become much more clear soon.
Today I topped all five plants again—this time at the first node of each of the four main branches created from the last topping. This will help build out a broader, more evenly structured canopy. I also used plant ties to gently pull down each of the branches to open up light penetration across the plant. In addition to branch training, I used ties to lightly hold back some of the larger fan leaves on the lower two branches to help expose new growth sites. I’ll leave those fan leaves on for another 3 to 4 days as the new tops develop, then remove them to redirect energy upward and continue opening the structure.
They were also watered today with a light nutrient mix, similar to last week’s. The plants still look very nutrient-rich, so there was no need to push the EC any higher just yet. Based on the current rate of uptake, I expect they’ll be ready for another watering in about 3 to 4 days.
If anything noteworthy comes up—especially regarding sexing—I’ll update sooner. Otherwise, I’ll be back in a few days to document a light defoliation and any continued developments.
Likes
45
Share
@BodyByVio
Follow
Beautiful flower full of trichomes. Smell and test fantastic. Very fast flowering. She was done on day 49 but I cut her down few days later.
I love the strain, the only thing that I will like this strain to have is a better yield. Beast quality buds I ever grew.

Likes
5
Share
@Chubbs
Follow
ADVANCED SEEDS WEEK 3
AUTO PURPLE DIESEL
This week has been exciting the growth has been phenomenal. I would say it's probably been 4in of growth this week. The shade of grren shows no signs of issues. I did add a little GH Calimagic to the feed so will see how they take it. All in all Happy Growing

Likes
17
Share
@420DeepGrow
Follow
Gracias al equipo de AnesiaSeeds, Marshydro, XpertNutrients y Trolmaster sin ellos esto no sería posible.
💐🍁 Sticky Boof:
Prepárate para dejarte llevar por Sticky Boof, nuestra última obra maestra que está poniendo el listón muy alto para los amantes de las índicas. Nacida del legendario cruce de Super Boof y Cadillac Rainbow, Sticky Boof es una potente planta con un asombroso 80% de dominancia Indica que promete una relajación sin igual.
Prepárate para un viaje épico con el asombroso 37,5% de THC de Sticky Boof.
Sumérgete en una cosecha abundante con Sticky Boof, que produce hasta la friolera de 500 g/m² en interior y 800 - 900 g por planta en exterior. Esta variedad es generosa y está lista para llenar tu alijo de cogollos de la mejor calidad.
Sticky Boof es todo rapidez y eficacia, acelerando el tiempo de floración en sólo 7 u 8 semanas.
💡TS-3000 + TS-1000: se usaran dos de las lámparas de la serie TS de Marshydro, para cubrir todas las necesidades de las plantas durante el ciclo de cultivo, uso las dos lámparas en floracion para llegar a toda la carpa de 1.50 x 1.50 x 1.80.
https://marshydro.eu/products/mars-hydro-ts-3000-led-grow-light/
🏠 : Marshydro 1.50 x 1.50 x 1.80, carpa 100% estanca con ventanas laterales para llegar a todos los lugares durante el grow
https://marshydro.eu/products/diy-150x150x200cm-grow-tent-kit
🌬️💨 Marshydro 6inch + filtro carbon para evitar olores indeseables.
https://marshydro.eu/products/ifresh-smart-6inch-filter-kits/
🍣🍦🌴 Xpert Nutrients es una empresa especializada en la producción y comercialización de fertilizantes líquidos y tierras, que garantizan excelentes cosechas y un crecimiento activo para sus plantas durante todas las fases de cultivo.
Consigue aqui tus Nutrientes:
https://xpertnutrients.com/es/shop/
💻 Trolmaster Tent-X TCS-1 como controlador de luz, optimiza tu cultivo con la última tecnología del mercado, desde donde puedes controlar todos los parametros.
https://www.trolmaster.com/Products/Details/TCS-1
📆 Semana 2:
Fantástica semana, estan creciendo de una forma espectacular gracias a la ayuda de @marshydro, @xpertnutrients y @trolmaster.
Se puede apreciar un cuarto nudo y se ven aparecer las primeras futuras ramas, espero que todo siga asi.
Esta semana espero trasplantar a la maceta definitiva.
Potencia de la lámpara: 50%

Likes
2
Share
@fabialien
Follow
Semana sel 9 al 14 de septiembre 2024.
Vemos un desarollo bastante vigoroso en todas, esto también se puede adjudicar el hecho de la nutrición que han estádo llevando esta tanda se fem y regulares, la mandarine qué nació con apical va bastante bien.


Likes
18
Share
@Diips
Follow
d.50 a few spots appeared on the leafs.
gave a 10 ml dose of bio p k and waiting a week before giving a dose of orgatrex and bactrex
edit: d.50 i also gave 0.5 ml of calmag from Biobizz
edit d.53 will i be giving her the orgatrex and bactrex treatment ✌️🌞
d.53 she got 20 ml orgatrex, 1g of bactrex and 0.5 ml of biobizz calmag
d.54 added scrog and did lst with clips to even out the height and space… still need to adjust it.
Likes
5
Share
@Ibgrowing
Follow
She has grown a lot since last week so i did some more lst. I think that she has almost reached full growth potential if she hasn't already. The bud development is starting to ramp up. I also removed a few leaves
I watered once with 2,5l of rain water and another time with 3l.
There were some very hot days (32-38 °C) so she had to be in the shade a lot of the time.
Likes
6
Share
@AcidBurn_40
Follow
21.02.24 BT 32
Mahlzeit Buddy's 🙂
Den Lady's geht es Wunderbar Sie haben alle beide auf gehört sich zu Strecken.
Jetzt geht es langsam los und die Buds Plustern sich auf.
Jeden Tag bis Dienstag werden noch da und da ein paar Blätter entfernt aber ohne Sie zu stressen max 2 pro Pflanze am Tag.
Es sind auch nur die Blätter die Bud's verdecken
Heute gab es wieder lecker Futter 😋 Hesi Blüh Complex 5ml auf 1L Wasser , Hesi Booster 2ml auf 1L Wasser ,Hesi Phosphor + 0,4ml auf 1L Wasser und Hesi SuperVit.
Alles zusammen ergab ein Super Nährstoff Trunk der Sie jetzt erst mal für 4 Tage versorgt .
Skunk #1 riecht sehr stark aber das war klar und immer sehr sehr fein.
Der Typische Skunk Geruch wird von einer schönen Zitronen 🍋 note abgerundet.
Tangerine Sugar riecht sehr süß und fruchtig.
Tricome bilden alle beide sehr gut, der Nodien Abstand der Skunk #1 ist definitiv kleiner somit gehe ich stark davon aus das sich fast ein dicker kolben zeigen wird und das an allen Haupt und Seitentriebe.
Tangerine Sugar wird auch schöne Bud's zum Vorschein bringen aber halt keine durch gehende kolben 🙂
Ihre Triebe sind definitiv nicht so kräftig gewachsen wie die von der großen Schwester aber verstecken brauch Sie sich auch nicht.
Mögen all eure Lady's Gesund und brächtig Wachsen und euch mit schmackhaften Stuff versorgen 😉
Danke für vorbei schauen bis zum nächsten Update✌️😊

Likes
38
Share
@Esoteric_growing
Follow
Defoliated one final time, running out of height space fast. Hopefully they do not stretch much more in the final 6 days of stretch.
Also picked off a few lower shoots after pics were taken, it was quite a aggressive defoliation so hoping they recover well in the next few days.
Also raised ec by 0.1 as the ec dropped a point over the last few days.
