The Grow Awards 2026 🏆 


Likes
Comments
Share
@Golden
Follow
Week 5: Bud Bulking Bonanza
As the fifth week unfolds, excitement brews among growers as their prized plants enter a phase of explosive growth. Golden, the ever-watchful cultivator, observes with delight as a subtle change takes hold – a sign that the harvest is on the horizon. The once delicate buds are now transforming into hefty, resin-dripping colas, reminiscent of robust donkey dicks. It's a sight to behold for any cannabis connoisseur, promising a bountiful yield and the fulfillment of months of dedicated care.

Processing
Likes
11
Share
@ganjaman24
Follow
Sorry guys been lagging on posting because got a lot other stuff going on n I figured this plant would’ve been chopped by now but I must say she’s been filling out quite nicely..I lowered the light hours to try n see if thatll he’ll ripen her a bit faster as I’m looking to replace her with another plant

Likes
166
Share
@iMeus
Follow
(11.20.18) Hello friends,, I'm going to update this grow on my computer since the phone is struggling to even handle typing this message... I'll try to have everything ready by tomorrow. Much love
(11.21.18) ~ Update ~
Hello again! I have some good news! The buds are purple and beautiful, I can’t wait to see the end results :) I hoped the cold weather would bring out some purple qualities and boom! It did it :D as a side note it was a bit weird making a vlog while being sick but hey that’s how it goes. I hope you guys have a wonderful Thanksgiving, enjoy the holidays my friends, much love <3
~ Individual Progress Notes ~
[CBD Blueberry]
Height: 23”
Tops: 7
Notes: This girl may be the weirdest one but she’s got the buds! I’m not sure what will become of this mutated girl, though I’m sure she’ll have fantastic anti anxiety qualities. I might turn most of the end product into RSO. Though I’ll cure and keep some on the side for times of need.
[Mazar]
Height: 22”
Tops: 16
Notes: Had a bit of nute burn, not too much though. I’m going to feed this girl separately so I can avoid stressing her out. The Mazar has the most bud sites, this make her buds smaller in comparison to CBD and SSH.
[Super Silver Haze]
Height: 23”
Tops: 16
Notes: I have to say it, this plant might be my favorite. I love Mazar and all her fluffy beauty but the heavy stems, big fans, packed buds, she took my number spot! I love how strong and easy it is to deal with her. As a new grower I couldn’t ask for a better beginner strain.
[White Widow]
Height: 23”
Tops: 16
Notes: Okay, White Widow will always be my numero uno. An all day smoke that never gets old (to me). I could work, study, game, or sleep without any distractions or odd effects. This might be in part to my personal chemistry, so I can’t say this will affect you the same way. I hope this girl is like all the WW I’ve had before or better!
~ Final Thoughts ~
As I bring my weekly update to a close I wanted to say thank you all for the support and comments, you have no idea how grateful I am to each and every one of you. Enjoy the holidays, much love & good grow’n <3


Likes
29
Share
@Spliffing_Around
Follow
I am differentiating the ec between the plants , so please do not mind the feeding, 3 are flushed , the rest get 1300-1500 ec


Likes
21
Share
@Felloffthegrid420
Follow
put the net in lets see how well this well go. didn't have no $$ so i went around the house and yard and got to work and built me a net set a screw ever two inches come out pretty cool if yeah ask me if all goes to plan they sure are beautiful gals so far 💪🙏🙏

Likes
14
Share
@FourVentiFarms
Follow
28th week for critical
the critical was very resistant, very strong but had like 50 seeds maybe for stress or defected seed
Likes
6
Share
@midnitrtoker
Follow
Added pump & timer, still feeding a 3.0 EC the nutrients are in Grams not ML I hope this didn’t confuse people. They’re still going strong. Please stay on the look out as I will be doing a Black Velvet journal and that’ll be one to watch!!!!
Processing
Likes
43
Share


Likes
102
Share
@love_2_grow
Follow
D21 - Last girl standing. She may be all alone in the tent, but she is thriving and looking healthy, and I hope to have another girl soon to keep her company. I gave her about 0.5 liters of water @ pH 6.1.
D24 - The girl is thriving: 12 cm tall, 24 cm wide. Short and stocky like Cartman.
I switched the light from about 40% to 60% yesterday, and I'm now reading around 500-600 PPFD at the canopy level. On the high end for sure, so let's see how she handles it. However, the daytime temp in the tent jumped up to around 30 degrees C after I switched the light. #tinytentproblems
D24 (part 2) - Alright, it's only been a few hours, but it is clear that she REALLY didn't enjoy that sudden increase in photons. After some hours under the more intense light, I checked on her, and she displayed several signs of light stress, such as her leaf edges curling upward ("taco"-ing) while the whole leaf was drooping.
Clearly, she wasn't happy, so I dimmed the light until I saw around 430 PPFD at the canopy level. She is "sleeping" now, but I will check on her tomorrow to see how she reacts.
D27 - Today was the last day in week three of veg. I think she is already going into pre-flower, and she already has a faint smell to her.
She is 16 cm tall and 28 cm wide.
I haven't trained her yet but will start doing some LST next week. I also started brewing compost tea (worm castings, neem meal, kelp meal, biochar, rock dust, algal limestone, bentonite, and molasses) which I will leave overnight and feed to her tomorrow.


Likes
15
Share
@masterofsmeagol
Follow
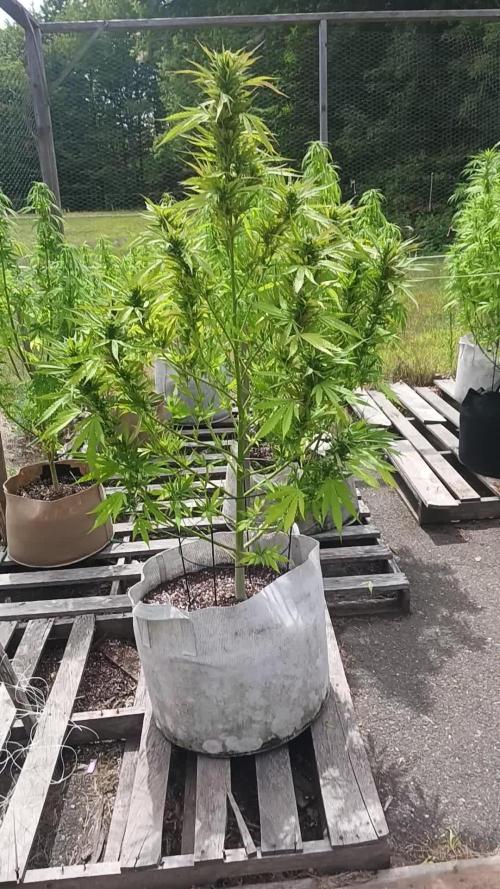
8/17 Watered everything but the 50. Found two leaves with sep markings on the pink kish in the 50. Definitely not using old soil again. I'm pretty sure THIS plant contracted it from the soil and not the way the others did with the lawn mower and birdseed hijinx. It's supposed to rain for the first time basically all summer. It's am 80% chance so I HELD OFF ON PLANT DOCTOR AND DID NOT APPLY as I'm supposed to have a clear day after. I'll apply the plant doctor in the morning. I'm hoping this rain will knock down a bunch of those thrips. They seem to be on a small branch on a plant or two. One or two leaves show damage and I'll pick them off. I figure I'll get them after I apply plant doctor. I'll use either citric acid or just my regular bt-k pillar treatment with Castille or liquid soap. That will kill them as well. I'm on really worried about it. I also might just buy a bunch of lady bugs and unleash them once things get further along.
EDIT: TOOK A QUICK VIDEO AND A COUPLE PICS. HOPEFULLY WE GET THIS RAIN. IF NOT IM GOING TO TREAT THE THRIPS THAT ARE ON TWO PLANTS NOW. I THINK IM GOING TO GO WITH BT-K FOR NY PILLARS AND HOPE THAT THE DISH SOAP IN THE MIX KILLS THE THRIPS. I HAVE LOTS OF DIFFERENT OPTIONS SO ILL FIGURE SOMETHING OUT. BUDS SEEM TO BE EXPLODING IN GROWTH. OH AND THANKS TO THE OUTDOOR GROWER THAT MESSAGED OFFERING TO HELP. I APPRECIATE THAT. THANKS.
8/18 We got the rain we were expecting. It was sheet rain for a few hourscand rained during the night. Everything was drenched and it was cold (50°F). I shook off the special kush that's way further in flower. I decided to use the leafblowrr despite the risk of spreading anything. I did it so that it wasn't ever blowing TOWARDS another plant but still. I was hoping it might blast off some thrips that might have survived that torrential rain. We've never had a dry summer like this. I'll moniter things. My water day is tomorrow so I assume that's when the girls will get their plant doctor dose. It's a great time of year for cannabis growers. We get to watch all the hard work we've put in literally pay off. It's very peaceful in the garden.
EDIT: Went over at about one to check things out and do some minor defoliation. I checked on the thrip situation and I dont know if I blasted them off with the leafblower or if the rain washed them away bit I doubt it. Ivecmade the decision to treat these little bastards. It's on one plant but it's started to spread to another branch on another plant. I probably just overlooked it but still. Seeing that it rained like he'll and I'm seeing like zero signs of septoria I'm going to treat everything. At least I think I am. I haven't decided what to use. I think I could just use bt and soap and I'd probably be alright. I'd feel better doing that as it's something I'm familiar with. Outdoor growing. It's always something.
8/19 In the 40's last night. Hopefully that will help with the thrips. I was hurried and since today tops at 72° I only watered the 10th planet big mk ultra and the chem dog with preventative plant doctor. I'm not seeing hardly any septoria and if I do itsca random leaf. I mixed up 3tsp of citric acid and some Dawn in a 2 quart hand sprayer and treated the 10th planet that I thought had heat stress and the Pink kush in the ten gal that has the damage. I also treated a branch on my good tenth planet. It was the only branch with markings so I think I've got it early enough. I'm just wondering the best way to tackle this. The pink kush I'm sure, could handle spinosad. That strain is much later flowering. I'll see how the citriccacid works and go from there. If the other girls need water they'll get it when I get home alongcwith plant doctor. I've got some work to do. I'll keep this updated. Opinions are always welcome.
UPDATE: THE PLANT IN THE TEN I SPRAYED LOOKS BETTER THAN WHEN I SPRAYED IT! I ALSO DIDNT WATER AS ITS UNDER 70° AND EVERYTHING I WATERED LOOKS WORSE THAN WHAT I DIDNT. WATERING NEEDS CHANGE QUICK WITH A 40° TEMP SWING. THESE THRIPS ARE GONNA HAVE A FEW MORE NOGHTS IN THE 40'S. THE CITRIC ACID SEENED TO KILL ON CONTACT. MY PROFESSIONAL BUDDY ADVISED TO ORDER GREEN LACEWINGS AS OPPOSED TO USING SPRAYS. HE SUGGESTED SPOT TREATMENT BUT AFTER MY RESEARCH ON THRIPS THAT WONT HE AS EFFECTIVE. I HAVENT DECIDED WHAT TO DO. I MAY ORDER THE LACEWINGS AND I MAY CONTINUE AND ROTATE TREATMENT. I DONT WANT TO OVERREACT (WHICHVI TEND TO DO) BUT I ALSO DONT WANT ALL MY LEAVES TO DIE. ILL KEEP THIS UPDATED. IM PLANNING TO GO OVER TONIGHT AND CHECK THINGS OUT. I MAY SPRAY A FEW MORE PLANTS AND WATER WHILE IM THERE. ITS TIME FOR THERE PLANT DOCTOR PREVENTATIVE.
8/20 I watered the two kush in the back WITH THE PREVENTATIVE DOSE OF PLANT DOCTOR as they were dry I assume due to the wind they get. The one in the 50 I found one sep leaf. Looking carefully arpund the garden I can tell that I have a thrip infestation. First time I've fought this and it seems most people don't really know what to do besides predators at the beginning of the season. I'm too far along for spinosad. At least thats what I've been told. My pro buddy said to try to spot treat it. It's not bad bit I'm afraid it might be worse than I think. The plants I treated with citric acid look MUCH better. I think I'll dial the dosage of citric acid down and start with that tonight and switch up treatments. I can get rid of them it's just going to take a ton of work. I think I've had them before and I attributed to something else. I so think that the very early pink kush plants could handle spinosad. I hope so. The plants I watered the other day look overwatered. The plants I didn't water look GREAT. The special kush in late flower looks happier than I've ever seen her. The difference being we went from 104° one day to 72 the next with 46° night Temps. This week is highs of 70's lows of high 40°'s. I've got a lot of work cut out for me. Didn't do a video as I didn't have time but I'll do one.
EDIT: Nothing needed to be watered at noontime and I'm trying to not overwater so I left them. The two I watered this morning are fine. I'm glad I caught this thrip bullshit when I did bit it sounds like it's going to be a HUUUGE pain in the ass to beat. One thing right after another. I've found those suction marks and the silvery shit they leave behind on pretty much every plant now. I'm thinking me using the leafblower (away from the other plants I THOUGHT) must have blown a bunch of them around. I'm not seeing a lot of bugs. Mainly feces. I did find a couple adults. Honestly, I've probably had these before and not known it or attributed it to something else. Literature I'd all about spinosad which of course I have on hand. AI told me I could use spinosad in early flower so MAYBE I could treat the pink kush plants with it but ill have to figure something else out for the other girls. I'm planning to treat tonight depending on where the research takes me. Not sure exactly what I'll be using but I'll keep this updated.


Likes
9
Share
@Canadian
Follow
Day 71 from seed the plant seems to be growing beautifully and now they are starting to develop beautiful flowers and they are entirely covered with white snow trichomes it is a very strong and powerful plant to grow what a beauty . I also I defoliate some of the lower branches that will not going to develop well enough because lack of light so they can use that energy on the upper buds instead of the lower ones.
thank you for reading I will continue to update have a happy grow.

Likes
76
Share
@DogDoctorOfficial
Follow
🌸 Week 8 Flower – The Trichome Symphony Begins 🌸
Eternity Grow Cup
This week… it’s all about the frost. ❄️
We are diving deep into the universe of trichomes, those magical crystal-like structures that define potency, aroma, and visual beauty. Each pheno this week is presented with its own dedicated video — so everyone can witness the uniqueness and evolution of these genetics firsthand. The photos? Focused close and true on the trichomes and their stalks, the very essence of the plant’s protective and expressive language.
💎 What Are Trichomes?
Trichomes are tiny resin glands that cover the surface of cannabis flowers and sugar leaves. They’re responsible for producing and storing cannabinoids (like THC and CBD), terpenes, and flavonoids — the compounds that create the plant’s effects, scents, and flavors.
They act as the plant’s natural defense — from UV rays, pests, and environmental stress — and in return, they gift us with beauty, medicine, and art.
Why So Many Trichomes Here?
This room has turned into a crystal forest thanks to a harmonious mix of tech, care, and nature:
🔹 Spectrum Tunings:
Using the TrolMaster system, we’ve dialed in a spectrum rich in reds, far-reds, and UV at precise times to stimulate trichome production. The plants are responding in full.
🔹 Lighting:
The under-canopy power of the ICL 300s, combined with the canopy-level intensity of the Model 1s, is creating full-spectrum saturation from top to bottom. Buds are stacked, frosty, and glowing from every angle.
🔹 Nutrition Synergy:
The tag-team of Aptus Holland and Plagron has been flawless. The clean base, balanced micro and macro elements, and biostimulants have driven these girls into full expression mode. You can see the nutrition working in every crystal.
🌿 Where Are We Now?
We’re likely one week to ten days from harvest, but of course we’ll follow the plants’ signals. They’re still swelling and building — it’s the final stretch, and they’re sprinting.
Nerdy Note:
Trichomes can be bulbous, capitate-sessile, or capitate-stalked — and in this run, the capitate-stalked ones are standing tall and loaded. Expect a full cannabinoid and terpene profile when it’s time for analysis.( bro talk not lab hihihihi)
🌟 Let’s take a moment to recognize that we’re witnessing the peak of this cycle. This is living art, frozen in time by a camera lens but alive in scent and energy.
This Week’s Feeding Program
To support this explosive trichome production in Week 8 Flower, we’re feeding with precision and purpose. Every drop counts now, and here’s the clean, efficient mix we’re running:
• Aptus Holland – Regulator: 0.15 ml/L
• Aptus Holland – System Clean: 0.25 ml/L
• Aptus Holland – RO Water Condition: 0.8 ml/L
• Aptus Holland – All-In-One Liquid: 1.25 ml/L
• Plagron – Green Sensation: 1 ml/L
• pH set at 6.2
💧 We’re keeping it clean, clear, and consistent. No extra PK boosters or unnecessary additives. Just smart nutrition, tuned spectrum, and stable conditions to let the plants express themselves naturally. The synergy between Aptus Holland’s Clean Program and Plagron’s Green Sensation is clearly showing in every frosty bud.
This week, we’ve fine-tuned the spectrum to push the plants into full resin-production mode. I’ve reduced the white light intensity to 40% while keeping the reds and UVs running at 100%. This shift focuses energy on the wavelengths that directly stimulate secondary metabolite production—especially trichomes. Red light enhances flower development and density, while UV exposure encourages plants to produce protective compounds, like cannabinoids and terpenes, as a natural defense. This balance between lower photosynthetic pressure and high-spectrum stimulation is helping the girls finish strong, frosty, and full of character.
🙏 Massive thanks to all sponsors, followers, friends, and growers in the community. To the ones competing, to the ones just watching — THANK YOU. This is almost the end of the road, and every diary, every plant, every effort deserves respect.
💬 Don’t forget to follow the full 4K experience on YouTube, and for behind-the-scenes action and updates, join us on Instagram.
With Grower’s Love,
DD 🌱
Genetics - Runtz https://www.zamnesia.com/6000-zamnesia-seeds-runtz-feminized.html
Nutrients - Plagron https://plagron.com/en/hobby
- Aptus Holland https://aptus-holland.com/
Controls - Trol Master https://www.trolmaster.eu/
LED - https://www.futureofgrow.com/en
LED - https://www.thinkgrowled.com
Soil - https://www.promixgardening.com/en
Germination - Cannakan https://cannakan.com/?srsltid=AfmBOopXr-inLXajXu3QFgKXCXXos4F1oEvScjMKIB5MR5dk8-GJ-F49
DOGDOCTOR 15% off
Smoking Papers - https://ziggioriginal.com/
Terpene saver - https://grovebags.com/
As always thank you all for stopping by, for the love and for it all , this journey of mine wold just not be the same without you guys, the love and support is very much appreciloved and i fell honored with you all in my life
With true love comes happiness Always believe in your self and always do things expecting nothing and with an open heart , be a giver and the universe will give back to you in ways you could not even imagine so
As always, this is shared for educational purposes, aiming to spread understanding and appreciation for this plant. The journey with nature is one of discovery, creativity, and respect. Let’s celebrate it responsibly and continue to learn and grow together!
Growers Love To you All 💚
#EternityGrowCup #RuntzHunt #GrowersLove #CannabisCommunity #AptusHolland #ProMixSoil #TrolMaster #Zamnesia #Plagron #ZiggiPapers #Grovebags

Likes
7
Share
@Cultivatorcarlos
Follow
everything in the second week of flower went well. she really stretched and the buds quickly started getting fat. also every watering i would notice a very strong odor of weed.
december 22nd 2021: gaver her last half of gallon used in last feeding. also nothing was tested. ph tested at 6.6 last feeding and it usually comes out a little higher after a few days.
january 1st 2022 i noticed the first trichomes.
Likes
26
Share
@donutgrower
Follow
Big week! I got my new EarthBoxes and a bunch of goodies. I picked up the Probiotic Farmer's Alliance kit from BuildASoil, so I also got some EM-1, Kashi Blend, dolomite lime and Malibu compost. Alongside that I picked up Colorado Worm Compost (vermicompost), Gnarley Barley (malted barley, corn and hemp) and Craft Blend (aprox 3-5-2 organic mix). Unfortunately there was a bag of soil missing, so I ended up using my own mix though I am somewhat scared of it being too clay-heavy for the SIP. I inoculated with EM-1 and began fermenting a batch of activated EM-1 to make the bottle last longer.
It looks about a week from LST, after that I hope to set up a two-tier SCROG setup and begin growing the bushes. I will begin spraying AEM-1/EM-FPE/EM-5 alternatively once a week for IPM, I will try to avoid using neem this round (unless I find this approach lacking). I also brewed a batch of EM-FPE with aloe that smells incredible, I can't wait to give it a go.


Likes
422
Share
@Crashoverite
Follow
Hi all🧑🌾
Welcome to my final 🍌💜👊 week update.
First of all. I would like to thank you all for such an amazing support on this bananas journey. I am amazed of the amount of love received from community here. Thank you Grow Diaries and Fastbuds for opportuniy to share and grow this amazing genetics. Love you all❤️💜💚
Was looking for strong indica dominant strain and after reading and hearing so much about this one. Just couldn't resist to not give a go. Was a bit worried before planting seeds that my final yield outcome may not be satisactionary as only have 0.26msq and Fastbuds advertising this strain as 450-550g msq but thankfuly my result was way above this scale.
My 2 beautiful ladies
Athena - right corner lady. She was slighlthly more dominant over entire grow cycle. She got more space on scrog earlier and that's why she developed the most.
Xena - left corner lady, I belive that she could outgrew her sister if she just have more space and another week of time. Did not expect her to turn so well on the end.
Both girls were put in darkness for 48h before chop. Wet trimmed and hang for a week. Daily jars burbing for 10 days and every 2-4 days now.
Weights
Wet trimmed
Athena 870g
Xena 632g
Total 1502g
Dry trimmed
Athena 172g
Xena 147g
Total dry 319g
Bubble hash 6g (37g of trims)
I am very happy with this result.
In my opinion Banana Purple Punch Auto its a masterpiece.
Thank you so much for all the support, likes, follows and comments 🙏❤️💜❤️
Peace and love brother and sisters ✌️💚🧑🌾
Smoke review coming in shortly
Links
https://2fast4buds.com/seeds/banana-purple-punch-auto
https://plagron.com
https://www.biobizz.com/
https://fishheadfarms.com/


Likes
30
Share
@Silverback_Guerilla
Follow
9/18:
New week...fed with Boomerang and Kangaroots
9/19:
Applied Axiom harpin proteins and boomboom spray
9/20:
Fed full strength TPS One...decent growth. The smaller one is less droopy now.
9/21:
Tucked a few leaves and took some photos and a video.
Looking good. Just a couple more days of 24/0...
9/22:
Switched out the 560w of 5000k CCT lighting for 720w of 3000k CCT lighting and set the timer for 12/12.
Decided against 13/11 with emerson effect...trying to save a few bucks on electricity.
I'm keeping the lights at 30" from the tops for a day or two.
9/23:
The girls loved their first night of sleep...so perky!

Processing
Likes
20
Share
@Wilflay
Follow
Hi guys! This is my first grow ever. For this round I'll have 2 Northern Light Auto from WeedSeedShop (WSS).
I'm so psych. 😝😁 I'm making the most off the current situation by realizing a long lasting dream off mine.
For your knowledge, I'm using a 60x60x160cm grow tent, 2 small fan, an 220m^3/h extractor (220/280) with a 400m^3/h Bull Filter.
I'm also using a humidifier for day time and a dehumidifier for night time.
The germination pots I used are 7x7x7cm.
For the monitoring, I have a low cost meteo station with a remote sensor which is in my grow tent.
I'll use BioBizz and GHE for my nuts and BioBizz Light Mix for the substrate.
I'm planning to reuse it for my garden on my future grow. I bought an anaerobic composter to this effect.
I hope to make around 2 ounce.
Take care.
Stay safe and masked.😷

