The Grow Awards 2026 🏆 


Likes
Comments
Share
@justsomedude420
Follow
3/13/2024
Day 49 from sprout 🌱
Love the way this watermelon is developing 😍 She is dinking about 3/4 a gallon every 3 days and being fed once a week. Smells are getting stronger... kind of a sweet/pungent aroma. Nice long pistils, frost is starting to appear 👍
Thanks for the visit and happy growing ✌️
Processing
Likes
7
Share
@KonstantinUKR
Follow
Результат недели видно на фото
Честно говоря, удивлён результатом роста в 4л горшке.
Рипен лить закончил, неделя воды теперь.


Likes
114
Share
@Natrona
Follow
This week, my Titans are sleeping in a cooler dark room until harvest.
So for your viewing pleasure, I've loaded some videos made of the Titans during there time with me.
I'm wondering what to serve at my Queens Tea Party... I made some butterscotch pistachio bars and modified the recipe for less sugar. 😋 We experimented with topping the bars with black cherry spread, orange marmalade and a mango jelly. All are very tasty as the bit of sour/tart enhances the butterscotch sweet.
A few solar eclipse pics.

Likes
9
Share
@TickleToast
Follow
Looking very good here at the beginning of week 5,
Finally upped the ppm a bit, can tell they're starting to get hungry.
9/10 clones rooted, picked out the 3 best looking and got them transplanted! 🚀🚀🚀
Nutrients for the transplanted clones are as seen in the previous few weeks,
Remaining 6 clones will be donated to some fellow growers in need ~ Always feels good to not have to throw plants away 😎
~~~
Small defol - bottom leaves and some crowding the center,
Definitely some of my biggest early fan leaves so far - over 1ft long AND wide 🤯🤯🤯
~~~~~~~~~~
Granddaddy Purple (Feminized Photoperiod)
(Sponsored By)
~Zamnesia~
https://www.zamnesia.com/us/11056-zamnesia-seeds-granddaddy-purple.html
Hybrid: Grandaddy Purple x Purple Kush (Purple Urkel x Big Bud*)
30% Sativa / 70% Indica
Flowering Time: 63-70 Days
22% THC
CBD 1%
~~~~~~~~~~
Zamnesia was kind enough to give us a discount code with this grow ~ go get you 20% off at checkout!!!
20% Off Code: ZAMMIGROW2024
https://www.zamnesia.com/us/
~~~
In-depth information regarding my day-to-day / common practice may be found on the front page of my profile (in the comments).
~~~
Breeders - my services are available!
I'm always keeping an eye out for great genetics to test and showcase.
Shoot me a message! :)
~~~
https://bit.ly/3MplXqf
^^^GrowAce Affiliate Link^^^
Use this if you want to show some support!
(Just follow that link and the cookie stored in your browser is good for 30 days!)
~~~
Questions & Feedback are welcomed, feel free to message me!
Thanks for stopping by growmies! 🤙🤙🤙🙏🙏🙏
~~~~~~~~~~

Likes
13
Share
@gr3g4l
Follow
Puedo decir que la sobrefertilización fué superada con éxito y aumentaré las dosis de top bloom y top bud. A falta de agua de osmosis sigo mezclando agua destilada con agua del grifo mitad mitad y añadiendo ácido cítrico para bajar el Ph .
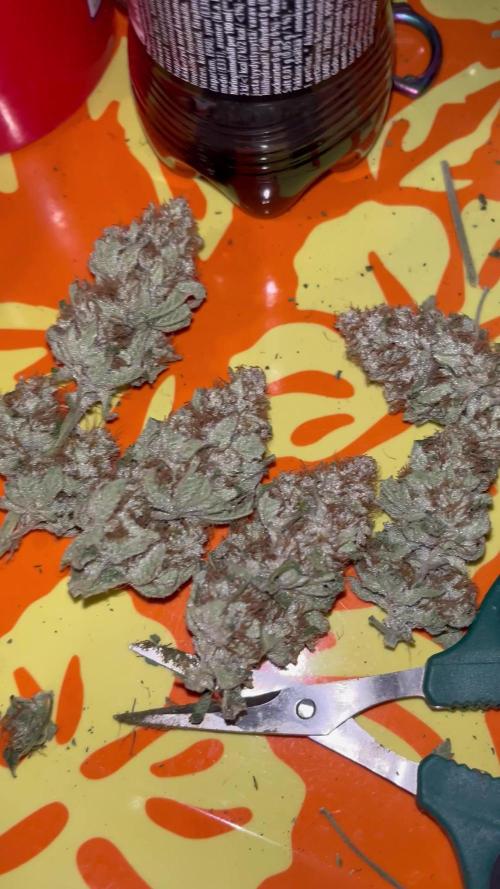
Esta semana es ya de locos con el olorcito que desprenden, Un olorcito a fresas, caramelos y madera todo en uno. tremendo. xd
A estas alturas uno empieza a sufrir por la posibilidad de que aparezca la dichosa botritis y hay que vigilarlas más amenudo y tener preparadas las tijeras.


Likes
Comments
Share
@LokalGrenz
Follow
Everything looking good so far solo cup for another
Week or two I think
Likes
8
Share
@Indiepolo
Follow
Additional 8cm this week I think my setup can handle 8 more, anyway I am happy with the grow. Have a nice day.
Likes
43
Share
@MadeInGermany
Follow
Hey everyone 😋.
We arrived the week before last .
The last update comes on Saturday before they are harvested next Tuesday :-).
It just smells incredibly delicious, just like the last time it grew with this phenotype 😍.
This mother will stay defensive for a very long time 👍.
She is really something special 😃.
Otherwise everything is still going great.
Starting tomorrow, she will only get 0.4 water for the last 5-6 days, which she can use up her last nutrients.
Until the next update I wish you a nice week, stay healthy 🙏🏻 and let it grow 🍀👏🏼
You can buy This Strain at :
www.Zamnesia.com
☝️🏼☝️🏼☝️🏼☝️🏼☝️🏼☝️🏼
Strain
Gelato clone from mother (Zamnesia )
☝️
Genetics: Wedding Cake x Gelato x Gelato 33
👍
Vega lamp: 2 x Todogrow LED CXB3590 COB 55 W
1 x Sanlight S2W 62 W
💡
Flower lamp : 2 x Todogrow LED CXB3590 COB 55 W
1 x Sanlight S2W 62 W
💡 ☝️
Grow Aero System : Growtool 0.8
☝️
Fertilizer:
Canna Aqua Vega A + B , Canna Aqua Flores A + B , Rizotonic, Cannazym, CANNA Boost, Pk 13/14, Canna Cal / Mag, Canna Ph - Grow, Canna Ph-Bloom
☝️🌱
Water:
Osmosis water mixed with normal water (24 hours stale that the chlorine evaporates) to 0.2 EG. Add Cal / Mag to 0.4 Ec Ph with ph- to 5.5 - 5.8
💦 💧
Likes
71
Share
@Roberts
Follow
Quebec Blast grew pretty well. Buds are rock hard and frosty. She is not known for large yields so I am very satisfied with my results I learned a lot during this run. Was first grow with photoperiod plants in DWC. I grew her underca Spider Farmer SE5000, in a New Level Hydro bucket. She came out great. Started to foxtailing at end. My room was getting too hot. I will be waiting to try it for sure. Thank you Quebec Seeds, New Level Hydro, and Spider Farmer. 🤜🤛💪❄️🌱
Thank you grow diaries community for the 👇likes👇, follows, comments, and subscriptions on my YouTube channel👇. ❄️🌱🍻 Happy Growing 🌱🌱🌱
https://youtube.com/channel/UCAhN7yRzWLpcaRHhMIQ7X4g
SE5000
https://amzn.to/3qFpAML
Spider Farmer Official Website Links:
US&Worldwide: https://www.spider-farmer.com
UK: https://spiderfarmer.co.uk
CA: https://spiderfarmer.ca
EU: https://spiderfarmer.eu
AU: https://spiderfarmer.com.au
Coupon Code: saveurcash (is stackable in most cases)
Www.newlevelhydro.com
Www.hygrozyme.com

Likes
11
Share
@Chow_13
Follow
Aug 05 - Temp(High/Low) 28/19 Rain(mm) 0.0
Aug 06 - Temp(High/Low) 32/17 Rain(mm) 0.0
Aug 07 - Temp(High/Low) 32/18 Rain(mm) 2.6
Aug 08 - Temp(High/Low) 18/15 Rain(mm) 30.3
Aug 09 - Temp(High/Low) 19/14 Rain(mm) 5.2
Aug 10 - Temp(High/Low) 24/16 Rain(mm) 0.0
Aug 11 - Temp(High/Low) 25/15 Rain(mm) 0.0
Cold weather and rain has stunted her. Put her in the gazebo to keep her as dry as possible.
Likes
5
Share
@Localbudz
Follow
This past week I pushed the nutrient EC value to 2.8 these plants need it! Tomorrow is the first 12/12 light cycle, will be adding Si to help with internodal spacing. Chitosal definitely sparked growth, one more foliar application before I add it to the reservoir. Am excited to see flower formation this scrog is large. Timing will be improved next time by popping more seeds to guarantee germination.


Likes
40
Share
@BudBoutique
Follow
! this is my current status, gonna upload my last veg weeks within the next week - got a bit busy around Spannabis - thank you for your understanding! 💚
Welcome to Bud Boutique Grow Diary - really appreciate all your love and support :)
Don't forget to check out my other current grows!
🗓️ This Week:
after 48 hours of complete darkness (important for seedlings to make sure all plants switch into flower same time), I finally switched my lights to the 12/12 schedule and sent my ladies into the flower.
- super strong and praying up
- still lack of nutrients, especially calmag which I increased slowly for this plant.
- Day 3: Foliar spray with APTUS Regulator and APTUS Nutrispray to give them extra micronutrients and give them a little shell for protection.
! always use APTUS Regulator first and mix well with your water before adding any other nutrients for Feeding or Foliar!
Thank you for still staying with me 💚
___________________________________________
--- 🌱 Strain (Sponsor) ---
🏷️ Wedding CheeseCake by Fast Buds
https://2fast4buds.com/seeds/wedding-cheesecake-fast-flowering
--- 🥗 Nutrients and Feeding (sponsored by APTUS: APTUS Ambassador) ---
🍸 APTUS: full nutrient schedule extreme
-- Regulator, N-Boost, P-Boost, CaMg-Boost, K-Boost, Allin1 Liquid, Startbooster, Topbooster, Enzym+ every feeding
-- Fulvic-Blast, NutriSpray as Foliar each once a week
🔗 https://aptus-holland.com/
--- ♻️ Grow Control (Sponsor) ---
TROLMASTER: TENT-X + LM14 Light Adapter to dim/sunrise/sunset lights + Temp & rH Sensor all remote on App
🔗 https://www.trolmaster.eu/
--- 🏭 Grow Setup ---
💡LUMATEK Zeus Pro 600
* 🏠🌿 Indoor: Homebox 120x120x200cm (4x4)
* 📐🌀 PrimaKlima exhausting Fan 1180m3/h (running on 60-80%)
* 🌀 Can Light Filter 800m3/h & 1x Fanbox 1x Dyson fan for Air circulation
🔗 https://lumatek-lighting.com/zeus-600w-pro-29/
🔗 https://primaklima.com/de/shop/ventilatoren-de/ec-ventilatoren/pk160ec-tc/
🔗 https://canfilters.com/products/filters/
All Likes and comments are highly appreciated!!!
👨🌾 don't forget to check out my Instagram for daily educational content: budboutiquee
- Bud Boutique


Likes
18
Share
@Diips
Follow
d.71. had trouble uploading video, so i uploaded some screenshots from the video.
d.72 shes looking better after the dose of orgatrex i gave her yesterday.
d.73 buds getting bigger 🌞
d.76 i little bit of light bleach, burnt tips due to me readding the tabs and not being too gentle, so i might have broken a few roots in the process, thinking about maybe breaking the taps down to pieces next time ill be in the same situation with better timing, comparing to me re-adding more tabs too late.
also im getting a ac infinity tent down the road. been having high humidity due to winter weather comming in
Likes
4
Share
@Northfork
Follow
Week three all the girls are strong and healthy no problems. Besides the sherbet cream cakes seem to have some problems with the transplant possibly you know what I’m not exactly sure of what went wrong with them, but they both are smaller, but much slower growth rate in all other strains I have planted Besides that everybody is still nice and happy. The girls are still getting foliage fed every four days with pure protein, soluble kelp meal as well as getting boogie brew, heavy harvest tea every seven days. I added two videos to this week to kind of show how the girls really look it’s hard to get a good look at them with a photo but they’re all growing well and healthy but they’re kind of just trees right now and we want bushes so as of this week, I think after I give them their tea tomorrow, I will tie everything down and start stretching and we want at the end of this grow to have at least 10 foot of width on all four big girls. Well, still achieving a strong height of hopefully 8 feet..

Likes
17
Share
@TheReefinery
Follow
Week 12 complete and she's starting to fatten up a tad more.
Pistils are going brown but she kicks up new white ones every morning. 80-90% clear tricomes still and as I hoped she looks like she's got another week or two to go.
Slight clawing of the leaves and some brown spots but they're very few of them. I've raised the LED a couple of inches just in case of light burn. Or it may be she still has a lot of food in the coco as after checking the runoff of tds it was around 1000ppm but as it's living soil she should just take what she needs and stop when she's had enough.
And I'm still just feeding her water as I'm 'flushing' her. The Symphylans are still doing their job well from the looks of her!! After researching Symphylans, they are microscopic centipede like insects that are white and they mainly eat seedling roots or decaying organic matter..so they're essentially cleaning the medium..and they stay under the soil away from the light. They can makes holes in roots for pathogens to enter her..but as she's doing so well and as it's only a week or two away from harvest I'm not going to worry about it.
If you want to see Symphylans in action check the last video from this week!!
Next I'll be doing 2 x photoperiod Chocolopes 🍫
Thanks for stopping by - feel free to comment, give and feedback and follow - and I'll have another update next week!! 🤙
Likes
15
Share
@PiusWaxis
Follow
Here we are at the end of my plant's wonderful eleventh week of flowering, another week full of exciting developments and new discoveries.
The constant and unstoppable growth of the plant has come to an end, showing a beauty and vitality that are a true spectacle for the eyes. 😎
The abundant layer of resin that has formed is a clear sign of the health and well-being of the plant, once again confirming the benefits of the premium nutrients used throughout the entire growth cycle.
TrollMaster's "TENT-X" environmental control system continues to prove its worth, precisely maintaining optimal temperature and humidity levels to promote vigorous plant growth.
The combination of advanced and precision technologies ensures that plants can thrive in a controlled and conducive environment😎
I am thrilled to share with you the latest video showing the temperature, humidity and VPD trends of this last week of flowering, providing further demonstration of the extraordinary performance of the TrollMaster control system and its synergy with the other elements of the grow room.With each week that passes, the anticipation for the new discoveries and challenges that await us continues to grow.
With the constant support of Plagron nutrients, trust in the TrollMaster control system and the excellence of MEDIC GROW LED lighting, I am sure that I am always ready to face any challenge!
Thank you again for being by my side in this extraordinary adventure, dedicated to exploring the wonders of plant cultivation. Together we continue to look to the future with confidence and enthusiastically anticipate the successes that each new week holds for us. 💪👽🌱✨
REVIEW TENT-X:
I was pleasantly surprised by the effectiveness and functionality of the TROL MASTER!
This device is simply amazing, as it has allowed me to monitor the environments I use it in accurately and efficiently.
One of the most impressive features of this device is its ability to operate LED lights easily and intuitively. Thanks to its user-friendly interface, I could easily customize the lighting of my rooms according to my tastes and different situations. I particularly appreciated the possibility of programming the sunrise/sunset simulation, thus creating a more natural situation.But that's not all: the device goes further and manages to keep me constantly informed about the humidity and temperature of the surrounding environment. This feature has proven to be very useful, especially in times when I am not present.
I was able to set humidity limits, so that the device would immediately alert me if the levels exceeded the desired threshold. This allowed me to intervene promptly and avoid excessive oscillations.
The accuracy of the temperature measurements was another welcome surprise. The device is equipped with a high precision sensor that allows me to constantly monitor the temperature of the rooms. Here too I was able to set temperature limits, allowing me to be notified immediately if they were exceeded.
Overall, I was really satisfied.
The TENT-X exceeded all my expectations. Its ease of use, precision of measurements and possibility of customization make it an indispensable tool for those seeking to monitor and optimize environmental conditions.

Likes
2
Share
@QualitySeeker
Follow
Lets wait for the two ladies theyll be ready in two weeks. I already started flushing them couple or three days ago
I will keep growing in coco this was my first time and not gonna be last.
Likes
13
Share
@gr3g4l
Follow
Por norma general no soy de podar hojas pero esta vez voy hacer una excepción y quitaré las que más sombra hacen , las grandes, a los 30 dias a 12/12h. Pasados 7 dias de su última poda de bajos, tercer y cuarto nudo. Entonces ya solo me quedará ir quitando algunas yemas de los nudos inferiores
Parecen haberse estabilizado y no crecen al mismo ritmo que vinieron haciendo estos 30 primeros dias a 12/12h.. A principios de semana la más pequeña, la OGKush nºI serian 70 ctms y las más alta , la AnimalCokes nºVII, 100 ctms.
Pasados 6 dias del último tratamiento contra la araña roja le volví a dar y esta vez con Plant Vitality Plus de Bac. Total hasta ahora, un lavado con agua corriente, una de Mactina (químico ), dos de Solabiol y una cuarta con el Vitality.
Llevo dos semanas viendo las puntas quemadas y estoy observando que va en aumento, posiblemente sea un exceso de nutrientes debido también en gran parte a que el agua de base sale a 0,85 EC y 8,02 de PH unos valores muy altos.
Miraré de correjirlo ahora con un par de riegos solamente con agua y cambiando al Top Candy la próxima semana manteniéndome con dosis bajas. Sobretodo se nota en las OGKUSH , las más pequeñas.
A la vista está que fué demasiado regarlas dia si dia no con TopBloom a 1,8 EC. Ahora toco madera para que no afecte demasiado al resto todo y que ya se ven afectadas.