
Likes
Comments
Share


@Ieiogrow94
Follow
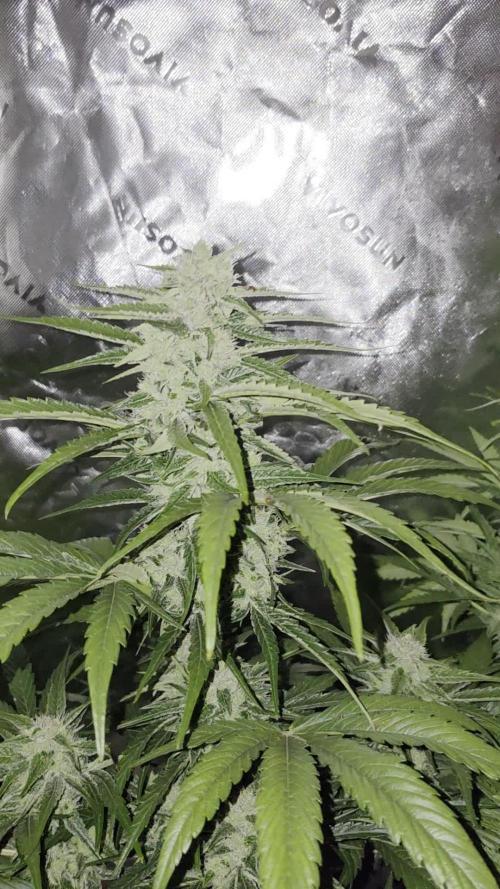
Eccoci qui...
Tutto va per il meglio, questa settimana non ho applicato stress alla piccola, ma ho guardato l'evoluzione che ha avuto dando i nutrienti.
Ora ha un odore davvero intenso ed uno strato di resina pauroso, vediamo come si riprende dalla defogliazione che ho fatto settimana scorsa.
Si sta sviluppando un bel colore viola che si riflette sulle cime come si vede dal video, OTTIMO!!!
Seguiranno aggiornamenti, grazie a tutti per il supporto🔥🌲❤️


Likes
16
Share


@Lazuli
Follow
This was my last grow during the winter ever, its too hard for me to keep the room warm, the plants suffered and less yield then my other blue dreams i grew in the past.
Processing
Likes
6
Share


@Jack_Greenstalk
Follow
3 Plants. 3 citrusy phenos!
#1 : First to sprout rapid rooter. TASTE: Pure Lemon front end into hashy cakey afghani. refer to this as the "lemon hashcake" phenom very dense, beautiful nug structure. Yielded 24.5 dry grams of primo smoke. Uplifting more cerebral sativa high with some punch in body as well. happy stress reliever for sure! has some "gassy" or fuel notes to it but very subtle
#2 Tangerine pheno: I orginally thought sour 76 was sour diesel x 76 Afghan til i read hso marks post on uk420 forums saying its cali sour d x 76 afghan. cali sour d is cali orange x sour d x mexican sativa. and it shows in this pheno which smell and taste pretty similar to tangie my friend grows which is cali orange x skunk 1 (mexican sativa x Colombian sativa x afghan indica) pretty similar genetics roots! Smell: Sweet tangerine 🍊
Taste: Just like tangerines 🍊
Medical Effects: Hybrid feeling effects felt both in body and mind. Stimulating mentally, relaxing in the body. Mild pain relief generally with amazing relief improving feeling in joints (reduced swelling or irritation in otherwise aching areas, loosened tension at joints)
Notes: After breaking up or grinding the sweet tangerine open jar/bud smells turns more sour tangerine with very subtle gas aroma. This one is scary strong! I am an all day regular smoker of the most potent buds I can find, and I never make it thru 1 bowl of this without long breaks after each hit. Starts off strong and creeps to EXTREME psychoactivity. Not for the faint of heart this one might not be best for "new smokers" 😎🔥🔥🔥 yielded 26.1 grams if id have taken clones this woulda been the keeper of the batch, but I got more to check out in future run :) and I got a cloner and veg chamber to start keepin the keepers now I know i like the strain!
#3 Lime Fuel pheno: Smell: Lime🍈 and gas ⛽
Taste: lime
Medical Effects: Cerebral uplift. Creeper. thought it was weakest on initial smoke but 10 minutes in it end up being strongest high of all 3. super wicked sativa, buzzy uplifting all similar to Cinderella 99 or strong jack herers this has almost a "scary high" first few times but once you get used to it or microdose, it is a super fun creative medicine. Helps my arthritis pains and gives me the clean up the house kind of high
Notes: Foxtailed, lowest yield of 3 sour 76's likely because its place directly under the light (perhaps didnt like too intense direct light) but is the most potent of the 3 as well. yielded 22.5 grams of dry
Processing
Likes
13
Share


@ladyjane
Follow
8/10 - In prep for flower I've got some Compost Tea brewing with a little Terp Tea Bloom by Roots Organics. .Also did a little selective defoliation
8/11 - Flipped the ladies to flower today! And all is good in the 8x4.
8/12 - Watered all the ladies with the Compost/Terp Tea. Also did some more defoliation and added some mosquito bits for added pest prevention.

Likes
168
Share


@Tropicannibis_Todd
Follow
💩Holy Crap Growmies , we are outdoors and in the Ground and there Doing Great💩
👉It's been another full week and she's almost ready I'm thinking maybe another week left 🤔 👈
Out of all the girls in the garden she's been the tuffest , I've had zero issue with her 👈
I GOT MULTIPLE DIARIES ON THE GO 😱 please check them out 😎
👉THANKS FOR TAKING THE TIME TO GO OVER MY DIARIES 👈
👉NutriNPK NUTRIENTS USED FOR FEEDING 👈rain water to be used entire growth👈

Likes
42
Share


@MadeInGermany
Follow
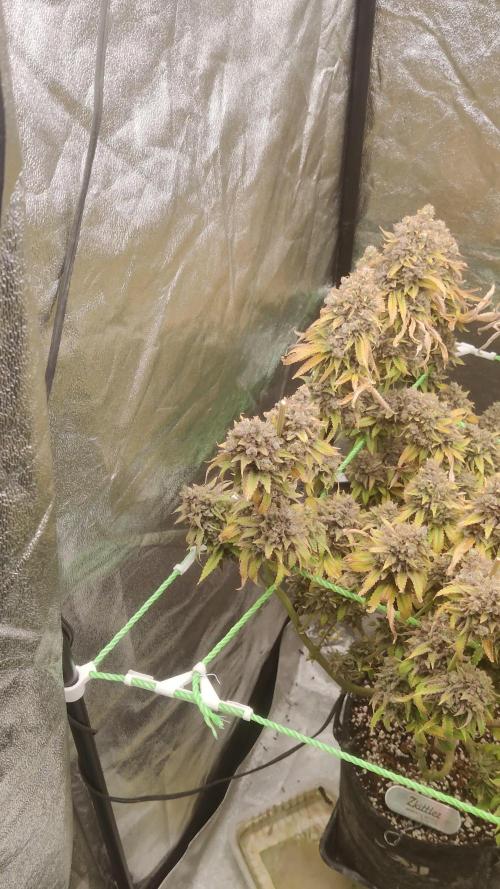
Flowering day 70
since the time
change to 12/12 h.
Hey everyone 😃.
The time has come .
We arrived in the last week before the harvest 😍.
The plants were flushed the last time and are left to stand again for the next 2 days so that the pots are not too wet before they are then put in the darkroom for 48 hours.
The trichomes are 70% milky and 30% amber 👍.
After 48 hours in the darkroom, it is harvested .
Of course, there will be an interim update before the last update 👍.
Until then, I wish you lots of fun with the update.
Stay healthy and let it grow 🍀
You can buy this Strain at :
https://sweetseeds.es/de/cream-caramel/
Type:
Cream Caramel
☝️🏼
Genetics:
Blue Black
x
Maple Leaf Indica
x
White Rhino
👍
Vega lamp:
2 x Todogrow Led
Quantum Board 100 W
💡
Bloom Lamp :
2 x Todogrow Led
Cxb 3590 COB 3500 K 205W
💡💡☝️🏼
Soil :
Canna Coco Professional +
☝️🏼
Fertilizer:
Green House Powder Feeding
☝️🏼🌱
Water:
Osmosis water mixed with normal water (24 hours stale that the chlorine evaporates) to 0.2 EC. Add Cal / Mag to 0.4 Ec Ph with Organic Ph - to 5.5 - 5.8 .

Likes
2
Share


@fabialien
Follow
Semana 5 de crecimiento, notamos ligera aparición de Araña roja, vamos a combatir con jabon potásico y neem hoy 8 de agosto se aplica jabón potásico y neem con esponja para erradicar posibles nidos.


Likes
32
Share


@ZzTooRightOGzZ
Follow
•She was started for fun.
•Not much to say about her just letting her do her.
•Week 3 fead her with 2ml off grow auto from living Soils.

Likes
12
Share


@MicroHidroGrow
Follow
Arranca la semana con una solución más cargada y las plantas atadas al limite. No puedo imaginar lo que deben ser las raíces. Pero hasta ahora la solución está siempre limpia. Los EMRO están funcionando a la perfección. Espero que empiecen a formarse bien las flores.
Día 17. Empezó el engorde. El estirón frenó. Ahora voy a esperar que las flores empiecen a tomar forma para luego hacer una defoliación y el último guiado, y así dejar todas las flores con una exposición a la luz de forma pareja. Estoy bastante contento y satisfecho con lo que vengo observando.
Día 20. Hice una defoliación de las hojas superiores. Cómo solamente tengo hasta 3 nudos debajo de la cabeza con flores, saqué las hojas grandes de arriba que hacían sombra a las flores bajas. De esa forma las flores de arriba desarrollan un poco más las hojas pegadas a las flores, pero no tanto como para hacer gran sombra. Y las flores del 3er nudo, se siguen alimentando de las hojas grandes que dejé. Este corte lo hice hace años en un SCROG de critical mass, y obtuve muy buenos resultados. Ahora a esperar el tan preciado engorde.
Día 21. Las flores ya empiezan a ganar volumen camino a su formación. Se las ve cambiando día a día. Por el momento sólo puedo agradecer que no ha habido inconvenientes. La solución se mantiene increíblemente limpia, siendo que por el volumen y amontonamiento de raíces que debe haber en los caños, debería haber aunque sea algo. Pero las EMRO vienen haciendo su trabajo bastante bien, así que fue una excelente inversión, y bastante accesible en precio. Mañana arranca la 4ta semana. Espero que sea una semana de grandes avances.


Likes
9
Share

@DerEkstaseHase
Follow
3 Headies haben angefangen zu Schimmeln, ich hab sie dann sofort entfernt.
Schade, aber ist ja noch n Haufen dran.
Dann Daumen drücken und hoffen das die Pflanze die paar Tage noch übersteht.
Ich habe den Luftentfeuchter aufgestellt!

Likes
41
Share


@Skinnytalls420
Follow
Day 15-05/11/21 it’s the Start of week 2 of veg everything is looking good hopefully my Mars hydros are here in next few days!!! Day 16-06/11/21 today plants are looking really good I gave them there first bit of biobizz grow!! Day 17-07/11/21 nothing new today no need for watering probably water tomorrow!!! Day 18-08/11/21 didn’t give them anymore water today but defenitly will be watering tomorrow!!!! Day 19-09/11/21 i gave them all i nice 750ml of water today with biobizz grow all looking good!!! I started a new YouTube so if everyone who reads this could subscribe I would really appreciate it!!! Day 20-10/11/21 nothing new today all looking good!!!! Day 21-11/11/21 nothing new today I tried some training on about 3 of them that u see in the video they don’t seem to need water today but most definitely will tomorrow!!!
Likes
30
Share


@WeWantItToGrow
Follow
This week has been such a gift! I have learned so much about proper care for a plant I had no idea how little I knew sitting down and observing these majestic trees produce such a potent flower has really humbled me. Premium cultivars strain has shown resilient and self sustaining easy to grow traits that it is hard to mess up. (Which I’ve done a few times lol) Notice the trichomes (I put the zoom lens on and got up in there so they could be better seen the bud itself is slathered in them ! This is going to be an amazing smoke! Also looking at the structure of the bud it’s self it has volume very full bodied bracts with pistils throughout It’s just an all-around beautiful thing to observe

Likes
1
Share


@Marihuano
Follow
this week we did the topping following the guidelines of our more experienced friends.

Likes
1
Share


@Russian_Scrog_King
Follow
hello everyone, I thought the plants were already big enough and switched them to flowering.
A shivaki (Three A Light) type of training was conducted for 27 days and after a day the plants recovered from stress and since this quarrel is going well, I thought that it was impossible to wait any longer.
I expect to harvest in 70 days

Likes
28
Share


@MrGrowthSpurt
Follow
Another excellent easy to grow strain. Early on she developed what appeared to be rust spots on the bottom half fan leaves. I implemented calmag into her feeding. It didn't appear to reverse the impact but did delay it or slow it down. Not to mention the last month she and the others have been neglected due to my schedule. She has been very resilient throughout. She is in the drying phase currently so I will definitely update when I take her for a test drive.

Likes
8
Share


@potcommunication
Follow
All good in the neighborhood
2 of 3 moved to the brand NEW FRIDGEGROW 2.0 system.
the orange one lost... ;)
just after a few days in the new home they grew like mad


Processing
Likes
2
Share


