


Likes
24
Share


@Firepharmer
Follow
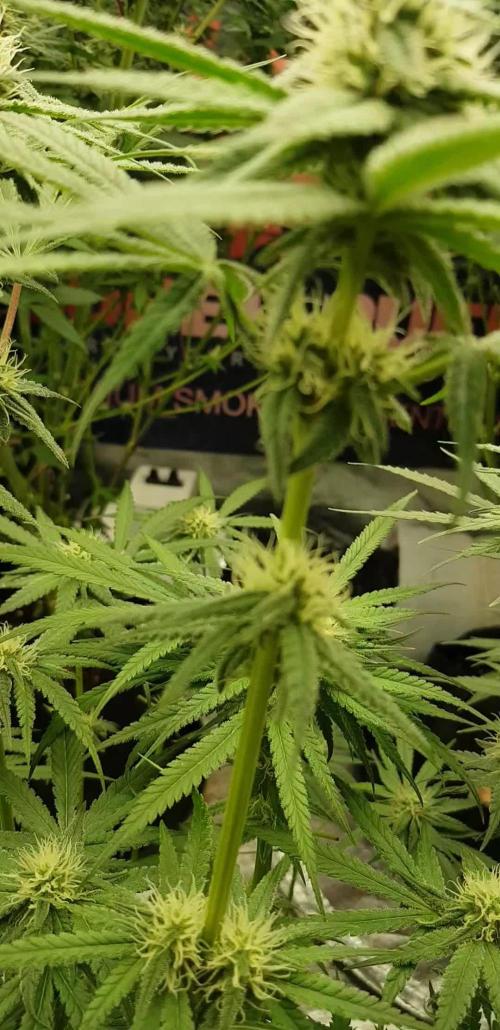
Rock hard buds Miicrobialmass for the win and the new led is killer. The knobs like knots grow out of the sides of the buds are something to look at wow !!! Monkey berries is in flushing mode , slurricane won’t be far behind in the next week or 2 I’ll flush


Processing
Likes
13
Share


@GIJOSE
Follow
Week 4 down in the books! The girls should be finishing their stretch. Bud sites are getting more stout! I raised my newts 8ml. I'm hoping the girls don't start to burn. Hope everybody's grows are doing well. Cheers! -G.I.JOSE


Likes
18
Share


@Zeno63
Follow
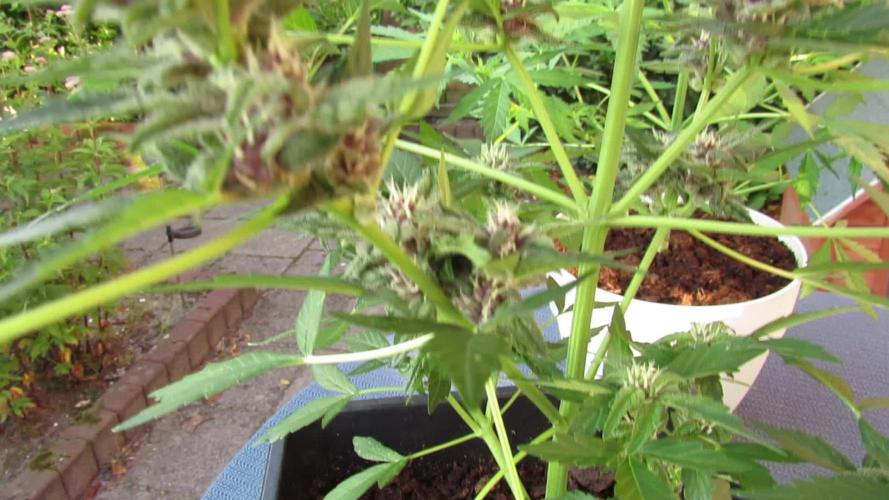
Wir sind kurz vor dem Ziel. Ich denke in einer Woche ist es soweit, dann wird die Pflanze aus dem Zelt gehen . Und ein schönes Video für den Contest gemacht . Solange wünsche ich viel Spaß mit den kleinen Video und den Bilder heute.
Die Pflanze erfüllt zu 100prozent meinen Vorstellungen, da in Deutschland nur maximal 50g/Monat erlaubt sind . Arbeite ich mit einer 3er Rotation, so das monatlich eine Hinzukommt. Mein Ertrag sollte im Bereich von 30-40g liegen. Und hier scheint es genau darauf hinauslaufen.
Der Blumat und die Biotabs performen genau wie erhofft, ruhiger , ordentlicher Grow, fast schon zu langweilig . Komplett Problemlos.
Es wäre sicher möglich, mehr rausholen . Mit Erhöhung und Zugabe von sonstigen Dünger. Aber wie oben beschrieben, ist mir dieses Ergebnis am liebsten .
Freue mich auf nächste Woche.
Wir sehen uns .
----------------------------------------------------------------------------------------------------------------------------------------------------------------------------------------------------------------------------------
We are almost at the finish line. I think it will be ready in a week, then the plant will come out of the tent and a nice video for the contest will be made. In the meantime, I hope you enjoy the short video and the pictures today.
The plant meets my expectations 100%, as in Germany only a maximum of 50g per month is allowed. I am working with a three-stage rotation so that one is added monthly. My yield should be in the range of 30-40g. And here it seems to be exactly that.
The Blumat and the Biotabs are performing exactly as hoped, a quiet, orderly grow, almost boring. Completely trouble-free.
It would certainly be possible to get more out of it by increasing and adding other fertilizers. But as described above, this result is my favorite.
Looking forward to next week.
See you.


Processing
Likes
29
Share


Likes
17
Share


@Hoodoo
Follow
2020-08-24 Chop chop chop. I DID NOT FLUSH! I read a lot of guides and some scientific data and I wanted to see if I could detect an issue with non-flushed cannabis. We'll find out!
After seeing that the trichomes were not going to turn amber (all milky for many days) I did a bit of research and found that some people say WW doesn't produce amber trichomes until week 13-14. I have been monitoring to decide when to cut the plant. I noticed that there was some foxtails developing. The grow was messed up because the plant stretched so much. This created different lighting strength areas so some parts developed faster than others. Everything right under the light was definitely ready for harvest.
I have done a bit of a wet trim and hung everything up at 74F and 55% relative humidity.
Took a pic of the 8 main colas that I setup from the beginning with my mainlining technique from Nebula.
Definitely way messier than I intended (need to lollipop way higher in the future) but those buds are pretty giganticccccccccccccccc
2020-08-26 It is now smelling fairly grassy as the chlorophyll breaks down. Everything going as expected. I was kind of worried by the smell because it was very earthy, now very grassy. The air coming out of the tent smells like fresh cut grass but if you actually touch/squeeze the buds with your hands, it EXPLODES with citrus smells, far more so than when it was still alive. No signs of mould or mildew. I bleached the tent right before hanging so hopefully no infections. I will post the harvest report later on!


Likes
10
Share


@levensfiets
Follow
overall i've learned a lot fro mthis grow. Had fungus gnats, a little mold on #2 (discovered during harvest) and also experienced what its like to grow in pure peatmoss.
amended to little at times, amended too much at other times. three completely different grows.
Plant #1 was by far the best one. Most resin production and overall most stable in terms of nutrient uptake and deficiencies.
overall i will probably not grow a lot of sativa's inside this fridge anymore. its just not good to have them all foxtail and stress out over small things. Time for more indica's! 😇

Likes
13
Share


@TheSource
Follow
I I’m filling a 100l water butt with 250ml each of dutchpro A and B and 150ml of explode in the same brand also used 30ml of rootexcelarator by house an garden and 15ml of x-force by bio green also 5ml of canna version of calmag!

Likes
19
Share


@Deepgrow
Follow
Primera semana de floracion, 7 dias, ciclo de luz 1212 y ya veo los primeros pelitos.
Empiezo a agregar pastillas easy to bloom, de Royal Queen a 2/3 de la dosis indicada por el fabricante, al bajar el PH con las pastillas agregro PH + y Ata Clean para mantener limpio el autopot, aunque se lo hecho en el riego a todas las plantas y les va bien.
Las he ido doblando las colas mas largas para equilibrarlas en altura, aunque no hizo mucha falta, quite un par de hojas muy grandes y le aplique el ultimo tratamiento de prevencion con jabon fosforico e insecticida natural de aceite de Neem, por cierto, ha venido muy bien, 0 bichos.
Quiza le aplique en un par de semanas cola de caballo para prevenir hongos.
Processing
Likes
10
Share


@Barcelona_Farmers710
Follow
Seguimos en fase de Vega con alguna que otra plaga... pero de momento todo bajo control, pasaremos a foliar con delta 9 para ver los resultados. Pasaremos a flora con el nuevo equipo Led para intentar reducir el calor de los focos y ahorro energético. Iremos informando farmers buenos Humos!🍁


Likes
15
Share

@GERGrowDesigns
Follow
Welcome to Flower Week 5 of Divine Seeds Divine Rapier
I'm excited to share my grow journey with you from my
Sensi Seeds Project . It's going to be an incredible ride, full of learning, growing, and connecting with fellow growers from all around the world!
For this Project , I’ve chosen the Feminized Photo Strain Divine Rapier:
Here’s what I’m working with:
• 🌱 Tent: 120x60x80
• 🧑🌾 Breeder Company: Divine Seeds
• 💧Strain Info : 29%
• ⏳ Flowering Time: 6-7weeks

Likes
2
Share


@EtnoGrow
Follow
here we see how the girls are advancing, the buds are becoming clearer and clearer which makes us feel that it will be a decent harvest at least, we cross our fingers.
Likes
120
Share

@Hologram
Follow
OK, im doing an update now becouse my breakup cake is going tranny!!(hermie)
I already have noiticed she was not growing as strong .. but u can blame that on anything , especially when growing outdoor..
but this morning i saw that she was g(r)oing 'bananas'!😢
I have put her aside from the rest (in the back of garden) but think gonna have to terminate her asap!..(and i will, right after this post👍)
The weed she will give will be filled with seeds and those seeds will be hermies too, so wothless..
and if i dont throw her away quick she can infect the rest.
So goodbye breakup cake..😢
who wants to eat a cake when they are breaking up anyway..😒 (just hiding my pain with lame humour 😳)
happy growing for all ✊


Likes
47
Share


@Northern_Ent
Follow
Sep 7: what a great plant. Totally love how it’s going. Flowers keep getting fatter and heavier and she’ll be done before the end of September.
Sep 8: there a tree root sticking up a bit in my yard which means the plant can be tilted toward the late afternoon sun. This is helpful because the sun is getting really low to the horizon already and we’re down to 13 h of daylight. Plus now direct sun is done in my yard by about 6 pm. Indirect light is okay but you really want direct sun at all times.
Videos shows use of 730 nm far red light at dusk. Just a few seconds is all it takes to set the plant into dark mode two hours faster. It’s a bloom booster because you get two bonus hours of darkness or a 26 h day. Very effective but don’t miss a night and you have to adjust the timing each night.
When starting this on July 20 Civil Twilight, as listed on timeanddate.com for my location, was at 9:45 and today it was at 8:40 pm. The red light at dusk is a highly recommended trick if you have daily access to your outdoor plants. Also works indoors, of course, and on autos too.
Also I think it helps ‘stabilize’ the plant by emphatically putting it into dark mode, and therefore less susceptible to stray light to cause a hermie. Have not had hermie problems in four seasons of using the red light so that is my only ‘proof’ but it is true so far, even with taking flash pics before using the red light.
Sep 9: getting heavier and now more branches are weighed down and slumping against the scrog net. Nice problem to have, I know, and without the scrog net some of the branches would be breaking off now.
She’s now officially too big and too top heavy to keep moving around the yard in pursuit of direct sun. Sun is much lower to horizon now and direct sun hours are dropping too.
Sep 10: getting close to done and getting very top heavy. Awesome.
Sep 12: raining today. Has been cool last few nights and some purple colour is just starting to show.
I don’t want to overdo fertilizer near the end, but I decided she is showing K deficiency. I’m out of malted barley but I still have potassium silicate, so I used that and some cal-mag. I’m avoiding kelp and molasses or using more P at this late stage because that can make the dried bud hard to burn and that really sucks. So, potassium silicate and cal-mag it is. The potassium silicate raises the pH and it takes about the same volume of vinegar to get the pH down. A good does of acetate is likely good for the bugs in the soil too. Then a squirt of Dr Bronners soap as a surfactant and that also supplies some biodegradable carbon for the bugs in the soil. Seems to work overall and is cheap.
Apologies for the large number of pics, but she’s so photogenic. 😎
#seedsman420growoff
#seedsmanseeds