The Grow Awards 2026 🏆 


Likes
Comments
Share
@Bread_n_Buds
Follow
And it starts like this. an official collaboration starts with the friends of Zamnesia, from today I will only grow, grow and flower Zamnesia Seeds plants and I really like it.
We are close to a flowering in the extreme heat and therefore we opted to start with 4 very fast F1s, they are not joking guys when they tell you that they are made to be more resistant, stable and fast they are not telling you something false. The girls are super fast, even those from other brands tried in the past are excellent and a sliver and this one from Zamnesia have all it takes to be the best autoflowering on the market.
The Wurlz F1s were also born at the speed of light, 18 hours in water, 24 on land and we were already born, both of us.
Oh yes, a lot of research is being done on autoflowering plants, you have all noticed monstrous improvements compared to Low Rider and subsequent derivatives.
Whoever works best wins and from what I have been able to see so far Zamnesia is working very well. I know, there is a group of sceptics, friends I'm here on purpose, give me a couple of months and we'll see.
Zamnesia is the best online shop in the situation, you can find everything from seeds, to mushroom kits, through vaporizers and a thousand other things https://www.zamnesia.io
Wurlz F1 seeds specifically
https://www.zamnesia.com/10669-zamnesia-seeds-wurlz-f1-automatic.html
Site Description
ZAMNESIA SEEDS - WURLZ F1 HYBRID AUTOMATIC: EFFECTS TO LEAVE YOUR HEAD IN A WHIRL!
As the end product of combining Runtz with Watermelon Candy, Wurlz F1 hybrid Automatic showcases a reliable, uniform, and, above all, easy growing experience. The resulting buds offer mind-blowing flavors and soothing effects, making Wurlz F1 Automatic more than worthy of being on your radar.
GROWING WURLZ F1 HYBRID AUTOMATIC
As an autoflowering strain, it takes just 9–10 weeks for Wurlz F1 Automatic to move from germination to harvest. Fortunately, there's very little required other than a bit of maintenance along the way. This is partly due to the F1 genetics that make this strain robust and uniform, resulting in plants that reach a similar height and provide a similar (large) yield. Moreover, Wurlz F1 Automatic is highly resistant to disease, pests, and other ailments.
Reaching heights of about 65–80cm, Wurlz F1 Automatic is not an overbearing plant and can fit into smaller spaces with zero fuss. Once ready to yield, growers have the potential to see a return in the region of 450–500g/m² indoors and 50–150g/plant outdoors.
AROMAS, FLAVORS, AND EFFECTS OF WURLZ F1 HYBRID AUTOMATIC
After Wurlz F1 Hybrid Automatic wows you with its easygoing growing experience, the best is yet to come: the smoke test. Teeming with terpenes, this cultivar offers a fruity and candy-like flavor tinged with just a little bit of pine for good measure. In terms of effects, Wurlz F1 Automatic is bolstered by 24% THC and a finely tuned array of cannabinoids, making for a soothing, physically relaxing, and, in larger amounts, couch-locking high. So settle in with some of your favorite friends, snacks, and movies; this is relaxation at its finest.

Likes
7
Share
@PCGrows
Follow
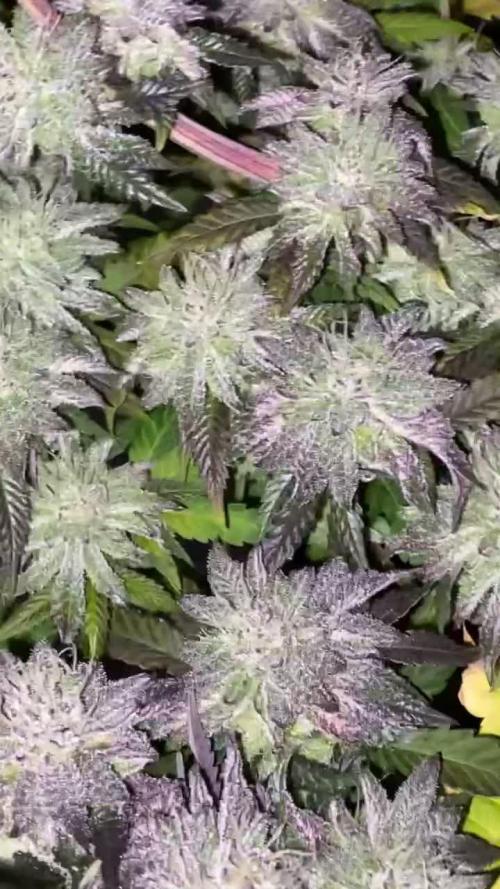
First week of full flower, clear budsites and she’s stretch good! LST is really keeping all budsites relatively same size and all getting super purple/black


Likes
12
Share
@PedroAndHisPlants
Follow
My first grow has been a great learning experience, and I couldn’t be happier with the results. From the reliable BioBizz soil and nutrients to the impressive performance of the Spider Farmer SF 1000, everything worked well together. Each component contributed to a successful harvest, and I’m excited to continue experimenting and improving my setup with new gear and techniques.💚

Likes
3
Share
@Krautbauern
Follow
We removed the lower 2-3 leaves that turned yellow and started to dry. Maybe dou can call this a defoliation
Like the first time, Ztrawberriez is a blast to grow. It already has a sweet, berry flavour. Soon she will be ready...we can hardly wait, but she is fast af
Likes
34
Share
@ScotlandHaze
Follow
Overall very happy with the grow. Got 24oz of very dense nugs! I also managed to get 2oz of less dense but still pretty bag-appeal, and a shit ton of trim which I made into tidy ass brownies, which have made typing this incredibly difficult😂! Both of these strains are definitely bed time strains. The Critical kush is has the usual overwhelming kush taste, however the peyote(purple nugs) have a very sweet / flowery taste and smell. Disappointed I only done 1 peyote but more than happy with the critical. Would definitely grow both these strains again!

Likes
22
Share
@Spliffi
Follow
Week 1👍🤙👍🌱
The fear of non germination!! I gave the Trichome & Cream an extra week. Nothing happened but nature is funny like that.
These seedlings are exploding. Dynomyco is the Bomb.
Jon Dabs
Check them out here:
https://jondabs.com
@jondabs Instagram
The Sponsors
Check them out here:
Dutch Passion
https://dutch-passion.com/en/
Hydroponic.co.za
https://hydroponic.co.za/hydroponic/harvesting-and-growing-accessories/
Bud Juice
https://www.gohydro.co.za
The Best Grow
https://thebestgrow.co.za
Dynomyco
https://www.dynomyco.com
Nuclear Roots
https://www.nuclearroots.co.za
Photronic
https://shop.photronic.net
Special Thanks to Hydroponic.co.za. I buy all my products from them. Best service.
Daily updates coming...

Likes
12
Share
@Aleks555
Follow
Day 100. The Opium plant from Divine Seeds is doing absolutely fantastic! Over this time, it has shown amazing results, and I’m very pleased with how it's developing. I've been giving it maximum care, paying attention to every aspect of the grow.
As for the nutrients, I’ve been using Xpert Nutrients throughout the entire cycle, and the results speak for themselves. These nutrients truly help the plant reach its full potential. I've noticed that the buds have become denser over the past weeks, and the aroma has intensified.
We’ve also pruned some leaves to improve light penetration to the lower branches and possibly enhance the flowering potential. Big thanks to Xpert Nutrients for their products—they continue to impress!

Likes
15
Share
@Aleks555
Follow
42Fast Buds - Gorilla Zkittlez Auto 🌱
Today marks 70 days, and it's finally time to bring this incredible journey to an end. 💫 Honestly, I can hardly bring myself to cut her down, I've grown so attached to her, and she's just so beautiful. But the trichomes have turned a deep amber, and there's no more time to wait.
For the last 6 days, we’ve been flushing her roots with ice-cold water, watching as she transformed, her colors changing and becoming even more stunning. It wasn’t just a grow – it was a true process of evolution.
I want to give a huge thanks to 42FAST Buds for their amazing genetics and for allowing me to grow such a phenomenal strain. Gorilla Zkittlez Auto is an absolute masterpiece! 💥
Special thanks to Xpert Nutrients for their incredible fertilizers and ongoing support. Without you, we wouldn’t have achieved these remarkable results. You helped grow not just a plant, but a true work of art! 🌟
Likes
30
Share
@shwable
Follow
Ladies are getting more colourful each day.
The terps are really fvcking crazy loud.
Processing
Likes
4
Share
@Skillgrower
Follow
A meio da 5 semana outras no inicio, sem prolemas, a reagir bem ao suprercrop, muito fortes estas meninas


Likes
29
Share
@Jjthejetplane79
Follow
This has been one of my better autoflower runs. Much love to fastbuds for hooking me up with these fine autoflower genetics. One love canna-fam


Likes
4
Share
@eldruida_lamota
Follow
Vamos familia, actualizamos la sexta semana de crecimiento de estas Terp & Tonic de Seedstockers.
La temperatura que estuvo entre los 24-26 grados y humedad dentro de los rangos correctos.
Esta semana ya cambiamos a 12 horas luz,12 horas de oscuridad, estiraron bien y ensancharon bastante también, el color es verde sano.
Se nota que los nutrientes de la marca Agrobeta hacen sus funciones.
También realicé una poda de bajos que yo si las veo necesarias para explotar después la flor.
- os dejo por aquí un CÓDIGO: Eldruida ,descuento para la tienda de MARS HYDRO.
https://www.mars-hydro.com
Hasta aquí todo, Buenos humos 💨💨💨

Likes
3
Share
@Chefc14
Follow
Gorilla Sherbet super fast genetics with very delicate scents, S.A.D. all reinforced with poles soon the weight becomes important, the Tropicanna asks for a lot of water, an excellent signal, also tutored. Adoss 🤙🤙

Likes
20
Share
@Elysian_gardens710
Follow
We have our AK-47 running in a water pitcher lol. Honestly because i wanted to try a transplant and wanted to see the roots develop on Autoflowers. Also, we were out of planting pots when we transplanted. 😬🤦♂️
The pitcher is filled with Fox Farms Happy Frog soil.
So far AK-47 is very fast. Transplant didnt stunt her at all. (From jiffy cube into soil)
When I transplanted her we made sure her taproot was still inside the netting of the Pod.(just an observation)
Stats:
Vivosun 2x4 tent
1Gal water pitcher
Fox Farms;Happy Frog soil
2x viparspectra 600w refractive LEDs
Durabreeze carbon filter
4" inline fan

Likes
52
Share
@Salokin
Follow
Hi Growmies,
She has now completely stiffened and the buds start stretching along the colas. It’s still very hot here at times and temperatures climb towards 30 Celsius, hopefully that will fix itself with autumn around the corner, other than that I ordered a secret jardin temp controlled vent in order to get a bit more control of my tents temp. She already starts smelling very strong like oranges with some citrus subnotes. Will also add another fan next week to get some circulation under the screen.
Until next week and thanks for stopping by.
Likes
1
Share
@bigsmoke42069
Follow
Week 4 of flowering 10/9/24
Defoliated plants.
Watering 4 times a day (with 10%-20% runoff)
hand watering to full saturation of the media with 20% runoff at the end of the week.
Checking runoff EC every 3 days.
Lights now at max height and 90% power.
Cheap AliExpress exhaust fan timer broke.
Humidity rose up to 99% inside the grow tent, but fans kept circulating the air.
After noticing, immediately turned on the dehumidifier to 40% RH with extra fan pointing on the canopy to max.
hopefully no herm problems and mold issues.
Adding 2.5ml/gal of H2O2 (35%) to the reservoir to keep bacteria away.
Likes
3
Share
@dushi_genetics
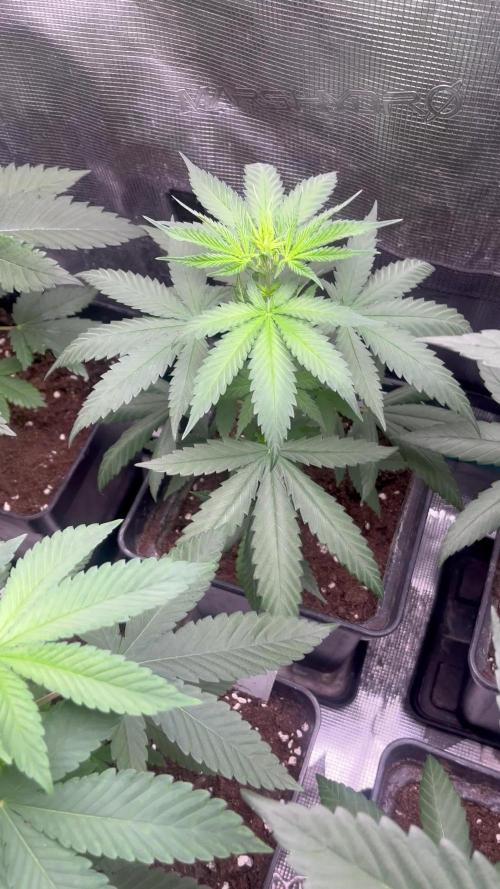
Follow
Week 5 Day 7 Flowering Stage.. All plants getting big but got into some stress because one of my AC went off so temperature was a bit high and humidity was also high. But looking nice😊🔥


