The Grow Awards 2026 🏆 


Likes
Comments
Share
@BLAZED
Follow
Week 16 (Harvest)
30-1 First day of darkness.
Temperature: 27.9 degrees (lights on) 18.8 degrees (lights off)
Humidity: 65% (highest) 48% (lowest)
31-1 Second day of darkness.
Temperature: 24.5 degrees (lights on) 19.5 degrees (lights off)
Humidity: 65% (highest) 50% (lowest)
1-2 Drying day 1
The Saparot is ready to be harvested!
Before chopping her down, i took a lot of pictures.
I was able to remove most of the soil to see the rootball.
I hang plant as a whole to have a slow dry.
The exhaust fan is on setting 4.
2-2 Drying day 2
Temperature: 19.1 to 17.5 degrees
Humidity: 62% to 57%
I changed the exhaust fan to setting 2 because setting 4 was a bit high in my opinion.
3-2 Drying day 3
Temperature: 19.9 to 18 degrees
Humidity: 62% to 59%
I changed the exhaust fan to setting 1, as someone told me that it was enough air movement for drying.
4-2 Drying day 4
Temperature: 19.8 to 18.5 degrees
Humidity: 62% to 59%
5-2 Drying day 5
Temperature: 19.9 to 18.8 degrees
Humidity: 62% to 59%
Today i checked on the drying plants and the buds are shrinking a bit, they are getting a little bit crispy on the outside aswell,
I hope they wont dry as fast, and i aim for a 12/14 day dry.
Cant find the temps for 6-2 to 2-13.
I do have a video when she was at the half of the dry process.
14-2
Trim day, yay!
She was easy to trim, the buds are nice and dense, and there was not a too high bud/leaf ratio!
She dried for 14 days.
End results:
Dried buds: 81 Grams.
Dried Trim: 18.5 Grams.
I am really surprised how good these genetics are! If you like CBD, i really suggest trying JYM Seeds out!
The Saparot smells very fruity almost like a fruity coctail. The buds are super dense, and very bag appealing.
After some months of curing the sweet fruity smell changed to a more sour smell, but still smells amazing!
To be honest, i cured her a bit poorly, burped too less, and because the buds are so compact she holds moisture better then normal, so she tastes harsh, but thats on me.
I have a pack of JYM's Sour Fruit aswell, so i will for sure try it out again! And my hope is already very high :D
Thanks for following my diary, and feel free to check my others out aswell!
See you at the next one!
Likes
55
Share
@Natrona
Follow
Blue Cheese F1 automatic
Week 6 2/9-15
The Cheese gals are in full flower, the buds are puffing out and stacking. I even see some lower buds connecting to the upper buds and some pistils are turning brown. There is some smell when I open the tent. The F1 genetics are reflected in that these 2 plants are almost identical.
I don’t see much difference in their growth so far using the different mediums. Soil and soil/coco blend. Maybe harvest will show a difference in yield from each one. Time will tell.
On 2/13 I did major defoliation on my Cheese gals.
I removed all large fan leaves and any leaves shading bud sites. Initially, I thought this would be my last defoliation, however I have heard that 1) they continue to grow new leaves until day 20 of flower and 2) there must be enough foliage on the plant to photosynthesize energy. Well, I hope I left enough leaves for energy to keep bulking up the buds. Stretching has slowed down. Both girls grew only an inch and now 17 inches. This is only the end of flower week 2.
Controller is set to flower. I add 2 gallons of water to the T700 humidifier daily to keep the VPD in line.
2/9 & 11 4 gal fed 2 liter each nutrients added at ½ of recommended amount. Making 4 gallons since I have 2 pots of carrots and a Dill in the back.
Bloom Juice 45ml
Plant Juice 75 ml
Royal Rush 15 ml
Power bud 15ml
Green sensation 7.5ml
Recharge 2.5ml/gal
4 ml
Cal Mag
5
Ppm 333
Ph 7.02
Temp 66
2/13 5 gal
Bloom Juice 60ml
Plant Juice 60 ml
Royal Rush 20 ml
Power bud 20ml
Green sensation 10ml
Recharge 2.5ml/gal
4 ml
Cal Mag
25
Ppm 538
Ph 6.6
Temp 66
Your likes and comments are appreciated. Thanks for stopping by.
Growers love 💚🌿
💫Natrona💫

Likes
1
Share
@MOTB666
Follow
Doing good so far no signs of deficiency or nutrient burn that I can see.
Nutrient change on day 58
Had the ac go out for about day so had one day around 80-82 degrees F. Other than that being doing good so far this week


Likes
26
Share
@Sickone
Follow
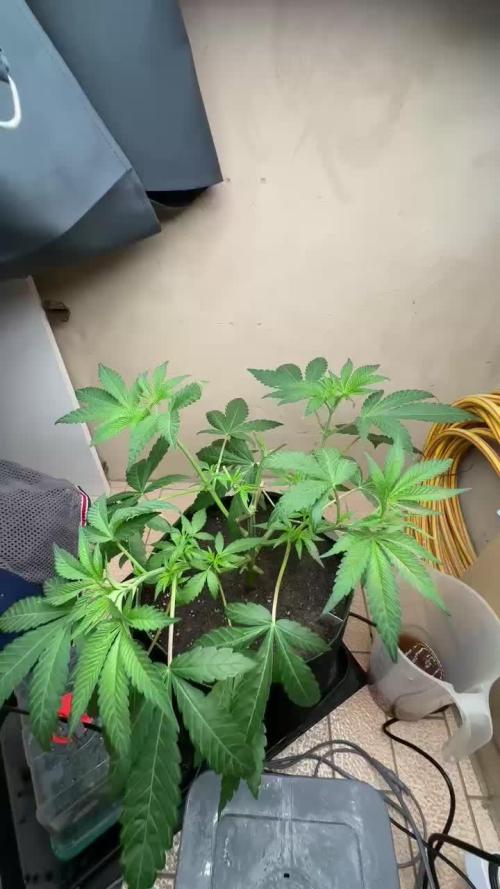
Ab geht es in die nächste Woche alle Ladys machen hervorragende vortschritte in die breite. Zudem sind die Abstände der neuen Abzweigungen relativ gering und gleichmäßig.
Aktuelles setting:
18/6 Zyklus
60-75% Luftfeuchtigkeit
Temperaturen liegen zwischen 20 und 25 Grad regelmäßig.
Der Ventilator kommt täglich für 10 Std zum Einsatz allerdings noch gegen die Wand gerichtet damit die Luft Abprallen kann und frühstens 2 Std nachdem das Licht eingeschaltet wurde da die Ladys meiner Meinung nach den Tag nicht direkt mit Stress beginnen sollen :)
Zudem entwickelt sich bei einer Pflanze
(Welche vermutlich eine andere Sorte ist vom aussehen her) einen stark bekannten Haze Geruch der mich direkt zum lächeln bringt wenn ich sie besuche! :)
PPFD: 470
DLI: 30,5
LUX: 18.000
Kelvin: 5100
Dünger bisher nicht verwendet da sie noch frisch umgetopft sind und der Biobizz Light mix laut angaben und Infos von anderern Growern für 2-3 genug Nährstoffe besitzt.
Edit: 27.04.24 Eine Lady sieht krank aus :(


Likes
35
Share
@Grow_for_Happiness
Follow
Week 8 of flower is at a close and these girls are really starting to express themselves. They're slowly putting on their colours and getting ready to really shine. Some of the close up pics looks like a red trichome here and there, will have to break out the scope soon and keep an eye, aiming for the 5-10% range. They're smelling delicious and quite strong. Not as strong as the Pink Lemonade I did last run, but they're close! Nice fruity smell and a heavy dankness hahaha. Carbon filter on the 6" fan , don't even notice the tent smell being in the same room. Dropping humidity to 45%, will have the VPD between 1.1-1.3 for the remainder of the grow.
Let's keep these girls healthy and cruise to that finish line!

Likes
43
Share
@DrDuhboto
Follow
Plants are under Scrog now and are beginning to fill it out.
I defoliated again. And watered twice with transition to bloom level nutrients.
Lots of molasses and I added bat guano and worm casting top dressing.
I also added nematodes, and predatory mites to the soil as I find this keeps thrips from ever getting established.
I had taken one of these plants and placed it into flower directly from seed to see what it would do and It has grown some very nice flowers already that started turning a deep purplish red at 2 weeks.


Likes
245
Share
@Roberts
Follow
Hey everyone, so Thc bomb has grow into a big girl. Ph has been a lot more stable I was pushing too much potassium, and it was causing issues as coco got less wet. If you were growing in a 2x2 tent this 1 plant is too big. Lol thanks again Bomb seeds, and Spider farmer. 🌱🔥💣💥🤤💨💨💨
Thank you grow diaries community for the follows, likes, comments, and special thanks to my YouTube channel subscribers. Happy growing everyone, and be safe🌱🌱🌱
If interested in purchasing a Spider Farmer SF-1000 please follow appropriate link below :
US:https://amzn.to/396hXXb
CA:https://amzn.to/3ol4oK4
DE:https://amzn.to/3q15SJT
UK:https://amzn.to/2L7NVKN
AU:https://amzn.to/3pZD6ZQ
FR:https://amzn.to/2Xkomsi
IT:https://amzn.to/3nk7A7h
ES:https://amzn.to/2XhtGwB

Likes
26
Share
@PedroAndHisPlants
Follow
My first grow has been a great learning experience, and I couldn’t be happier with the results. From the reliable BioBizz soil and nutrients to the impressive performance of the Spider Farmer SF 1000, everything worked well together. Each component contributed to a successful harvest, and I’m excited to continue experimenting and improving my setup with new gear and techniques.
💚☀️🤙🏼

Likes
14
Share
@Smile_gan
Follow
Just start week 10 looking a bit better for leaf color issue. Have no feed anyting.Just watering only.
Have found some mold on BCN #2 i take out some mold bud that around 30%
For problem of PH locked, I think it already fix. All yellow and brown leaf was change to green slowly and looking better.


Likes
Comments
Share
@StillBlazin
Follow
Hier habe ich ein Phenom Hand gemacht mit einem Min Fuck Samen die Pflanze kommt bald in die Blüte.

Likes
6
Share
@TheMayor4434
Follow
Start of week six we start seeing rapid growth from all plants in height and bud production. 1 of the ladies is an absolute freak but in all the good ways. Shes reaching a meter in length and is going to have 5 slender long kolers. The rest are all around the 80cm mark minus the two under achievers which are at the 70 cm mark which is amazing as the plants are supposed to be the size at harvest. Not changed much apart from excluding the voodoo juice nutrients ,adding another 600w light to the tent and a tiny bit of defoliation. My flat is starting to smell amazing. Sometimes I bury my nose in the outlet pipe and inhale a deep breath. Haaaah

Likes
12
Share
@Enki_Weed
Follow
Diese Woche habe ich meine Pflanze nur einmal gedüngt, ansonsten nur mit Wasser, CalMag, SuperVit und GreenSensation versorgt. Ich sehe immer noch leichte Anzeichen von Überdüngung. Allerdings entwickelt sich die Pflanze wunderschön und verströmt einen intensiven, fruchtigen Duft nach Orange und süßen Aromen. Zudem ist sie extrem klebrig, wie man auf den Bildern sehen kann. Auffällig ist auch, dass die Blätter dunkler geworden sind. Dieser Effekt ist für mich neu, da es meine erste Sorte ist, die so reagiert. Es ist wirklich faszinierend!😅🤤
This week I only fertilized my plant once, otherwise only supplied with water, CalMag, SuperVit and GreenSensation. I still see slight signs of overfertilization. However, the plant develops beautifully and exudes an intense, fruity scent of orange and sweet aromas. In addition, it is extremely sticky, as you can see in the pictures. It is also noticeable that the leaves have become darker. This effect is new to me because it is my first strain that reacts like this. It's really fascinating! 🍊💐🎂
Processing
Likes
20
Share


Likes
10
Share
@ZweetZkittlez
Follow
Activaron 24hs en un vaso de agua sin cloro. Luego al tupper con papel (rollo de cocina).
Luego de 3 / 4 días ya se pasaron a tierra.
En los primeros días y luego, en toda la etapa vegetativa vamos a usar un humidificador para tener una humedad entre el 70% y 80%


Processing
Likes
3
Share
@GanjaFarmerGrow
Follow
I am happy to say she is starting to recover from the not clean warm air...
Things are slowly looking up..
Have to give it to her the genetics are good..
she is tall and longed branched the smell is also starting to come up...
Hope she goes good untill the end...
fingers crossed
🙏

Likes
8
Share
@JamaicanDream_420
Follow
De momento hubo dos que germinaron mal y seran repuestas por otra Gorilla cookies y la otra por una cream caramel auto,fallo tambien una northern,por lo demas todo bien,segundo riego desde germinacion con poquito de calmax y gooooo..Segundo riego de la semana a 50ml x planta aplicando algun nutriente pero sin subir mucho la Ec a 0.69,hasta la proxima semana budyyes