
Likes
Comments
Share


@pzwags420
Follow
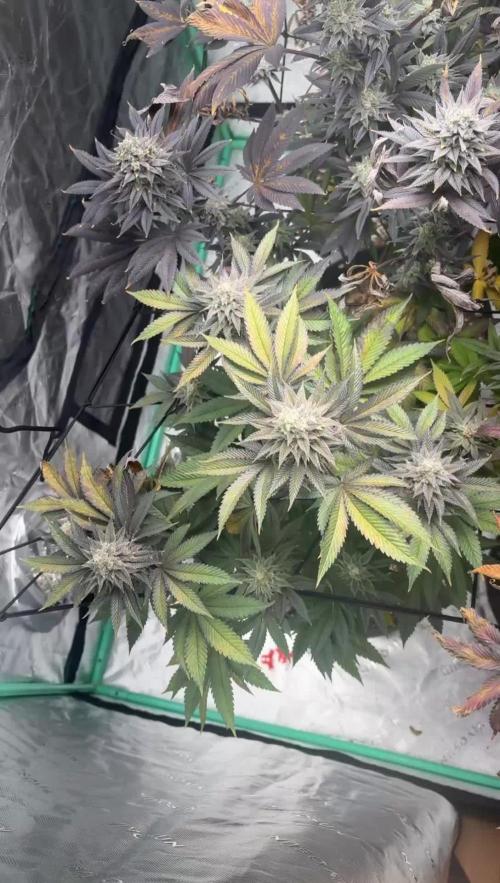
Week 5 flower is progressing well. bud sites are getting bigger with more pistils and trichs on leaves everyday. This will not be a 8 week strain I'm thinking 10 but will calibrate if necessary to get the full potential of this genetic as I can see she is a special one already!

Likes
11
Share


Likes
14
Share


@Fullmeltalchemist
Follow
D71/F19 - 11.25 - Got them all defoliated. Everything is looking open, lots of light for the flowers, lots of room to grow and good airflow. I've got a couple co2 bags hanging in there too now.
D75/F24 - 11.29 - Responded well to defoliation. Getting chunky! <3


Likes
8
Share

@Organic473
Follow
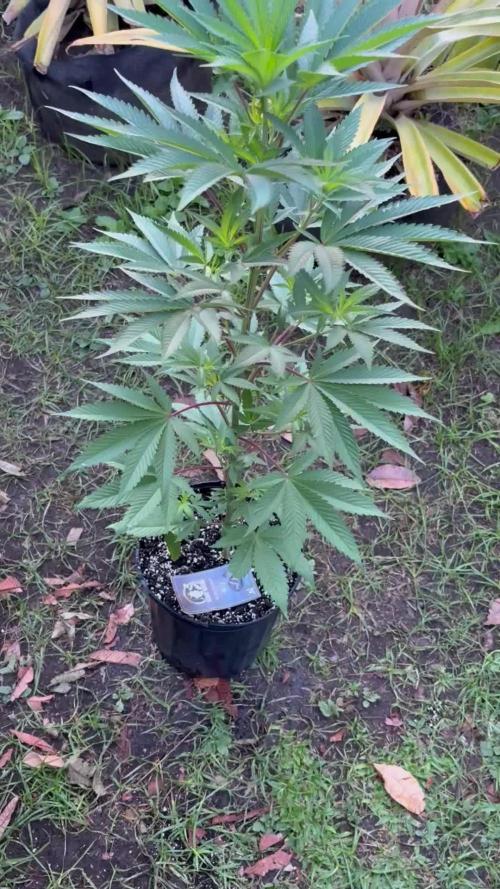
This girl is growing so healthy and lovely. I am just loving her every day so far no complaints. I may have to change the pot size soon.
Likes
21
Share


@GODSGIFT_2005_JM
Follow
🍼Greenhouse Feeding BioGrow
⛺️MARSHYDRO
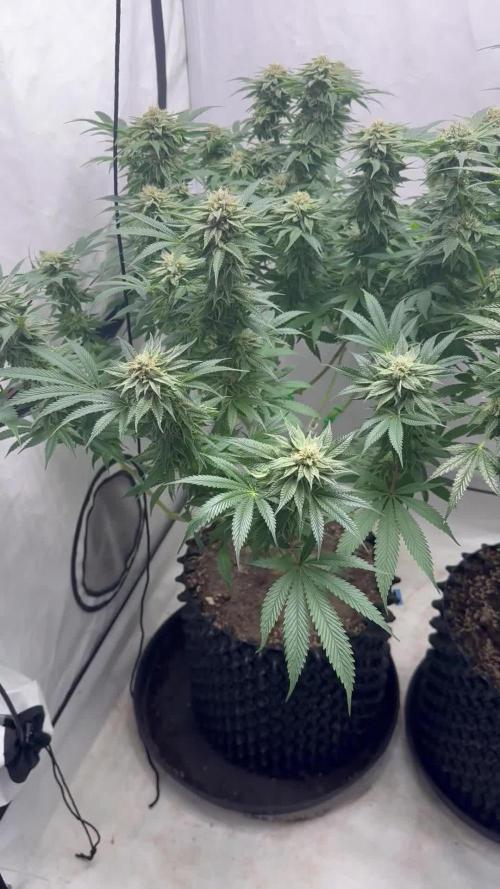
The ⛺️ has a small door 🚪 on the sides which is useful for mid section groom room work. 🤩
☀️ by VIPARSPECTRA (models: P2000 & XS 2000)

Likes
18
Share


@Chubbs
Follow
420FASTBUDS
FBT2106 WEEK 6
The two of these are growing very interesting. One is stacking and bushing up quite nicely and the other almost completely opposite. There's alot more stretch on the one and very weird flower formation. I'll let it grow and see what happens but not sure really what to expect. Very pretty color purple on the one but temps have been super cold this past week as we've had a blizzard come through so I put a oil heater in the tent as it was getting way to cold and had me worried. Happy Growing
Likes
4
Share


@ProfesorExplicito
Follow
the wind is strong and sun too, nothing seems to matter and grows healthy and fast.
Likes
20
Share


@MrWolfe
Follow
So this round I just lollipopped and didn’t strip the top at all, with better veg next round it’ll work better but I’m having issues with some plants not quite trellised how I’d like. Everything smells great, BCS,BD and WM are getting fat and PKB is frosty and tight. Watering is more of a chore than I’d like I think I’m just going to use some 5s for the next round . Thanks for following along I hope your buds are fat and frosty.


Likes
17
Share


@Mr_nugs_lover_David
Follow
It's been a beautiful strain to work with, the flowrs are definitely worth it after all this time, the quality is definitely high. However this pheno of ak420 smells very different from the other 2 phenos I've grown along with her. The flowrs are beautiful, very solid and frosty nuggets, I smoked a few little nuggets when trimming but I'm excited to taste the big buds, hope you guys enjoyed the process. I want to say that this pheno #1 has a different smell compared to the other 2 phenotypes of ak420 that you can see here on my page as well, so stay tuned guys! Overall result is very nice, good quality, strong weed, sticky, stinky. I can say that it's very great and also you can get them for a very cheap price so it's a very good investment if you're looking for a powerful and affordable strain. Cheers growmies! ❤️💚💛💎👨🌾


Likes
53
Share


@DogDoctorOfficial
Follow
Ladies, gentlemen, and all the wonderful beings following this journey, I am thrilled to announce that we have reached the highly anticipated harvest week for our beautiful PCRs. This has been an incredible journey, and now it's time to reap the rewards of our hard work and dedication.
The PCRs are nothing short of perfection. Their frost-covered buds are a sight to behold, glistening like they've been kissed by winter's breath. The trichomes are abundant and sparkling, making these ladies look absolutely stunning. The aroma is intoxicating, a true testament to their strong genetics and the care they've received.
Upon taking them out of the tent, I was amazed by their strength and resilience. Despite my best efforts to make them dance, these ladies stood tall and proud, requiring no support at all. This just goes to show the exceptional quality and sturdiness of the PCR strain.
Aptus Holland's Enzym+. This product is a game-changer, breaking down dead root material and turning it into usable nutrients, ensuring our soil remains rich and fertile for future grows. Speaking of which, I do plan to reuse the soil, thanks to the amazing benefits of Enzym+. This enzyme product not only helps with nutrient uptake but also keeps the soil ecosystem healthy and thriving.
Here's the final stats for this week:
TDS: 130
PH: 6.8
Temp: 21°C
A huge shout-out to Aptus Holland for their incredible products that have consistently supported my plants' growth and health. Also, a massive thank you to Art Genetix for creating the phenomenal PCR strain that has brought so much joy to this grow.
To all my fellow growers, followers, and the entire community, your support and encouragement mean the world to me. This journey wouldn't be the same without you. As we move forward, let's continue to spread love, positivity, and the joy of cultivating these amazing plants.
Stay tuned for the final results and more updates as we dry and cure these beautiful buds. Until then, keep growing, stay positive, and never stop believing in the magic of cultivation.
Peace, love, and happy growing!
Genetics - P.C.R. @Art_Genetix_Team https://artgenetix.world/
Nutricion @aptusholland https://aptus-holland.com/
LED Power @Lumatek and @viparspectra
As always thank you all for stopping by , for the love and for it all, i fell blessed to have you all with me for one more love journey Thank you Thank you Thank you , you guys are great and have been amazing , thank you for everything !
#aptus #aptusplanttech #aptusgang #aptusfamily #aptustrueplantscience #inbalancewithnature #trueplantscience #dogdoctorofficial #growerslove
With true love comes happiness , Always believe in your self and always do things expecting nothing and with an open heart , be a giver and the universe will give back to you in ways you could not even imagine so !
Friendly reminder all you see here is pure research and for educational purposes only
Growers Love To you All
Discount Codes :
@thecannakan DOGDOCTOR 15% off
@theneutralizer PORKIT5-DOG 15% off
@kannabiaglobal DOGDOCTOR 30% off
@seedsmangenetics DOGDOCTOR 10%off
@terpyz.mutant.genetics DOCTOR 15% off
Have a fantastic week!

Likes
7
Share


@CreatureCreator
Follow
Just getting started on the right foot. Coco and bags sterilized and flushed thoroughly with 0.7EC at 6.0pH solution. Will transplant tomorrow once the coco drains down a bit. Plants look great and excited to push down the accelerator.
4/2 - transplanted into 3 gal and watered in.
4/4 - Reservoir cleaned, sanitized, and online. Switched to tap water (0.3EC) and nutes at 0.8EC for total of 1.1. Ph 5.9. New feed pump installed (no more getting electrocuted when I put my hand in the bucket. YAY!) and 5" watering rings installed. PPFD 550.
4/5 - really quite chuffed. PPFD to 600 and they are looking great. Moved Zoey up 2" to match canopy height.
4/6 - switched Silica Boost to foliar spray at rate of 40ml / gal in RO water, pH to 5.8
Likes
22
Share


@RDWCGrowing
Follow
1/11/2024 Vegetation Week 1 Day 1- I have a root almost in the water.. Yay!! Top feeding is almost done. she is looking a little sad as I work the transition Top feeding but once the roots are fully in the water she will start to take off. Ensured my PPFD is set between 250-300 it is set to: 258
1/12/2024 Vegetation Week 1 Day 2- I have a root in the water.... NO TOP FEED TODAY SIR!!! now that a root is touching the water and she looks stable, I am not going to topfeed, I will see how she looks tomorrow and as long as everything looks good I am going to go ahead and do a change and week 1 fill on Nutes.. I know it is a couple of days in but the same Nutes go through Week 2 and get changed at Week 3 So I should be good to go.. I will just ensure I fill to root touching the water when I change tomorrow.
1/13/2024 Vegetation Week 1 Day 3- Water Change Day!!
I added 36 Gallons of Water to the system:
Silica= .5mil/gal= 18mil
CalMag= .75mil/gal = 27mil
FloraMicro=3.0mil/gal = 108mil
FloraGro=2.0mil/gal = 72mil
FloraBloom= 2.0mil/gal = 72mil
PH DOWN= 30mil
Very important thing with this system is to now wait the 24 hours for the system to adjust.. Do not make any further adjustments to your PH up or Down for 24 hours to allow time for the system to balance.
1/14/2024 Vegetation Week 1 Day 4- Today I just adjusted the PH to ensure that it was right at 6.0
1/15/2024 Vegetation Week 1 Day 5- Today I Cleaned up the lower damaged leaves from the transition from top feeding to roots in the water. She looks good today.
1/16/2024 Vegetation Week 1 Day 6- Today I just took a picture of the beautiful lady for Log. Other than that just normal day to day operations, check the pH, check the Humidifiers and fill as necessary, check level of water in the Res. Everything looks great. onto Tomorrow!!
1/17/2024 Vegetation Week 1 Day 7- Today I filled the humidifers, checked the PH and just let her grow.. Grow baby Grow.....

Likes
19
Share

@LueRootsGrowGermany
Follow
Hallo und herzlich willkommen in Veg. Woche 3
Endlich kam ordentlich Sonne und sie hat ein tolles Format. Wie es scheint haben wir uns gut um die Wurzeln gekümmert, im Moment konzentriert sie sich sehr schön auf Höhe, Kraft und Vitalität. Der jetzt noch (Stengel) bald Stamm, wird Stabiler und kommt in leichte Struktur. Blattmasse nimmt auch deutlich zu! Sie sieht fabelhaft aus und ich denke, ihr geht es auch super! Auch die ersten Triebe in den nodien wachsen. Insgesamt momentan eine top Geschwindigkeit!
Nebst sehr neugierige Kater (2) hat sich zusätzlich herausgestellt, dass ein Hornissennest sich 2 m entfernt im Dachstuhl befindet.
Zunehmender wird es sehr ungemütlich und ich denke, ich werde sie runter in den Garten verbringen müssen.
Auch da im Außenbereich sind noch mehr Katzen, daher werde ich am kommenden Dienstag irgendeine Art Schutz für die süßen fertigen.
Zur Nahrung:
Gegossen wird seit 3 Tagen jeden Tag 1 Liter. Aktuell fahren sie ganz gut mit 2 Tage angepasstem PH- Wasser und einen Tag 80% vom Düngerschema an Makro u. Mikronährstoffe. Stickstoff befindet sich noch ausreichend bis ca. Mitte nächster Woche im Medium. Trinken tun sie wirklich gut, Gestern wo es so heiß war, hab ich am Nachmittag noch etwas nachgießen müssen. War aber die selbige Menge wie Morgens ergo 2 mal 500 ml. Ich hatte mich auch dazu entschlossen, einmal Super Microbes am Mittwoch statt erst Sonntag zu geben. Ich werde jetzt sehr genau darauf achten, wie sich die schöne verhält. Aber mir macht es schon den Eindruck, das sie sehr hungrig sein werden!
Somit freue ich mich sehr auf die kommende Woche!
In diesem Sinne euch noch einen schönen Sonntag und eine erfolgreiche neue Woche!
Viele herzliche Grüße an alle Kollegen wie auch die Community!

Likes
11
Share


@Young_agronomist
Follow
03.08.23-Рост продолжается , цвести еще не собирается и это хорошо !
Продолжаю тренировки лст постепенно увеличивая ппм каждые 3-4 дня . Растет низким и очень кустистым. На данный момент получает раствор на вегетацию greenhouse feeding 1000 ppm, ph 6 , выход стабильный.
Likes
19
Share


@Enollam
Follow
Servus zusammen 🏽
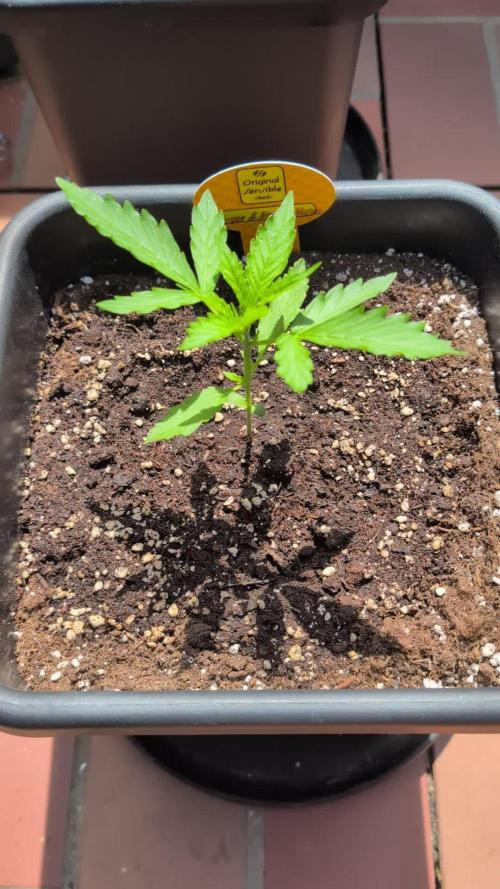
Sie kam vor ein paar Tagen in einen 11 Liter topf, getoppt wurde auch... ich vermute,dass sie deshalb kurz durchhing...
Vermutlich wird sie,wenn sie sich erholt hat vorübergehend bis das Zelt leer ist umziehen... Was sie dann bestimmt wieder etwas stressen könnte 🙈
Wir werden sehen

Likes
15
Share


@Luckydope69
Follow
In der zweiten Woche sind die Ladys schon ein ganzes Stück grösser geworden. In dieser Woche werde ich nach und nach mit dem binden der Triebe beginnen und aus den Mädels richtige Büsche zaubern.