
Likes
Comments
Share


@Prepp
Follow
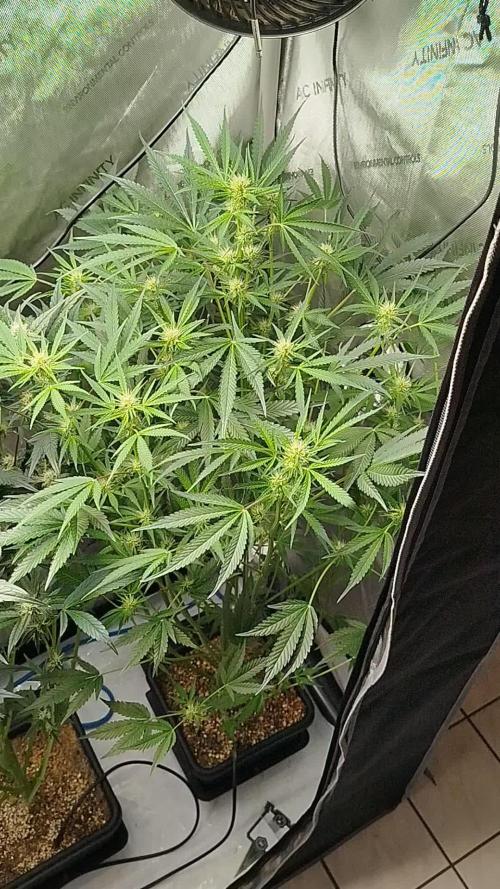
The 5L pot did wonders!
My goal is to fill this entire 3x3 tent.
I found myself having humidity and heat issues. To remedy this I purchased a new Vivosun cool mist humidifier and placed my warm air humidifier outside of my tent near the passive intake. Works wonders!
Ventilation:
2 X 4” clip fans
4 inch, cheap, in-line fan and carbon filter
(I will pay for this later. Just buy the 6 inch MINIMUM! CHEAPER IS NOT BETTER!)
Growing about an inch per night!

Processing
Likes
5
Share


@HERBBEANZ
Follow
Okay so I came up with this incredible method of training that I call "root lining".I figured this out years ago in outdoor season when a deer bulldozed through my med crop and knocked a sweet lady over, that started it all. The plant was completely parallel to the ground with roots growing out of the nodes where contact was made with the ground at the stock. Long story short she ended up being a 14 footer with 6 foot whale dicks! That gave me this little idea that's been non stop producing top quality fat resinous buds. This method increases nutrient uptake and makes a huge difference in quality and size. I essentially main line, really low to the ground, until the stock makes full contact with the ground. I then gently rub the downside of the stock with the back of a butter knife to speed things up and break down the chlorophyll layer. Then I add remo roots gel (see all videos). I then add a sprinkle of coco on top just to barely cover the stock (dont add to thick of a layer as this might "choke" and rot the stock) and mist that spot 2-3 times a day. 3 days later and boom! She'll be pumping out roots and go into full beast mode. Give it a try and you'll never go back!

Likes
24
Share


@myrceneCB1
Follow
WEEK 15 - 15/5/2021 - 21/5/2021
16/5/2021 - 2.5ml/L Florakleen mixed with 5 gal of water for each res tank. This will run for 48 hours followed with Neem oil + Chitosan + hydroguard top feeding.
18/5/2021 - I decided to go back to manual top fertigation. Mainly because I've been noticing several leaves on Moby dick and Critical Jack yellowing and older leaves seem to be showing multiple nutrition issues. So the usual diagnosis of nutrient lockout again then. Together with Fungus gnat issue, I think it's best to top fertigate until harvest.
Minimal defoliation done and several small lower branches removed for Moby dick plant 4.
19/5/2021 - 10 gal water mixed with the following:
Liquid silicon - 1ml/L - 38ml
Cal Mag - 2.5ml/Gal - 25ml
Micro - 2.5ml/Gal - 25ml
Gro - 0.5ml/Gal - 5ml
Bloom -4ml/Gal - 40ml
Chitosan - 1ml/L - 38ml
Hydroguard - 2ml/gal - 40ml
Neem Oil - 3ml/L - 114ml
pH - 5.9
EC - 1.08 mS/cm
T - 25
All 8 pots drenched with the neem oil mix.
20/5/2021 - All 8 pots drenched with the neem oil mix again. Mixing neem oil with other nutrients may not have been a good idea. After a day, the sight and smell is just horrible. Looks like cheese curd floating around. Next time if needed, I'll just water the neem oil separately with the nutrient mix. It was truly a bitch to clean the whole container. So oily and stinky.

Likes
2
Share


@GhostBlvckPhant0m
Follow
Week 6 Veg. The Wock smell is getting stronger by the day. Strong candy terps with gas, Straight GAS that stings the nose bit makes you want to take an even bigger huff. I can already tell she’s going to be stanky once flower starts. One thing to note about Wockesha is that she is a super compact plant with thick foliage once topped. I’ve started to introduce the bloom nutrients at 1tbsp/g. since I’ll be flowering in the next 3 to 4 weeks, I’m adding early to ensure that all nutrients in my living soil will be broken down and readily available to all plants as soon as bloom starts.
Likes
34
Share


@SalocinSpecial
Follow
D75 (04/02/2021): Glue Gelato has been in the closet for 24h. Banana Kush is ripening everyday. I might place her in the closet with light ON for one more week when Glue Gelato will be chop and in the tent drying. RH% and temperature are fine in the closet at the moment and it does not smell that strong with Glue Gelato inside. That give me an option to continue Banana Kush for more days in it.
- temp in the tent: 22C light ON ; 18-19C light OFF
- temp in the closet: 18-19C
- water: approx. 3L of tap water for Banana Kush
- RH in the tent: 42% light ON ; 45% light OFF
- RH in the closet: 42-44%
D76 (05/02/2021): Glue Gelato has been in the closet for 48h. I will chop her tonight! I will place Banana Kush in the closet with light ON. She needs at least one more week I guess
- temp in the tent: 22C light ON ; 18-19C light OFF
- temp in the closet: 18-19C
- water: approx. 2L of tap water for Banana Kush
- RH in the tent: 40% light ON ; 46% light OFF
- RH in the closet: 42-44%
D77 (06/02/2021): Banana Kush is in the closet and the environment is good at the moment.
- temp in the closet: 18-19C
- no water
- RH in the closet: 42-44%
D78 (07/02/2021): Banana Kush buds are getting fat. When I squeeze them I can tell that they are getting denser. She drink less water which is a sign she's getting closer to the end.
- temp in the closet: 18-20C
- no water
- RH in the closet: 40%
D79 (08/02/2021): I gave around 3L of tap water. Trichomes still look cloudy with no amber but I can see more of them and they look bigger.
- temp in the closet: 20-21C
- water: 3L of tap water
- RH in the closet: 35-40%
D80 (09/02/2021): She get frostier everyday! It's beautiful to see! She definitely have more trichomes than she had last week when she still was in the tent. The trichomes of Banana Kush are not yet at the same stage where Glue Gelato's trichomes was when I chopped Glue Gelato. I'm glad that I waited and that I did not chop both at the same time.
- temp in the closet: 20-21C
- no water
- RH in the closet: 35-40%
D81 (10/02/2021): I gave approximately 3L of tap water. She's a beauty but she's not ready. I said one more week last week... I say the same haha one more week! 😅😏
- temp in the closet: 20-21C
- water: tap water, 130 PPM, PH7.0
- RH in the closet: 35-40%


Likes
2
Share


Likes
6
Share


@PersonalSmok3s
Follow
Being Mephisto Freebies there’s not a lot of info on how these particular seeds grow. I found them low maintenance, they weren’t the thirstiest girls I’ve grown and I found quite late on they didn’t like high temperatures, caused over half of them to foxtail. That being said the trichome production was there from week 2 of flower and by the time I cut them down they were some of the greasiest plants I’ve grown to date!
I left a decent amount of the sugar leaves on while trimming with the hopes it will slow the drying process by a few extra days, between 7-10 days hanging, then into jars with humidity packs to cure.
It’s been a fun grow and an exciting introduction into the Mephisto brand, over the last year I’ve managed to purchase a few different strains on there Monday drops so il definitely be running some more in the future.
Hope this diary has been helpful ✌️
Il upload the dry weight before I put it all into jars.


Processing
Likes
2
Share


@krst97
Follow
Started today second week (20/05).
Very pleased with how it grew the first week.
The plant appears healthy despite the excessive lengthening that caused its release due to the too much weight of the leaves.
Although it has a fan pointing at it, I still expect it to reinforce the stem to remove the support.
Update: Very strong stem.
20/05: Root Complex (3.5ml/700ml) + TNT Complex (3.5ml/700ml) --> Final EC 625
24/05: Root Complex (3.5ml/700ml) + TNT Complex (1ml/700ml) --> Final EC 325
27/05: Coming home after two days i found my baby plant that now isn't just a baby! Beautiful and strong!
I've noticed only a small spot in a leaf, highlighted in the video; and a strange skin around the stem, highlighted in the other video.
Likes
299
Share


@Metatronix
Follow
Hello to you all.
As a true visionary I decided to go FULL HYDRO this week, that means water in buckets and outside the buckets /s
This grow turns out to be an uphill battle but i already decided to bring it to completion no matter what...Icy weather, floods, alien invasions what's coming next a big bank crash?!
I'll bring this grow to the end! Who needs banks anyways when you got #coins ;)
On 22.02. added nutrients to the 140 liters of solution.
That's it, I hope to see y'all next week growmies.


Likes
15
Share


@AmnZhz
Follow
Week 4, 22/3/2020 - 29/3/2020, as seen in the pics the growth since last week was tremendous. She's gained 4 times her mass and she very healthy. Of course increased the nutrient strength this week and the watering. This week will water 4 times per day for 45 mins each time.


Likes
12
Share


@Zoe_Spacecake
Follow
Las podas han retrasado el crecimiento bastante. Creo que las plantas acabarán por rellenar todo el espacio pero no estoy seguro. Ahora se ven bien los pelos blancos.
Processing
Likes
6
Share


@MasterB
Follow
Had issues with wind burn on the seedlings, so adjusted the fan and seems to be much better. Also keeping an eye on ph drift and adjusting as needed. Topped up nutes to growing stage. Looking good! Topped all the total paralysis day 21


Processing
Likes
5
Share


@Losweed
Follow
The flowering is start😁😁😁 G14 is much higher than amnesia xxl, but both have flowers. I change the light period on 18/6😃
Likes
26
Share


@KingSalomonsWeed
Follow
Notfallprotokolle treten in Kraft.
Grund?
Gelato 41fast
UNKONTROLLIERTE GEWALT.
Obwohl ich sie einige male sehr zärtlich dazu überredet habe (ok, es knackte einige male) in andere wuchs richtung zu wachsen, nimmt sie ¾ des grow room an platz ein. Und, das ist keine Beschwerde. Sieht von oben fast aus wie ein sea of green (zufall).
Und überall, diese watte Bällchen.
Ich bin entzückt!
Update. Es wird wasser mit Wasser gegossen, welches ich aus einiger Entfernung per Hand aus einem wasserlauf hole.. 😛
Die Phylaxien der Gelato 41 fast sind anders.
Heftig. Sind superdick lang und schnell wieder braun.
Bud Körper bilden sich und sind hart.
Und das überall. Ok tiefer gleich kleiner.
Am 001.009.021 wird sie 71 tage alt.
35 in Blüte.
And, what the phylaxien!
I mean they re unnormal.
Never seen phylaxien growing so massive (i mean pls look at one phylaxie., i think theyre big,) and then as FAST they go brown.
Boah difficult to explain.
I checked the soil. Wet enough.
Looking my Gelato 41 FAST. She is everywhere healthy.
I read this is a monster genetic
But to see, how it grows!
This strain is (so far) different from all the others i made with before.
First its a photo. (accidently because I'm a idiot)
Than 2 weeks untrained growing.
Than not vey lovefull i showed her her new grow direction.
And the smell. Of Gelato 41 fast is..
The smell of Gelato, 41 fast.
Heavy smell on your fingers from everywhere. Steam, sheet,,, buds are becoming sticky.
I mean i smell vanilla schololade.
My Next noise means she smells like an gelateria.
And YES! SHE IS! FAST!
GREAT! WORK(till now).👍🏻 👊
I tried to make some defoliation... You wont see on the photos. Just 3 leaves and 8 little buds somewhere i found.
O8. Oo9. I cut off 2 side branches.
I knewed it before that they will take only energy from the GELATO 41 FAST.
But holy mother earth, she got enough of this.POWER!
And its me a little ankward, because im the only one till now, who got an growdiary of this FABULOS HEAVY SWEET SMELLING STRAIN!
And., the BREEDER SEEDSTOCKER, himself is watching this GROWDIARIE!!!
And holy mother earth... Im so a noob.
First I thought it was business, advertising.
The contact, i mean.
Than, after i joined the original website of SEEDSTOCKERS, and i read what i really bought!
THE PENNY FALLS..
Its the FLAGSHIP.! (
.
So im the advertising?
Oh je oh je. I do my best, but remember, please,
(and because of some little mistakes i did)
.
.
.
OK OK ok ok, big mistakes!
It is not the yield another grower can go for it, what i expect i will harvest.
But HiGHEST Quality!
This is what i expect.
And dont get me wrong,
I build an joint of some fast dried micro buds.
Brought to a friend.
After the third time Jonny goes out(because after one or two breathes he forgotten jolly Rogers). He Realized it. "Hey i hold the joint now all the time (15 min). Why don't you say a word?"
"I knewed it. But i just smiled. Looking about how long it takes till you notice it!"
He thought a few seconds "Longer"…
Both began to laugh.
So the quality i try will be heaven!
DID YOU REMEMBER THE SEED
WHEN I FELL IN LOVE?
SMARAGDGREEN.
10.09
Everday you can see the buds go with more flesh.
And sticky as nothing i had before.
Smelly? Yes. It is!
It seems that i had an Sativa dominant phenotype
Like the leaves form. (and from some fresh harvested i smoked, with 75 % milky trychomes, and the rest clear... 😛 Heavy uplifting, motivated you start to do something! As you start to moving you discover that you re really stoned).
And my 0.36 m² tent is from the GELATO 41 FASTer as i never seen any Cannabis so quick blooming, sticky everywhere.
ABNORMAL! in a great way.
And i think, soo small arent they. Or?


Likes
23
Share


@BookiesandBream
Follow
Smells are getting progressively stronger, smelling like tropical punch still. Showing signs of purple, possible with the dropping temperature at night with the AC. They are cover with trichomes and looking lovely!

Likes
11
Share


@evAq22
Follow
Guys I wish I could tell you something about the grow. But honestly I'm just letting my plants do their thing... I mean it's living soil it's like set and forget.
08.05.2025
Trimmed the cover crop