The Grow Awards 2026 🏆 


Likes
Comments
Share
@BudBoutique
Follow
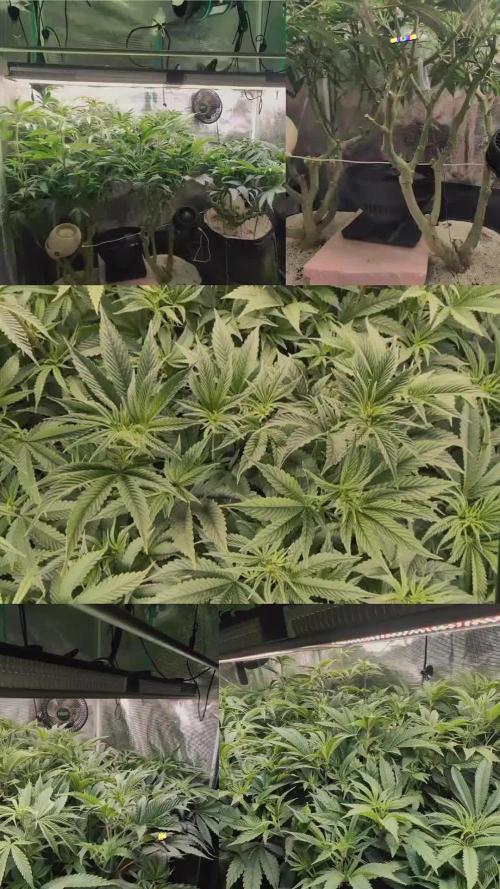
! this is my current status, gonna upload my last veg weeks within the next week - got a bit busy around Spannabis - thank you for your understanding! 💚
Welcome to Bud Boutique Grow Diary - really appreciate all your love and support :)
Don't forget to check out my other current grows!
🗓️ This Week:
- still lack of nutrients, which got worst
- Day 24: attaching once a week APTUS Foliar with Regulator & Nutrispray with the amazing CannaFogger by Petra Grow
- Day 26: as you can see its the only plant out of 9 in this run and I really can't catch up with her that well. Giving my best over the next week.
- Bud sight development accordingly slow
Thank you for still staying with me 💚
___________________________________________
--- 🌱 Strain (Sponsor) ---
🏷️ Wedding CheeseCake by Fast Buds
https://2fast4buds.com/seeds/wedding-cheesecake-fast-flowering
--- 🥗 Nutrients and Feeding (sponsored by APTUS: APTUS Ambassador) ---
🍸 APTUS: full nutrient schedule extreme
-- Regulator, N-Boost, P-Boost, CaMg-Boost, K-Boost, Allin1 Liquid, Startbooster, Topbooster, Enzym+ every feeding
-- Fulvic-Blast, NutriSpray as Foliar each once a week
🔗 https://aptus-holland.com/
--- ♻️ Grow Control (Sponsor) ---
TROLMASTER: TENT-X + LM14 Light Adapter to dim/sunrise/sunset lights + Temp & rH Sensor all remote on App
🔗 https://www.trolmaster.eu/
--- 🚿 PetraGrow (Sponsor) ---
CannaFogger Foliar Spray
🔗 https://www.petratools.com/product/petragrow-cannafogger-atomizer-new-mini-fogger
--- 🏭 Grow Setup ---
💡LUMATEK Zeus Pro 600
* 🏠🌿 Indoor: Homebox 120x120x200cm (4x4)
* 📐🌀 PrimaKlima exhausting Fan 1180m3/h (running on 60-80%)
* 🌀 Can Light Filter 800m3/h & 1x Fanbox 1x Dyson fan for Air circulation
🔗 https://lumatek-lighting.com/zeus-600w-pro-29/
🔗 https://primaklima.com/de/shop/ventilatoren-de/ec-ventilatoren/pk160ec-tc/
🔗 https://canfilters.com/products/filters/
All Likes and comments are highly appreciated!!!
👨🌾 don't forget to check out my Instagram for daily educational content: budboutiquee
- Bud Boutique


Likes
31
Share
@yan402
Follow
FERMAKOR BARREL MIX – BASE IN USE
(Testing on the Fantasy Feast girl we pulled out of another diary
https://growdiaries.com/diaries/274722-grow-journal-by-yan402 )
(FERMAKOR BASE SYSTEM KOH VERSION diary
https://growdiaries.com/diaries/278391-grow-journal-by-yan402)
(Urea & Micros on the way — first week running without them)
🍶💧🍶💧🍶💧🍶💧🍶
💧 30 L Barrel – Current Working Mix
🍶💧🍶💧🍶💧🍶💧🍶
Step 1 – Calcium Nitrate (Part A)
7 L warm water (~35–40 °C) → added 45 g Calcinit, stirred until fully clear.
That’s the calcium + nitrogen backbone for the feed.
Step 2 – FERMAKOR PK Base (Part B)
15 L water in the main barrel → added 30 ml FERMAKOR PK Concentrate, mixed well.
This forms the main P + K part of the formula.
Step 3 – Combine Solutions
Slowly poured the Calcinit mix into the barrel while stirring — no reaction, still crystal clear.
That confirms the mix is stable and precipitation-free.
🌿 Step 4 – FPJ / FFJ Batch
Added 30 ml homemade FPJ (fish + veg batch) ≈ 1 ml/L.
Color shifted to a light-amber tone — looks alive and active.
🍋 Step 5 – Citric Acid Balance
Added 1 tsp citric acid after everything was blended to fine-tune pH and help chelate micros later on.
📦 Step 6 – Top Up & Check
Filled to the 30 L mark with plain water → pH tested with drops, showing yellow-green — roughly 5.8 – 6.0 range.
Nice clean look, stable smell, no residue.
💧 Current Base Ingredients (Active Mix)
Warm Water ≈ 22 L total
Calcinit 45 g → N + Ca foundation
FERMAKOR PK Base 30 ml → P + K support
Citric Acid 1 tsp → Chelation + pH balance
FPJ / Fish Emulsion 30 ml → Organic enzyme booster
Result: clean amber mix, mild and balanced.
I’ll let this version run for a week before adding anything.
👀👀👀👀👀👀
Observations and changes
👀👀👀👀👀👀
27.10.25 VW27 noticed some min burnt tips so I decreased Calcium Nitrate 45 to → 40g, decided to add two more elements micros and Epsom salts just to make sure they got everything, Fetrilon Combi 1 (Micros): 0.5 g, Epsom salts: 8 g
28.10.25 VW27 she seems devoid of any deficiencies, seems ready for the flip to 12/12
02.11.25 VW27 girl is looking good so I decided to stop making daily videos and do a standard once a week update.
09.11.25 aVW28 7 days since flip,stretch in full swing, first pistils showing, leaf color deep and healthy. Slight tip burn early week → gone after pH stabilized.
Feed stayed clear, no residue, roots clean and sweet-smelling.
🌱💦🌱💦🌱💦🌱💦🌱💦🌱
🌿Day to day tasks & actions 🌿
🌱💦🌱💦🌱💦🌱💦🌱💦🌱
09.11.25 VW28 -- Fed 5l of #1→ no runoff
🍶💧🍶💧🍶💧🍶💧🍶
💧 Nutrients in 30 L #1 Veg — FERMAKOR
🍶💧🍶💧🍶💧🍶💧🍶
💧 Calcium Nitrate (Calcinit / Nitcal): 45 → 40 g
= 1.33 g/L → 207 ppm N + 253 ppm Ca
🍶 PK Concentrate (FERMAKOR Base): 30 ml
= 1.00 ml/L → balanced 1:1 P:K + light micros (from extract)
💧 Home-made FFJ/FPJ (Fish + Veg): 30 ml
= 1.00 ml/L
🍶 Epsom Salt (MgSO₄·7H₂O): 8 g
= 0.27 g/L → 26 ppm Mg + 35 ppm S
💧 Fetrilon Combi 1 (Micros): 0.5 g
= 0.017 g/L → Fe 0.7 ppm • Mn 0.7 ppm • Zn 0.3 ppm • Cu 0.3 ppm • B 0.1 ppm • Mo 0.02 ppm
🍶 Citric Acid (Chelation & pH Balance): ½ tsp (max)
= 0.16 tsp/L → add only after pH check
💧 Target pH: 5.8 – 6.0 (drop test yellow-green)
📦 TOTAL: 60 ml / 48.5 g inputs per 30 L
= 2.00 ml/L + 1.62 g/L
YouTube Link: https://youtube.com/-m8h?si=A7x4Zlr2kj-_ga31
Likes
15
Share
@Aleks555
Follow
Gorilla Zkittlez Auto is a true work of art among autoflowers. With its powerful, dense buds literally dotted with 'sugar', each stage of growth of this plant is pure eye pleasure. The scent she exudes is as delicious as her taste-sweet, with fruity notes, promising an unforgettable delight. This beauty not only looks great, but also gives a strong, powerful effect that both relaxes and cheers up. Special thanks for this outstanding variety of 42Fast Buds, and, of course, Xpert Nutrients-your fertilizers made such impressive results possible. Each stage of growth was perfect thanks to this tandem. This variety is a real miracle for any grower!
Xpert Nutrients is the fertilizer that truly makes a difference! 🌱
From the very start of our grow, Xpert Nutrients has proven itself to be exceptional. Every plant receiving this nourishment flourishes—from strong roots to dense, trichome-covered buds. With its balanced formula and ease of use, our beauties get everything they need for optimal growth and flowering. It’s a joy to see how the plants respond to this fertilizer!
A huge thank you to Xpert Nutrients for your high-quality product and continuous support. Without your nutrients, our results wouldn't be as impressive! 🙌


Likes
6
Share
@weedelicious
Follow
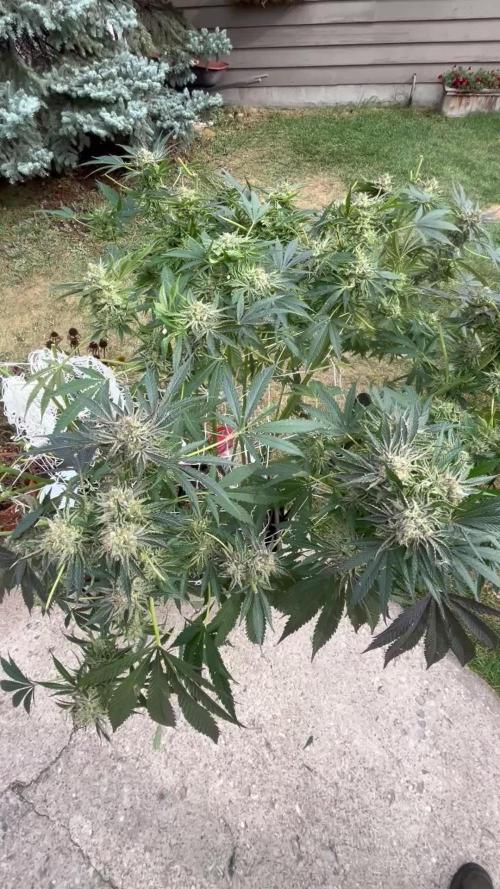
Hey growmies,
It's been four days since the last short. Today, the Pink Gelato finally started drinking water again. Looks like the cinnamon and light watering actually helped. The other plants are doing okay, but the heat’s getting to them too. I think harvest time is coming up soon – just gotta find the right moment to start drying. All three plants got two liters with Cal-Mag today. Fingers crossed they all pull through!

Likes
7
Share
@Lacremelabs
Follow
The flora has started, and I increased the amount of MKP while reducing calcium nitrate. PPM is slightly above 1000, nearing 1200. The pH remains between 5.8-6. They are in that phase of substantial daily growth, hoping for a bountiful harvest. I'm still defoliating and tying them.


Likes
5
Share
@MG2009
Follow
02/28/2021
What a difference in a week! Potted up GSC
To 1 gallon pot, Blue Dream next, pics coming soon.
(Later tonight)
Blue Dream potted up and watering done.
Both have nice side shoots for clones. GSC is at 10" tall, Bluedreamatic Dream is at7.5"
Also took 5 cuttings of Wreak Havoc hope to have 2 of each clone
(GSC,BLUE DREAM,WREAK HAVOC) for outside, I believe I got the lemony kush pheno which is perfect for my climate!
Likes
16
Share
@Northern_Ent
Follow
Lemon Cream Kush was a great olant. Lovely smell and lots of nice hard and frosty buds.

Likes
6
Share
@FeebleSnane
Follow
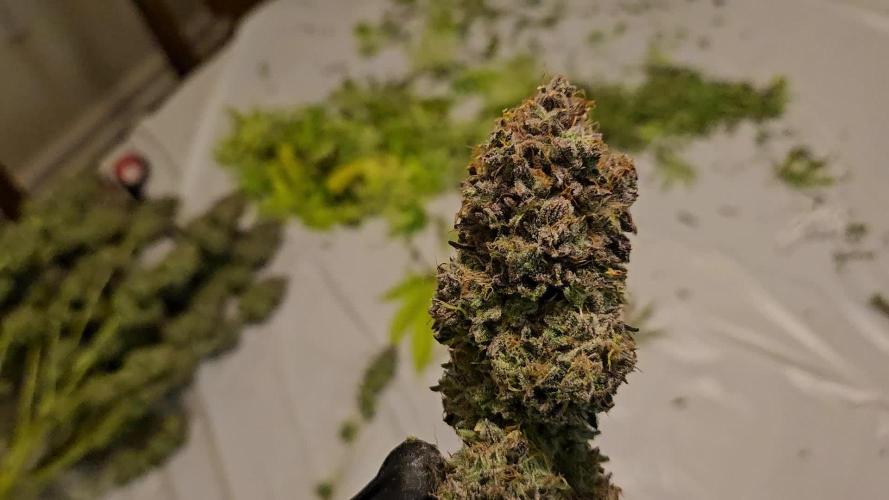
This plant came down after 115 days of life, and 59 days of flower.
I enjoyed everything about this plant for the entire grow. It didn't give me any problems with nutrients that were hard to handle. It had minor burns at the tips, but that's usually what I'm looking for in my nutrient levels - right at the limit. The plant became super smelly towards the end. So much so that I got a letter about it 😶. It got even smellier when it was trimming. I'm really looking forward to seeing how these buds will look after drying up. I'm really hoping to see extra dense buds with some heft to them.
Likes
11
Share
@VitaminGreenGrow
Follow
Still vegging is a good sign that she can grow some more. Expect her to start Flowering soon. Excited to see what can be achieved by an Autoflower that survived frost and low sunlight hours although not expecting much yield. Will continue with biogrow and fish mix until she start flowering. Added some mulch on day 47. The increasing temperatures and African sun is dehydrating the soil too quickly and forms a hard layer which is a pain in the ass when I water.

Likes
10
Share
@Northernnewbie
Follow
Today I harvested after about 24 hours with lights turned on. The smell is strong lemon with a hint of mint :) I cant wait to taste her when its dry, and in my opinion it smells and looks good :)
Had some problems with temperature, but with some gear improvements I think I got the right solution for it for next time.
As this is my first try doing this im pretty happy, but ofcourse there is room for improvements :)
Thanks to everyone for checking in on my diary and the likes! :)
Happy growing and peace 🌲✌️
Total dry weight - 338grams 🌲

Likes
119
Share
@Tropicannibis_Todd
Follow
💩Holy Crap Growmies We Are Back💩
Well growmies we are at 63 days in and everything is going as good as can be 👌
👉 So even with some major issues in the early stages , shes bounced back as good as expected 👍Or better 👈
Lights being readjusted and chart updated .........👍Even with early major issues due to the soil/medium she's come a long way 👈
👉I used NutriNPK for nutrients for my grows and welcome anyone to give them a try .👈
👉 www.nutrinpk.com 👈
NutriNPK Cal MAG 14-0-14
NutriNPK Grow 28-14-14
NutriNPK Bloom 8-20-30
NutriNPK Bloom Booster 0-52-34
I GOT MULTIPLE DIARIES ON THE GO 😱 please check them out 😎
👉THANKS FOR TAKING THE TIME TO GO OVER MY DIARIES 👈
Likes
6
Share
@Comfrey
Follow
I missed to take some fotos ore a video. So I chooses to show where the soil is made: in Comfreys garden. Unfortunately I‘m not allowed to grow there my weed. It‘s a community garden with privat owned ground but with a lot of neighbors. The German law allows to grow cannabis in your own garden for private use but not in a private garden situated in a community garden club (Kleingartenverein). But anyway I’m lucky because we have a very sunny balcony, too. Next week more fotos…

Likes
Comments
Share
@Dr_Zauberer
Follow
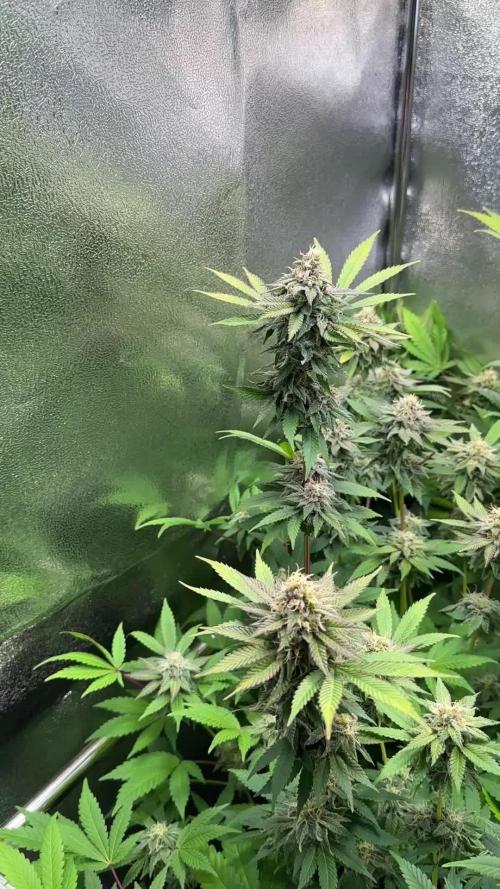
Day 97
Nothing more to say just enjoy :D right one still struggling but she is getting there. Big buds also the biggest stretch and very much sativa pheno like.

Likes
10
Share
@extraterrestrial1
Follow
Day 1
Water: 50ml RO water
Humidifier: 70-75% (HIGH-MIST)
Fan Speed: Mid-Low
Light on @ 16:20 (22.5° celsius @ 70% RH)
Light off @ 9:20 (19.5° celsius @ 65% RH)
---------------------------------------------------
Day 2
Water: N/A
Humidifier: 80% (MID-MIST)
Fan Speed: Low
Light on @ 16:20 (21.7° celsius @ 78% RH)
Light off @ 9:20 (19.3° celsius @ 81% RH)
---------------------------------------------------
Day 3
Water: N/A
Humidifier: 80% (MID-MIST)
Fan Speed: Mid-High
Light on @ 16:20 (21.4° celsius @ 77% RH)
Light off @ 9:20 (20.5° celsius @ 78% RH)
---------------------------------------------------
Day 4
Water: N/A
Humidifier: 80% (MID-MIST)
Fan Speed: Mid-Low
Light on @ 18:30 (21.3° celsius @ 80% RH)
Light off @ 9:30 (20.1° celsius @ 75% RH)
--------------------------------------------------
Day 5
Water: 50ml RO water
Humidifier: 80% (MID-MIST)
Fan Speed: Mid-Low
Light on @ 19:00 (22.3° celsius @ 80% RH)
Light off @ 13:00 (19.7° celsius @ 81% RH)
--------------------------------------------------
Day 6
Water: N/A
Humidifier: 80% (MID-MIST)
Fan Speed: Mid-Low
Light on @ 19:00 (22.3° celsius @ 74% RH)
Light off @ 13:00 (19.1° celsius @ 83% RH)
--------------------------------------------------
Day 7
Water: N/A
Humidifier: 80% (MID-MIST)
Fan Speed: Mid-Low
Light on @ 19:00 (21.8° celsius @ 78% RH)
Light off @ 13:00 (18° celsius @ 83% RH)
--------------------------------------------------
Likes
29
Share
@Wrongholn519
Follow
This is really the day when I am cutting the plants down. I don't want to fill out the harvest section until I have all the info needed to do it. I find the way it is set up on here to be kind of silly...
Today is day 95 since these girls popped and stuck their heads out of the soil. I'm blown away with the size of these plants considering their age.
I'm going to contribute the majority of this success to the CO2 gas I use. I filled out my tank 4 times for a total of 100 dollars .. the 4th tank I bought is still full and I'll be able to use it on my next grow.
These buds and colas are extremely dense and packed with resin. They are giving off a really deep and complex smell. Kind of like a fruity earth mixed with skunk.
I plan on drying at temperatures between 62 and 68 deg. fahrenheit with humidity about 55%. Once the smaller branches snap completely and the buds don't come off 'stringy' then I will move on to the next step of curing. For this I use Grove bags and boveda humidity packs (62% RH).
I'm expecting at least 8 oz off of each plant and I do intend to press some with my resin press

Likes
18
Share
@eldruida_lamota
Follow
Que pasa familia, vamos con la cosecha de estas Tropicana Cookies Fast Flowering, de FastBuds.
Por dónde empezar, las flores son bien compactas , y van repletas de resina, tienen tonos rosados por dentro muy bonitos, y tiene un aroma súper dulce aunque engañar engaña porque saber sabe más tropical y cítrica.
Es muy sencilla de cultivar, es de ciclo bastante corto aunque también si le dais una semana más no pasa nada agradecer se agradece al final.
Mars hydro:
Code discount: EL420
https://www.mars-hydro.com/
Agrobeta:
https://www.agrobeta.com/agrobetatiendaonline/36-abonos-canamo
Hasta aquí todo, Buenos humos 💨💨💨


Likes
19
Share
@GoldenWeedGrower
Follow
Legend
Timestamp: 📅
Measures: 🛠️
Water: 🌊
Actions: 💼
Thoughts: 🧠
Events: 🚀
________________________________
📅 D29/V27 - 21/09/23
🛠️
🌊 1L
💼
🧠 She's growing very fast now and she looks healty. Maybe the silica made his job or maybe can be the CO2 dispenser effect ? We'll see.
🚀
________________________________
📅 D30/V28 - 22/09/23
🛠️
🌊
💼 I cropped the main bud by mistake and then topped it
🧠 It's ok, I have about 10-11 buds now to keep until the end
🚀
________________________________
📅 D31/V29 - 23/09/23
🛠️
🌊
💼 Mounted the SCROG. Made LST, big defolation and a couple of timelapse videos
🧠
🚀
________________________________
📅 D32/V30 - 24/09/23
🛠️
🌊 3L
💼
🧠 The total energy of the plant remain the same, so I expect (or better hope) a big grow of secondary buds in the next days. Let's see !
🚀
________________________________
📅 D33/V31 - 25/09/23
🛠️
🌊
💼 Added Rhino Skin to the RES
🧠
🚀
________________________________
📅 D34/V32 - 26/09/23 - and added water and nutes.
🛠️ EC is 1.0, pH 5.5.
🌊 6L of water and nutes
💼 Made LST with Timelapse
🧠 She seems ok 👌
🚀
________________________________
📅 D35/V33 - 27/09/23
🛠️ EC is 1.0, pH 5.5
🌊
💼 LST almost HST
🧠
🚀
