




Likes
11
Share


@Bluemels
Follow
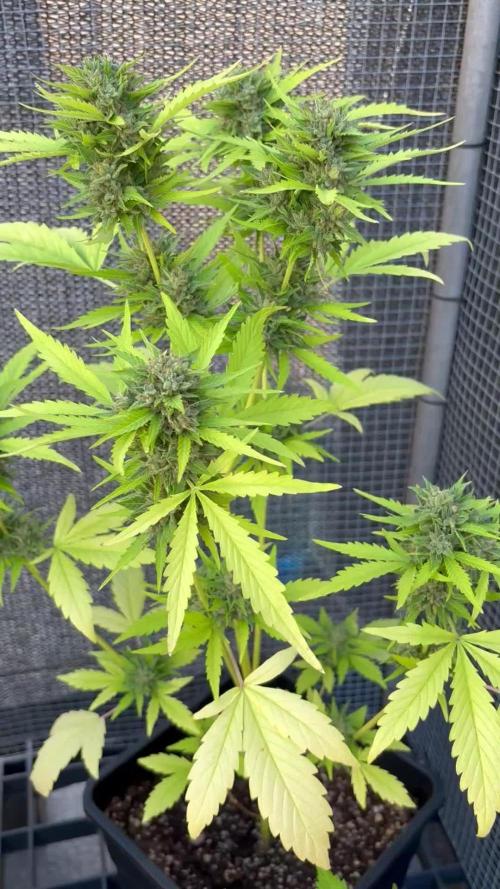
Tag 53: Ab heute beginnt die Blüte bei der Chocolate Haze. Obwohl ich sie vor 2 Tagen nochmals entlaubt habe, ist die Pflanze schon wieder enorm gewachsen 😳
Ich hoffe ich kriege sie in der Blüte gebändigt 😬

Likes
Comments
Share

@deseed_uy
Follow
Otra vez lluviaaa , van subiendo las temperaturas pero de repente se vienen unas lluvias con tremendo frio asiq ahi van luchando. A las think different q son las mas cercanas a la cosecha las tuve q entrar para las tormentas porq no quiero arriesgar los cocos


Processing
Likes
7
Share


@Cogollo_eu
Follow
**Encontrarás la traducción a español al final de la descripción**
From/Desde: 15/03/19 || To/Hasta: 21/03/19
From day/Desde día: 22 || To day/Hasta día: 28
You can find the Gorillas Diary here:
** Podéis encontrar el diario de las Gorilla aquí:**
https://growdiaries.com/diaries/25675-makingmoney-with-gorilla-mm-vs-gorilla
-----IMAGES & VIDEOS-----
Video 1:
Exactly the same video as 2 but accelerated +300% to fix it to 1 minute for instagram.
Video 2:
4 days (25~28) TimeLapse, 1 image each 60 secs @ 30 fps
Video 13:
General video of the 4 plants and it's trainings, i'm sorry for being so repetitive with the music.
Video 16:
Video of the main Money
Video 19:
Video of the secondary Money
Photo 22:
Last main branches toppings
-----WEEK SUMMARY-----
This week i will just say, an image worths more than a million words... so now let's talk about a video 👊
-----WATERING CALENDAR-----
18/03/19 - 400 ml with all "LAST" week nutrients @ 0.95 E.C. PH5.9 (i had some rests from the last watering)
- Also i applied a foliar irrigation with the same mix as the last week
20/03/19 - 1.000 ml with all week nutrients @ 0.9 E.C. PH5.9
*****ESPAÑOL*****
-----IMÁGENES & VÍDEOS-----
Vídeo 1:
TimeLapse, exactamente el mismo vídeo que el 2 pero acelerado a un poco más del 300% para ajustarlo a 1 minuto para Instagram.
Vídeo 2:
4 días (25~28) TimeLapse, 1 imagen cada 60 segundos @ 30 fps, vídeo increíble en el que se ve com responde la Gorila al Man Lining, en aproximadamente el minuto 2 podo y entreno un poco a la otra Gorila y la principal de las Money Makers, al final del vídeo podaré la última Money Maker.
Vídeo 13:
Vídeo general de las 4 plantas y sus entrenamientos, siento la repetitividad de la música entre los vídeos.
Vídeo 16:
Video enfocado a la Money principal
Photo 10:
Los cortes nombrados (Top&Bottom) de la foto 11
Photo 22:
Los toppings de las ramas principales.
-----SUMARIO SEMANAL-----
Como una imagen vale más que mil palabras, ahí os dejo varios vídeos 👊
-----CALENDARIO DE RIEGO----
18/03/19 - 400 ml contodos los nutrientes de la "ÚLTIMA" semana @ 0.95 E.C. PH5.9 (me quedaba un resto del útlimo riego)
- También he hecho un riego foliar con un resto del ultimo riego foliar
20/03/19 - 1.000 ml con todos los nutrientes de la semana @ 0.9 E.C. PH5.9

Likes
16
Share


@StickyFingah420
Follow
Día de cosecha y la verdad estoy muy contento con lo que veo, son hermosas estas flores y su fragancia exquisita.
La planta tuvo una deficiencia de Cal/Mag, la que se corrigió a tiempo pero de igual manera afectó en su crecimiento y rendimiento, más allá de eso estoy feliz por las flores de calidad que tendré para degustar más adelante.

Processing
Likes
24
Share


@GrimbolTheDruid
Follow
*If anyone read through my GDP diary, this is going to be mostly the same stuff.
So, sad day friends. I got spider mites and had to throw all my plants out. This is what I think happened:
About 2-3 weeks ago I noticed some freckling on the lower leaves. I looked at it and thought it might be a cal/mag issue so I added cal/mag that week and went about my business. I saw it about a week later and it wasn't getting any better so I added more cal/mag. This continued for about 2-3 weeks until I finally took off a leaf and examined it under my microscope. I saw little bugs crawling everywhere and my stomach just dropped. My fiance did some quick research while I was panic ripping leaves off (see pictures) and she correctly diagnosed it as spider mites.
I debated with myself and my close friend and ultimately I decided to throw all the plants in my tent away. I know that there are a lot of people who will say that there are things I could have done to make it to harvest but what it came down to is the people I take care of and personal pride. I consider myself a caregiver and I give away product for free that I am not going to use to my family and close friends. I thought to myself "Would you smoke this?" and when my answer was "ehhh, I don't know", I thought about how it would feel giving it away and immediately made the decision to destroy them. I take an immense amount of pride in my product and this hobby and if I am not going to stand behind it I would rather just start over. I grow from my heart (shout out to the Grow From Your Heart Podcast!) to help people and make sure my family is not getting unsafe product from sketchy people. To spray pesticides in flower that may hurt people and have little bug carcasses in there just goes against that in every way and is just wrong in my opinion if you are giving it away to others. If you are the only one smoking it then it is one thing to take that risk but not with your patients. I want my medicine to help people, not create or exacerbate health issues.
It is also important to note that the mites had moved from my flower tent into my veg space and took over my auto berry as well. Damn things are crafty and fast.
So that is why I made the decision to destroy them all after 3+ months of res changes, pruning, and manifolding on a slow vegging strain. Feel free to chime in with your opinion but I do not regret my decision. I threw out my new clones, mother plant, and auto berry I had on my veg side as well. Shout out to all the other growers out there that do the right thing by their patients. Caregivers > Cash croppers.
For anyone curious, I removed everything from my tent and scrubbed it all with a 20% bleach/water solution. All equipment has been wiped down and stored in the garage away from any organic materials. I will give them until tomorrow (2 days) to air out and dry and then I will wipe it down again with bleach and wait another 2 days. Hopefully that will make sure everything is dead and will not come back next grow. That next grow should start in about a week.
It sucks but sometimes it happens and you gotta be ready for it. Lesson learned. Never bring outdoor plants into your indoor garden even if it is after just a day or two. A bunch of people on here and Reddit warned me and I did not listen. Now I have learned the hard way and it feels like when your parents "told you so" haha.
Thanks to everyone who stopped by along the way. Stay tuned for a new grow coming soon. It is going to be some cool new limited edition Mephisto Illuminautos. I am pretty excited.
Good luck out there and always grow from your heart folks.
-Grim

Likes
41
Share


@Skinnytalls420
Follow
Day 71-31/12/21 some have a good two weeks yet might take one down tomorrow!!!! Day 76-05/01/22 chopped one down yesterday 19more to go night take some more down tomorrow!!!
Likes
117
Share


@BigDaddyK
Follow
Ok this is my Full guide with pictures on how to setup a Deep Water Culture grow, items you will need for this grow -
Firstly a TENT or ROOM i use a tent
REMEMBER stuff you buy NUTRIENTS off eBay and Amazon could be decanted (watered down) , or cheap chinese fakes (Ph Meters, PPM meters) you should really buy these things from you local hydroponics store,as they are guaranteed , i ve dropped a few into the bucket and they are fked,its been a sunday night with a bank holiday monday and i m fked,
1) Ph Down - makes the ph of water LOWER - this is VERY STRONG SHIT , wear gloves and googles if you are messing with it, i drop a bit into my main reservoir Ph 6.9 ( maybe 10ml per 200L)
2) Ph up - makes the Ph go higher - also STRONG SHIT -only needed in Emergencies
3) Ph meter
4) PPM Meter or EC meter
5) 20L Bucket + moulded lid netpot
6) Air Pump ,air hose 3m ,air stone x2,
7) Pebbles to fill to top of netpot,
8) ROOT IT cubes , i use these and ONLY these, by that brand,i know why,and so im telling you,
9) Seeds - I prefer Fast_Buds ,autos ready in 10 weeks of 18/6 - top quality
10) Nutrients, I use Canna as they are the easiest, they have a way of filling the one side , if you take the top off you can squeeze into the measuring side - I would also recommend Advanced Nutrients,but they are more expensive - so you will need 1L Canna Aqua Vega A+B ( it comes as two parts that you cannot mix together , when you put this into the water you MUST stir it well before putting each one in seperately otherwise you will get salts formed and crystals floating around,10 ml per 10L week 1-2 ,15ml per 10L week 3, 20ml per 10L in week 4)
1L Canna Aqua Flores A+B (as above) 25ml per 10L week 5, 30ml per 10L week 6 ,30 ml per 10L week 7 , 25ml per 10L week 8,15ml per 10L week 9, 0 per 10L week 10
250 ml Canna Rhizotonic (roots love this use this from start 20 ml per 10L and cut down after 4 weeks to 5ml per 10L up until week 9
250 ml Canna Cannazym ( breaks down dead roots, enzyme of some sort) 15ml per 10L from week 3 through to week 9
250 ml CannaBoost - (quite expensive but worth it, DWC will show you why) 15ml per 10L week 3 to 4 , 25ml per 10L week 5-9
250 ml Canna PK 13/14 (bud booster) this is optional because you only add it once,personally i add 15 ml per 10L in week 7 so its stays in for 10 days
I leave my water for at least 24 hrs before using it, in a big old olive container i bought , i think its 225 L i might be wrong, but it was cheap , solid and had a top :)
I check my water levels ,my PH and PPM daily
11) Jubilee clips x3 - to secure the fan ,filter and outlet.( 5 clips if using air cooled hood )
12) Fans - i have 2 little fans and 1 big one = think about it, outside there is always good air flow -
13) Extractor fan -mine is 6 inch
14) Carbon Filter - mine is 6 inch im not overly impressed with any brand.
15) Ducting- 5m of 6 inch easy enough,well for me...
16) Ballast - LUMATEK -i found this one amazing and switchable.
17) Lightbulb -600w HPS ALL THE WAY but i would use 1000w HPS if i could keep the heat down, they both fit in same fitting
18) Air hood - i have a MAGNUM superXXXL it has screw in holders for glass , they are quite tight
19) Timer for lights , must be good quality , I do 17 hrs on 7 off as it's more natural
20) Syringes for measuring accurately
21) Bucket to mix solutions
THE GOLDEN RULE - you can always put in but never take out - never put in too much or undiluted into the reservoir unless you really know what you are doing, less is better than too much .
Ppm v EC - you may well buy an EC meter instead of ppm meter there is an easy way to convert between the two ~ 1.0 ec = 500 ppm
EC multiply by 1000 then divide by 2 to get ppm
This diary will start shortly but as so many people ask me how to setup HERE YOU GO :)


Likes
2
Share


@Enki_Weed
Follow
Tag 14
Die erste Woche der Keimung war… sagen wir mal, eine echte Herausforderung. Und auch in die zweite Woche starten wir mit einigen Schwierigkeiten. Der pH-Wert im Gießwasser tanzt immer noch Tango und will sich einfach nicht stabilisieren lassen. Alle sechs Stunden muss ich ran und nachjustieren – ganz schön zeitaufwendig!
Auch die Temperaturen sind noch ein Thema. 27 Grad sind einfach zu hoch, und da die kleinen Pflänzchen noch keine schattenspendenden Blätter haben, heizt es ordentlich auf. Ich habe mir aber mit Kühlpacks beholfen und das Gießwasser auf angenehme 22 Grad runtergekühlt. Hoffentlich mögen das die Wurzeln! Immerhin: Die Wurzelbildung scheint gut voranzugehen, jede Pflanze hat jetzt schon ein kleines Wurzelnetz entwickelt.
Um jeder Pflanze die besten Startbedingungen zu geben, habe ich ihnen jetzt jeweils ein eigenes Licht spendiert. So kann ich die optimalen Werte für jede einzelne einstellen. Ob das alles so klappt, wie ich es mir vorstelle, wird sich in den nächsten Wochen zeigen. Aber wir starten optimistisch in Tag 14!
Was steht heute auf dem Plan? Ich werde die pH-Werte im Auge behalten und schauen, ob die Kühlpacks die Wassertemperatur stabil halten können. Außerdem werde ich die kleinen Pflanzen genau beobachten, ob es ihnen gut geht.
Bis die Tage

Likes
Comments
Share


@eldruida_lamota
Follow
Vamos familia, actualizamos la quinta semana de floración de estas Black Rainbow de Seedstockers, salieron las 3 de 3, 100% ratio éxito.
Aplicamos varios productos de Agrobeta, que son increíbles para aportar una buena alimentación a las plantas.
Temperatura y humedad dentro de los rangos correctos dentro de la etapa de floración.
La tierra utilizada es al mix top crop, por cambiar.
De 3 ejemplares seleccioné los 2 mejores para completar el indoor y trasplanté directamente a macetas de 7 litros, cambien el fotoperiodo a 12/12 y aplique una buena poda de ramas bajas, se ven bien sanas las plantas, tienen un buen color y progresan a muy buen ritmo por el momento, están cogiendo ya una tricomada seria.
Agrobeta:
https://www.agrobeta.com/agrobetatiendaonline/36-abonos-canamo
Hasta aquí todo, Buenos humos 💨💨💨

Likes
6
Share


@Syntaxx1313
Follow
So far so go. After changing the light cycle the plant started to flower and it's looking really nice.
The bud are starting to stand out now and it seems like it will give me more than a oz. The last auto I grew ended up producing 30 grams after it was harvested. I still wish the would of been a autoflower as I presumed but things happen and we need to just make the best out of it. I can not wait till I actually smoke this baby.

Likes
7
Share


@Manollo420
Follow
Cruisin down the highway gotta eat a lot of peaches
Ready steady, 2 weeks left to fatten up those buds
Gonna give them one last magsulphur feed and then its only water till harvest
Keepin it simple yo
Likes
8
Share


@MMVSS
Follow
So This...Is Something We've Been Working To Perfect! Two Successful Runs In The Past And Now We're Going BIG! Ever Seen Living Soil With Cover Crop And Mulch In A Hydro DWC Converted For Aquaponics? YES LIVE SOIL LIVE WORMS AND MITES AND SPRINGTAILS..LIVE MICROBES AND LIVE FISH FOR LIVE PLANTS! 😉 Remember Where Yall Seen This First. MMVSSOIL Is Bringing The Gap And Making History! MARK MY WORDS. Believe You Can Achieve...And You Will!!!!


Likes
4
Share


@Ryno1990
Follow
This beautiful girl Snow Panda from Atlas seeds has been growing amazing since the start she has been flourishing threw these 2 weeks of flower so far growing buds faster then all the other girls loving the medic grow fold 6 she's been growing under she is the 2nd biggest of the girls an can't wait to see her around harvest time
Processing
Likes
3
Share


@macrocefalo
Follow
The ladies were flushed on the 68th and will be flushed again on the 71st. Analyzing the resin with a magnifying glass, I think we will not have a harvest before the 75th. B3 this blooming I think she will be looked after with more than 80 or 83 days.
Likes
142
Share


@MadeInGermany
Follow
Hi all 🤗 Everything grows very well and healthy 😇
The stragglers were repotted this week. I also have to give the grown-ups at least 3-4 weeks vegi, because there is still no space in the bloom chamber 😂
But it gets exciting too, 5 topping bushes and 6 normal ones, unfortunately I can't top the 6 normal ones because of space constraints 🙈.
If you have any questions please ask ;-) otherwise all the best for everyone and let it grow 😎


Likes
4
Share


@Hodo420
Follow
The plants are exploding in growth. Especially the gorilla cookies. I need to start doing a better job of watering my girls. I means its hard having to mix up all these nutrients at one time so I water my plants 2 at a time. I water 2 one day then the other 2 the next day. Im trying this method out cause it makes watering not so intense during dlower.
Likes
190
Share


@Burmese
Follow
Hi everyone, Here’s the update for this week along with some beautiful videos.
Please enjoy... 😊 ✌️
BTW Grow with Mars... 😉
Soil-Organic-LST
Day 92~98
This week I topped up my soil with 50g of my potting mixed,25g of tea leaves fertilizer and 15g of bone meal.
Soil
RO water
Coconut water- 15ml/L
pH- 6.5
ppm- 85
Run off
pH-6.7
ppm-650
Soil Potting Mixed Recipe
-Coco peat: 30%
-Soil Compost: 20%
(Soil,Sand,Cow manure,Ash)
-Bone meal: 10%
-Earthworm fertilizer: 10%
-Perlite: 15%
-Marble stone: 5%
-Crash egg shell: 3%
-Chicken manure: 3%
-Banana peels: 2%
-Gypsum: 2%
———————————————
Coco-Inorganic-ScrOG
Day 92~98
Becoming foxtails...
Coco
RO water
Bloom- 4.0ml/L
Micro- 2.0ml/L
B52- 2.0ml/L
Bud Candy- 2.0ml/L
Cal-Mag plus- 1.5ml/L
pH-5.5
ppm-890
Run off
pH-5.9
ppm-800
Coco potting mixed recipe
Coco peat : 70%
Perlite : 30%
Transplanted from 1gallon coco/soil mixed pot at Day-42.
Scrog size
Area : 1ft x 1ft (30cm x 30cm)
Hole size : 2” (5 cm)
Material : iron welded by four steel pillars.
Height from base: 6” (15cm)
Stay tune friends.
Happy growing to you all... ✌️ 🇲🇲
Likes
6
Share


@Gratak
Follow
Normales wässern und 1 mal pro Woche Dünger.
Außerdem bin ich mit meiner Lampe von 30% auf 60% gegangen



