The Grow Awards 2026 🏆 


Likes
Comments
Share
@FarmerT
Follow
Week 9 looking good getting ready to chop down both lsd25s the big bud and cherry cola still have time to thicken up for sure

Likes
12
Share
@Mr_BFL
Follow
Flush!Flush!Flush!
Fantastic smell. Moby dick like Red Grape o like that & shiskaberry like cherry jam!


Likes
3
Share
@cmstacker01
Follow
Good yielder, give them least 9 week flowering.
Can take a good feed, i suggest to cut of N last 2 weeks.
Had 2 pheno. 1 is very bubblegum type of smell and the other is just slight fruity.
Harvested 3 plants.
1 was 56.20 dry at 52%RH
2 was 52.33 grams dry at 52%RH
3 was 80.23
grams dry at 55%rh
Total=188.76 grams for
3 plants
All the plants Peyote critical Orange SHerbert Candy Dawg where flowered under 300W Led
Organic way.
Total sum of grams for all plants 401.32 grams
= 1.3333gram per watt
Will i be growing this for the future? Nope, i'm looking for something more unique for my taste.
Imo pretty generic kind of weed.
Will update later for taste after 4 week cure

Likes
15
Share
@I_Identify_As_A_Dan
Follow
Week 15 for Gelato 41 by seedstockers
She got a MASSIVE defoliation... session done to her. She looks a little naked as of now but she will bounce back nicely by next week😇 She really needed it, it was so bushy before you couldn't even put your arm into the plant to figure out what was what😂
Oddly enough 30% of the plant seems to be in pre-flower when the rest doesn't... She does get shaded the quickest in the garden but wouldn't expect her to be flowering already...
Still hasn't been watered since the rain last week but i may have to give water once this week as we have 40+ degrees incoming 😰

Likes
2
Share
@thefrozenking
Follow
Day 56
these autos are running 12/12 because of the northern light being photo period

Processing
Likes
50
Share
@Mr_Motalovah
Follow
Hello growers and tokers! 👋 👩🌾 🧑🌾.🔥💨
Hope you had a great week because these ladies sure have! 😍
They're starting to get that sweet aroma this strain gives off, her aroma will be over powering my tent in full flower. Love it!
Pictures and info were taken on day 12 of flower.
I put 71cm tall because that's the average between the three girls.
CC 1: 78cm
CC 2: 68cm
CC 3: 68cm
CC 1 is killing it with the double main colas. 💪 💪 🤩
CC2 is my favorite. She's got a perfect shape, nice evenly distributed canopy. Took LST great.
For me that's the goal when I do LST.
CC3 doesn't fall behind in any way, she's looking great.
There's a bunch of new growth everywhere so after 21 days i'll be doing some pretty heavy selective defoliation.
Feeding 1,5L each, every other day. Will be increasing as they ask for more.
How do they ask for more?
When feeding if the soil is drier than normal I give a 150-200ml increment of water.
I do that until they stop feeding so much then i just maintain that amount.
I start reducing if it takes longer to dry.
That works good for me. The old finger in the dirt trick. 👍
Nothing like knowing exactly what your ladies need first hand.
They've got a lovely green lush color.
It's a delight growing this strain.
I'll have to get me some more seeds for next run because this is a strain that will always have a spot in my garden. 😍 😍
Hope you enjoyed this week's update and stay tuned for next week.
If you like what you see check out the other strains in the garden. 😁
Take care and stay safe!
One love!

Likes
16
Share
@Noob_quest
Follow
So the pics are few days old due to there being a problem with my page for some reason.
Buds aren’t really getting fat and the girls have yellowed quite a bit since I took these pics on Monday.
Still learning I think I just didn’t start feeding them early or heavily enough and they never really recovered.
It looks like my yields will be well down vs my 2nd grow which was all organic... which I may go back to for G4.
Anyways, given them big feeds and plan to harvest the most developed plant end of this week and let the others go another few weeks to see if they gain any weight.
So lessons learnt. Can’t wait to get these down and start fresh.
Thanks for reading have a great week 😊


Likes
170
Share
@nonick123
Follow
Día 42 (27/02). Riego 1,25 Litro H20 + Wholly Base 2,5 ml/l + Solid Green 1,5 ml/l + Rise Up 0,5 ml/l de Gen1:11
TDS 898 PPMs - pH 6,5 (mínimo ajuste con pH+ para subirlo desde 6,2)
Plantas sedientas con un intervalo de riego cada 4 días. A partir de ahora regaré cada 3 días
Día 43 (28/02) Las ramas crecen muy rápido y se van colocando para recibir el máximo posible de luz. Es impresionante su evolución día a día!
Día 44 (29/02) Han crecido 17 cm desde que cambié a 12/12. Alucinante! 😍😍😍
Día 45 (01/03) Riego 1,25 Litro H20 + Wholly Base 2,5 ml/l + Solid Green 1,5 ml/l + Rise Up 0,5 ml/l de Gen1:11
TDS 891 PPMs - pH 6,25
Añado un poco de substrato al top y a los bordes de la maceta antes de regar, porque se ha compactado ligeramente.
Día 46 (02/03). Las plantas siguen su crecimiento imparable. 3 cm al día 😍
💦Nutrients by Gen1:11 - www.genoneeleven.com
🌱Substrate PRO-MIX HP BACILLUS + MYCORRHIZAE - www.pthorticulture.com/en/products/pro-mix-hp-biostimulant-plus-mycorrhizae
🎚️Controlled by TrolMaster TCS-1 Tent-X System Main Controller - https://www.trolmaster.com/Products/Details/TCS-1
Likes
4
Share
@7circleshg
Follow
5 dias despues de la semana anterior, buen desarrollo de flores aunque preferiria mas engorde. Optima produccion de resina
Se dejo el blossomblaster y empezamos, el viejo y confiable, Monster bloom y heavybud
Likes
1
Share
@Bluemels
Follow
Tag 35: Bisher steckt die Triple G das runterbiegen gut weg.Die Pflanze ist sehr stark.
Tag 39: Beginn Scrog.
Likes
17
Share
@eldruida_lamota
Follow
Que hay familia, actualizo la sexta semana de floración y última de estas Runtz F1 automáticas de Zamnesia.
Vaya liada de floración, la luz… los nutrientes… la tierra…desperdiciada, no me gustó mucho este proyecto, la verdad es una variedad poco resistente y además se quedan enanas, las flores también son enanas y no son nada prietas ni gustosas.
La temperatura está 25 grados y la humedad anda entorno al 40%. Riego cada 48 horas.
Hasta aqui todo, en unas semanas actualizaré ya la cosecha y la smoke review.
Agrobeta:
https://www.agrobeta.com/agrobetatiendaonline/36-abonos-canamo
Mars hydro:
Code discount: EL420
https://www.mars-hydro.com/
Os comento que tengo un descuento y para que compréis en la web de Zamnesia de un 20%, el código es ZAMMIGD2023
The discount 20% and the code is ZAMMIGD2023
https://www.zamnesia.com/
Hasta aquí es todo, buenos humos 💨💨💨.

Processing
Likes
39
Share
@GreenHouseLab
Follow
Harvested Z1 (Zkittlez 1) at 95 days and Z2 (Zkittlez 2) at 90 days, At week 11 the trichomes were 90% milky with 50% orange pistils. They both received a minimum 2 full water flush, what I mean by that is a good 20% runoff to get all that built up out of the fabric pots.
Note to self. 7 Gallon pots were unnecessary for these autos, 5 Gallons would be more than sufficient possibly even 3 Gallon.
I believed the yield would be more considering how dense these buds are. I had forgotten Z2 had been massacred throughout this grow, unintentional topping as she was starting to flower and the carbon filter which fell on the plant damaging the top bud and other smaller bud sites. Taking these into consideration and after weighing Z1 I am very impressed by Fastbudz genetics especially under 13 weeks! I added a video of Z1 & Z2 dry weight to show transparency of my end results for this grow. I think better internodal spacing could allow for better bud development hence a better yield. Overall extremely pleased.
Z1 = 97gr
Z2= 61gr
Density of Buds: 10/10
Resin: 9/10
Smell: 10/10
Dry Time and Cure for Smoke Report: 6 days (are now placed in Masson jars open lid for the next 2 days then 30 min x2/day) at Relative Humidity 60% // Temp: 72° F
Smoke Report : High THC can be felt but not overpowering. Easily tell its heavier on the Indica side - will only know for sure once I try Zkittlez pheno 1.
Curing will take some time. Generally I find 8 weeks minimum tends to give me a good quality product. I will be burping the mason jars twice a day for the next 2 weeks or so and add a 58% Bodeva pack. I prefer 58% vs 62% because I tend to use a Pax vaporizer.
00
Likes
6
Share

Likes
29
Share
@Reaper
Follow
buds fatten up now,
The hydro plant is destroying the soil completely, the buds are 3x as big lol.
i started this grow during the cold winter temperatures, thats why everything got slowed down a few weeks. i expect to harvest withing 2-3weeks from here.
Likes
10
Share
@TiRobotProds
Follow
🔥🔥🔥🔥 en attente de l'explosion florale. Leq branche commence a ce givré d'une couverture de trichome fantastique.


Likes
4
Share
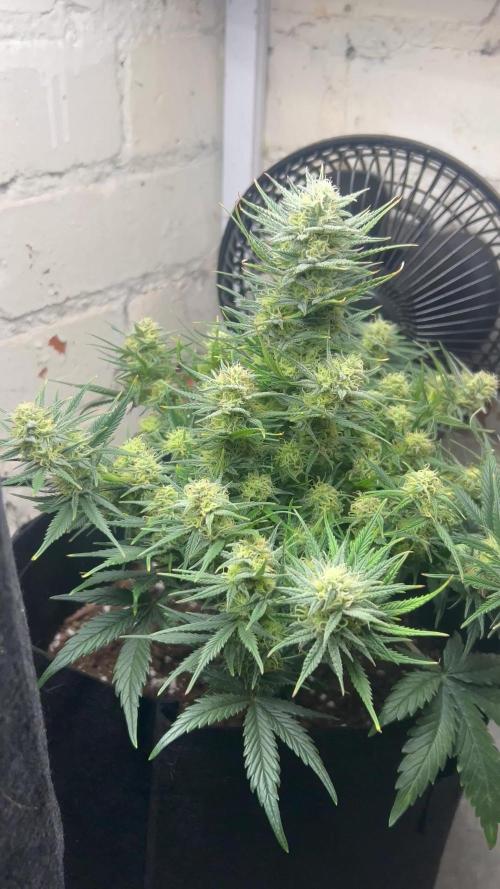
@Organic473
Follow
This girl is doing what she wants spreading out and loving the space I made for her with the 10 gallon pot.
There are pistils popping everywhere on her pre flower I guess I have to start flowering her for the next week.

Likes
44
Share
@ILoVeThiSpLaNt
Follow
Giorno 28
Si prosegue la fase vegetativa aspettando le due Rainbow Belts che si sviluppano per bene
A settimana prossima ❤️


