
Likes
Comments
Share


Likes
12
Share


@Chubbs
Follow
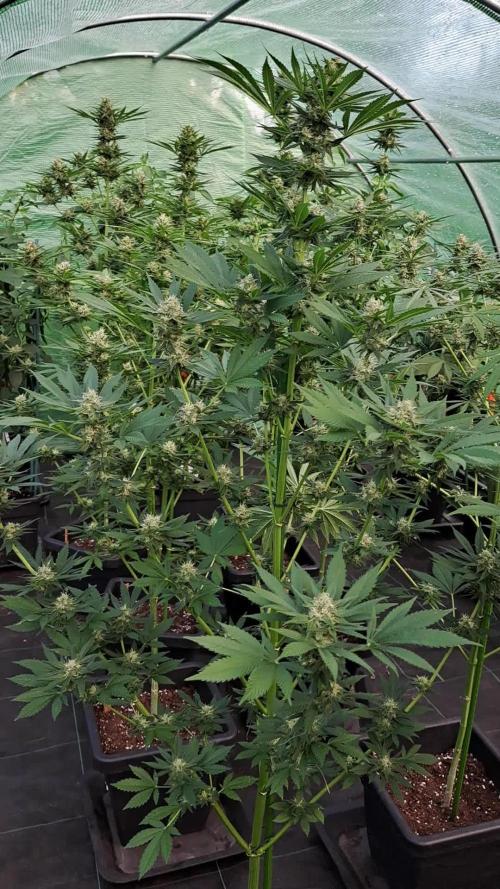
I hope everyone's New Year is off to a great start. These two are not the tallest but sure make up for it in flower and smell. They're stacked super tight a little to close for my liking but still healthy and happy. Over all Happy


Likes
2
Share


@Strangelet
Follow
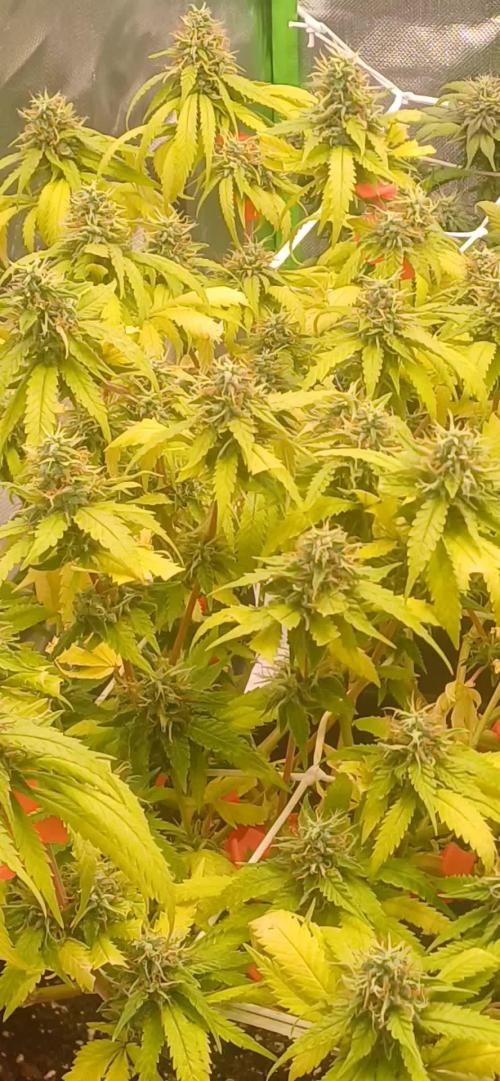
Harvest day 74. 10g dried after 4 days.
Little plant and little yeald.
Didn't respond well to topping, problems with over feeding in late flowering. Also began to foxtail in last week, probably due to 40°C at daytime.
Will update the smoke test curing.


Likes
3
Share


@NyBushDr
Follow
Sorry on vacation so a couple of pics from the cam and a time lapse is all I can give you! See you for a detailed update next week as we get close to flip :)


Likes
8
Share


@HeartStrong_Garden
Follow
I'm really glad the second girl finally pulled through whatever was causing her to struggle to grow. Her leaves are coming in strong now. I've been letting the soil dry back a bit more in between watering. I just spray the bottle a total of 30 times now. 10 at a time to let the water soak instead of pooling and flowing away. No nutrients yet, her roots are probably still just in the Light Warrior soil. I do still put water in the self watering pots to add humidity to the tent and to "cook" the soil nutrients .

Likes
3
Share

@Oyziphar
Follow
🌞
The week started with moderate (25°C) summer temperatures 🌡️🌡️🌡️ But the day before yesterday and yesterday we had hot (+25°C) temperatures again 🌶️🌶️🌶️
Fourth week of Light Deprivation
👉👉👉👉Every morning at 9:00 am I move the plant to the greenhouse.
👉👉👉👉Every evening at 9:00 pm I move the plant (together with some other strains) inside the growroom (which I don't use in the summer)
➡️ The buds are filling up, more and more trichomes, and every day they start to smell stronger 👃👃👃
👉Once this week I boost the plant with gift of water enriched with OPF 7:2:3 ; Fulvic 25 ; Yuccah ; Biovin liquid ; Earthworm compost extract
⭐Big Thanks to Luc from Plant Health Solutions / Bioplantenvoeding dot nl ⭐

Likes
8
Share


@GhostByte
Follow
24/3 Harvested as soon as i saw a few amber thrichs here and there. I dont like too much cbn.
I learned i need to defoliate more next run, the bottom buds seem kind off airy because of lack of light penetration. I used to grow with stronger HPS lights before and now getting into the LED game. A little switch for me but ill get the hang of it.
I dont have a hanging scale, ill put the dry weight here on my next post in a couple weeks.
1/4 shes dry and started to trim. Gotta clean the scissors every bud 😄 onto trim jail and curing. Will test a popcorn bud tonight
2/4 everything is trimmed and in grove bags. Froze the trim overnight and the popcorn buds and made dry sift hash this morning.

Likes
35
Share


@The_Bearded_Grower
Follow
Day 80 Harvesting was a bit of a trick with this one because I used to Trellis Nets but it went very smoothly no accidents and in the end I ended up with a staggeringly large amount of wet weight. My wet weights have a minimal amount of stock so that they more accurately represent the actual weight of the flower itself. In three days roughly I will be putting in the dry weight and then putting all the flowers into curing.
welcome to Day 83 this will be my last update i have now done my final trim and got my dry weight 362.30 gram's !! off one plant. that's 12.77 ounce's i don't sell but my god if i didn't care about laws lol, For a plant thats no cured i will sat it tastes smooth AF and has a nice head high that i didn't really expect from her being that its not cured and didn't really look like she had tones of trichomes. This baby is going to be nice in a month.
I'd like to thank everyone that followed this grow and asked questions as always my friends keep your stick on the ice

Likes
5
Share


@Mrg7667
Follow
Smells like Rubber bands coated in a berry sugar or berry sryup very interesting on the nose!
Harvested day 67 ish maybe a couple more hard ot tell outdoor Split the harvest into drying buds and some to made into fresh frozen hash. i can dry weigh the fresh frozen buds and put that weight in the wet section and i will put the to smoke buds in the dry weight section so total between the two will be the whole plant
Drying was a big mishap got condensation around day 10 of drying and it caused some mold 🤦♂️ right around the time i was going to cure!
Found a peroxide soak that ill post butt it seemed to take off all the mold without affecting tricomb heads! Had to re dry for another week afterward i feel like the re dry maybe messed with the terps because it definitely never got the smell back like i thought but who knows slmost 3 weeks into cure coukd get better but doubt it

Likes
32
Share


@AsNoriu
Follow
Day 1. Ohh , what a long and painful attempt it was.
First seed - failed root
Second seed - I was impatient and dig her out, needed like 24 hours more, never made it, had root
Third seed - made it, but I started working and in the morning made a football of her ... died.
Forth seed - maybe will make it, brown start, could be Growing root up, covered with extra soil ... Will wait....
Have 5th seed soaked too ;)))
Later Day 1. She is out !!!! November 24 is first day.
Happy Growing !!!


Likes
56
Share


@Northerngrowers
Follow
Genética de Jack Herer en cultivo 100×100 orgánico, en éste caso con una poda apical realizada y con muy buen resultado.
Grandes flores cubiertas de tricomas hasta el punto de formar gotas de azúcar, es impresionante.
Sabor diferente, muy especiado, con un efecto eufórico y creativo, gran pegada.


Processing
Likes
15
Share


@eldruida_lamota
Follow
Que pasa familia, volvemos de #GMM20 , y la verdad que entre buenos humos fue un día agradable, ya actualizó esta cepa , crazy cookies de zambezaseeds ya están a punto para cortar, una a tirado al final plátanos y la verdad que no estoy tan contento aun viendo el tamaño.
Ph controlado hasta el final, la temperatura al final algo alta pero sin problemas, Humedad correcta.
Así que hasta aquí es todo , que paseis un buen finde fumetillas.


Processing
Likes
31
Share

@The_Bearded_Grower
Follow
welcome to day 5 of veg and i must say she looks very good and strong. still upset i cant get voodoo juice but vitathrive is as good a replacement as i have.
any questions shoot me a comment
like my work hit that like button and maybe check out my other diary's
stay safe and keep your stick on the ice
Day 9 of veg 10/07 man she is growing fast. did the transplant today