
Likes
Comments
Share


@BLAZED
Follow
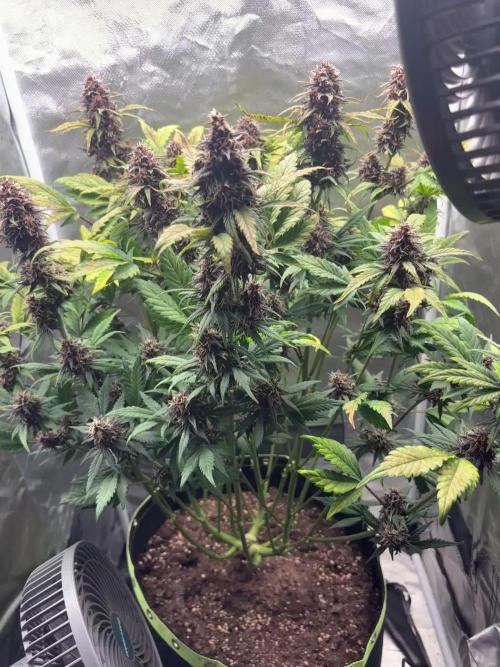
W16 (16-5 to 22-5)
16-5
Temperature: 25.4 degrees (lights on) 19.8 degrees (lights off)
Humidity: 68% (highest) 48% (lowest)
Watering: 1000 ml.
17-5
Temperature: 24.8 degrees (lights on) 20.1 degrees (lights off)
Humidity: 69% (highest) 51% (lowest)
Watering: None.
No pictures.
18-5
Temperature: 25.1 degrees (lights on) 21.1 degrees (lights off)
Humidity: 67% (highest) 42% (lowest)
Watering: None.
19-5
Temperature: 25.7 degrees (lights on) 19.1 degrees (lights off)
Humidity: 64% (highest) 44% (lowest)
Watering: 1500 ml.
No pictures.
20-5
Temperature: 25.8 degrees (lights on) 20.9 degrees (lights off)
Humidity: 68% (highest) 45% (lowest)
Watering: 1500 ml.
21-5
Temperature: 25.9 degrees (lights on) 20.6 degrees (lights off)
Humidity: 67% (highest) 51% (lowest)
Watering: 1000 ml. (Only with Silica and Calcium)
22-5
Temperature: 25.9 degrees (lights on) 19.6 degrees (lights off)
Humidity: 68% (highest) 47% (lowest)
Watering: None.

Likes
Comments
Share


Likes
7
Share

@Kominest
Follow
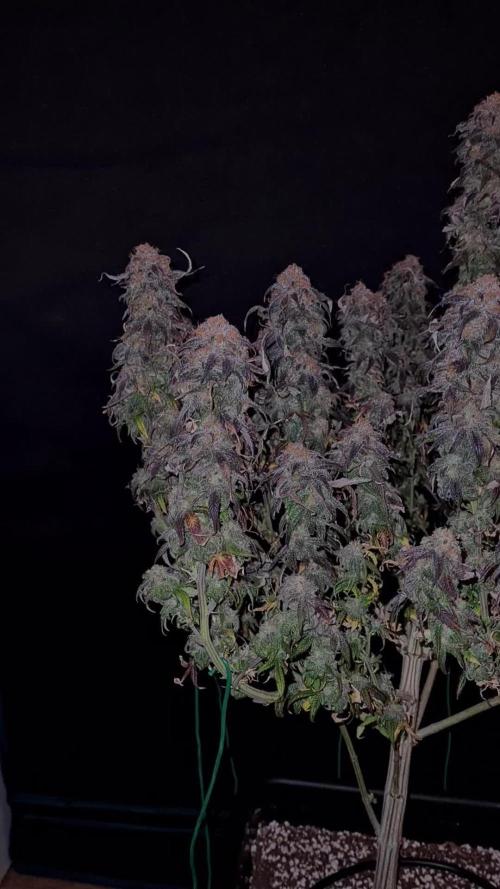
Light smell still nothing big . Leafes are going crisp on the upper part . They’re pretty much done and i will take some off in the next days .middle part still looks ok so I think about taking the upper buds off bit earlier and let the rest develope a bit more but let’s see how motivated iam in the next days . She’s still going strong even with the calmag issue .buds still develope nicely and I turned her like halfway so she gets some more light on the buds that didn’t got so much in the first weeks . Let’s see what the next days bring.
Trichomes getting milky but still some clear to see as well . Will check again next week

Likes
14
Share


@GrowWithTheFlow710
Follow
Saw some explosive growth this week. Some signs of preflower. The broken stem plant is very stressed, while the other is thriving.
Did first round of defoliation, went a tad overboard perhaps. Going to try and do a minor lollipop once I get some small buds going.
Starting adding some silica blast for stem strength, fish shit for soil microbial life, and sugars to help nutrient intake. RO water, having to PH down to 6-6.5 now that I'm using the silica blast. Stopped the sns209, no signs of pests. Added another fan (total 3) and bug catcher (total 2).
*I am growing 4 plants here, but only tracking one.

Processing
Likes
11
Share


@Luv2Grow
Follow
Day 50 - Starting off the 8th week and she’s looking good. Filling in more and more each day. Gave her the first feeding of the week today and removed a couple dying leaves.
Day 51 - No water today, she still needs to dry out a bit. She’s filling in fairly nicely and looking forward to seeing how this girl will turn out in the end.
Day 52 - Gave the girl a full 3/4’s of a gallon of pH’d water. She’s definitely filling in a bit more each day.
Day 53 - For the most part, she’s looking pretty good but she’s definitely got a little deficiency. A few of the leaves I defoliated seem to point to a cal-mag deficiency. So I’m going to give her good flush tomorrow and up the cal-mag a bit and hope that helps.
Day 54 - Flushed her with a gallon of water and foxfarm’s sledgehammer. Gonna let her dry out quite a bit and then up the cal-mag and hope this corrects her issue. Other than that she’s filling in quite nicely.
Day 56 - Last day of week 8 and she’s really starting to pack on now and looking good. Letting her dry out a bit more before starting feed schedule after flushing.

Likes
5
Share


@LongJohn420
Follow
19.9 5th flowering week done. Healthy girls growing nicely. All got used to new homes pretty fast almost instant. Also growth is good after topping. I'm happy how these plants look. I think I might just fit them in there. It's gonna be a jungle tho 😂 I think I'll put net in to help spacing...
Strawberry Lemos are almost same looking just few cm diff in height and one is little smaller than other two.
Cbd Shark is wide and green looking really good . Seems like nice genetics in that girl 😋
I have sprayed girls with alg a- mic and blackjack once a day.
Ok thank for stopping by and for all the support! Thanks guys! 🙏
Happy growing!


Likes
3
Share


@Promi
Follow
Cleaned out the lower part of dry leaves.. nothing more. Don't disturb Autos ^^

Likes
17
Share


@Kirsten
Follow
26.12.24:
I have noticed light stress on my plants. I had moved the lights further away and increased the light intensity to 70%. Unfortunately that created some issues. Namely severe palour of the leaves.
To try and rectify the situation, I've dimmed the lights to about 30%, staying at the same distance, about 30 inches away. I measured the par levels, after I did this. They should a reading of anywhere between 40 and 150, at the canopy of the plants. They are all different sizes. This seems to have improved the colouring on all plants.
After this evenings watering, I will monitor recovery and increase lighting intensity again slowly. I am also using the light cycle of 21/3, so the plants have many hours more light to absorb, than for example 12/12 or 18/6.
I am pleased with the progress, considering all of my mistakes!
29.12.24:
So I finally gave LST a shot, it's probably a bit too late, however I really want to get the most of the triploid pheno, and I went a little crazy and LST'd all plants except 2, as they're too small.
I did that late last night, this afternoon I was amazed to see the plants turn their leaves back to the light source. I'm glad I overcame my fear of trying it. I'm very excited to see them adapt and progress! 😁 there are videos above with before and after of my LST process.
Thanks for checking out my diary 🍃 ✌️


Likes
3
Share
@BLAZED
Follow
Week 23 (18-11 to 24-11)
18-11
Temps: 18.9 to 26.3 degrees
Humidity: 39% to 61%
Watering: Both 500 ml.
19-11
Temps: 18 to 25.4 degrees
Humidity: 44% to 60%
Watering: Both 500 ml.
Dry Weight #1 3.8 kg. #2 3.6 kg.
20-11
Temps: 17.6 to 25.5 degrees
Humidity: 42% to 59%
Watering: Both 500 ml.
Dry Weight #1 3.7 kg. #2 3.6 kg.
21-11
Temps: 17.1 to 24.9 degrees
Humidity: 43% to 63%
22-11
Temps: 16.9 to 24.9 degrees
Humidity: 42% to 61%
Watering #1: 500 ml. #2: 600 ml.
Dry Weight #1 3.7 kg. #2 3.6 kg.
23-11
Temps: 17 to 26.7 degrees
Humidity: 42% to 62%
24-11
Temps: 17.4 to 26.1 degrees
Humidity: 43% to 62%
Watering #1: 500 ml. #2: 600 ml.
Dry Weight #1 3.6 kg. #2 3.4 kg.


Processing
Likes
20
Share


@PureMedicin
Follow
Popped 20 seeds and all seemed to be fine. I encountered a problem with one of the pink kush seeds. It seems to be sprouting with a very small root and it released itself from its seed shell in the paper towel. It died
I have tasted all the strains except the G 13 Haze. So i hope to get 1 or 2 good plants. Especially from the Pink kush and orange sherbert.
10x Pink Kush, 5x Orange Sherbert, 2x Cookies Kush, 2x G13 Haze and 1x Utopia Haze. Growing in biobizz Coco mix. Using a soil nutrient for the first week or two
Likes
5
Share


@satirosseeds
Follow
Esta semana empiezan a entrar en la sala de floración. Las primeras en entrar han sido unas shishkaberry´s, 2 zkittlez y una grapefruitmalawi. También hay un macho shishkaberry.
Likes
5
Share


@SEGA_Y_Griega
Follow
I like development at this stage😁
13.3.23 poured clean water 150ppm
light at 50%
Frosted Guava | Original Sensible Seeds
Frosted Guava ist eine atemberaubende Marihuana-Sorte, die eine große Menge fester, kompakter Blüten hervorbringt, die mit potenten THC-Trichomen übersät sind. Durch die Kombination von Guava und Frosted Skywalker lässt Sie die tiefe Indica-Sensation auf Wolke 7 schweben. Machen Sie sich bereit für den Start nach einem 9- bis 10-wöchigen Indoor-Blühzyklus. Diese mit Zucker überzogenen Knospen sind bereit für den Fang und was für eine Ernte sie mit rund 600 g bringen m2. Feminisierte Frosted Guava-Samen gedeihen auch im Freien, werden Anfang Mitte Oktober fertig und ernten etwa 700 g plus pro Pflanze. Mit einem exotischen Terpenprofil aus Caryophyllen, Limonen und Pinen ist die Beute von Frosted Guava eine Kombination aus süßen, fruchtigen Aromen mit Tönen von sauren Erdbeeren und Grapefruit, aber machen Sie sich bereit, die Potenz ist belebend und bereiten Sie sich darauf vor, mit vollständiger Entspannung von Körper und Geist entrückt zu werden .
Alle schriftlichen und visuellen Materialien sind nur für Informations- und Bildungszwecke bestimmt.
this week I decided to install a large tent Mars Hydro 120•120, for one and a lamp with a large coverage FC E4800. I set up the climate control, now the temperature is around 24, I installed two fans to blow the Secret Jardin monkey fan 20w, I wanted to buy them for a long time. The heater also works! Hope it warms up soon 😅

Likes
8
Share


@2x2UkGrow420
Follow
Also a fastbuds purple lemonade in a 11 litre pot (30grams)a a original cheese in a 2 litre pot(experimenting)which is not ready yet. Strawberry pie.....wow so impressed with the yield but also the looks are amazing and smells like strawberries... who’d of thought it lol. Recommend to everybody will defo grow again. Fastbuds are killing the auto game!👊🏻
Likes
7
Share


@Mr_Maritime
Follow
What a week.
Set up my new light today, next week should be 🔥
Had a mishap during lst and broke one of my better branches. I bandaged her with frog tape without wrapping it. She responded well and is back at it. Think I’ll leave the tape and let her break through it.
I’m going to start eyeing changes with my nutes now that I expect her to drink more under this light. I will likely start watering more than twice a week. Right now she gets 1L every 3-4 days.
Lemme know what you think. I’m stoked fr.
Likes
67
Share


@Ageddd
Follow
_____________________
| ROYAL CHEESE HARVEST |
|_____________________|
Whats up!! Harvesting a little earlier than when i would like, because of the rise of bugs that appeared last days due to climate conditions... this year temperatures are oscillating more than usual having 1 rainy week, then a sunny hot one just after it rains.. In fact, last year, it did not rain until November
So the plagues were on the leaves, mildew powdery(just a coulpe of leaves),aphids(like just in the leaves of one cola), and some caterpillars almost ready to get out and start eating all the buds, (hopefully i cut that day)..
Sounds bad, but the parts of the plant affected was only the leaves... and means that a proper cleaning is coming so removed all the leaves and the result is what you can see, that bonsai.. Spotted 2 dead material points in big colas, that i removed after drying..
I did not weight the plant wet because of the smell that i had on my house that day, things went very tense, i was a bit busy, and even, it has not much sense to me, im better weighting the dry material.
So at the end i think im having very good quality, and the affected parts are less than i thouth at first, so im very happy with the results..
On the scales are the best buds, the rest is the lower part of the colas that were less developed so im doing hash with that part..
Been busy guys so im uploading more photos today ^^
I hope you like all the grow thank you for follow it :)
Song: Eazy-E - Down 2 tha last roach00000
Processing
Likes
9
Share


@VIPgrower
Follow
Week 12 and humidity in room is higher then I like at night 60 and duringlighys on to need dumhumidifer badly I think or maybe all good no signs of mould that’s for sure so I tried supercropping for 1st time they seemed to like the 1st to tops I did and the all peeled up and getting more light so I did it A couple more tops will see if it makes difference or not check out the vid and pics

