The Grow Awards 2026 🏆
Likes
Comments
Share
@Zengrower
Follow
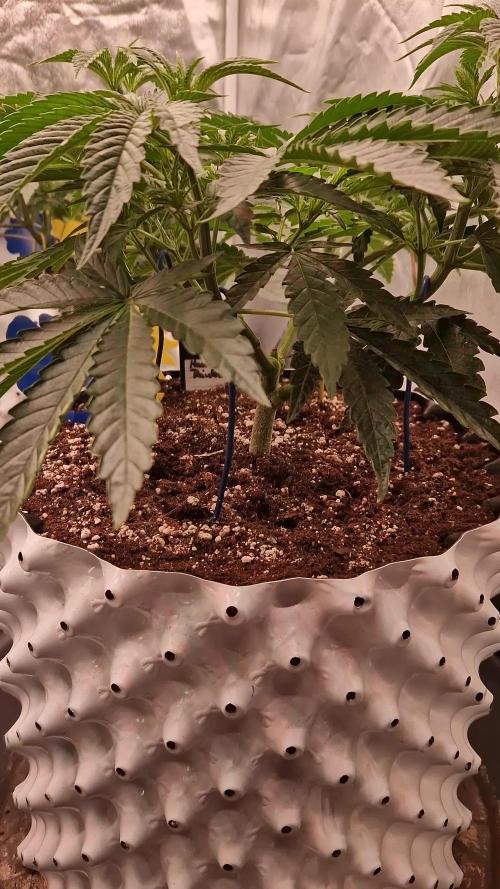
Allright! After the suspected light stress last week, the plants are in their second day of 18/6 light schedule and it looks like they are recovering. The front-left plant's upper leafs seem to be straightening out and overall the plants look healthier than last week 👌. I plan to measure the light intensity, but as things look now, there were two plants that were more susceptible to stress from the LED lights. It's not what you want in a grow, but it has taught me a valuable lesson. Don't just blindly assume a plant can handle 100% of the grow light in the third week ✌️☘️ In the end I don't think it affected the grow that much. The plant on the left corner in the back is a bit taller compared to the rest, but all plants look healthy and ready to start blooming! I have applied some LST clips on the side branches of the tallest plant. This guides the branches sideways and creates a more open structure. You can check them out at https://www.royalqueenseeds.com/growing/533-bending-clips.html 🌿🌿🌿 Mid-week update The plants have grown very fast this week and now they're all in bloom ✌️ Because of the fast growth, I've removed some of the fanleafs in the canopy, and fan leafs and small branches in the lower parts of the plants. I use the leafs for tea with liquorice in the morning and at dinnertime I chop them up for a mixed salad. The taste is really good and raw Cannabis is super healty as well.
Likes
36
Share
@nonick123
Follow
Día 44 (15/07) Wow! No hay shock de trasplante! 😍💥😁 Todas las ramas se han estirado hacia arriba tras el ajuste de LST y se están formando nuevos nodos rápidamente Esta combinación de nutrientes de Lurpe + substrato de PRO-MIX HP es una maravilla 😍 Día 45 (16/07) Ayer tuvimos ola de calor (37 ºC) y han aguantado muy bien! A última hora de la tarde (cuando ya no había sol directo) les apliqué H2O en spray foliarmente para refrescar los estomas Hoy parece que vuelven las temperaturas estándar para esta época del año: 29 - 30 ºC en las horas centrales del día Riego con 1 litro de H20 pH 6,5 Día 46 (17/07) Pequeños ajustes de LST Hay algunas ramas inferiores que no se han formado / estirado mucho Lo más probable es que haga una buena limpieza este domingo, 7 días después del trasplante, para dejar solo los brotes por encima del 4º nudo Día 47 (18/07) Riego con 0,5 litro de H20 pH 6,5 Este domingo (día 50) haré limpieza de partes bajas y tal vez también de nuevo topping en las 4-6 ramas principales 😁 Día 48 (19/07) Día de muchísimo calor con 37 ºC. A ver como lo llevan! Riego con 0,5 litro de H20 pH 6,5 Día 49 (20/07) Para ayudarles a llevar mejor el calor de las horas centrales del día, coloca una malla de sombreo (70%) sobre el invernadero Lo cierto es que se nota que baja mucho la temperatura debajo de la malla! Van a estar más fresquitas! 😍 Riego con 0,5 litro de H20 pH 6,5 Día 50 (21/07) Training session! Hago limpieza del tercio inferior de la planta, de todas las ramas y nudos que no superan la línea del dosel marcada por el 4º nudo (1er topping) También hago topping (2º) a todas las ramas principales La idea es tener 12 ó 14 colas principales para que no se hagan muy altas De paso saco unos cuantos clones de las ramas inferiores eliminadas 😁💥 Para superar el estrés, hago las siguientes aplicaciones y riego: - Riego con 1 Litro de Té Vegetativo de Lurpe Solutions. Preparación: 24 horas con bomba de aire (oxigenación) con ingredientes: Green Sunrise 8 ml/L + Insect Frass 16 ml/L + Hummus Lombriz 8 ml/L + Melaza 1 ml/L + Kelp Hidrolizado 0,25 g/L - Aplicación foliar Kelp hidrolizado de Lurpe Solutions a 0,25 ml/l 💦Nutrients by Lurpe Solutions - www.lurpenaturalsolutions.com 🌱Substrate PRO-MIX HP BACILLUS + MYCORRHIZAE - www.pthorticulture.com/en/products/pro-mix-hp-biostimulant-plus-mycorrhizae
Likes
53
Share
Harvest Report: The Swift Journey of Blackberry Auto Greetings, fellow cultivators! The moment we've all been eagerly awaiting has arrived – the harvest of my Blackberry Auto. This beauty has moved through her life cycle with astonishing speed and grace. Let's take a moment to reflect on her incredible journey from seed to harvest and celebrate the fruits of our labor. Seed to Sprout: It feels like just yesterday when I planted the tiny seed of Blackberry Auto. Nestled in a Root Riot cube, she sprouted with vigor, her first delicate leaves reaching for the light. The conditions were perfect, with temperatures at a steady 28°C and relative humidity at 95%, creating an ideal environment for her early growth. Transplanting and Early Growth: As she transitioned to a small pot filled with rich soil and Mycor Mix, Blackberry Auto continued to thrive. The Mycor Mix, with its blend of various mycorrhizae species, worked wonders in enlarging her root system and facilitating nutrient uptake. Her early growth was nothing short of spectacular, setting the stage for the robust plant she would become. Rapid Vegetative Phase: Blackberry Auto quickly outgrew her initial pot and was soon transplanted into her final home – a 16L AutoPot. This setup allowed her to drink as she pleased, supported by the precise hydration of the AutoPot Aquavalve. With a foundation of Aptus All-in-One Pellets and Mycor Mix Soil, she had everything she needed for explosive growth. Her leaves grew enormous and lush, and her branches spread wide with gentle low-stress training. Swift Flowering and Stunning Development: Entering the flowering phase, Blackberry Auto didn't slow down. Her buds formed quickly, each one a masterpiece of nature. The colors were a sight to behold – deep purples, vibrant magentas, and hints of dark blue. The aromatic symphony filled the grow room, a testament to her potent genetics and the meticulous care provided. Natural Brilliance and Final Weeks: Observing her rapid progress, I ceased all feedings to let Blackberry Auto showcase her natural brilliance. Her final weeks were marked by a dazzling display of colors and an incredible pace of bud development. Each day brought new marvels, as her buds swelled and her trichomes sparkled like a constellation. A Heartfelt Reflection: From the moment she sprouted to her final days of flowering, Blackberry Auto has been a true wonder. Her speed and beauty have exceeded all expectations, and it's hard to believe how quickly she reached this point. This journey has been a testament to the magic of cultivation and the resilience of a well-bred strain. Acknowledgments and Gratitude: As we celebrate this harvest, I extend my deepest gratitude to @fastbuds_official for creating such a remarkable strain. To Aptus Holland, my main sponsor, your support has been invaluable in nurturing this beauty. A special thank you to Grow Diaries for providing a platform to share this journey, and to the community for your shared passion and camaraderie. 🌱💚 As we move forward, I eagerly anticipate the trim and smoke reports, where we'll dive into the sensory delights of Blackberry Auto. For now, let's revel in the joy of a successful harvest and the extraordinary journey that brought us here. Genetics Blackberry Auto @Fast_Buds Food - @aptusholland @aptus_world As always thank you all for stopping by, for the love and for it all , this journey of mine wold just not be the same without you guys, the love and support is very much appreciated and i fell honored and blessed with you all in my life
Likes
13
Share
@Bryankush
Follow
Giorno 1 come vedete ha già i prefiori ma penso che questa settimana si concentrerà ancora sul suo allungamento. Giorno 2 ultima defogliazione e LST In questo settimana non la toccherò fino alla fine vedendo il suo allungamento poi a fine settimana farò una defogliazione essenziale e del leggero Lollipopping. Giorno 4 viene annaffiata con 2,25L di acqua
Likes
4
Share
@Ageddd
Follow
This week the plant was bended, and accidentally i broke a branch ... But she recovered well, she selected the other branches to grow just like in 2 h nothing could be done, but as you can see she is concentrating the growth in the other colas, so the structure is bended against the pot and with 3 main branches at the moment... Another little problem appeared when, 2 days after using Green Explosion in a half dose, i raised the Top Veg to 2.5 ml/l but she reacted bad and some overfertilization spots are apperaing in the tips of the leaves, im uploading it when the next week is complete... But dont worry is not too much overdose, just a little, (Its like she said thats the limit at the moment ) so after this, next 2 irrigations are being done with plain water to flush the soil... Im not using Micro Vita, but i gotta get that magic microbes to avoid this messy things, they muffle all this changes in PH !!! So next week, transplanting to definitive text pot, bacterian life and until the end :) But everything is fine this plant is soo strong and nothing cant stop her at the moment :D Take care GD !!
Likes
4
Share
@ccred
Follow
Habe mich hier gerade registriert, weswegen ich dieses Diary erst ab der 10. Woche anfange. Kurz zur Erklärung: Wir hatten eine Tangerine Dream Auto von Barney's Farm im 3L-Topf mit einer Habibi-LED-Lampe von Crescience. - Allerdings ohne Zelt, da wir uns das Leben einer Cannabispflanze als totale Newbees mal anschauen wollten. Sie wuchs zierlich (wurde aber auch schon über 50 cm groß) und brachte kleinere aber schöne Blüten. Allerdings war sie durch unsere Ahnungslosigkeit und meine Ernährungsfehler so gestresst, dass sie gezwittert ist und sich sogar selbst bestäubt hat. Die Pflanze, um die es in diesem Diary geht, ist ein Samen von ihr ( - also kein "echter" BF-Strain). Mittlerweile ist sie ab Erdboden 175 cm groß mit einer 35 cm langen Kola auf dem Haupttrieb. Eine echte Long Tall Sally. Das "Zelt" ist eine Improvisation aus einem Gitterregal mit nur noch einem Boden, an dem die Lampe hängt, und einem darüber geworfenem Grow-Zelt. Da das Prachtstück aber mit Topf knapp 2 m hoch ist, steht das Gitterregal zusätzlich noch auf vier gleich dicken Büchern. ;-) Am Anfang machte ich ihr gleich Stress, da ich sie zu spät umtopfte. Fette Ringwurzeln im kleinen Anzuchttopf waren die Konsequenz. Nachdem ich die etwas zerissen hatte, damit sie aus dem Teufelskreis wieder raus kommt, dauerte das Warten 3 lange Tage. Aber dann ging's los - als ob nichts passiert wäre. Ich füttere die Pflanze locker und etwas schwächer nach dem Feeding-Plan von Crazy Hills (aktuell WK 5 der Blüte). Die einzige Ausnahme ist, dass ich jedem Gießwasser der Pflanze - von der Wiege bis zur Bahre - als Prophylaxe CalMag hinzufüge. Ich habe zuviel gelesen und gehört, was Growen unter LED angeht. Sie scheint es zu mögen, zumindest sagen die Blätter nichts Gegenteiliges. :-)
Processing
Likes
17
Share
@Fabhz
Follow
The guy who sold me the seed said the strain was Critical Man Auto from family ganjah (seed bank). I only bought one seed and it was sent in a non original package. I am wondering if it is truly a Critical man auto. 😦
Likes
12
Share
Note: Moisture and Temp readings are done in the mornings. Lights are on an automated 17/9 schedule unless stated otherwise. Drip water system waters 1 Liter every 9 hours. Quick Notes: I notice as I go into full-blown flower, the plants are starting to need less frequent waterings, especially North. The watering system overflows her pot often, and the AKs soils feel relatively damp before the auto-watering starts. All plants are stopping their growth also. North is the furthest into flowering and is starting to smell and get sticky, the microscope is showing trichome development also. 📏: AK1: 36 in (91.44 cm), AK2: 44 in (111.76 cm), North: 24 in (60.96 cm) Day 64 (Jul 29) - Manually watering today. All plants drinking a bit slower, especially North (probably had a 0.5 liter overspill). Refilling drip water system tomorrow to get a better pace for watering. 💧: Tap: 7.45 pH Adjusted with pH down. AK1: 1.5 liter (5.95 pH, 1 ml FloraMicro, 2 ml FloraGro, 3 ml FloraBloom, 2.5 ml CalMag) ~1220 PPM AK2: 1.5 liter (6.05 pH, 1 ml FloraMicro, 1.5 ml FloraGro, 3 ml FloraBloom, 2.5 ml CalMag) ~1150 PPM North: 1.5 liter (x pH, 1 ml FloraMicro, 2 ml FloraGro, 3 ml FloraBloom, 2.5 ml CalMag) 💦: 57% (37-67) - 🌡️: 27C (22-30) Day 64 (Jul 30) - Noticing Plants drinking slower. Soil not completely dry in the mornings as usual. Defoliated AK2 a bit more. Attempted to Supercrop but decided not to follow through (crushed main trunk between fingers without bending it over) Watered all plants and refilled drip water system with 14.2 liters. 💧: Tap: x pH Adjusted with pH Down. All: 14.2 liter (6.2 pH, 14.5 ml FloraMicro, 14.5 ml FloraGro, 33.5 ml FloraBloom, 33.5 ml CalMag) ~1250 PPM, ~2250 EC 💦: 49% (38-70) - 🌡️: 28C (20-30) Day 65 - Plants look healthy. Set drip System to water 1 liter every 9 hours. 💦: 38% (36-65) - 🌡️: 26C (20-29) Day 66 - Plants look healthy. 💦: X% -🌡️: xC Day 67 - Trimmed some leaves below. Humidity spiked unexpectedly, buying dehumidifier. 💦: X% (40-79) - 🌡️: XC (21-29) Day 68 - Humidity spike overnight. Manually watered AK1 & AK2, not North (didn't seem like she needed it). Looks like the plants are needing a bit less watering overall. 💧: Tap: x pH Adjusted with pH down. AK1: 1.5 liter (6.05 pH, 1 ml FloraMicro, 1.3 ml FloraGro, 2.3 ml FloraBloom, 2.3 ml CalMag) AK2: 1.5 liter (5.95 pH, 1 ml FloraMicro, 1.3 ml FloraGro, 2.3 ml FloraBloom, 2.3 ml CalMag) 💦: 45% (39-71) - 🌡️: 27C (20-29) Day 69 (week 9) - Humidity spike overnight. Set water system to water 1 liter every 11 hours. Dehumidifier came in mail, monitoring effectiveness throughout the day and tomorrow. Refilled water system and set to water 1 liter every 10 hours. All: 14.2 liter (6.2 pH, 14.5 ml FloraMicro, 14.5 ml FloraGro, 33.5 ml FloraBloom, 33.5 ml CalMag) ~1550 PPM 💦: 44% (36-70) - 🌡️: 26C (19-29)
Likes
10
Share
Not too much on the scale but the terps and the intensity of the smoke is great. Two very distinct phenos that makes it so much interesting to understand the differences between.
Likes
4
Share
Booommm! Llegó la hora tan esperada Farmers nuestras flores llenas de resina acabandose de formar, la verdad que estas genéticas ayudan mucho al desarollo del cultivo espero que os guste!! Salut y força al canut!!!
Likes
46
Share
3 different phenos. Still can't believe I am having doctor greenspoon style buds on my N3. Crazy phenotype
Likes
14
Share
Day 15 Topping applicated ✂️✂️✂️😁
Processing
Likes
2
Share
Likes
144
Share
@roro_204
Follow
I received the clones from An out of province breeder. It reached me after three days of driving on the road with no light. Their future was not certain. I didn’t think I would need that many fans for the clones because they are so tiny, I figured they didn’t need that much maintenance. I was 100% wrong when I’m working with this many plants. I ended up getting mild mildew on top of the soil on the first week because there was barely any air circulation. At this point I didn’t have any Ventilation put up yet. And one fan on the floor. I ended up installing three fans in one room. No issues
Likes
25
Share
Piante spettacolari con grosse teste!!! Odore incredibile e resina gommosa e appiccicosa perfetta per estratti!!! Grazie a tutti per il supporto e a @Barneys per la collaborazione ne vedremo delle belle!!!! ❤️🔥🌲
Likes
4
Share
@Lazuli
Follow
This plant now only gets overdrive, i didnt flush her so theres still enough nitrogen, it will deplete slowly she will be ready in about 2 weeks
Likes
14
Share
@Papablob
Follow
03/11 Elle vas bien. Elle est en forme. 😁👍 Bien sur, merci à Dutchfem pour ces jolies graines . On en trouvent là: https://www.dutchfem.com/
Likes
17
Share
Hi! Thanks for checking out my Royal Dwarf grow! Please comment on how healthy you think the plant is or any thoughts. In less than 2 weeks I have learned so much from you guys and i want to make a point of thanking you as this medicine allows me to live what I would consider a normal day to day life! :) So... Beginning week 2 and from the first few pictures and videos I think the plant is getting healthier, Getting a ph meter this week also, will probably resolve any issues I think I'm having. Day 7/8 I was going to switch from the Vitalink Plantstart + Canna Rhizotonic schedule to Canna A, B, Rhizotonic and Cannazym. I have not gotten around to doing so yet as I think I've been overwatering the plant. stopped watering and started using the spray bottle to keep the moisture up. will water with the new nutrients once the plant has dried out a bit. Day 9: Transplanted from a 1L to a 19L/5Gallon, the top half of the 1L container was dry and had what looks like well developed roots and the bottom half was wet and the roots were hanging out when transplanting. I definitely should have let it dry out more. Day 10: Rhino pro 200/600 Carbon filter arrived and it's the 1100cfm/overpowered version as I read it was better to get a filter with a better CFM rating than what your fan can move. The fan is an Isomax 900cfm or is it m3/hr ? I added a short video after the pics so you can get a fairly good view of the setup. I got 5m acoustic ducting and connected it up as best I could with the space I had. I Was covered in rock wool, didn't have wire cutters and had to go buy some to finish the job 😅. Talk about a nightmare! I left 1mtr spare ducting for the intake fan in future grows. I think it's worth mentioning that the 6 fans on the back of my grow light are louder than the filter/ducting/fan/ducting (in order). Noise level of light and fan combo is between a really expensive/good quality bedroom fan and a hairdryer as a comparison. As I don't have my intake fan yet Im using passive intake and my fan has a 3 speed controller so I have it on speed 1 and there is negative pressure. Finally i mixed up the canna nutrients and changed ph from 7 to 6, I'm not sure what's ideal for autos but I read that anywhere between 5.8 and 6.3 is good for autos? Let me know! Day 11 (update) As I have now realised how to edit my weeks in the diary I will start doing so! Read that a fluctuating PH is good between 5.5-6.5 so I'm gonna stay at ph 6 and let it do its thing. The plant seems to like this a lot more than ph7 although it is still stressed from transplanting (1ltr-19ltr) it's still growing new leaves but growth appears slower. Finally after a few cold showers I have recovered from being covered in rock wool! (thank god😂) also I started a RQS Quick One as a backup for the dwarf and RQS Fast Eddy as Im eager to see if medical marijuana has a better effect on my depression, anxiety and sleep problems than regular high thc low cbd strains. Check out my profile (JuicyFruit) to see my diaries for these strains! Day 13- my dwarf still seems stressed from the transplant, its growing some new leaves slowly but is still drooping from transplant. gonna be a dwarf-dwarf by the sounds of it! 😆 and i was doing some research on optimal hang heights for my Phlizon "3000w" COB LED, it seems that 40 inches is good to start from. i also read another users opinion that the switch on the fixture labelled VEG&BLOOM is mixed up with the other switch that is labelled STRONGER. The VEG&BLOOM switch is LEDs along with IR. (i read that the IR is probably further stressing my transplanted dwarf) and the STRONGER switch is COBs. i took a minute to think about this but after realizing that the plants can probably handle the COBs (STRONGER) at the right distance i may aswell use them for veg and switch the LEDs and the COBs on 1 or 2 weeks before flowering for full flower power! after reading all that i went straight over and switched the LEDs off and put the COBs on. il post pictures in the morning to show how the plants reacted. fingers crossed people! Please comment on anything you think i could improve on or any advice to help this plant grow better as it is much appreciated! Peace! Day 13 Update: took some photos and it likes the COBs, although they are very hot combined with a sunny day reaching high temps of 29c. turned the fan up and opened another passive intake on the tent. finally im going to get some calmag and a oscillating fan for the leaves and hot spots in tent :)
Likes
175
Share
Day 36 First day of the final week of vegetation. Originally I was planning on vegging another few weeks but since the right girl already has a bigger bush than a 70s pornstar I'll flip soon, before space will be an issue. Preferably I'd veg the left girl longer as she is still lagging in size but it's too big of a mission to set up my second tent and move her over there. Super easy day today, all I did was to give the right girl 3 liters of pH 6.1 water as well as tightening a few LST wires. Day 37 All I did today was to tighten some LST wires, removing some more leaves down low on the plants, and watered the girls with pH 6.6 water. The left girl got around 2 liters and the right one only got a liter since she wasn't all that dry considering that she was watered yesterday. I also started brewing some compost tea to feed to the girls tomorrow. I used the same recipe as previously: worm castings, rock dust, biochar, lime, bentonite, neem meal, kelp meal, and some molasses. Day 38 Open the tent today and was met by a surprise - one of the tops on the left girl had broken off. I tightened the LST wires yesterday and all was ok when I closed up the tent but I guess that I had tightened a bit too much so the top eventually broke. Sigh. Wasn't planning on topping again this week but yeah, gotta roll with it. Maybe I move one of the girls to the second tent after all. We'll see. All I did in the tent today was to feed the girls some compost tea. Each girl got around 0.5-liter tea as a foliar spray and then an additional 2.5 liters in the pot. True to form I naturally forgot to pH the tea. No idea why I always seem to forget to pH my compost tea but I really should make an effort to remember it next time. Day 39 All I did today was to give the right girl 3 liters of pH 6.6 water. She is so much bigger than the small plant so she drinks a lot more. Currently, I'm watering around 10% of the pot volume per day. I'm pretty sure I will move out the petite girl and put her in my small drying tent and keep the right beast in my main tent as I'm kinda curious to see the yield I will get from her when she can spread out properly. I have already ordered another grow light and it should arrive tomorrow. Day 40 Today was a busy day in the tent as one of the girls moved out to her new home. Before I go into details, I should take a step back and explain my setup. I have this tiny tent that is 40x40x120 cm big (16x16x48 inches) that I use as a drying tent. It has a circulation fan, an extraction fan, a carbon filter, a temp/humidity monitor, and an inkbird humidity controller to control everything. I have been considering turning it into a small grow tent to fool around and see what I can grow in such a small space. I've always been fascinated by small challenges, to see what you can accomplish within strictly set (and small!) boundaries — both in size and in budget. I was planning on setting up this tent after the summer, but as I'm running out of space in my main tent, it seems like a good idea to do it now instead. The only thing the tent lacks to start growing is a light, and I already have a ViparSpectra P600 light, but it is currently used for my chilis and tomatoes while they are waiting to move outside. So I bought a new low-budget light to use with the veggies and move in the ViparSpectra light into the tent. The P600 is also a budget light, but I'm hopeful that it will still work well in such a small space. After putting in the light in the tent and measuring the PAR level, it looks like the ViparSpectra is more than up to the challenge as I had to dim the light not to fry the canopy below. The entire build with everything in it (tent, light, fans, carbon filter, etc.) is well below 250 euros. So about half of what one of the lights in my main tent costs. lol. Once the light was installed in the tent, it was time to move the left girl. First, I carefully removed the scrog net, and it was pretty easy as the plants hadn't grown into the net yet. The small tent has a tiny door that it was a challenge to get the girl in but with some help from my girlfriend and some brute force; the plant went in. It is very tight in there, and I will have to do some selective pruning for sure, but I'll do that over the weekend. In the main tent, I moved the girl into the center and put back the scrog net. I will have to train her further to fill up the space entirely, so maybe I do another week of veg after all. I'll work on her over the weekend as well and see where I'm at on Monday. I adjusted the lights to read similar PAR levels at canopy level in both tents, but once I go into flower, I'll bump up the main tent as I have CO2 in there, so the girl should be able to handle more light and heat. Finally, I gave each girl 3 liters of pH 6.1 water. I had to use the ultrawide lens on my phone to capture each plant in the photos. Fun to finally use that lens :) Day 41 Today I moved the small tent back into its stealth location, another IKEA wardrobe. There's no real risk that anyone would discover my grow but I still prefer to keep everything as hidden as possible. Watered the girls, each one with 3 liters of pH 6.5 water. I also removed all LST wires from both plants but attached some new ones for the right girl. (I'm going to keep calling them left and right even though they aren't in the same tent anymore.) Finally, I defoliated the bottom of the left girl. That's it. All in all, a really chilled day. Day 42 Today was the last day of week 6 of vegetation. I know I said earlier this week that this would be the last week of vegetation, but I might veg the right girl another week. To give her a bit more time to fill out the tent. I'll decide that tomorrow, but in any case, I'll flip the left girl as her tent is so tiny, and I don't want her to get any larger. The left girl is now 38 cm tall, and the right girl is 46 cm tall. The right girl got 4 liters of pH 6.1 water today as she is sooo thirsty right now, but the left girl didn't need any today, so I left her alone. I started brewing some compost tea (worm castings, rock dust, biochar, lime, bentonite, neem meal, kelp meal, and molasses) as I want to do one final foliar feed tomorrow before sending the girls into flower.
Likes
5
Share
Plants in containers seem to be 2 weeks ahead of plant in ground, marigolds dping great