
Likes
Comments
Share


@LegacyMarketFarm
Follow
MAY 28TH 2024 - AMENDED with a TOP DRESS between EACH ROW of plant's using GAIA GREEN GYPSUM & GAIA GREEN MINERALIZED PHOSPHATE.
The plant's will be getting another top dress THIS SUNDAY as their LIGHT CYCLE changes to 14/10. We will be TOP DRESSING with GAIA GREEN POWER BLOOM & GAIA GREEN GLACIAL ROCK DUST.
They where given their first FLOWER MICROBE tea 55 gallons split between all of the beds. Not even in flower yet and their consumption is pretty encouraging signs.
MAKE SURE to subscribe to our YOUTUBE for this next FULL LENGTH episode coming up after THIS SUNDAY !!
MOST IMPORTANT OF ALL, SUPPORT OUR SPONSORS !
PROMO CODE GREEN PLANET : LEGACY
PROMO CODE MARS HYDRO : LEGACY
PROMO CODE SEEDSMAN : LEGACY10
MAKE SURE TO FOLLOW OUR SOCIALS & JOIN OUR GREAT COMMUNITIES !
TWITTER : https://x.com/LegacyMrketFarm
YOUTUBE : www.youtube.com/channel/UCR89iF2Iqy3zlHZhFfU2MMg
YOUTUBE GAMING : www.youtube.com/channel/UCw8-qCFg-PUf00waTO5JOGw


Likes
Comments
Share


@Hashcakee
Follow
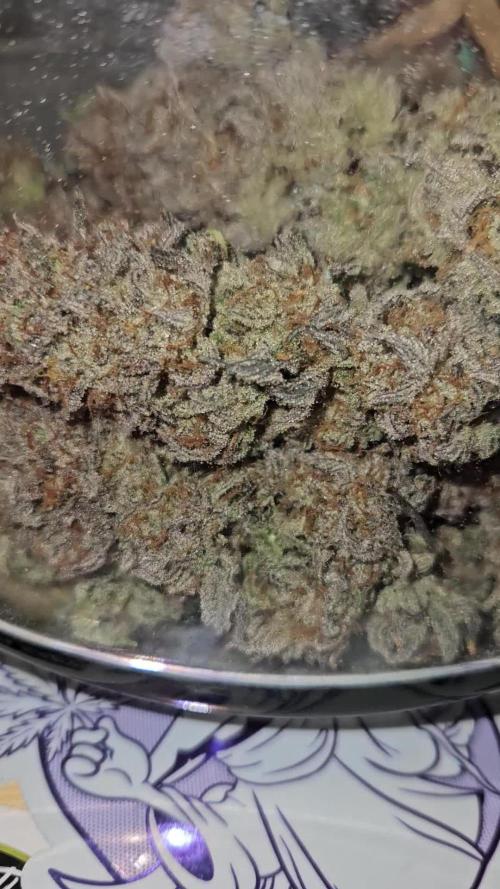
Going to update a smoke report after drying. Going to do a 3 stage sampling on the cure to find the best time. Small bowl with no cure, small bowl after 1 week cure. If needed, one more test on the 2nd week of curing. Got smaller buds on this one but that is ok. Moreso excited on profile. Going to update the yield tonight
Likes
12
Share


@Sieben
Follow
Well i wanted to harvest , but trichomes say wait a lil , so i give em some days or a week, plants getting ph corrected water only since a week.
I'm still unsure to harvest all or only the big ones and give the bottom buds and the Mutant "Haze" Lemon Orange another week...
But overall i'm impressed and satisfied with the results , guess in germanation seeds may got a lil too warm and thats why Gran Jefa hermaphrodited and other Fullgas Not growed.
Can't wait to harvest 😁
Left Gran Jefa, right back Fullgas , right Front and mid Lemon Orange.

Likes
5
Share


@Willy_Balls
Follow
#43 clones are maturing too fast I feel. Especially that a mother is ripening normally. I would guess it’s because of poor rooting. It’s the only difference.
I keep runoff at around 3 max.
Around week 5 the runoff ph started to drop below 6. Even towards 5.5. Both in rockwool and coco.

Likes
13
Share


@Yiyis_Grow
Follow
Bestva Quantum Board 2000 W & MrHide Seeds
Semana sin problemas. Se aplicó a modo preventivo tierra diatomea disuelta en agua y pulverizada foliar.
También se utilizó hongo Clonostachys, trichoderma, levaduras lácticas y transformadoras de celulosa, y Streptomyces; todos para evitar enfermedades bacterianas y hongos.
Se están regando con agua llovida, regulada a un ph de 6.3 - 6.5.
Se empezó a utilizar fertilizante de flora a razón de 4ml por litro de agua.
Se ha defoliado 2 veces (1 en vegetación y otra apenas empezó a florar). Las hojas se están recolectando para hacer aceite full espectro medicinal sin THC.
Suerte y buenos humos


Likes
12
Share


@Ashbash
Follow
60x60x120cm tent. Basic cheap one not sure what brand, if any. 200w CFL for veg, and a 250w HPS for bloom. Gonna continue with biobizz and maybe a couple of other supplements later down the road. Soil is biobizz allmix. Says pH ready so no need to adjust. Hopefully that's right!

Likes
15
Share


@Fan2Grow
Follow
I really glad to see difference between phenotype, everything going so well, thx 4 U support , and happy grow everyone . 🤩🤩


Processing
Likes
5
Share


Likes
22
Share


@Polliceverde18
Follow
Ciao growers aggiornato giorno 50 do acqua ph 6.3 con EC di 1000 ų/cm più o meno
Le vedo un po troppo scure con sfumature sul viola... spero che faccia parte del suo carattere... metti like se ti e piaciuto!!!👍👍👍
Aggiornamento giorno 11/2 2 litri diviso 3 con 2 ml Rhino skin. Odore debole ma molto buono mi ricorda Amsterdam !!!
Aggiornamento 14/ 2 2,7 l diviso 3 con rhino skin bud candy e long flowering greenhouse con 1400 ų/cm e 700 ppm vorrei defogliare ma sono indeciso...🤔 Aggiunta una seconda lampada da 1000w il 13/2/21.
Alla prossima settimana ciaoo 👋👋👋
Likes
9
Share


@GEORGE_21
Follow
Esta semana aplique delta 9 de manera folear, 2 ml por cada planta y un litro de agua, se recuperaron un poco de la defoliación.

Likes
71
Share


@MarcXL
Follow
Week 8 of flower, started flushing with "clean fruits" few days ago. Also picked all the bigger leaves out and removed the ScroG net. Buds are very dense and hard, so I will harvest as soon as possible to prevent bud rot. First sugar leaves seem to have tendencies for moulding soon as they started turn brown. I will try to raise the temperature a bit and reducing the air humidity.
They are very sticky and now offering a strong smell. I only open up the tent for 5 minutes and the smell is exploring the whole house. Wife is not amused.😂
Likes
18
Share

@DogDoctorOfficial
Follow
Grow Report — Week 6 From Seed
(12/12 From Seed · Early Flower / Week 2 Flowering Transition)
Quick Recap (for new joiners)
This is a 12/12-from-seed run, now entering Week 6 from seed, which we can comfortably call early flower / second week of flowering transition — though we don’t obsess over labels.
We follow the plants, not the calendar.
Two plants, two approaches:
• Plant A: Metal clips + harder structural training, with a short 18/6 period earlier on, plus LST
• Plant B: Pure 12/12 from seed, gentle LST and leaf positioning only
Both plants are now fully in flower mode, no doubt about it, just expressing it differently, which is expected and welcomed.
⸻
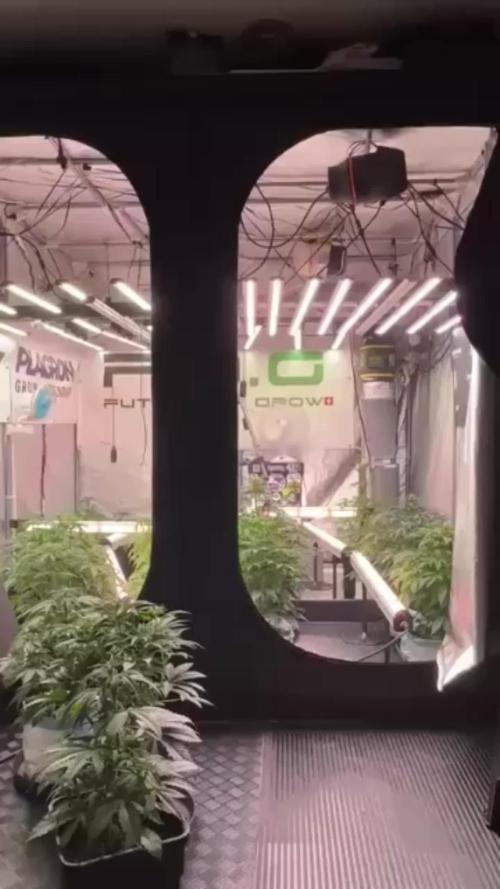
🌡️ Environment Update
• Day temperature: ~28°C (successfully raised)
• Humidity: ~65%
Even though it’s still a bit cold outside, increasing plant mass, higher lighting intensity, and added under-canopy lighting have turned the tent itself into a stronger and more stable heat source.
This allowed us to stabilize conditions naturally, without forcing anything — exactly how we like it.
Lighting & Atmosphere
• PPFD: ~600–850 (depending on plant size and position)
• CO₂: ~900 ppm
Airflow
• Unchanged and dialed in
• Vortex extraction
• Cross-winds with multiple fans
• Constant, gentle movement across the canopy
The goal remains the same: fresh air, no stress, no stagnation.
⸻
💧 Feeding & Nutrition Strategy
This week marks an important and intentional nutritional transition.
• EC: 2.4
• pH: 6.5
From this point forward, all feedings will be pH 6.0 and above.
Why?
As flowering progresses, nutrient uptake priorities shift. A slightly higher pH improves the availability of key elements needed for bloom development, and the plants are clearly asking for it.
Nutrient Change
• Introduced: Terra Bloom — 5 ml/L
• Removed: Terra Grow
This switch is happening now, not earlier, because the plants have clearly entered the flowering transition.
No rush, no shock — just listening to plant signals and responding accordingly.
The current Plagron-based approach continues to perform exceptionally well, and plant response has been outstanding so far.
⸻
🌿 Plant Behavior & Training Notes
Both girls are looking amazing, each in their own way.
• The metal-clip + harder-trained plant looks structured, composed, and confident
• The pure LST plant is expressive, vigorous, and stretching beautifully
The plant that experienced a short 18/6 period is currently smaller, noticeably so — which is interesting and worth observing.
Not better, not worse — just different.
Different light histories, different training styles, different expressions.
This is exactly why side-by-side approaches are so valuable.
Both plants are:
• Healthy
• Actively flowering
• Responding positively to the environment and nutrition
Plant A — Canopy Management Note
This was also the week where a light, selective defoliation was performed on Plant A to open the canopy slightly and improve light penetration.
She is clearly more advanced in flower development, visually closer to what would normally be considered around day 21 of flowering, and the timing felt right.
Only larger, blocking leaves were removed — no stripping, no stress — just enough to:
• Improve airflow
• Expose developing flower sites
• Support her more advanced flowering pace
The plant responded calmly and confidently, confirming that the intervention was well-timed and appropriate.
They’ve also been in and out of the studio for photos — and they handled it like champions. The in/out space continues to work perfectly.
⸻
🔮 What to Expect (and What Not to Expect)
What to expect:
• Continued flower set and structural definition
• Stretch management through positioning, not force
• Gradual increase in flower density as nutrition settles in
What NOT to expect:
• No aggressive defoliation
• No forced stress techniques
• No chasing numbers just for the sake of it
This run is about clarity, observation, and respect for plant rhythm.
⸻
🙏 Final Words
A big thank you to:
• New joiners discovering this run
• Old souls following along quietly
• The curious, the critical, the lovers, the haters
• Sponsors, supporters, and the wider community
Every set of eyes matters. Every perspective adds value.
More updates soon — this was Update 1, and we’ll be back after more time with the girls.
As always: slow hands, clear eyes, and trust the plant. 🌱✨
FOR DISCOUNT CODES AND MORE JUST FOLLOW THE LINK https://website.beacons.ai/dogdoctorofficial
📲 Don’t forget to Subscribe and follow me on Instagram and YouTube @DogDoctorOfficial for exclusive content, real-time updates, and behind-the-scenes magic. We’ve got so much more coming, including transplanting and all the amazing techniques that go along with it. You won’t want to miss it.GrowDiaries Journal: https://growdiaries.com/grower/dogdoctorofficial
Instagram: https://www.instagram.com/dogdoctorofficial/
YouTube: https://www.youtube.com/@dogdoctorofficial
⸻
Explore the Gear that Powers My Grow
If you’re curious about the tech I’m using, check out these links:
🔆 Lighting & Environmental Control
• Future of Grow — Advanced LED lighting technology
https://www.futureofgrow.com/
DISCOUNT CODE: DOG20
• Lumiflora — Under-canopy LED lighting
https://lumiflorade.com/
• TrollMaster — Environmental controllers and automation gear (past collaboration)
⸻
Genetics
• Zamnesia Seeds — Genetics used in this project
https://www.zamnesia.com/
⸻
🌱 Soil, Substrates, Boosters & Root Support
• Plagron — Substrates, bio mixes, and supportive products
https://plagron.com/en/
⸻
🎒 Storage, Curing & Preservation
• Grove Bags — Curing and storage solutions
https://grovebags.com/
⸻
📸 Photography Equipment & Tools
(Not sponsors, but part of my creative toolkit)
• Sony A6700
• Sony full-frame macro lens + few more
• Stacking photography workflow - learning
• iPhone (for behind-the-scenes shots)
We’ve got much more coming as we move through the grow cycles. Trust me, you won’t want to miss the next steps, let’s push the boundaries of indoor horticulture together!
As always, this is shared for educational purposes, aiming to spread understanding and appreciation for this plant. Let’s celebrate it responsibly and continue to learn and grow together.
With true love comes happiness. Always believe in yourself, and always do things expecting nothing and with an open heart. Be a giver, and the universe will give back in ways you could never imagine.
💚 Growers love to all 💚
📸 P.S. – The Eye Behind the Lens
All photos in this diary (for now — except for the ones showing the camera, which I took with an iPhone) are taken with a Sony A6700 paired with a Sony full-frame macro lens and a few more.
Photography is part of the story — it’s how we share the fine textures, the glow, and the quiet details that words can’t always capture.
I’ve also started experimenting with photo stacking — a technique where multiple images, each taken at a slightly different focus point, are layered together to create one perfectly sharp image from front to back.
It’s not digital enhancement or AI; it’s pure photography — a way to reveal the plant’s beauty in microscopic depth, from trichome to petal.
You’ll even see a few shots of "ghost me" capturing the shots — camera, lens, setup — because every grow deserves not just to be cultivated, but documented like art.
FOR DISCOUNT CODES AND MORE JUST FOLLOW THE LINK https://website.beacons.ai/dogdoctorofficial
NEW DISCORD - Official Server Invite Link : https://discord.gg/ksjAkA5T74

Likes
29
Share


@xTherapy_Growingx
Follow
I’m giving her nothing but water now to start the flushing process..she’s almost ready 😍
Likes
11
Share

@NoProbation4Weed
Follow
last 3 days no watering and last 48 no light.
drying conditions are RH 50% and temp 14°C.
Likes
422
Share


@Crashoverite
Follow
Hi all😁
Hope everyone keeping well.
So far everything going very good.
Girls are developing very well.
Will keep updating each week progress🍌💜👊 every couple of days.
Have a wonderful week brothers and sisters. ✌️💚
Light setting 20 watts
16/10 day 8
Introduction of root juice and fish shit. I hope girls will like this starter dish.
18/10 day 10
Girls are developing very well. Second watering with approx 250ml per pot on entire surface.
20/10 day 12
Everything going as planned. Steady development. Another watering of same as on the 18th. Except watering I am spraying soil surface with water every few hours.
22/10 day 14
I would called a perfect week. Athena it's a bit faster than Xena in early growth but this early faster development means nothing. Xena it's a princess warrior anyway so all good 😂😎
Really enjoying this early growth 😁
Wish everyone a great week coming!
Peace and love brothers and sisters ✌️💚
Likes
6
Share


@KambleFrost
Follow
As mentioned above
Haven’t finished harvesting bottom half
Leaving for another couple weeks to ripen.
Total wet weight of 1711 is what I have harvested and drying thus far, dry weight will be total weight from entire harvest.