
Likes
Comments
Share


@Sickone
Follow
Ab geht es in die 8. Woche.
Montag:
Die CalMag Lady macht einen überhaupt nicht vitalen Eindruck, jedoch kämpft sie dagegen an und streckt sich in die Höhe.
Alle Ladys wurden heute erneut gedüngt nach Düngschema allerdings ab jetzt ohne BioBizz Bio Grow aufgrund Empfehlung.

Likes
422
Share


@Crashoverite
Follow
Hi everyone 😁
Welcome back in another week update!
Thank you all for this amazing support on this bananas journey💚💚💚
Uploading and updating each week content on daily bassis so please revisit this diary if week not over yet.
So far all going great. Girls looking very healthy and happy. Due to my short trip had to leave my 🍌💜👊 girls unsupervised for 3 days. Was stunned when opened my cabinet on the Dec 5th. Athena stretched like crazy. Good 3 inches. She better slow down as not much roof space left for her. May tie some taller branches to netting if necessary. Introducing blooming nutes for the first time this week on December 6th at smaller dosage and on the second watering as listed.
Week 8
Dec 4 - Dec 10
Dec 5
Leaves tucking
Dec 6
Heavier selective defoliation on both girls. Athena fully lolipopped and Xena at 75%. Watered with 8 ltr beetwen both with perfect runoofs PH 6.4. Girls were very thirsty 🤤
Dec 7-8
Just enjoying how my girls developing. Frost has landed and they are start showing colours. All is looking great.
Dec 9
Second watering for this week 7 ltr beetwen both. Runoffs PH 6.4
Even with so much difrence in size of my 🍌💜👊 girls it seems that they are drinking my juice almost equally.
Dec 10
Applied selective defoliation and tied 3 tallest branches of Athena to netting to avoid any potential burns on these beautiful baby colas.
It's the end of the week!
Thank you all again for such a great support, all the likes, dm's, comments and follows 💚💜💚💜
Stay tuned for coming week update 😁✌️💚

Likes
15
Share


@NiBaMeCa420
Follow
Ow damn these ladies are almost done and we can not be more exited about these the smell is absolutely awesome and the buds look gorgeous.
We started flushing yesterday so all the nutrients are gone and we now only give water with the awesome flawless finish from advanced nutrients
and we will flush for little over a week and then we are going to harvest
this is the first time we did a scrog and we must say that is was a good experience and we probably going to do it again really soon
Talk next week
Cheers,
Nibameca

Processing
Likes
14
Share


@Shaunofthedank
Follow
Plants leaves are out of control. Had to do an early pruning to open up plant a bit. Probably could’ve done more but dont wanna stress them out too much. Raised light a bit to encourage a bit of stretching. Irrigation working great but overwatered plants again testing it.
Did some lst to open up plants and get branches above those giant leaves.

Likes
42
Share


@Maggie_de_Block
Follow
Tried some new growing techniques, which may have resulted in lower yield compared to my last grow, but I also think the strain just yields a bit less. Overall easy to grow, didn't have to do too much and got a decent amount of good looking buds
Likes
3
Share

@WeedbayGarden
Follow
18.1 | F9 Plants are looking more and more green and all nice. Still some thrips in the canopy sadly but those predator mite satchels also doing work, I can see plenty of predator mites too. Plants have stretched a little bit over these couple days between the update, bending some growth under the trellises every two days. Might remove a leaf here and there but nothing major at this point.
19.1 | F10 I raised the led wattage from 240w to 280w. Also lifted up my corner fan, it started to shade the corner plant. I took a video of my nuisance - thrips and also video of the good guys, check it out!
21.1 | F12 Scrog is filled, like really filled. Doing first big defoliation on Friday!


Likes
16
Share


@SeshHouseCannabis
Follow
Been doing a lots of defoliation in this week(Especially on ETHOS-Lilac Diesel) and all the plant are looking great. Still waiting for the bloom fertilizer and then we will start flowering stage as soon as we received the fertilizers.


Likes
6
Share

@AlpenZilla
Follow
Week 11 – Day 79 (Flower Day 51)
🔄 General Update
Unfortunately, I ran into a nutrient lockout earlier this week – some of you may have seen it in the comments.
📉 The drain pH just won’t go up anymore, even after multiple flushes with light nutrient solution.
I’m now down to 50% of the feeding schedule and reduced light intensity to around 600 PPFD to keep stress levels low.
❄️ White Widow – Day 51 of Flower
She’s clearly showing signs of the lockout now ⚠️
Still, the buds continue to swell visibly, which is honestly a nice surprise!
It seems like she’ll make it to harvest without major damage.
Flushing only from now on – harvest is planned for next week.
⚠️ Drain pH is stuck at 5.6 – completely off, but can’t be fixed anymore at this point.

Likes
5
Share


@Tried_and_Tested
Follow
Another steady week of bud development. I haven't really done much with those apart from the occasional removal of yellow leaves and tucking nuisance leaves under the net.
The plants are all still growing in line with the previous expectations, with Topping and LST being the biggest, Mainlined next and then LST only in last place. It will be interesting to see the results though.
Should only be a few more weeks until harvest, as a large majority of trichomes are already milky.

Likes
30
Share


@Gruenerfinger85
Follow
Hallo meine Garten Freunde.
Ich heiße euch herzlich willkommen zum Ende von diesem Grow, ich bin mit der Qualität der Blüten äußerst zufrieden.
Dieser Strain hat mich vollstes überzeugt, ich bin sehr begeistert von der Resistenz gegenüber den Schädlingsbefall oder im allgemeinen.
Man kann ruhig ein zwei Tage mit dem Gießen im Verzug sein ohne das dieser Strain dir das gleich Übel nimmt.
Diese Sorte ist auch nicht so anfällig für über Gießen oder über und unter Düngung.
Ich habe in der Mitte der Blüte ein kleines Problem mit Frassflügler ( Triepse ) gehabt, da für kurze Zeit mein Lüfter ausgefallen ist, den Befall hat sie ohne weiteres weggesteckt, ohne jegliche Anzeichen für Probleme.
Die Buds haben sich sehr vielversprechend entwickelt und haben einen süßlich tropischen Geruch im Raum verströmt.
Wo drüber ich am meisten gestaunt habe war dass man diesen Strain Trainieren kann egal ob topping oder HST das haben die Damen gut weggesteckt.
Das einzige was man beachten sollte wenn man die Pflanzen toppt ist, dass man mit einer längeren Anbau Zeit rechnen muss.
Von insgesamt 5 sind 5 Seeds gekeimt, leider habe ich ein Sämling verloren.
Ansonsten haben sich alle Pflanzen so entwickelt wie ich es mir gedacht habe.
Der Ertrag hätte größer ausfallen können, dann hätte ich aber auch größere Töpfe nehmen müssen, und das konnte ich zu dieser Zeit leider nicht. Die Medusa #1 braucht noch einwenig länger.
Also meine Freunde wär eine schnelle Sorte sucht, dem kann ich diesen Strain ans Herz legen.
Vielen Dank das du mich und meine Schönheiten bis hierhin gefolgt bist ich weiß das sehr zu schätzen und wenn du willst kannst du bei meinen anderen Tagebüchern vorbeischauen oder mein Instergram Profil besuchen. https://instagram.com/gruenerfinger85?igshid=OGQ5ZDc2ODk2ZA==
Ich wünsch euch eine erfolgreiche Woche und fette Ernten ✌️🏼bleibt alle gesund.
Hier gibt es noch 20% Rabatt wenn ihr Diesen oder andere Strains sucht.
Bei Royal Queen Seeds gibt es auch viele andere tolle Produkte die dir beim Thema Grow oder dir bei der Fermentation helfen können.
Gib diesen Code ein.GROWERS20
https://www.royalqueenseeds.de
Likes
7
Share


@CannaGrowmie
Follow
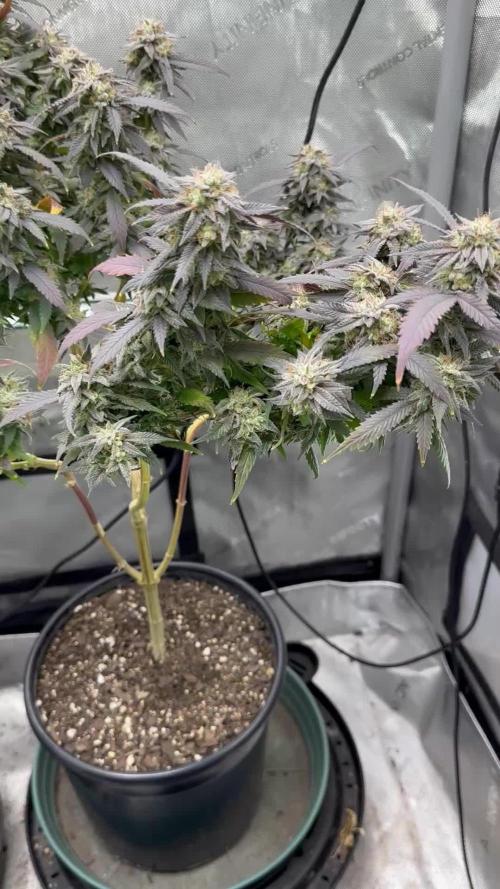
She finished up beautifully with deep silver and purple colors throughout, extra frosty, and super dank!
Will update with dry weight


Likes
21
Share

@MadeInGermany
Follow
Flowering days 27
since time change
to 12 / 12 h
Hey guys :-)
The ladies look beautiful and are growing very well.
The sweet smell starts to blow through the whole tent :-) .
This week it was watered 3 times with 1l each (nutrients see table above)
Nothing else happened this week. Everything has been checked and verified.
A lot fun and stay healthy 💚🙏🏻
👇🏼👇🏼👇🏼👇🏼👇🏼👇🏼👇🏼👇🏼👇🏼👇🏼👇🏼👇🏼
You can buy this Nutrients at :
https://greenbuzzliquids.com/en/shop/
With the discount code: Made_in_Germany you get a discount of 15% on all products from an order value of 100 euros.
👇🏼👇🏼👇🏼👇🏼👇🏼👇🏼👇🏼👇🏼👇🏼👇🏼👇🏼👇🏼
You can buy this strain at :
Clearwater Seeds
Water 💧 💧💧
Osmosis water mixed with normal water (24 hours stale that the chlorine evaporates) to 0.2 EC. Add Cal / Mag to 0.4 Ec Ph with Organic Ph - to 5.8 - 6.5
MadeInGermany


Likes
14
Share


@portcityplug
Follow
Manage to get the monster transplanted into the new tent couple of branches broke unfortunately It is taking up almost the entire five-by-five I don't know if it will be over 3 pounds but I sure am hoping My last girl I managed to get 1.3 pounds out of the 4 by 3 tent This one is double the size with a bit more light so hopefully we can get there Nugs already barely fit in my hand halfway done flower 😇😁🤩 day
Ok 94 My top nugs are Anywhere from the size of a can of pop up to a 2L
Day 97 of grow I've decided from now on I'm going to be Putting the day and as how long it's been flowering
Day 35 of flower added dense by green planet with ph water at 600ppm and 6.4ph first time let see if it will dense 😃

Processing
Likes
5
Share


@sercultiveta
Follow
35 dias de actividad en el indoor, foto periodo de 20 horas de luz y 4 de oscuridad


Likes
33
Share


@Weird_Jimmy
Follow
✋Wk 8: Time slows down, as buds build and plants are thirsty.
👉One of the best part about growing cannabis, and actually fun plants of any variety, is that the anticipation of the final results seemingly makes time slow down. When I hit 40 it was like I had hit the top of the hill and everyday since then has seemed like it was getting shorter and time was going by much more quickly. I started growing herbs and peppers on the patio a few years ago the race towards the inevitable has seemed to mellow out. A year ago I started growing LEGAL cannabis! I had dreamed of this since I was in college. The risk was too great to get busted for growing even a small plant. Seeing the plants grow a little each day is amazing. Seeing the progress of just one month is amazing. The days seem to take longer as a pleasant side effect of my impatience for the finished product. I have grown lots of different plants, and cannabis is definitely the most magical to watch grow.
👉The 1 gallon is starting to build out its buds. The shape of the plant is amazing, all the secondary branches are almost the same height! The branches are very stout and have grown straight up. I have supports installed and may start by just making a simple hoop around the plant with some soft garden wire to keep them from spreading out. The frost is starting to form on the one gallon buds as well. The frost is extending out onto the leaves. I haven't removed any leaves or larf sites in a couple weeks. The leaves went from big and fat fans to smaller skinny fingers much like you'd expect from a Sativa dominant strain, yet this is an Indica dominant strain. Its making for much better light penetration so minimal larf and fatter colas perhaps. When fertigating it takes a few minutes to be able to get all the sulution to the plant. This is from the density of the roots. Its been soaking up the water and nutrients very well. Towards the end of the week I was getting less run-off and the run-off EC was climbing. I will probably do a good low EC fertigation next week.
👉The 3 gallon is a dense bush. I haven't taken any of the secondary branches. I have taken some interior shaded small branches from the big branches. I have also taken some of the interior leaves that were totally shaded. Ive have also removed almost all the large early growth leaves as they got more in the way of air circulation and access to the media for watering and observation. The main cola is barely indetifiable as the main cola so far. The symetry of the plant is very nice and I hope it stays this way. Its also behind the 1 gallon plant and will finish 2-3 weeks after it. I am guessing 6 more weeks max. Even if its not ready I will have to harvest it 6 weeks form now because I have to go out of town for business for a week. I will take it as far as it can go. The plant is drinking alot and I am giving it as much as 5 liters a day. The run-off has also gone down and as a result the run-off EC has been creeping upwards as well. The coming week I will be giving it a goof low EC fertigation and increase the volume of inflow. My target for inflow EC is mid range on the General Hydroponics Flora Series Drain to waste nutrient schedule.
👉 I have included pix of my fertigation log. The log show tents conditions, inflow stats and run-off stats. Both plants are soaking up the fluids. Both plants are getting the full line of the General Hydroponics Flora series nutrients/supplements and mixed full strength in RO water from an industrial RO water machine. This week I increased the amount of Cali-magic about 25%. There are some purple stems around and want to keep it from becoming a leaf issue if its form a slight lack of Ca/Mg. Next week I will continue the higher level of Calmag and also will do at least one low EC fertigation. When I do a low EC fertigation I only have Armor Si and Calimagic in the solution. I will follow the low EC event with a small dose of regular nutrient solution.
👉I am sure that the way I am doing this diary is probably pointless in terms of interest to others. I am doing it in the spirit of a true diary and for my own personal use as a record. I am trying to make it understandable and comprehensive for others. I'm sure that is folly in the long run but I do enjoy being able to review my work in a comprehensive way.

Likes
23
Share


@GrowGuy97
Follow
Started flushing the biggest plant today the should have about another week & half left on it, all the other ones are still clear & cloudy! Fingers crossed everything goes good through harvest I have never flushed or done any of the harvest or cure process😅😬


