The Grow Awards 2026 🏆 


Likes
Comments
Share
@Chuckwaggon420
Follow
This week is what I have been waiting for. Time to switch these girls over to flower and I am way excited? They have grown insane over this first week put on over 5 inches. Pulled the a/c in the tent got it all hooked up keeping temps perfect in there low is 76 high is 82. Stay posted gama be

Likes
1
Share
@ChitownCannaChica
Follow
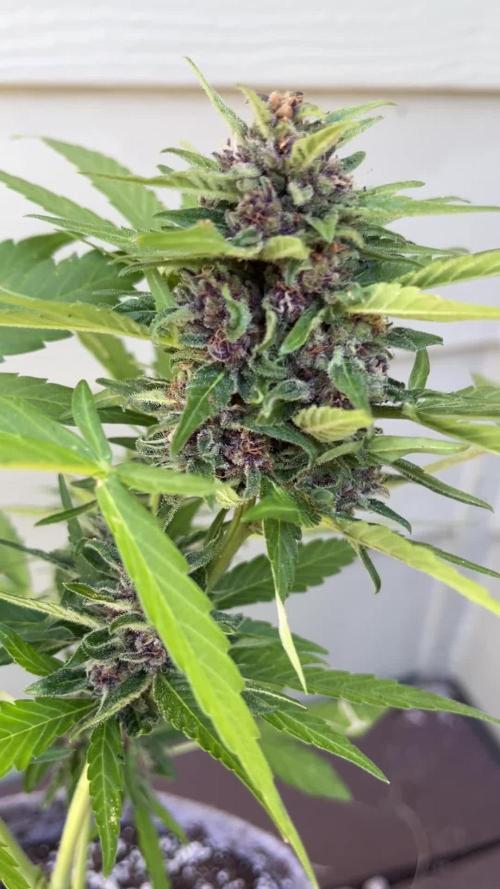
Temps dropped by 10-17 degrees- especially at night. Have not given any nutrients, just hose water. She seems to be doing fine. Ipm weekly and the cold is making her slow down a touch. Other than that, the frost is developing nicely and countering all this plant has been through with the temp swings, bouts of rain, bouts of dryness, wind, sun, no sun, etc- I should get a decent little harvest! Smell is divine! Has these sweet vanilla pine aromas with a deep purple bud. Probably chopping next week!🏻💚


Likes
14
Share
@SUMAN
Follow
I'm in the fade waiting for 30% amber it's taking forever tho, no amber as of yet on any plant also the barneys farm runtz muffin strain hermed on me...😮💨also put the runtz muffin in 3days of darkness Friday chopped today Tuesday Sept 5


Likes
5
Share
@TheChronicHunter
Follow
This is a pretty casual diary — just tracking for my own purposes mostly.
Been trying some new strategies to increase temperature and humidity in the tent.
She’s just flipping over to flower now — I wasn’t sure weather I would top the plant... but I decided to this one time just in the edge of flower — didn’t want to do it earlier to avoid inducing flower

Likes
1
Share
@Blessed
Follow
Cured for 1 month, nice trichomas covering, smell good, nice THC level (not for beginners), easy to grow, long cycle, needs long term veg time.
Likes
52
Share
@MadeInGermany
Follow
Flowering day 11
since time change
to 12/12 h.
Hey guys :-)
The first days of this week it looked really terrible for me because it was much too cold because of the unusual temperature.
The heating mat has now also arrived for the big tent and lo and behold the plants have been developing really well since that day ☺️👍.
The temperature doesn't keep quite as well as in the small box, but at least I don't get below 18 degrees in the pots at night anymore, even though it's only 16 at the top 😅👍.
Since I switched to flowering, it was time to rinse off a bit with Clean Fruits :-) .
Did them a lot of good.
You have already received the first watering with Grow Liquid and the next in a mix with Bloom Liquid 😀👍.
Otherwise everything was cleaned and checked.
Stay healthy 🙏🏻
👇🏼👇🏼👇🏼👇🏼👇🏼👇🏼👇🏼👇🏼👇🏼👇🏼👇🏼👇🏼
You can buy this Nutrients at :
https://greenbuzzliquids.com/en/shop/
With the discount code: Made_in_Germany you get a discount of 15% on all products from an order value of 100 euros.
👇🏼👇🏼👇🏼👇🏼👇🏼👇🏼👇🏼👇🏼👇🏼👇🏼👇🏼👇🏼
You can buy this strain at :
https://www.ripperseeds.com/en/feminized/kmintz-feminized-cannabis-seeds
Water 💧 💧💧
Osmosis water mixed with normal water (24 hours stale that the chlorine evaporates) to 0.2 EC. Add Cal / Mag to 0.4 Ec Ph with Organic Ph - to 5.8 - 6.5
MadeInGermany

Likes
51
Share
@eldruida_lamota
Follow
Esa familia, ya hemos vuelto fumetillas, ya estoy de nuevo activo para explicaros mis métodos para cultivar vuestra yerba.
Bueno contamos esta vez con una cookies gelato de royalqueenseeds, la verdad por oídas y lo que leí, que son una cepa bastante fuerte tiene bastante thc, veremos estas semanas cómo avanzan.
Si germinación 100%, 5/5 ejemplares germinados y preparados para brotar.
.
Hasta ahora el ph lo dejamos en 5.8 la temperatura ronda los 22/24 grados y la humedad está en torno al 80%.
.
Ahora en la alimentación, gama agrobeta.
0,5 ml x L Piramid , vía radicular.
0,5 ml x L Growth black line , vía radicular.
0,1 gr x L Cancerbero , vía radicular.
0,1 ml x L Tucán , vía radicular.
0.1 ml x L Flash Root , vía radicular.
0,4 ml x L Great Green , vía foliar.
.
Empezamos con muy buen pie, espero que no surjan muchos problemas en futuras semanas, buenos humos 💨💨💨.

Processing
Likes
20
Share
@Mr_nugs_lover_David
Follow
She's looking super healthy and and strong can't wait to see this beautiful strain in full flowering stage, I'm feeling a very good stretch,shed definitely a big girl,she's eating very well, no deficientes or nutrients burn so far. Let's see how this wonderful organic lady performs.
On August 9th I start to see the change from vegetative stage to flowering stage,she looks super healthy and strong,I missed some watering a few days ago,however she is perfectly fine and happy,she's a dream to grow.

Likes
47
Share
@Esjey
Follow
Hello. 29th day of flowering. Everything looks beautiful, smells beautiful. I stopped adding calmag from biobizz because something is wrong with it...
Best regards.
Smoke weed every day ✌️


Likes
39
Share
@Hazecat_420
Follow
Se aplicó una defoliación a todas las hojas amarillas y bajas que aún quedaban para ir limpiando un poco lo que no traerá frutos. Seguimos, cada vez queda menos 👽


Likes
24
Share
@MrGrowDiarie
Follow
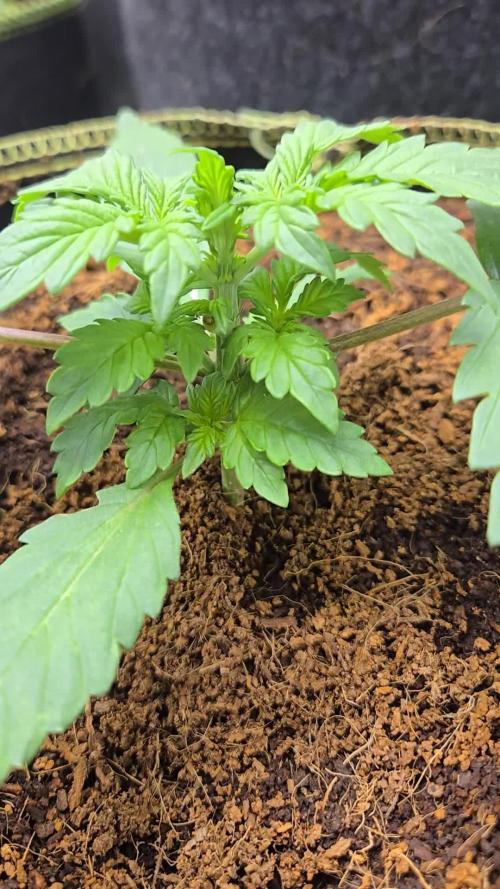
Week 3 – She’s coming along strong! Already showing those classic autoflower traits early on, around day 15. The growth is picking up fast now, especially with the space to stretch out in that 10L pot. You can really see the structure starting to form – compact but full of energy. Let’s see how much she stretches over the next week!
Likes
34
Share
@MadeInGermany
Follow
Info:
Unfortunately, I had to find out that my account is used for fake pages in social media.
I am only active here on growdiaries.
I am not on facebook instagram twitter etc All accounts except this one are fake.
Have fun with the Update 😃.
Flowering day 49
since the time
change to 12/12 h.
Hi everyone 😀.
We are about 10 days before the harvest 👍.
The trichomes are 70% milky, 10% amber and 20% clear.
as soon as 30% is amber and 70% is milky it is harvested.
Today I am going to rinse you thoroughly so that you can use up your last nutrients.
Have fun with the update.
Stay healthy 🙏🏻
You can buy this Strain at :
https://www.exoticseed.eu/
Type:
Quick Sherbet
☝️🏼
Genetics:
75% Indica / 25% Sativa
Sunset Sherbet X Black Lemon
👍
Vega lamp:
2 x Todogrow Led
Quantum Board 100 W
💡
Bloom Lamp :
2 x Todogrow Led
Cxb 3590 COB 3500 K 205W
💡💡☝️🏼
Soil :
Canna Coco Professional +
☝️🏼
Fertilizer:
Green House Powder Feeding
☝️🏼🌱
Water:
Osmosis water mixed with normal water (24 hours stale that the chlorine evaporates) to 0.2 EC. Add Cal / Mag to 0.4 Ec Ph with Organic Ph - to 5.5 - 5.8

Likes
15
Share
@Kurow
Follow
Had a bad humidity (spots on leave are wet spots that got handled ASAP) scare last week so got a dehumidifier up in there comfortably. Still smooth sailing.

Likes
22
Share
@Basementganja
Follow
The final week!Just waiting for the trichomes to shift from milky/clear ---> milky/30% amber.
This girl was unfortunately nutrient locked since week 3 of flower, due to low ph (~4).
Yield suffered. Potency didn't!


Likes
37
Share
@Roberts
Follow
Mandarin XL auto is doing good. I had to give tge solution a nutrition boost early week. It just was not strong enough for her. She is doing good. She is ready for a solution change very soon. I was hoping she would start transitioning first to go to blooming nutrition. Everything is looking good beside that nutrition problem. Thank you Medic Grow, Gen1:11, and Ganja Farmer. 🤜🏻🤛🏻🌱🌱🌱
Thank you grow diaries community for the 👇likes👇, follows, comments, and subscriptions on my YouTube channel👇. ❄️🌱🍻
Happy Growing 🌱🌱🌱
https://youtube.com/channel/UCAhN7yRzWLpcaRHhMIQ7X4g

Likes
7
Share
@HylianGrass
Follow
ITs finally tine to cut the girl . After checking all around for trichomes I’ve decided it was about damn time. She took longer to flush , i keep her in the dark for a good week until i felt like she used up all of her locked down nutes . Just by doing my bud manicuring and trimming i got a good half gramm of resin that turned to delicious fingerhash . The buds show a bit of foxtailing but i really dont mind it , and it doesn’t affect the taste or quality’s of the end product. As you can see lst training gave results. This yield is definitely a good one with amazing results, the smell is really strong but i doesn’t smell like typical weed if i can say so . All around fastbuds genetics goes hand in hand with my set up, a real blast growing this strain


