






Likes
11
Share


@mike97
Follow
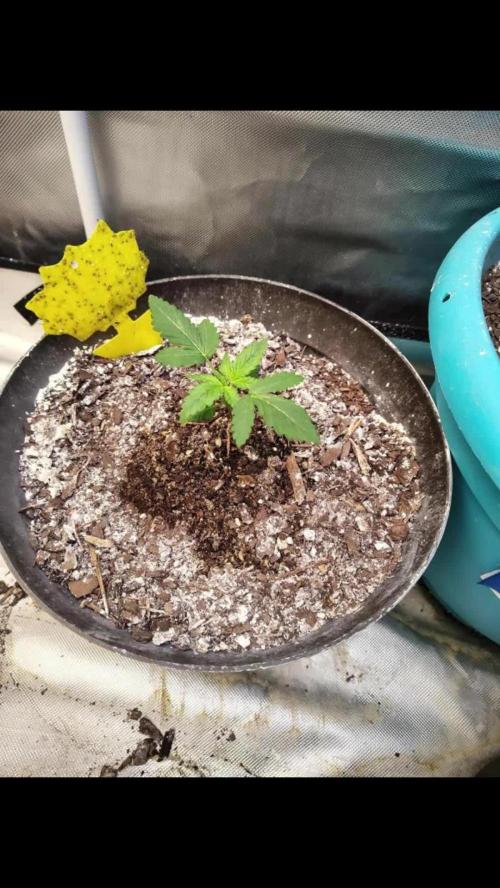
Week 10 beginning of the final stages.
Smell is amazing 🤩
What would you guys make different?

Processing
Likes
1
Share


@Dunk_Junk
Follow
Wow monster growth this week!!! last week 9cm, same time this week 30cm!!! Also I fimmed/topped her earlier in the week too!!
Looks like she started flowering this week too.
Look how much she has stretched! I've tried doing a bit of LST. Truth be told I have no idea what I'm doing, but it seems like a good idea to me to spread out the branches so they all get decent light.


Likes
2
Share

@BackdoorMan
Follow
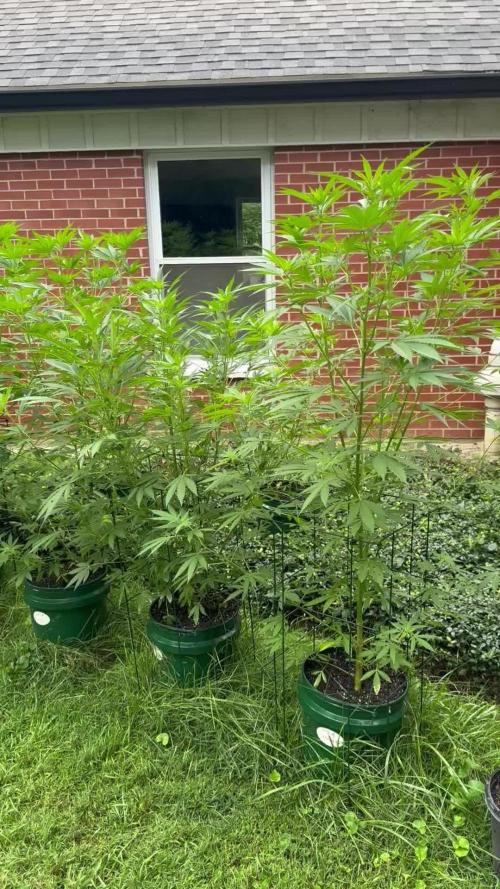
Tenth week of Veg for most of the girls. Start of second week of flower for Purple Punch. The Sour Diesels are now beginning to flower. Changed Purple Punch to Super Thrive nutes for flowering and will do so next week for the Sour Diesels. Thanks for looking in. See you next week. Let me know what you think.

Likes
20
Share


@DaddyPrime2
Follow
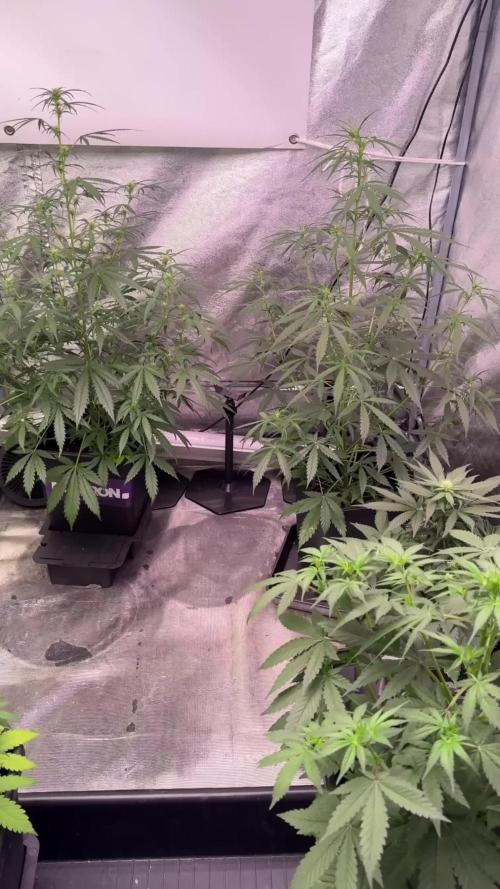
6/11 day 55 day 56. Officially 2 months of growth. Somehow I've kept an auto flower in the vegetative stage for quite a bit of time. They are flowering and have stretched a ton. I will get actual measurements for each plant this
Pheno #1 looks more indica (they all are) than the others. The pistils are shorter but more of them and the node spacing is a tighter than the others and she's stayed the shortest(least amount of stretch) and has thicker leaves(maple leaf style) her pistils started white and now have a pink tone to them and on closer inspection, some of the sugar leaves are purpling. This one could be expressing it more so because of environment. This week we've had lows and rains and cloudy weather. The other night it was in the low 40s, so in hindsight it might be environmentally expressed.
Pheno #2 is the one that's been the most well rounded the whole time. Popped quick and has always been steady and not too tall and not too short. Her pistils are bright white like roots or an initial taproot. But the calyx are a deep deep purple. I believe this purple expression to be a genetic phenotypical expression rather than environment. The purple clashes with the white so beautifully. They just makes it all pop with the green. It honestly looks like a purple clover flower 😄
Likes
2
Share

@DogDoctorOfficial
Follow
👑 Godfather OG – Pheno A
Week 5 | The Giant Begins to Wear Her Crown
Welcome back to another chapter of the 8×8 Adventure!
One of my favourite things about documenting every single phenotype individually is watching how differently each plant interprets exactly the same environment.
Same room.
Same lighting.
Same feeding philosophy.
Same genetics.
Yet every plant develops her own personality.
Godfather OG Pheno A has quickly established herself as one of the giants inside the tent, standing proudly above many of her neighbours while beginning the exciting transition into flowering.
She’s becoming impossible to ignore.
⸻
🌱 The Journey So Far
For those discovering this diary for the first time, welcome!
This entire project is being grown using the 12/12 From Seed method.
Rather than extending the vegetative period before changing the light cycle, every plant has received a consistent 12 hours of light and 12 hours of darkness from the very first day of life.
This allows every phenotype to determine its own natural timing.
Instead of deciding when flowering begins…
…the plants decide for themselves.
That is one of the most fascinating parts of this entire experiment.
Although every plant shares the same environment, no two stories have unfolded exactly the same.
⸻
🌸 The Transition Has Begun
This week officially marks what I’m considering Week One of Flower.
She’s living in that beautiful transition where vegetative growth hasn’t completely stopped, but flowering has clearly taken over.
Fresh white pistils are now appearing throughout the canopy, confirming that reproductive growth is well underway.
Those delicate white hairs are the first visible signs of future flowers.
Over the coming weeks they’ll multiply rapidly as each flowering site develops into what we all hope will become dense, resin-covered colas.
It’s one of the most exciting stages of the entire grow.
Every day brings noticeable changes.
⸻
🌿 One of the Giants of the Room
Standing at approximately 75 cm, Godfather OG Pheno A has become one of the tallest plants in this entire project.
Her structure is beautifully balanced.
Strong stems.
Excellent internodal spacing.
Healthy branching.
The Low Stress Training carried out during the previous weeks is now beginning to reveal its purpose.
By gently bending stems and opening the canopy instead of forcing aggressive structural changes, light is reaching more growing tips while the plant continues developing naturally.
Every adjustment made earlier is now beginning to pay dividends.
Sometimes patience truly is the best training technique.
⸻
💧 AutoPot Feeding System
This phenotype is growing in one of my AutoPot systems.
The AutoPot works through a remarkably simple but effective device called the AquaValve.
Rather than operating on timers or pumps, the AquaValve automatically refills the tray only after the plant has consumed the available nutrient solution.
In other words…
The plant decides when she wants another drink.
This creates an incredibly stable root environment while reducing fluctuations in moisture and nutrient availability.
As flowering begins, the feeding program has also evolved to support the transition.
Bloom nutrients have now joined the schedule while maintaining enough vegetative support to fuel the final stretch before the plant focuses entirely on flower production.
⸻
🌡️ Environmental Conditions
The room continues performing exactly as planned.
Current averages include:
• Day temperature: 31.1°C
• Night temperature: 25°C
• Relative humidity: 67%
• Nutrient solution: 21.6°C
• Root zone: 21°C
• CO₂ concentration: 639 ppm
Humidity remains slightly elevated during this stretch phase to support vigorous growth and healthy transpiration.
As flowers begin stacking over the coming weeks, humidity will gradually be reduced to create the ideal environment for dense, healthy blooms.
Maintaining environmental stability is every bit as important as feeding the plants themselves.
Healthy plants are built through consistency.
⸻
📷 This Week’s Gallery
This week’s photographs document her progress from multiple perspectives.
Close-up shots highlight the first pistils emerging across the growing tips.
Side views reveal her impressive vertical growth and balanced branching.
Bird’s-eye views showcase an increasingly even canopy thanks to the weeks of gentle training.
I’ve also included updates from inside the room together with controller readings to continue documenting every aspect of this project as accurately as possible.
Watching the room evolve week after week is becoming just as rewarding as watching the individual plants themselves.
⸻
🔮 Looking Ahead
Over the next week I expect the stretch to continue as flowering becomes fully established.
More white pistils should appear across every branch, and the first true flower clusters will begin forming as the plant shifts more energy toward reproduction.
Training will remain gentle, with only small adjustments made where necessary to maintain an open canopy and maximize light penetration.
The real building phase is only just beginning…
…and I have a feeling this lady has plenty more to show us.
⸻
💚 Thank You
Thank you so much for following another chapter of this 8×8 Adventure.
Every diary, every photograph, every update is part of a much bigger story, and I’m incredibly grateful to everyone who chooses to be part of it.
A huge thank you to:
💚 GrowDiaries for giving growers around the world a place to document, learn and inspire one another.
Zamnesia for providing the incredible genetics behind this phenotype hunt.
🌱 Plagron for supplying the nutrients that keep these ladies thriving.
💡 Future of Grow LED for providing the light driving every stage of development.
🌿 TrolMaster for helping maintain a stable environment throughout the entire grow.
And finally…
Thank you to everyone reading, commenting, supporting, asking questions, sharing advice, or simply following along.
Whether you’re a grower, a learner, a supporter, or just curious, you’re part of this adventure too.
I’ll see you all next week as Godfather OG Pheno A continues her journey from vigorous growth into what promises to be a spectacular flowering run.
Growers love and happy growing, everyone! 🌱👑💚
Processing
Likes
112
Share

@Dunk_Junk
Follow
Still monsterous. Had to bend down more colas during this week!! Crazy plant.
She will be so much better when I can spread her out, the amount of flowers on her are simply amazing.
I honestly didn't know what fimming her side branches would do, but it looks like it's paid off in spades.
A few more weeks to go yet, her trichomes have not developed yet.
Anyway, apologies for poor pics this week, they're all getting too big to get in and out the tent without damage. Last week I snapped the main cola on the CBD 😭
Likes
60
Share


@GuerrillaNo_4
Follow
(Slight Nute burn this week so flushed with PH 6 water and dropped resevoir PPM from 1000 to 800)
About 2-3C difference between ambient air temperature and leaf surface temperature (24.5-25C) .
No defoliation, just pushing larger fan leaves down. Tying down branches to keep canopy flat.
Light: Red/Blue/2x full spectrum CREE COBs (+IR and UV supplementation)
At plant canopy = Avg. PPFD 770umols/s/m2 ~ Lux 25,000-35,000 ~ Daily Light Integral 50-55
Crop control: Infection control practices i.e
-PPE, Alcohol Hand wash
-Gray room outside tent,
-Carbon filter
-HEPA filter
-Plasma Ionizer
-Inline UV-C germicidal bulb
Ed Rosenthal -Zero Tolerance on hand if needs be too. Hopefully to avoid ever needing chemical pesticides.

Likes
16
Share


@PigBearMan
Follow
High.
I‘ll keep this week updated in a few days. Everything‘s according on plan so far.
Never thought it would be that easy… these results…


Likes
4
Share


@Maximilian1234
Follow
Es geht in die Blüte 😃
Ich kenne den Strain noch nicht und rechne trotz topping mit einer starken Streckung in den erst ca. 4 Wochen.
Ich liebe es ja jedes Mal zu sehen wie schnell sich die Pflanzen entwickeln und nach Umstellung des Lichts verändern.
Ab jetzt werde ich bei jedem gießen den Mineralischen Dünger von Plagron verwenden.
Trauermücken nerven hart sollten aber dank fressfeinden bald Geschichte sein. Ich bin gespannt 😉


Likes
25
Share


@festaOG
Follow
Almost ready for harvest, starting to flush the girls out.
Love the array of colours and smells, got some gassy phenos aswell as sweet phenos.
Counting down until I have 10% amber trichs (discounting sugar leaves)
EDIT:
Added more photos


Likes
114
Share


@Natrona
Follow
**************Sponsored Grow***************
Hello friends and followers to my weekly Titan F1 update:
3/10-16 This week is mostly coasting and keeping my girls happy. I'm still not smelling Titan fragrance in the tent unless I get close. T2 is filling out and needs defoliation. I'll do that next week probably for both Titans. NOTE** even though a 2 liter pot is often used in SCROG set-ups, the narrow neck at the top of my tea pot makes it very difficult to pin limbs or trim.
For these Titans, I water 1- 2 liters every other day. Most of T2s (teapot gal) water (1ltr) runs thru to the bottom catchment. I leave it on the towel to keep humidity around the pot.
This week both gals did some yoga and stretched some more. T2 is now 4.5 inches. T3 also grew some more. When I topped her, she was 6 inches and now 7.5 inches. Bud stacking continues giving more height.
One other thing. I'm using AC Infinity T700 humidifier.
I dont like that it spews moisture on my plant leaves leaving a white residue. You can see height & water residue in the profile pics.
I'm using TPS1 @15 ml per gallon. I fed at approximately 950ppm this week. The PPM is on the low end of mid-bloom ppm which I do with autos since they are sensitive to too many nutrients and my early grows of autos were over fed.
TPS1 10 ml/gal in 3 gal
Recharge 5 ml/gal in 3 gal
Calmag 5 ml/gal in 3 gal
RQS says harvest 70-75 days or 40-45 days of flower. My calculations – harvest of T3 will be April 13-18 and T2 15th-20.
Based on the size of my gals, and the number of bud sights, I’m only estimating an ounce between both plants. This is one time I hope I’m wrong.
Given these RQS Titan are F1 hybrids and should be stable, I believe the height and the health differences are attributable to the copper wire teapot. They are in the same soil, same tent environment, same nutrient solution, same light, same everything except the growing container.
As I stated in previous discourse, I expected the overall plant to be smaller than T3 simply based on the pot size but did not expect to see such size differences so early, not to mention the nutrient issues.
Thanks for the visits, likes and comments, I appreciate all the plant love💚.
Have fun & love what you grow 💚
Sending love and light 💫
💫Natrona 💫
**************Sponsored Grow***************
Royal Queen Seeds is the first to off genuine F1 cannabis seeds. F1 hybrids are the future of cannabis genetics, offering unrivalled stability, vigor, and yields. They have eight (8) F1 hybrid strains including a CBD. Unlike regular hybrids, which can be created by crossing virtually any two cannabis plants, F1 hybrids are made by crossing two pure (also known as "inbred") genetic lines. The resulting seedlings not only grow bigger and stronger, but also maintain stable growth traits that result in a uniform crop.
In Rocket to the moon, I grew one Apollo F1, (please refer to my diary for full details). Huge base stalk, strong stems, remained under 3’, and yielded over 4 ounces. They have come down in price since their introduction. I was so impressed by the yield and growth of Apollo, I strongly urge you to look at the site for a variety that has what you are looking for.
I would like to express my sincere thanks to @James at @Royal Queen Seeds for giving me this opportunity to grow their quality seeds. It was a hard decision to select the strain to grow; I’m excited to grow Titan F1.
====================================
Royal Queen Seeds
Https://www.royalqueenseeds.com
use Discount Code use **GROWERS20** for 20% discount
Titan F1 stands out as one of the most potent options in F1 hybrids. Thanks to her genetic lineage, she produces sky-high levels of THC and boatloads of delicious terpenes. Plus, plants reach modest heights while churning out impressive yields.
Talented breeders created this F1 by crossing inbred lines that share a heritage with Blue Dream, Sugar Magnolia, and Amnesia.
Effects, Flavors, and Aromas of Titan F1: Powerful Effects and Sugar-Citrus Notes
Titan F1 will treat your olfactory system throughout the flowering phase, and beyond. This auto flowering variety unleashes a powerful terpene profile consisting mostly of myrcene, farnesene, ocimene, pinene, bisabolol, and limonene. Combined, these aromatic compounds offer notes of fruit, candy, and lemongrass. With the highest THC concentration within our F1 hybrid range, Titan F1 exerts a powerful and fast-acting effect that melts the muscles and clears the mind. Perfect for enjoying after a long day at work.
Growing Titan F1: Stealthy, High-Yielding Plants
With an average height of 65cm, Titan F1 can grow just about anywhere and maintain a low profile. This bushy plant features an indica morphology, a huge trichome count, and develops into a mature specimen in around 73 days from germination. Gear up for a uniform, consistent crop that will thrive in practically any environment.
Titan F1 data sheet
Variety: F1 Hybrid auto
Genetic Background: Blue Dream x Sugar Magnolia x Amnesia
THC: Ultra-high
Yield: XXL
Height:55 - 75 cm
Flowering time:40 - 45 days
Harvest:70 - 75 days after germination
Major terpenes: Caryophyllene, Farnesene, Myrcene, Ocimene
Effect: Calming, Focus, Physically Relaxing, Uplifting
Flavor: Candy, Diesel, Herbal, Pine, Vanilla
Climate: Short Summers
=================================
Equipment: AC Infinity
CLOUDLAB 844 – Advance Grow Tent 48”x48”x80”
CONTROLLER 69 PRO – Grow Tent Controller
CLOUDLINE LITE 6 - Inline Fan 6"
IONBOARD S44 – LED Grow Light Board 400W
CLOUDRAY S6 – Oscillating Circulation Clip Fan
Carbon Filter 6”
Pots: 2 liter wire basket tea pot
3 gallon Air pots
Soil Fox Farm Happy Frog Amended with worm castings, dolomite lime and mychorihiza
Seeds provided by Royal Queen Seeds
Https://www.royalqueenseeds.com
use Discount Code use **GROWERS20** for 20% discount
Nutrients: Total Plant Solution
TPS1
Canopy
Signa
Likes
25
Share


@Slinds
Follow
The thunderstorms finally came to an end and the coming week will bring some sunny days.
In the last few days I noticed that some ladybugs got attracted by my plants. They are welcome to stay for a long time.
The rodent, which I mentioned in the last week, didn't cause any new damage to my plants. The remaining damage is healing properly.
Size difference between all plants:
Plant 1: ~100cm
Plant 2: ~100cm
Plant 3: ~80cm

Likes
8
Share


@trichomhunter
Follow
After 48 hours of darkness, the time had come and the Purple Lemonade were ready for harvest. Since she reacted very well to the training and grew with enough space between the buds, I decided to dry upside down.
Dry weight and smoke report follow after curing. Stay tuned...
Likes
9
Share


@Mr_nugs_lover_David
Follow
She has performed very good with the lst method, nice plant, fast growth, quality flowers, it's a very good choice for everyone who's looking for a good quality strain at affordable prices. Very nice genetic, this phenotype concretely has a very sweet and floral terps. You can check the other 2 phenos of ak420 here at my page
