


Processing
Likes
15
Share


@CannabisAprendiz
Follow
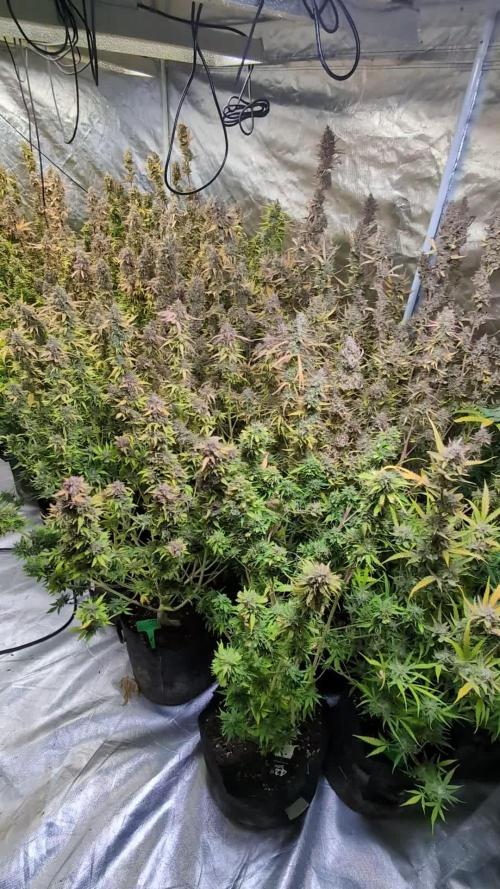
Hola con esta semana ya quedamos al dia con el seguimiento ya que estaba atrasado en el tiempo. Se nota una producción de resina notable en esta genética que nos ha gustado mucho por su olor y estructura de las plantas .
hemos creado un video por cada una de las 14 plantas del seguimiento, hay varias muy llamativas que están "pre-seleccionadas" para mantener a futuro, el olor que se llega a sentir es muy florar y dulce, si tienen alguna pregunta no duden en preguntar saludos.
Hello with this week we are already up to date with the follow-up since I was late in time. There is a remarkable resin production in this genetics that we liked a lot for its smell and structure of plants.
We have created a video for each of the 14 floors of the follow-up, there are several very striking that are "pre-selected" to keep in the future, the smell you get to feel is very flowery and sweet, if you have any questions do not hesitate to Ask greetings.
Likes
12
Share


@SpliffDoc
Follow
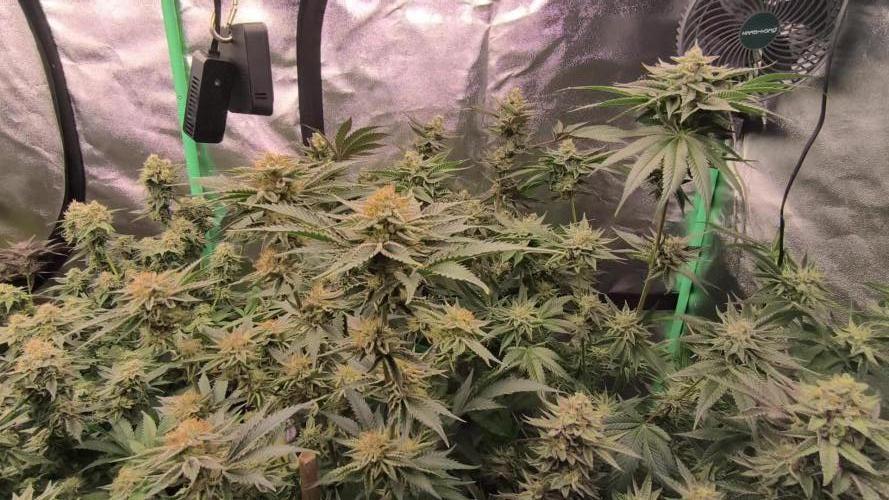
Getting dense now, really enjoying growing this strain, I'm excited to see the end result in 3/4 weeks. Let's go.l... Have a good weekend people, stay high🏻😉💚

Likes
9
Share


@Ryno1990
Follow
Today starts my flush week for this beautiful wedding glue from fastbuds the gelato is budding really nice an should only have another week or two before flush time

Likes
3
Share

@Jessi576
Follow
👉 Week 7 Bloom👈
👉18.04.2026 - 24.04.2026👈
👉 Days bloom: 43-49👈
The plants have gotten defoliated on bloom day 43 (usually around 40-43).
Two third of the Cherrytinis needed to be tied to a help in form of a staff in combination with velcro band, because this particular cultivar tends to grow all branches extremely long and therefore relatively thin, even tho he got enough silicat.
The ripper seeds strain is doing what this cultivar usually does:
It is growing small branches with a few nodies.
The buds are really growing thick, which is quite beautiful. This cultivar would perfectly fit a sog, but is sadly growing so tiny, that it would take too long until the mother could produce enough cutrings a time, to start a SOG.


Processing
Likes
11
Share


Likes
5
Share

@Chubbs
Follow
What up, what up. Weekly update on these ladies. They're progressing nicely. Some are a little smaller then all the rest so I'll germinate a few more seeds to replace those. Only like 3 so not to bad and shouldn't be to far behind from the others. Over all Happy Growing
Likes
119
Share


@Natrona
Follow
*****DIVINE SEEDS *****
*****OPIUM*****
Sponsored grow
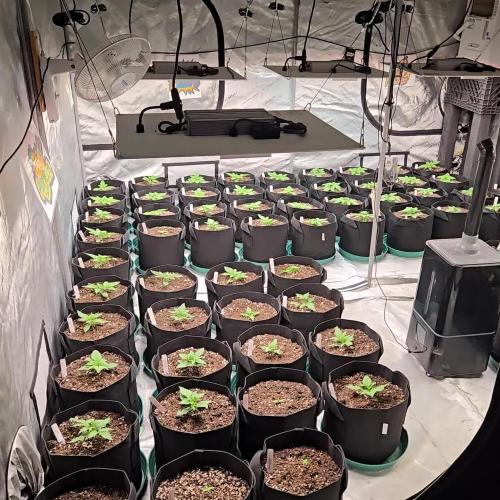
Week 2
Germination April 6.
Week 1 water only
Week 2 water only
This week 14-20 consisted of plain ph 6.6-6.9 water only. I gave a capful in the morning and evening.
Transplanted to final 5 gallon air pot using fox farm amended soil. At 2 weeks, they have a good root structure established.
Pics on 14, 16,18 &20
Until the plants are big enough to go outside, I will be using my AC Infinity tent and equipment. Once outside, I will be watering with well water and recharge and any additional fertilizers or amendments will be determined at that time.
Thank You @DivineSeeds for the opportunity to grow and try what looks like a winner on all profiles.
Thanks for the likes and comments, I appreciate all the plant love💚.
Have fun & love what you grow 💚
Sending love and light 💫
💫Natrona 💫
DIVINE SEEDS
***OPIUM***
Harvest:1000 g/m2
Divine Seeds developed Opium as a new champion strain, unprecedently powerful and loaded with unbelievable quantities of resin. Certainly, no average genetic base could be behind such brilliant parameters! Several Afghani Indica landraces, recognized as most potent and resinous, were bred together with a mighty Brazilian Sativa which Opium inherits its bright berry taste from. Then a great deal of work followed aiming for the highest THC level and endurability as well as a branchy structure that would provide maximal yields. Now we can proudly title Opium the best Indica you could dream of growing!
Indoors these plants mostly stay mid-height (1.5 m), reaching up to 2.0 m out of doors. Depending on your height limitations, Opium flourishes universally in grow boxes, balconies, green houses and terraces. Due to its Afghani parentage, this strain can stand hot weather if provided enough water and some shadow. Responds well to any training techniques: ScroG and SoG, LST, topping and FIM, supercropping. The start of blooming is marked with a rush of growth, when plants stretch almost 1.4x. Expect heavy colas that often require additional supports. Whilst ripening, Opium gives off a pungent earthy stench with fruity and berry undertones, also a bit of pine. Ready for outdoor harvesting in October.
The stoning psychedelic impact of Opium is like being hypnotized (unless you’ve had too much, then it feels more like a blackout). Stone-lovers will appreciate every minute with Opium: its spicy taste immerses your mind into daydreaming, while the body rests flat. Recreation with this psychedelic Indica means silent tripping from one insight to another. Mighty enough to kill chronical pains, Opium is also medically efficient against insomnia, nausea, appetite disorders, muscle spasms, headaches, irritation, fatigue, panic attacks, epilepsy. Best consumed at night time, the effects keep going for up to 4 hours.
Equipment and nutrients
Pots: 5gallon Air pots
Soil Fox Farm Happy Frog Amended with worm castings, dolomite lime and mychorihiza Recharge
Seeds provided by Divine Seeds
Divine Seeds breeding company
The link to Opium Feminized Seeds
Opium - Divine Seeds breeding company
The link to Opium Auto Seeds
Auto Opium - Divine Seeds breeding company
=================================
Equipment: AC Infinity
CLOUDLAB 844 – Advance Grow Tent 48”x48”x80”
CONTROLLER 69 PRO – Grow Tent Controller
CLOUDLINE LITE 6 - Inline Fan 6"
IONBOARD S44 – LED Grow Light Board 400W
CLOUDRAY S6 – Oscillating Circulation Clip Fan
Carbon Filter 6”

Processing
Likes
23
Share


@goeser
Follow
Startet the germination of this plants on 07.05.2018.
4 of 5 Royyal Gorilla Auto seeds germinated and are growing well.
They are staying in my garden and i hope that they will get more and more sun this coming week.
1 of 4 is quit strong , and ist already frosty and has good buds , hope they will get big and fat.
the other 3 plants are a bit slower and one of them is a bit small but bushy.
first "outdoor" grow for me in a not soo sunny area.

Likes
13
Share


@Huntress007
Follow
So this little baby is short and thick 😂 she is growing well but very stubby 🤷 anywho she looks very bushy and has fat leaves so she was defoliated and topped a second time! 💕🌸she seems to be coming along great!
Likes
30
Share


@BudXs
Follow
We are an update away from the results. Both control plants chopped by way of spin trimmer. Non defo has the biggest cola, defo plant has the most mains and seems a bit heavier when wet. Results in a week or so
Sbg.com


Likes
72
Share


@BodyByVio
Follow
The plant is drinking over 3 gallons of water every day. I’ve lowered the PPM’s to 600. Everything seems to be ok now. I will try to change the reservoir water every 5 days from now on.
She started to smell amazing! Very lemony 🍋
P.S. Lowerd the TDS to 550 PPM on day 46.
Also just realized that I stressed my plan with to much light. I moved the light at 13” and dimmed to 95% ... I will continue to dim it 2% every day...
Processing
Likes
28
Share


@Salgeezi
Follow
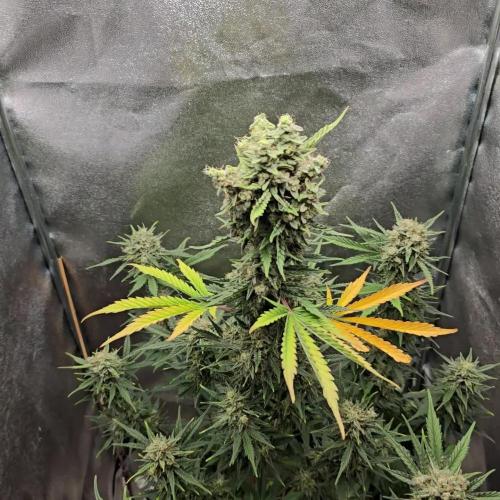
Kinda worried the buds are showing lots of cloudy trichromes and on sugar leaves I am seeing amber. Bud Structure and the way they are still taking their feedings are telling me otherwise. So Im guna keep on trucking. My grows flowering times are never what breeder says too, always longer.
Forgot to mention at the start of week 5 I added full tilt by floraflex aswell. Also started watering 8x a day with lights on. One time at lights off. At about 160ml each feeding with about 40-50ml runoff. These small pots are all roots and I feel the high frequency waterings are necessary to keep the runoff EC levels down
Wattage 170
EC 700
Humidity 58
Temp 78

Likes
11
Share


@Luv2Grow
Follow
Day 78 - Starting week 12 and she’s not going far into this week. Will end up giving her the axe on Thursday so she’s got one more full day to live. Trichs are about 25% amber now so she’s definitely ready.

Likes
10
Share


@YAKDADDYDWC
Follow
started off first time grow with cyco nutrients line was struggling to maintain ph but getting the full swing from 5.6 to 6 happy days

Likes
12
Share

@Mosquito_Haarlem
Follow
Haar laatste uren zijn gekomen.
Wat een geweldig prachtige bloemen heeft ze voortgebracht. Echt super!
Ik zal haar zondag 6 juli omhakken en in haar geheel ophangen.
Foto's zullen volgen dus hoe het in de gaten.
Wordt vervolgd......


