The Grow Awards 2026 🏆 


Likes
Comments
Share
@Salokin
Follow
Hello Growmies,
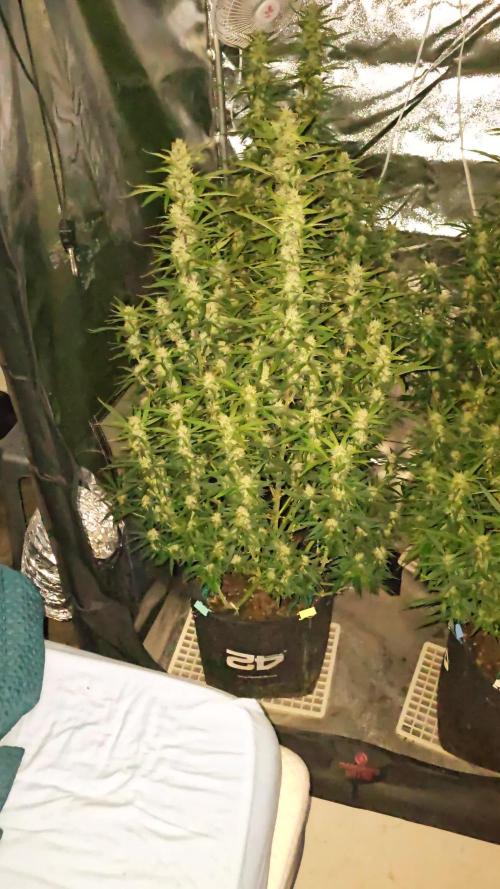
We’re now in week 9 with our Auto Bruce Lemon Diesel, and the progress is truly exciting. The plants are deep into the flowering phase, and their development is a sight to behold. Standing at an impressive height of 100 cm, these plants have fully stretched to their maximum potential.
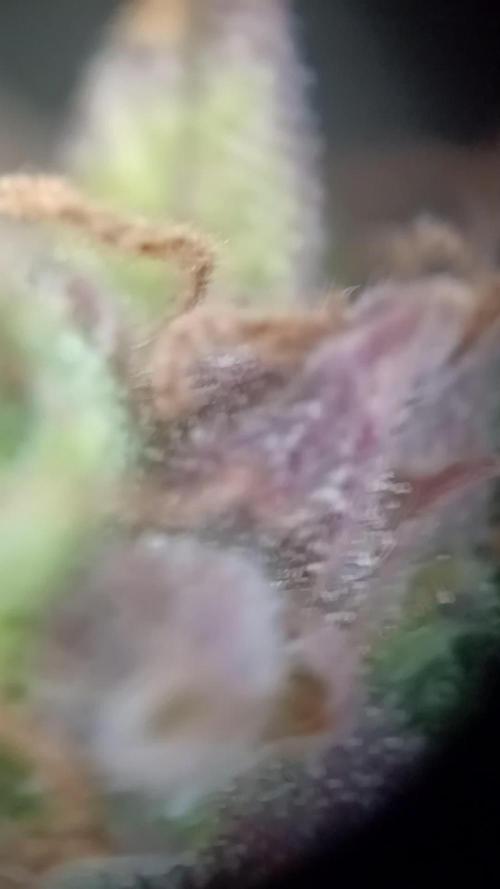
Based on the attached pictures, the plants are showing exceptional vigor. The dense foliage and multiple budding sites are clear indicators of their health and vitality. The main colas are thickening nicely, and the secondary branches are also forming substantial buds. The trichome production is visible, giving the buds a frosty appearance that promises high potency.
Plants #1 and #3 continue to dominate in size and appearance, standing tall and impressive. The adjustment of the GCx 9 light spectrum to 100% flower and 35% grow spectrum has been highly effective. This setup is maintaining optimal conditions, with the lamp at its maximum height and the plants maintaining a safe distance of 10 cm to avoid heat stress.
The foliage remains lush and vibrant, a clear indicator of the plants' health. The support grid is crucial at this stage, managing the shape and supporting the branches as they bear the increasing weight of the developing flowers. The root balls, as shown in the pictures, are robust and healthy, confirming that the air supply is perfect and not excessive, providing strong support for the heavy buds to come.
As the buds continue to mature, the anticipation for the final harvest is building. Each plant’s unique characteristics are becoming more pronounced, promising a rich and rewarding yield. I’m thrilled with the progress and eager to see how they continue to develop in the next week.
Stay lifted,
Salokin

Likes
Comments
Share
@GanjOS_OG
Follow
First week of Veg is done after the propagator tent. Clones looking good so far - getting healthy again. Startet LST.
Likes
49
Share
@AsNoriu
Follow
Day 77. Harvest day for that amazing plant.
Dry trim chosen.
Will update after drying.
Thank You Zamnesia for that chance !
Day 86. Girls has started curing process.
Happy Growing !!!

Likes
13
Share
@martymcfried
Follow
I have had problems with snapping bud sites off when attempting to train during my entire grow, but I have been getting more and more skilled at bending them over without breaking them. I didn't quite do a good enough job (in my opinion) of spacing out the Colas as I was originally going to ScrOG on top of my LST and Topping, but now I think I will just see how they grow. I wish I was more confident in my skills and could try to use the screen I bought, but I am very worried the stems are now to woody/hard and will start breaking if I attempt to put the screen on now. I plan on flipping to flower in the next 5- 6 days or so, then flowering them out for 9 weeks if possible. Should put me at harvest some time in late May/early June. Thanks for tuning in! If anyone can advise me on how to set up my screen I'd be ecstatic! Happy GROWING :)

Likes
11
Share
@plant
Follow
She’s looking nice looking healthy, drying up once every 2 days so she’s starting to drink, I just hope she doesn’t stretch too much as she’s already the tallest in there. Got some nice purple on the buds from the cold nights. Let’s hope she can get nice a fat 🌱🐞🤙

Likes
32
Share
@Ganjagrandaddy
Follow
Day 21 Veg today and all 4 ladies are looking mad for it !!
All vibrant and green with plenty of strength in their stems.
#1 has been trained this past week by pulling her 5th node over horizontal and keeping it held down by moving the peg along each day. Ideally it will need to be kept lower than the developing nodes from 2,3,and 4 which will be evened out as they progress to be the tops. This will avoid the topping and possible recovery time and also keeps the main intended stem. 7 healthy long thick colas is the intended aim using l.s.t and any other means necessary to get the best I can from this vigorous girl. #2 and # 3 are n on par with each other amd just about hitting their 5th nodes. I am going to try topping 1 and doing the same as #1 to the other.
#4 has got more size to her now but looks a way behind her sisters. hopefully she will catch up when she sees the attention her l.s.t siblings are getting.lol
So far an impressive few weeks for these genetics. So glad I have another few strains of the exotic auto range to play with too. Happy days. Until next time. be safe and well
DAY 23 UPDATE
I decided to F.i.m the #2 and #3 girls today so took some pics of their braveness. The #1 has been pulled further down and has a lot of willing competitors for main stems. #4 is still way too small to upset yet and may be left with no cuts and just some supercropping ( auto style). Be interesting to see the Fimming results when done too.
F.i.m = Bro science term coined from missed attempts at a straight topping of the maiming stem. "Fuck . I .missed" became the term for this method that can produce some really huge tops of multiple heads if caught at the sweet spot of the node lets see what we get.

Likes
40
Share
@Comfrey
Follow
Dutch Passion Shaman
Die Woche war geprägt von stundenlangem Landregen, Sonnenstunden, Nebel am Morgen mit sehr hoher Luftfeuchtigkeit, Sturm und noch mehr Regen. Die Pflanzen wurden deswegen von mir fast täglich auf Mehltau oder Fäulnis untersucht. Ein paar kleine Stellen im Inneren und auf der Wind abgewandten Seite habe ich entdeckt und sofort herausgeschnitten, Mehltau. Nichts Wildes aber es machte mir deutlich, dass die beiden Shamaninnen mit anschwellen der Blüten viel Liebe und Aufmerksamkeit benötigen, vor allem wenn das Wetter nicht so Cannabis freundlich ist, wie wir es uns wünschen.
Shamanin No. 1, die dunklere und größere von beiden, habe ich deshalb einige weitere Blätter genommen, so dass rund um die starken Triebe ausreichend Luft zirkulieren kann. Solange es nun windet und stürmt, sollte alles im grünen Bereich bleiben.
Shamanin No. 2 im kleineren Topf hat begonnen sich von der Spitze ausgehend allmählich farbiger zu zeigen. Sie sieht wunderschön aus und der Duft gefällt mir sehr gut. Sie hat ihren Platz gewechselt und steht nun in einem sonnigeren und luftigeren Teil des Gartens.
Danke für‘s vorbeischauen und das Interesse an meinen beiden Shamaninnen. 💚

Likes
25
Share
@Doofy
Follow
They look good, the gurl in the back her flowers are gettin very nice!! 😍🤩🙏
I turn them 180° every 2 days 🙏
The one in front looks allmost ready...
She´s lookin sharp, rocket to be launched... ❤️❤️ very thin plant, small harvest, small plant
Sexy ladies!! ❤️❤️ she smells like berries and cream 😋😍
Gettin frosty...

Likes
3
Share
@Muxa752
Follow
Все идет по плану , шишки пухнут ,появился характерны запах , в целом идет ленивый гров . подчищаю листву понемногу , стабильный полив ,хорошие условия , больше ничего не нужно )

Likes
38
Share
@Skunkman
Follow
Just going into the second week of flush the buds are really dense now! Chopping them down next Saturday hopefully 😎✌️🏻


Likes
10
Share
@3lementa1
Follow
I was still seeing strange things happen in the leaves but runoff pH was staying at around 6.5. One plant toppled over and started growing up from a bent stalk like an herb. I started looking for a new reflector so that I could mount my light horizontally instead of vertically to save space and ideally find a way to get the plants closer to the light without burning them. I started looking into MH bulbs as well as I figured at this point I clearly hadn't provided the light they needed. If I wanted them to thrive I needed to set them up properly for the last few weeks of veg. I transplanted this week into slightly bigger coco pots but in retrospect I feel I should have gone up to 3 gallon pots at this point.
Likes
73
Share
@Herbz_Unkraut
Follow
i looked awesome all growcycle...i streched alot & i noticed it drank alot more then the other plants while growing...had a good yield, i´m very happy overall


Likes
10
Share
@SamDo
Follow
Week 29 – Flowering Week 7
This week clearly marks the final phase of the Pineapple Upside Down flowering cycle.
There are no major changes to report, as the plant is now approaching the end of its life cycle.
This strain is listed for approximately 45 days of flowering, which corresponds to around six weeks.
However, due to earlier light stress, the cycle extended slightly beyond its theoretical duration.
At this stage, feeding has been completely stopped.
The plant is now running on Flawless only, dosed at 2 ml per liter, with the pH maintained between 5.8 and 5.9.
The objective is to flush properly and allow the plant to finish cleanly.
Trichomes are being closely monitored using a loupe.
They currently appear mostly cloudy, with a small percentage beginning to turn amber.
This indicates that the plant is well within its optimal harvest window.
Light intensity has not been increased and will likely be reduced slightly in the coming days.
The goal is to avoid trichome degradation, limit heat stress, and allow the plant to finish maturing gently.
We are now in the final stretch of this grow.
Harvest is expected within 5 to 10 days, depending on trichome evolution.
This run was not an easy one, but the focus now is to guide the plant calmly toward harvest and close the cycle properly.
See you next week, and take care.

Likes
35
Share
@Master_weeda
Follow
Bonjour à tous les padawans et les maîtres jedis
Pour cette semaine je prévoit de pratiquer comme technique spéciale le LST et juste un arrosage.
Pour cela comme à mon habitude j'attend le cinquième noeud ou que je juge la plante robuste.
Je profite que cette semaine qui va être relativement calme pour faire un LST appliqué et vous faire un rappel de ce qui est pour moi la meilleure technique pour arroser une autofloraison et la façon dont je pratique le LST.
En suivant ces quelques simples conseils vous obtiendrez un résultat optimal tout au long de votre culture :
Le cannabis est une plante qui n’aime pas recevoir un léger arrosage en continu. Il est impératif de l’arroser en grosse quantité, puis d’attendre que la terre soit bien sèche avant d’arroser à nouveau!
Pour calculer la quantité d’eau nécessaire à chaque plante, suivez cette règle :
Le volume d’eau à donner lors de chaque arrosage doit représenter au moins environ un quart du volume du pot !!
Exemples :
pour un pot d’1L, donnez 0,25L d’eau à chaque arrosage pour un pot de 4L, donnez 1L d’eau à chaque arrosage pour un pot de 12L, donnez 3L d’eau à chaque arrosage pour un pot de 30L, donnez 7,5L d’eau à chaque arrosage !etc…
Pour donner un tel volume d’eau, il est souvent nécessaire d’arroser en deux (voir trois) fois, lentement et uniformément sur toute la surface. Disposez de bonnes coupelles sous les pots, celles ci se rempliront d’eau qui remontera dans le pot par capillarité en moins d’une journée. Il est également très important d’utiliser un bon terreau de qualité, avec une bonne capacité de rétention d’eau mais qui assure également un bon drainage (celui ci doit contenir de la perlite, et/ou de la coco, etc..)
Il vous faut alors maintenant attendre quelques jours en sous-pesant régulièrement les pot avec vos bras. Quand ils seront redevenus très légers, vous pourrez arroser à nouveau !!
En effet, comme l’eau pèse beaucoup plus lourd que la terre, un pot gorgé d’eau pèse plusieurs fois le poids d’un pot d’une plante prête à être arrosée. Avec un peu d’entraînement, vous apprendrez donc très rapidement à sous-peser vos pots pour savoir quand une plante a soif.
C’est une technique à la fois très facile et très efficace, et qui peut être appliquée à toutes les plantes en pots !
En arrosant de cette façon, en général vous devrez arroser vos plantes tous les 3 à 6 jours.
Pour cette semaine 3 au jour 17 ma plante fais 12 centimètres et son cinquième noeud apparaît je décide donc de pratiquer un LST sur ma plante.
Pour ce j'utilise du fil de fer galvanisé que je plante directement dans le substrat en faisant attention de ne pas endommagé les racines car n'oublions pas que ce qui pousse dessus pousse aussi dessous.
Jour 17 je pulvérise du une solution composé d'une cuillère à café de savon noir mou dilué dans un litre d'eau en prévention d'éventuels nuisibles.
Je corrige mon LST suivant la pousse de ma plante ...
Pour ma par c'est la manière dont je procède. Comme promis petit rapel de:
Quand commencer à appliquer la technique LST
De nombreux cultivateurs commencent la manipulation dés que les plantes possèdent entre 3 et 6 nœuds ou une paire de feuilles. Durant cette première étape de la croissance, le tronc encore flexible est pliable sans risque qu’il ne se casse, même si au fur et à mesure du développement de la plante il sera de plus en plus difficile de le plier. Nous pouvons continuer à guider la croissance des branches durant toute la culture, même durant la floraison, ce qui pour cette étape représente un grand avantage face à la taille, qui n’est pas du tout recommandé une fois que la formation des têtes commence, cela stressera en effet la plante, ce qui aura pour effet de retarder la récolte.
Comment appliquer la technique de guidage LST
Si nous sommes prudents, la flexibilité naturelle des fibres du cannabis permet de plier leur tronc et branches avec une relative facilitée, même durant la floraison des plantes.
En utilisant une corde fine, nous pouvons accrocher la pointe de la plante à la base du pot par exemple ou à un tuteur que nous aurons planté dans le substrat. Nous plierons le tronc avec précaution et nous le fixerons avec la corde, à partir de là, nous pouvons augmenter progressivement la tension de la corde, chaque jour un peu plus, jusqu’à obtenir la position souhaitée. Soyez attentif à la réaction de la plante, essayez de ne pas appliquer trop de pression sur la corde et rappelez-vous que la flexibilité des branches peut varier d’une plante à l’autre.
Pour obtenir de meilleurs résultats, il suffit de suivre quelques règles simples. Pour commencer, nous devons choisir une corde fine mais pas trop pour ne pas blesser les troncs au fur et à mesure qu’ils grandissent et qu’ils deviennent plus gros.
Nous pouvons utiliser des crochets en plastique souple ou de n’importe quelle autre matière flexible pour éviter d’endommager les plantes. Spécialement en intérieur, utiliser des cordons en plastique de couleur (voir les diaries de @Silky) est très pratique pour voir facilement les accroches et faciliter le travail au milieu du réseau formés par les cordes, les tuteurs, les mailles ou les supports que nous aurons dans la culture. Bien entendu, en culture extérieure et surtout en guerilla nous ferons juste le contraire et nous utiliserons des matériaux de couleur qui n’attirent pas l’attention pour que notre jardin reste discret.
Pour stresser les plantes au minimum, la mieux est de réaliser ces manipulations le soir ou juste après que les lampes en intérieur s’éteignent, ce qui leur permettra de se remettre durant la nuit. Normalement, le jour suivant nous pourrons observer comme les pointes des branches que nous avons pliées se dressent de nouveau vers le haut à la recherche d’une source de lumière.
Que la force soit avec vous


Likes
4
Share
@Willy_Balls
Follow
Everything going great. Cleaned up some of the bottom leaves. 🍃
Increasing irrigation to 9 events.
Light at max intensity. Almost as high as it goes but they still got room to grow.
18.11
Defoliated the bottoms further and removed weak branches.
They really packed on budsites these few days.


Likes
9
Share
@Atom_x_Andromeda
Follow
Plants doing fantastic add your opinion.. stay till the end im sharing my medical grow pics with everyone thank you all for the happy comments and encouragement this is my first indoor, also first Autoflower, and first organic
