
Likes
Comments
Share


Likes
16
Share


@DaddyPrime2
Follow
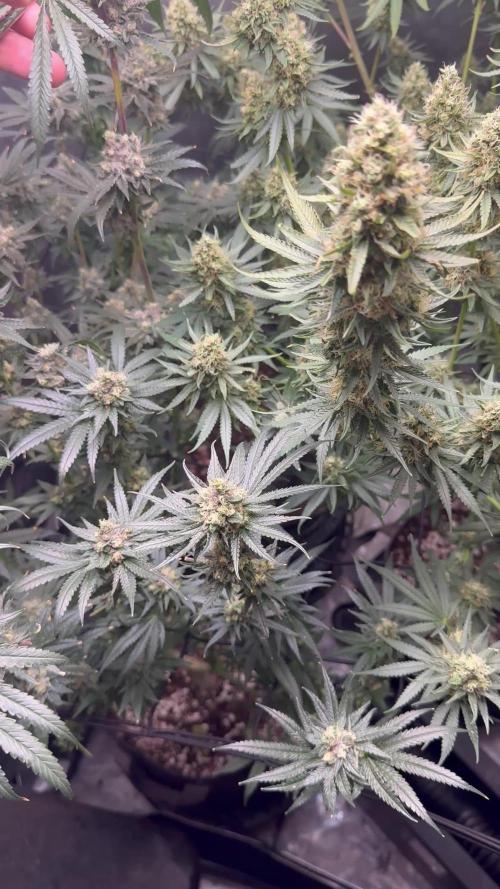
6/24 this may be the last week. The screen recordings are of both plants (purple octane and rs11) they're both close. I also went back and did some math and the last week of veg, should've been first week of flower. I may let her go for 10 weeks. We will see how she looks throughout this week(trichs)
6/25 looking super close. All cloudy besides maybe 10%
6/29 will get in there with a microscope again. just waiting on her to ripen. can't tell if she's done, or at rhat point where she looks so good that she's done but then that last week the plant explodes. well see and yall will definitely hear about it.


Likes
23
Share


@Susquihanna
Follow
OMG! Miss Gorilla was showing her strength this week and grew a whopping 9 inches this week. The sun is shining and she is drinking 1 gallon of nutrients a day.
@Fastbuds website says, "Plant Appearance This lady likes to stay low and will usually grow to a height of 60-130cm. Her growth structure is short and bushy, thanks to her sativa dominance, and will grow one main central cola, with fat side branches all around. Once flowering starts, expect Gorilla Auto to fill out thick and fast, as she begins to pack on size, weight and go crazy with the trichome output. From seed to harvest she is ready in 9-10 weeks, where she will finish with a short and fat appearance."
So far, Miss Gorilla is keeping up to her description.
I took a magnified picture and it shows me that Miss Gorilla will probably be in flower next week. It looks like she is in the beginning stages of flower.
@Fastbuds website said to, "add support around this strain, to help the side branches during the flowering stage" which I have done by LST with her side branchs. I have tied them down to allow light in and support growth.
I am feeding her 1 gallon on nutrients a day right now and @Fastbuds website said, She can take a big feed especially during week 3 and onwards." So, I am on target with that information.
I also have a pool umbrella protecting all of my plants from the direct sun.
As always, please comment and let me know what you think of Miss Gorilla.
Likes
152
Share


@BioBuds
Follow
How is it growing, my fun(k) loving friends?
***INFO*** For more on my setup, why it was monster cropped, and how I made the canopy, see Germination page and subsequent weeks.
They had 48 hrs of darkness, and the time has come to say goodbye to my friends.
I thanked them again, spend some time with them, and under the sound of Amazonian shaman's harvest and healing songs (will post link), asked for their gifts, and apologized for taking their lives.
I do this while in contact with the plants, touching, smelling them, observing every detail, no thoughts, just in the present moment.
I feel emotional as I do this and remember how they were a companion, a source of distraction in a time of worry, sadness, and loss.
How they already comforted me and kept me company in a time of painful insights about honesty, commitment, and staying true to myself.
I thank them again for their wisdom and gifts, viva Santa Maria, viva Planta Maestra, may the mother of all beings give us healing and protection.
And I proceed with the harvest as I visualize my intentions with every cut.
Branch by bud laden branch is tenderly untangled from the scrog net, taken with a clean-cut and immediately hung upside down in the grow tent, which will now double as a curing and drying room.
A couple more weeks and we will have the final cured and dried weight.
More photos and movies will follow, this is where we are so far!!
Thank you for checking in on our journey, all the love, support, and compliments were a true motivation, a very needed distraction, and guidance for me and for Sunshine.
Big hug, lots of love and take care!
***UPDATE***
The final weigh-in is ready. I hadn't seen them in a week, because of my vacation. The humidifier I set up, had failed. So the grow had dried in 7 days, what I wanted to be 14 at least. Thankfully, its Sativa ancestry shines through, the smoke isn't harsh, the buds a sticky and smelly, no hay smell at all.
We ended up at 246 grams, excluding a shitload of larf and popcorn bud, totaling at 310 grams all in, a first at a gram per watt for me, but for the Zambeza seed competition, I stated we would only weigh the quality bud. Overall I'm very happy!!
Guessed weights in the competition:
- @hashy : 0 grams
- @MrHyde : 198 grams
- @JamMAKEcan : 224 grams
- @TrickOrTrip : 260 grams
- @Greeneysgrow: 312.5 grams
- @Ohey_fu_kyu: 350 grams
- @Puffs4Pipes: 385 grams
- @Hempkid : 605 grams
- @DoDrugs420 : 621 grams
TrickorTrip was closest!! Congratulations!!! I will be contacting you to get the seeds with you!! Thanks for playing to all the others and better luck next time, I will give away some seeds again!!
Summary:
Cost of setup: 850 euro
Cost of nutrients and soil: 125 euro
Cost of seeds: None they were cloned
Cost of power: 150 euros in the power bill
Total cost: 1125,-- for setup and this run.
I smoke for medical reasons and it's used for ritual and healing purposes, never to be sold, as it loses its magical properties.
Should I have to buy Gelato of this quality at the dispensary that I frequent, it would cost me at least € 15,-- per gram.
246 x 15 = 3690 euros. also, 49 car rides of 25 miles there and back, 250 euros in gas saved.
Overall conclusion:
I think we can call this a succes. Made back my investment, my cost per grow and we saved the environment.
Thanks for all the love, tips and support! Couldnt have done this on my first indoor LED grow, without you!!
Wish you were here to smoke a fat one, some good conversation about our hobby and now... I'm hungry.... See you on the next one!! Hugs Bud!!!
PS. Should you be interested in Shamanism or Teacherplants by anything I mentioned. Pls watch the following documentaries or read these books:
- The Last Shaman on Netflix
- Fantastic Funghi on Netflix
- Food of the Gods, by Terrence McKenna
- The Herbal Jedi / Yarrow Willard on Youtube
- The Tao of Physics
- DMT: The Spirit Molecule on Youtube
- The Doors of Perception by Aldous Huxley
- Plants of the Gods by Richard Evans Schultes and Albert Hoffman
- What the bleep do we know - Down the rabbithole (although vague and some theories mentioned here, could not be replicated, like the water by Emoto)
- The Secret on Netflix- if you like enlightenment in bitesize, tellsell format
The link to Santo Daime hinarios for the Santa Maria cura, healing ceremony: https://www.youtube.com/watch?v=kSjNgg_-iD0&t=333s
If you want to learn more about permaculture / homesteading, see the following links:
- Pete Kanaris, Green Dreams TV, visits many permaculture farms in tropical area's, he is great!! https://www.youtube.com/user/GreenDreamsFL
- Supersoil recipe by Learn Organic gardening, take your ADD meds first, dont watch if prone to epilepsy... they like to talk... https://www.youtube.com/watch?v=z9_5iIqpTVA&t=1216s
- Mr Canuck, indoor organic cannabis growing master on Youtube: https://www.youtube.com/channel/UCtU2-cpxx18iQ4BvracrxDQ
- People creating food forests all over the world: https://www.youtube.com/user/happenfilms
Happy travels and enjoy!
Final update: Very happy to announce that this dairy had won the sixth place best diary of August 2021. My prize came in yesterday and I'm very happy!! Thank you Growdiaries!! Thank you Fastbuds!!! Thank you all my grow buddies here for the love and support!!
Hope to see you all, maybe at a future Growdiaries Meet and Greet? Wouldn't that be a lovely idea, per country and a yearly one on a different continent every year? The Growdiaries Conference. Would be a great Hemp growers fair... I'll keep dreaming and light another one... Big hug BioBuds

Likes
19
Share


@DogDoctorOfficial
Follow
so i was going for some leaves but end up striping the girls good .... i guess i enthusiasm myself easely lol but they seem to enjoy. normaly i dont do this at this fase, but they needed space and air circulation.
all i grow is medecin for myself, so its ok i gess !!!
hope you guys are enjoying, please let me know your opinion, tips and all are welcome and apreciated .
Peace and stay safe
D


Likes
6
Share


@codeblue
Follow
Incredible growth ... I had to bust out and move to a 2x5 with more height. Increased light coverage and airflow, nitrogen needs flushed, some signs of toxicity ... very happy.

Likes
4
Share


@Rko41
Follow
Aficionados French connection. La fais don pour que j’essaie la Spanish blue elephant planter tardivement au mois de juin elle va pas tarder à passer en flo
Likes
4
Share


@TiRobotProds
Follow
Cette semaine été décisifs, les pompons se développe bien et givré. La suite au prochain épisode growers.
Likes
4
Share


@CrazyDutti
Follow
- Wasser pro Topf : 1 Liter
- 0,25g Bittersalz
- P.h = 8,5 nach düngen 6,8


Likes
101
Share


@FoTwenny
Follow
Fo' Twenny Back with another update on our "GelatO.G" from Seedsman Seeds!
8/24: I did some selective defoliation to help increase light penetration. Next watering will be a flush with 2 tsp/gal of Fox Farm's flush agent SledgeHammer. A flush is recommended after week 3 in the Fox Farm Feeding chart. I figure the recommended flush will do some good considering I have a lot of coco in the mix and there are small amounts of salt fertilizer in my schedule.
Everything is growing strong with this lady and she has an abundance of growing shoots. She is stretching nicely with good internodal spacing. She responded well to training and is growing perfectly without too much crowding. The leaves all look very healthy and are a nice shade of green. Based on her look and color now, I am guessing she should get some really nice colors as she fades towards the end of flower.
8/28: Flushed the medium with tap H2O run through 2 KDF filters with 2 tsp/gal of Fox Farm Sledgehammer flushing agent and pH adjusted to 6.2. I started by giving 5 gallons. After checking the PPM of the runoff I ended up adding 5 more gallons mixed to same specifications. 10 gallons total was shared by 3 large flowering photoperiod cultivars and 1 smaller autoflower. She probably ended up with about 3 gallons give or take. I didn't measure how much each plant received. I just kept flushing each and checking runoff until it was under 1600 ppm.
Thanks for checking out my diary. If you liked this diary, check out my other diaries and give me a follow!
Until next time...
Peace ☮️,
Love 💚,
And Frosty Nugs ❄️🌲!
-Fo'Twenny


Likes
2
Share

@DmbTexasRanger
Follow
I am very happy with bloom. The plants are showing some amber trichomes very early. Some of it may be from bruising from me reaching over them?


Processing
Likes
12
Share


@Therbalist
Follow
Around 25g off no.3 pulled early due to spider mite making a comeback!
No.1 started to rot at the top overdid the STS spray.
No.2 is an absolute beast, lovely smell coming off it really impressed.
Will not be doing el natural ever again definitely get alot more off topped and trained plants. Enormous bud though was what I was aiming for!

Likes
32
Share


@GrowingTime
Follow
here we are Guys, 11th week, 6th into flower, the girl is recovering nicely.
she started to put some size buds and pistils are started back to grow white.
the Led is working perfectly and the buds are really frosty as fuck.
I hope she will still give me some nice weight even with the past big mistake.
UPDATE: she's definitely recovering fast. at day 82 the buds are swelling, I apologise for all the colors shades but i changed lights in order to get the best shots.
Likes
18
Share


@Grower_Of_Persia
Follow
week intel:
its time to harvest some of plants the ones that is mature enough. indica dominant plants will done first always so we should harvest them first
because my base nutrients and one of boosters was salt based, i'll do flushing this week to get some relieve to plants in the last days
stresses :
flushing
Drought stress via watering only one time with flushing this week
feeding:
day 1 : i flushed them with Advanced Nutrients Flawless finish and adjusted ph
day 3 : no more feeding from now on
day 5 : no more feeding from now on
guide of the week :
i harvest in 2 parts : first i harvest top of the branches and will let the lower buds to ripe another week then ill harvest the second wave.
indica dominant plants will get done 1 or 2 weeks sooner than sativa dominant plants that will often takes more than 8 weeks so be aware to harvest them sooner.
my dry and cure style is this:
3 days of hanging upside down to get water activity lower to around 0.6 in 50% humidity and 26 C temp (i know its a little high but we are in a hot summer right now and i cant get it lower even with air conditioner) and then after 3 days of drying i remove leaves and stalks, trim buds and move them to jar for the rest of their life :D . and in the first 4 days of curing i open the jar door and let hem get some fresh air in the jar for about 5 minutes and close the jar door again, after 4 days of curing like that buds are smokable but they will get better as they getting cured about 1 month.
im happy as hell with this harvest :D.

Likes
6
Share


@ganjaman24
Follow
All in all every strain is doing great! Blueberry is the closes to finishing followed by chemdawg and lastly the Somango I just flipped little over a week ago so still have a little while to go with her! Blueberry has a pungent and fresh berries/citrus aroma going on while the chemdawg has the infamous og odor no doubt og is related to it haha. Thanks for checking it out! XD ..sorry for the delayed update

