The Grow Awards 2026 🏆 


Likes
Comments
Share
@Cultivandomedicinanatural
Follow
Por una parte tenemos la que llamaremos Biscotii 1:
Tiene un tamaño monstruoso, que tuve que doblar en varias ocasiones el tallo porque no me daba más el foco para subirlo. De hecho una de las ocasiones me quemo una hoja del puntal y un pelín la puntita y como se puede ver hizo que la punta parezca un monstruo!! enorme, grande y de forma especial.
Hay gente en instagram que me pregunta que si lleva anabolizantes jajaajja lo más parecido a eso es los nutrientes de plagron!!! Que las revienta a las pequeñas
Esta tiene unos tonos morados que la hacen muy atractiva y una resina generosa. El olor es fuerte y la altura estirada es una pasada!!
Por otra parte la Biscotti 2:
El tamaño es inferior que la anterior, pero no por eso diría que poco productiva... Tiene un central que da miedo igualmente, los satélites son una pasada llena de resina.
En esta ocasión no tiene tonos morados, pero tiene mayor resina.
En general ambas dos tapan la botella de litro y medio de agua, prieta, olorosa y con resina para aburrir!!
😍😍😍😍😍
El peso le pondré en seco en cuanto lo pese 😇

Likes
12
Share
@Preston22
Follow
Nothing special.. just giving it a lil spray at the top of the soil every time it goes dry

Likes
21
Share
@420DeepGrow
Follow
Gracias al equipo de Kannabia Marshydro XpertNutrients y Trolmaster sin ellos esto no sería posible.
💐🍁 Amnesi K - Lemon:
La Amnesi-K Lemon es una semilla formada a partir de un trío de reyes, la Amnesia, la Lemon Skunk y la Jack Herer. Este matrimonio de tres dio lugar a una gran sativa que, con tonos dulces, terrosos y muy cítricos
🌻🚀 Consigue aqui tus semillas:
https://www.kannabia.com/es/semillas-marihuana-feminizadas/amnesi-k-lemon
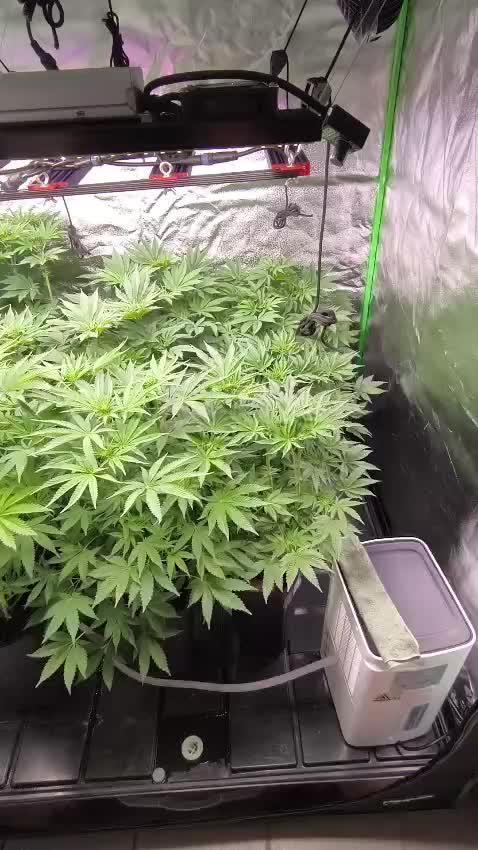
💡TS-3000 + TS-1000: se usaran dos de las lámparas de la serie TS de Marshydro, para cubrir todas las necesidades de las plantas durante el ciclo de cultivo, uso las dos lámparas en floracion para llegar a toda la carpa de 1.50 x 1.50 x 1.80.
https://marshydro.eu/products/mars-hydro-ts-3000-led-grow-light/
🏠 : Marshydro 1.50 x 1.50 x 1.80, carpa 100% estanca con ventanas laterales para llegar a todos los lugares durante el grow
https://marshydro.eu/products/diy-150x150x200cm-grow-tent-kit
🌬️💨 Marshydro 6inch + filtro carbon para evitar olores indeseables.
https://marshydro.eu/products/ifresh-smart-6inch-filter-kits/
💻 Trolmaster Tent-X TCS-1 como controlador de luz, optimiza tu cultivo con la última tecnología del mercado, desde donde puedes controlar todos los parametros.
https://www.trolmaster.com/Products/Details/TCS-1
🍣🍦🌴 Xpert Nutrients es una empresa especializada en la producción y comercialización de fertilizantes líquidos y tierras, que garantizan excelentes cosechas y un crecimiento activo para sus plantas durante todas las fases de cultivo.
Consigue aqui tus Nutrientes:
https://xpertnutrients.com/es/productos/
📆 Semana 6:
Esta semana ha explotado 💣, los cogollos comienzan a tomar densidad y llenarse de resina, me hubiera gustado aplicar algo mas de nutrientes en la fase vegetativa, la próxima vez será.

Likes
36
Share
@TerpTurtle
Follow
Gonna keep an eye out for crosses with face off OG!
Good outcome for 1st grow👽
BHO made made with whip it premium after about 3 days in freezer with column.
Likes
6
Share
@Frosty905budz
Follow
Plants are looks great ..
2 of the plants have huge colas already and getting bigger and fatter everyday.. I'm hoping the other 2 catch up ..lol
Been having some issues while mixing my nutrients in my resivor..
Got alot of great info from other growers on GD network and was able to resolve my issues...
Turns out the rhino skin was causing all the issues ...
Since getting some help I havent had any issue with the nutrients mixture..
I also cut down on how much additives I add each feed..
Also notice my stems are purple... from what I remember they were always purple since I got the clones ... maybe genetics or sulfur deficiency or something ... anyways to far into the week to be worried about that , although this maybe why 2 of the plants have slower bud production..
Likes
7
Share
@Ukfarmer420
Follow
Very nice smoke very smooth, made edibles out of the trim and small budlets...looking forward to the watermelon zkittles then the runtz

Likes
17
Share
@STAYINGONMYMAINCBATORUNTWO
Follow
Look at those faaaaades 😍😍😍😍😍 Flush is going amazingly I’ve now switched to the lights off for 24hours and will chop tomorrow so next update is hopefully on time and will be a harvest one! Been loving growing all these strains can’t wait to add the final report!


Likes
9
Share
@CanarianGrow92
Follow
These plants are getting bigger and bigger, i really like the shape of them, they look vigorous, at the moment great strain, still need to see the buds but its looking good 👍

Likes
Comments
Share
@Shneeblay
Follow
Having some problems with the epic buzz in the video cant work out what it is, added cal mag last week no difference any help would be amazing


Likes
9
Share
@Rock_n_Roll_Randy
Follow
FOR EVERYTHING MARS HYDRO VISIT:
www.mars-hydro.com
www.marshydroled.ca
PROMO CODE: rocknroll
VISIT THE ALIEXPRESS STORE:
@marshydro_aliexpress
Instagram: @marshydropenny
Thanks for taking the time to read and check out my diary🤜🤛
TS3000 FEATURES:
WIDEBAND SUNLIGHT FULL SPECTRUM LED GROW, Infinite close to natural sun light, suit for all plants whole stages indoor growing, rapid plant response from seed to flower, achieve maximum quality and quantity, much better than traditional HPS grow systems.
HIGH REFLECTIVE & NOISE FREE-Fanless LIGHT BOARDS design will make your growing life easy and quiet, quickly heat dispersing material aluminum reducing light lost to aisles and walls, increase the light intensity up to 20%, allowing your plants receive more energy and without burning your plants for maximum headroom.
HIGH EFFICIENCY ENERGY SAVING PLANT LIGHT, high-power NEW LED grow, Compares to traditional 3000 watt HPS lamp and other brand led grow light while only 450 watts true output with 1016 LEDs, more scientifically and energy-efficient! Perfect for 5' x 5' veg stage, 4' x 4' bloom stage, higher intensity in a MARS HYDRO grow tent, reflective area, or by crossing over using multiple TS3000.
BOOM YIELD LARGE GROW LIGHT, NEWEST SMD LED technology provide highest PAR/LUMEN output(1095.6umol/), makes you get 30% higher yield compare OLD led lights, can get max yield at 2.5g/watt, less pay but get more yield, bring a amazing grow trip to any home grower as it beams huge amounts of light energy to plants below.
COMMERCIAL LED GROW LIGHT, Updated easy dimming & daisy chain function, main light controlled, especially come with two waterproof and dimmable Mean Well Drivers, auto sensing power supply works on both 120VAC and 240VAC and 277VAC, suit for Large Rooms and Commercial Setups.
Low Energy-Consuming LED Grow Light: Consuming 300w and also mounted with 1016 chips, TS3000 has the ability to replace a 450w HPS light while reducing 40% power intake.
High Efficiency LED Grow Light: With overall light output PPF 343umol/S as well as amazing PPE 2.3 umol/j, it's 50% even more photon efficient and can assure a 30% more return than the old HPS/MH lights.
Patent Highly-Reflective Hood Shape: The reflector design on TS3000 is patented, which can effectively gather the light dispersed in all directions to enhance its light intensity as well as assist plants in absorbing more light.
Full Spectrum Plants Favorite Spectra: By the unique mix of spectra that makes most light in the 400-700nm waveband, incredibly conducive to plant photosynthesis. Adequate IR(730-740nm) is additionally consisted of in the range to generate larger buds.
Dimming And Daisy Chain Feature Available: Upon an independent dimming button on the external driver, backing 0-100% settings adaptation and up to 30 LEDs daisy-chained in a group, it supplies different light levels for various plant stages meanwhile saving energy.
Safety Certifications And Service Warranty: CE, ETL, RoHS, UKCA security certifications accepted, 50,000 hours durability, 5-year service warranty, and local after-sales repair
5x5 GROW TENT:
LOCK ALL LIGHT INSIDE MARS HYDRO Indoor Grow Tent interior is made of diamond mylar which is highly reflective. (Other brand's mylar and reflective rate is as low as 50%, won't provide efficient light. )MARS HYDRO 1680D canvas, being double stitched, it is tear proof and has perfect light locking. Mars Hydro's grow tent keeps 100% lighting beams inside and helps your plant absorb more lights. EXTRA-THICK --No light leaks or rips at all
DURABILITY GROW TENT Stable metal corner adapters and poles are the trustful supporters of the tent, standing sturdy, neither rusting nor paint-falling, quick easy tool-free installation. Mars Hydro's heavy-duty metal zippers, with double layer black lining, are the best on the market which create a light-proof seal
EASY OBSERVATION FOR YOUR PLANTS. Special observation windows are made by double layers of cloth. Observe the growing conditions of your plants without opening the tent and avoid disturbing plants. The observation window also serves to dissipate heat and ventilate air
AUTOMATIC 6 INCH EXHAUST FAN KIT W/ CONTROLLER:
Mars Hydro 6'' Inline Fan uses a mixed-flow design to maintain peak performance in a high static pressure environment.
GROW TENT FAN: MARS HYDRO inline fans are designed to ventilate hydroponic grow rooms, transfer heating/cooling, cool AV closets, and exhaust odors.
EFFECTIVE VENTILATION: Variable speed controller for easy fan speed adjustment. Optimal ventilation for your planting.
LOW NOISE LEVEL: Durable plastic fan housing and blades for extremely low noise(32dB-A); create a truly quiet growth environment.
EASY INSTALLATION: Removable duct ends with locking tabs for quick removal and easy maintenance and a cord length of 4.9 feet for hassle-free setup. This grows tent fan with a controller for easy fan speed adjustment.
BASIC PARAMETERS: Ventilation exhaust fan size: 6” | Dimensions: 315mm*225mm*210mm. | Weight: 2.7. | Airflow: 402CFM | Noise: 32dB-A | Bearings: Dual Ball.


Likes
11
Share
@Ledbelieve
Follow
Had to tear out my best looking Deep Purple because it was a male :(. So bummed 🙁 so only have one left so fingers crossed. Two of the fast buds CBD got about one week left. The other on is twice the size and about 3 weeks left. They smell very citrusy 🍋. Grow on!!

Likes
18
Share
@DeepRootsGrowTrees
Follow
PURPLE KUSH / KANNABIA SEEDS
WEEK #8 OVERALL
WEEK #7 VEG
This week she was transplanted to a 1 gallon cloth pot all is going well she didn't have any issues with transplant or the training she has been given!! Stay Growing!!
Thank you for stopping by and taking a look it's much appreciated!!
Thank you KANNABIA!!!
FOOP. COM
BUDTRAINER.COM
KANNABIA.COM PURPLE KUSH


Likes
38
Share
@ILoVeThiSpLaNt
Follow
La pianta per le bassissime temperature di fine ottobre è stata tagliata qualche giorno prima ma sicuramente la rifarò indoor. Sono molto contento e difficilmente lo sono. Ho detto tutto 😊🖐️


Likes
64
Share
@SmokingTiki
Follow
I ran out of BioBloom but the harvest is really close now so I would have water with clear water anyway, cool! I harvested the Gorilla Cookies end of the week. The two other ones are almost ready, I'll probably harvest them end of next week 😎 I also rearranged the last two ones to put them right under the light.
Processing
Likes
11
Share
@ganjaman24
Follow
They’re looking extremely healthy..gave em their first nute feed with the last watering seem to be doing fairly well..fimmed the GG and LST. Did not touch the unkown as it looks smaller to be the same age. Running GHE base line with few extra supplements.
****UPDATE****
Both are LST’d..might rethink the way I tie them. Going for a “coil” type look, we’ll see though. They’re looking great! Hoping for females!

Likes
7
Share
@Cultivatorcarlos
Follow
week 3 is a tough rn not gonna lie shes yellowing extremely fast and shes begging me for potassium. i was just giving her 2 tsps to 3 gallons of water. as of today (jan 8 2022) i gave her a feed of 1 and 1/4 bloom and 1/4 veg nutes to try to fight the yellowing. i honestly dont know if that was the right thing to do most threads i read just said to add some nitrogen but idk if dyna gros bloom and grow are meant to be mixed. especially this late in flower. either way its too late i already gave it to her i guess now all i can do is wait and see what happens. you can see how fast the yellowing is happening too.


