Likes
Comments
Share


@Jacks_Pot
Follow
The first week of the 12/12 cycle went without any problems.
The scrog is going fine and I've done some pruning & defoliation
underneath the screen making it easier to water them.
On day 40 (5th day of this week) I spotted the first pre-flowers.
I gave them tapwater with Plagron nutrients once this week.
The rest of the week I gave them ph adjusted tapwater every other day (Ec 0.46 - ph 6.1 - 1 liter each/48h)
The cobs stayed at the same height and power as last week (43 cm/17 inch and 188 watt – DLI 28 – PPFD 648)
On the last day it got a bit brighter again with the cobs at 40 cm/15.75 inch and 208 watt. (DLI 30.2 – PPFD 699)
I sprayed them once with a CannaCure solution (50 ml CannaCure + 200 ml tapwater, ph 6.1)
Temperatures stayed between 20 – 25 °C (68 – 77 °F) and humidity levels between 49 – 66 %
C u next week! ✋
Do you want to grow this strain?
👉 https://www.barneysfarm.us/pineapple-chunk-weed-strain-15 👈

Likes
3
Share

@psychonaut420
Follow
The start of week 3 veg I’ve been LSTing the plant I notice development drastically every 12hrs and now just starting to spot the development of side branches and new nodes I am following shogun nutrient schedu

Likes
17
Share


@Danger_Mouse
Follow
Variety prone to suffer from Botrytis because it develops super thick and compact buds. I harvested it a week earlier than expected when the first infected buds appeared.
Beautiful plant, with a spectacular structure and that when green lives up to its name and smells delicious.
The harvest was on 02/March equivalent to 02/September in the northern hemisphere.
The yield was 1016 g of dried and bottled buds.


Likes
2
Share


@R_atata
Follow
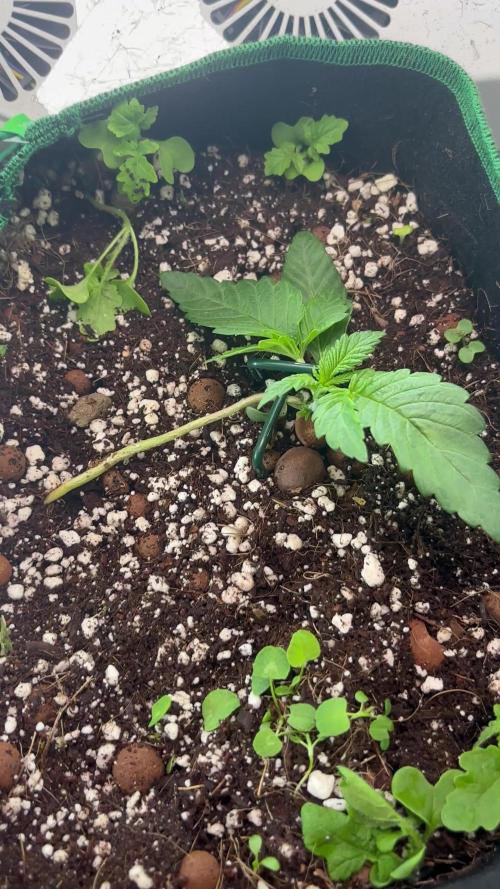
Erste Gehversuche Indoor. Living Soil aus Erde, Kompost und Perlit. Gegen Trauermücken wurden Nematoden gegossen. Von der Lemon Haze sind zwei Keimlinge kaputt gegangen. Der Dritte ist standhaft.
Auf in neue Sphären. 😀

Likes
49
Share


@masterofsmeagol
Follow
7/18 Plants are looking great. I was able to rearrange the plants so they have a little bit more space and so I can get around every plant. I have small random pest damage (i.e. I caught a four lined plant bug while hunting jpn beetles) but not enough h to warrant treatment. I will probably spray before flower. Sun's out amd plants were praying. I rotated a couple and it only took a few hours for them to "straighten out." I went to look again rhis morning and made the final determination to expand the cage. I'm looking for the 2x4's and the wire in the next couple days. The work that ive done now will but me sometime. I wonder how this rain impacted my soil.
7/19 Plants are looking fantastic. The stretch is starting. One purple punch looks like it's beginning to flower. I think I'm entering the transition period. Jpn beetle damage is evident but not significant. I defoliated a leaf with a a leafminwr or something in it. It's so much easier to get around the plants now. I'm seeing some chunks missing sporadically though. Went to the roses out back and found TONS of jpn beetleson top of each other reproducing. They destroyed that rose bush. I'm going to keep it as a trap plant. My dad's girlfriend wanted to spray it but that doesn't make sense as theflowers are all gone. Dad's grabbing the materials to extend the cage today I think. Right now I can get around every plant but the two big ones in the back. I just cant get to the backs of them and they are huge. Almost reaching the top of the cage. A 4'-6' extension will do wonders in flower. Can't wait.
UPDATE: Dad got the 2x4's and we assembled the extension and attached it. He's grabbing the wire as I type this. This worked out beautifully. I had no idea how big the blueberry cheese in the 50 gallon was! This extension (4ft i think) is PERFECT! Then I can get a little extra wire and pull it out if I wanted to. I think I have another 2x4 that I'm going to use in the middle. Lots of great pics and a video I'll upload tomorrow. Hot af today and humidity still super high. Even the commercial dudes was surprised I don't have wpm l and that judging by some of my plants structure that I may do better than I think. I certainly hope so. I WATERED 3 GALLONS OVER THE WHOLE GARDEN. The blueberry cheese in smart pots were drooping. They drink far more water than tje others. I would've given more but we are supposed to have thunderstorms. I left my back tarp off for the night. It will increase airflow and wind is down. I feel like this is going to be my year.
7/20 I updated and loaded everything on the app but notjing would save. Did it again in the website hopfully this saves
i didnt put it all up. Didn't water the plants today. Bags seemed okay weight wise. Good thing I did the extension yesterday because those three plants were drooping they were so thirsty. I focused most of the water yesterday on those plants that needed it. The others were somewhat dry but still had some weight. Like i said the blc drinks much more water than any of the other plants. I'm impressed with the growth I'm seeing. Especially since I have been being very stingy with the water and I've only fed like twice and that was just the kelp me/you and big bloom in negligible amounts. I'm watching for deficiencies. I'm just not seeing them. I'm picking up the wire and finishing the extension and then rearranging things. I'll update.
UPDATE: WATERED 4 GALLONS CONCENTRATING ON THE PLANTS THAT WERE DROOPING THE MOST. FINISHED ENCLOSURE AND INCREASED PLANT SPACE. TRELLIS WILL GO UP THIS WEEK. VIDEOS WILL BE UPLOADED TOMORROW.
7/21 I should've watered more volume last night. I noticed two plants that seemed much lighter than the rest. After some deliberation I gave them each a half gallon of water. One was the purple punch in the 10 that's huge amd the other was that huge blueberry cheese. I think I'm going to swap places with them, take out a pallet and get some other way to elevate that ONE plant and I'll have even more room. Then I'll add my supports. It's a dream working in there now. I noticed some small interior leaves being used up and dieing. I defoliated them but it was only a couple. I'll need to start nutes at some point. Doesn't need it yet though. I'm going to add some kelp me/you for the heat stress. I need to get the watering down better but it's more difficult when they each have different needs. I kinda have to read the plant. I'd rather be overwatered than underwatered. I tried to upload what I could but some won't.
UPDATE: I went over to clip off some fencing that was doubled up AND just to check on tge girls. Found two caterpillars (small but hairy so they were older not the inch worms and possibly what has been contributing to damage on those plants. Things are spread out so it will be harder for insects to move from plant to plant and I have better air flow. I worry that leaving my tarp off might lead to high winds and plants not able to take it buf I digress. I'll add supports later. Plants are huge and drinking far more water than I've been giving them. When I got there several were drooped right over and dry as a bone. The bags are essentially all roots now. I mixed up 8 gallons of water and split it between the plants. I gave less to the two Co trainer plants that weren't drooping and the 10 I watered yesterday that wasn't drooping but for the most part the ones that needed if got at least a gallon or more. The others a little under a gallon. It might rain A LITTLE tonight too. Oh, and since it's been so hot I added 1/2 tsp per gallon of kelp me kelp you to help the plants deal with heat stress. I also noticed that some of the very bottom interior leaves are being used up. I have a feeling ill need to switch to nutes pretty soon. Plus I need to suppirt those plants if I'm going to leave that tarp off and Gove them air. Took a video. But it won't upload here. I'll have to wait till tomm.
7/22 Didn't have much timevthis morning bit I dod a video. Boy those plants loved that water and that kelp. This morning everyone was standing straight up at attention. Supposed to get rain last night but didn't. Good thing I watered. I think I'm going to up the water next watering and then again to the 10% mark if necessary. Especially with the Blueberry cheeses. I'm noticing that a FEW INTERIOR leaves are showing nute deficiencies so I'm probably going to have to start feeding soon. I'll update later.
UPDATE: Went back over and cut off the extra wire. I'm going to need to water more volume. Specifically on two plants. The two huge blueberry cheese in 20 gallon smart bags dries out much faster than the rest. I'll have to out that on a different schedule or increase the amount given. Next watering will be 1.5 or 2 gallons a plant and it might be tomorrow from what I was seeing. It's super hot and with the added airflow the bags dry out faster. I also went through EACH plant looking for pests and defoliating old leaves that needed it. Plants are still nice and green but a VERY few older interior leaves are showing deficiencies. I know this is Normal especially since they are trying n g to transition to flower. I also saw pest damage on a couple plants. Four lined plant bug. I already found the one on the other plant and killed it but I'm considering doing a spray before flower. I'm thinking either captain Jack as a "catch all", BT which works great but mostly just on pillars or the organocide bee safe 3 in one pesticide. I also have pyrethium and other things. Thus far picking things off manually has been good enough. At the very least they will get an application of BT very soon.
7/23 Held off on watering this morning. Supposed to get thunder storms I DID split a gallon with two blueberry cheese that were the lightest in the 20 gallon smart pots. Thet drink way more. My water volume is going to need to increase. We haven't had nearly enough rain. I'm going to bump it up to 1.5 to 2 gallons each plant which will be 10% for the 20s and a little less for the others. I'm still seeing various pest damage. Nothing bad but I found another couples leaves that were chomped on by a four lined plant bug so I'm debating applying something tonight when I water. I'm also noticing old leaves being used up and some interior leaves showing slight deficiencies. It will be time to start nutes soon. I'll update as I go.
UPDATE: GOT THE FEELING I NEEDED TO CHECK THE PLANTS. SOMETHING DODNT LOOK RIGHT ON THE CAMS. WENT OVER AND EVERY PLANT BUT THE TWO I SPLIT A GALLON WITH AND THE PLANT IN THE 50 WERE DROOPED RIGHT OVER. LIFELESS. I SHOULD'VE WATERED THIS MORNING BUT I DIDNT HAVE TIME. I FIGURED THEY COULD WAIT UNTIL NIGHT. EACH PLANT GOT 1.5 GALLONS AT LEAST. I USED SIXTEEN OR SEVENTEEN GALLONS ON THE GARDEN. I GAVE EACH CONTAINER PLANT ONE GALLON AND GOT RUN OFF FROM BOTH. IM NOTICING SKIGHT FADING IN LEAVES BUT IM NOT INTRODUCING NUTES TO UNDERWATERED PLANTS. I THINK 10% IS GONNA BE TGE MAGIC NUMBER. 2 GALLONS EACH. EVEN THE 10 GALLON SMART POT. ALMLST AS BIG AS THE 30S BUT DRIES OUT QUICKER.
7/24 Plants looked fantastic this morning. Defoliated a few leaves that needed it. Showed my commercial buddy and he said things looked fantastic. Since the soils still holding nutes and I'm not seeing many deficiencies I may hold off on feeding. I'm starting early flower now. I will be using nutes soon. I think ive got the watering schedule pretty much down.

Likes
34
Share


@GreenLion
Follow
Hello everyone
This is first week of flowering stage.
She looks pretty good.
I flushed two times and after this added transition stage nutrients.
If you have any advice just say ;)
Likes
1
Share


@fabialien
Follow
Semana del 9 al 15 de septiembre 2024.
Estas Autos BSF van con todo, muy vigorosas, excepto una blueberry y una Orange Blossom que van un poco lentas.

Likes
7
Share


Likes
Comments
Share


Likes
36
Share


@Ganjagrandaddy
Follow
Day 56 ( 16 Flowering): I am in love with their appearance in this grow. They look surreal with their black smeared leaves and the contrast against the white pistils adds a dimension I have never seen in my grows before . They have been getting on with it quite happily and as the quickest to flowering and harvest according to their info , they should finish this week !!!. l I am glad that this is not the case and they have at least 2 weeks for sure. They smell so berry now , I cannot wait to smoke the finished article.
#1 The LOS girl is short and building her stacked buds now. She doesnt lookalike she will be a huge yield but her buds are beauties. I think I could have let her go without lst for a taller girl.
#2 is trained a little but not tied up the same as other in the grow. she has a good size to her and her buds look amazing too.
#3 Was the pale rubbery girl until the Mega Crop got busy making her green again. She is now quite a big lady and has had to move moved under the TSL-2000 to keep her happy without super cropping her. She is absolutely covered in small budlets
Likes
2
Share


@gr3g4l
Follow
Esta semana tocó la poda de los apicales y primer nudo dejando solo 4 nudos por planta.
Por lo que parece tienden a grandes hojas e internodos cortos.
Esta semana también aumenté la potencia del lumatex hasta el 75% unos 220W. Empecé con 100 W luego fueron 150 y ahora 220 , así hasta cambiar el fotoperiodo a 12/12h. Entonces al 100%, 300W.
Con 26 dias de vida ya tenian suficientes nudos, ramas y tocó hacer el apical y la poda del primer nudo a todas dejando 4 nudos por planta, 8 ramas secundarias.
Terminamos la semana con la nº5 con manchas en las hojas muy feas. Entiendo que tengo que tratarla diferente al resto por lo que la regaré menos y dejaré secar más entre riegos al menos un par de veces.
Likes
28
Share


@PEAKYPLANTERS
Follow
Hello everyone,! brother farmers!
welcome back to the beautiful flower gardens of Peaky
these girls are really very sexy
even if the tent is very small they continue to explode shoots everywhere
some burn from led ... but nothing so serious


Likes
98
Share


@CBD_Sweden
Follow
The growing cycle itself worked out as expected, except that the pH-level was way off from where it should be, and I found out a bit too late. Because of this the outcome of the harvest didn't say much about the potential of this strain, but as soon as I got enough time and space, she will get a new chance to shine.000

Likes
72
Share


@Wastent91
Follow
Ehi ragazzi come va? Scusate ma questa settimana salto la descrizione e i commenti xke sinceramente oltre che a dire che sta esplodendo di fiori, di densità totale e di volume impressionante! Mai visto un autos così prepotente di volume di cime! Ora metto la prossima settimana e vedrete, sono fiori ancora immaturi quindi significa che continuerà a buttare fuori resina per almeno 2 settimane penso! Questo penso sia grazie non solo alla mia abilità data dall esperienza, ma soprattutto dalla genetica spettacolare, e grazie al equipaggiamento dato i da Masr Hydro che davvero è una cosa eccezionale, mantiene una stabilità di temperatura e umidità all interno della grow, che prima mi era impossibile amministrare nel giusto modo, ora è tutto molto più semplice e sbrigativo, e questa stabilità, questo controllo preciso di tutte le variabili in gioco, mi sta donando una crescita rigogliosa davvero molto importante, rispetto ai cicli passati... Quindi i miei complimenti come al solito alla famiglia Masr Hydro, (vi lascio i link sotto del loro sito e dei miei componenti) e alla Fastbuds che mi da fiducia ormai da più di un anno, ma soprattutto a tutti voi che mi sostenete con i vostri like, che mi seguite, che mi fate sentire davvero un vero appassionato, parte di un qualcosa di una grande famiglia che è questo social Grow Diaries, mi fa sentire finalmente realizzato, grazie solo alla mia caperbieta contro delle leggi del mio stato italiano che mi hanno rovinato la vita già troppe volte, solo perché amo coltivare questa splendida pianta 😔 allora buon 420 a tutti e grazie di 💖 di esistere e sostenermi!
https://marshydro.eu/
https://marshydro.eu/products/mars-hydro-100x100x180cm-grow-tent/
https://marshydro.eu/products/4-inch-inline-duct-fan-and-carbon-filter-combo-with-thermostat-controller/
Likes
5
Share


@Knert
Follow
This lady started growing like crazy. She's become really bushy and quite tall, with side branches being mostly equally high all over the plant. Flowers starting to develop well, but smell stays on the weak side. I'm expecting her to slow down and eventually stop growing over the next couple of days. Nutrient-wise I used more or less the same schedule as for my Northern Light lady, only did I now give her phosphorous grains at D7 already:
* D7: 25g of organic granular phosphorus grains (bone meal) (6-16-0)
* D20: 25g organic granular fertilizer (6-3-3)
* D28: 35g organic granular fertilizer (6-3-3)
* D35: 30g organic granular phosphorous grains (bone meal) (6-16-0)
* D42: 20g of organic potassium grains (2-0-20)
I'm really curious about how much (if any) she's still going to grow in size and how the buds will develop over the following weeks. Next few days, will be very warm and sunny!
Likes
17
Share

@Green_Zyphoria
Follow
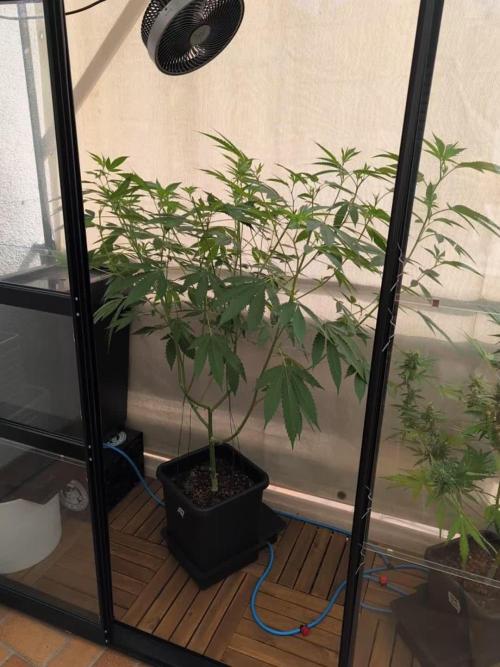
What's up guys! Quick update for this week. I decided to give the Gorilla Melon a nice cut to keep her height fully under control, and honestly, I'm pretty happy with her current structure. She’s shaping up beautifully. I'll see how she develops over the next two weeks and make a final decision at the end of July whether to cut her one last time or just let her ride. I'm still a bit anxious about that massive stretch coming up in August, so my main goal right now is keeping her in a compact shape that will comfortably fit inside the greenhouse.
To make sure she has enough power for the road ahead, I pushed a third Biotab straight into the soil today. Those thrips are unfortunately still buzzing around the place, but the Gorilla Melon seems to be way more resilient compared to her greenhouse-mate. My Orange Sherbet Auto right next to her, which is already in late flower, is definitely having a much harder time dealing with the pests. To get ahead of the problem, I’m going to release another round of biological pest control soon. The goal is to have everything thrips-free the time the Gorilla Melon finally flips into flower (hopefully).
Enjoy the peace of growing, guys! ✌️