The Grow Awards 2026 🏆 


Likes
17
Share
@Optimus
Follow
Didn’t expect the stretch to be so huge given the genetics. Like 10 cm in 3 days! Let’s see. Put in a dehumidifier, trying to reach optimal humidity of 60% for this stage.
02/01 The stretch is really strong. 75 cm by 02/01
04/01 I have been doing just minimal pruning/defoliation during the veg stage. I guess it was the reason why the stretch is so strong as the main colas try to reach the light. And there is a lot of weak side-shoots which make the plants really messy. Did some minor pruning today, because I don’t want to stress the plants much during early flowering. I’m going to remove all the side-shoots in two weeks when the stretch is over.
Next time I should do more pruning early, before the flip.

Processing
Likes
12
Share
@Tazard
Follow
These are clones that I managed to take from my summer garden that became a disaster due to a heat wave that we had breaking 100 year records. I expect everything to be 48” in height at maturity.

Likes
31
Share
@Moondogz
Follow
Hey everyone,
Another week of flowering has come to an end, and here's the latest update on my Lemon Orange grow.
I've added Silica and Power Buds to my girl's nutrient menu this week. Everything is looking great so far, with the buds continuing to develop nicely.
Thanks for all the support and advice. Feel free to share any tips or thoughts in the comments. Let’s keep this grow journey going strong!
🌱✨
Looking forward to hearing your thoughts!

Likes
43
Share
@TheCannaProphet
Follow
~ FastBuds PAPAYA SHERBET Photoperiod~
Well here we go on another journey together through 'Canna-land' and this one's kinda special... forget that, it's VERY special because this is FastBuds newest surprise for the community, a FEMINIZED PHOTOPERIOD STRAIN!🤯
I was fortunate enough to score these seeds, of which only 1000 were available and can't wait to see what this strain can do! This Papaya Sherbet, according to FastBuds, is a hybrid with a 9-10 weeks flowering period. For a more detailed and accurate description of this strain the following from FastBuds says it best:
"Combining the massive stature of Papaya (Oni Selection) with the strength and resilience of one of our best keeper cuts (Sunset Sherbet), this strain develops into a big, expansive bush adorned with numerous bud sites that later transform into a generous harvest of medium-sized buds. Papaya Sherbet flowers deliver a signature flavor of premium cannabis with subtle citrus undertones that emerge upon inhaling. During growth, her aroma makes for a sweet yet pleasantly bitter fragrance, giving you an idea of what the smoke will taste like. Notably stress-resistant, Papaya Sherbet is a great choice for growers working in challenging environments. She is very forgiving and rebounds quickly from any adversity, allowing growers the freedom to experiment with confidence that she will take everything like a champion she is. This strain embodies resilience, flavor, and abundant yields in every grow cycle."
Sounds like an epic strain and I personally cannot wait for this lady to strut her stuff!😍
________________________________________________________________________________________________________________________________________________________________________________________________________________________________________________________________________________________________________________________
The Setup:
This is going to be an outdoor grow, but I have started the Papaya Sherbet photoperiod indoors as our weather is still a bit too chilly to put a newly sprouted seedling outside (nighttime temp's dipping regularly into the 40's℉).
The plan is simple... let her grow inside under a 19/5 light schedule until the nighttime temperatures are in the mid 50's℉, which shouldn't be long. After which, she'll be moved outside and transplanted into the soil which I have already setup and inoculated with beneficial microbes from BioTabs and slow release dry amendments from Gaia Green. Once she's established herself outside she'll be given periodic top dressings of Gaia Green 4-4-4 and 2-8-4 along with worm castings and Compost Tea's. Her grow area is approx. 5'x5' and I have posts and a trellis net set up already for when she gets bigger to aid in training her. Let the fun begin!🤪💚
________________________________________________________________________________________________________________________________________________________________________________________________________________________________________________________________________________________________________________________
Weekly Updates:
8/11- Here we go into the FIRST WEEK of flower for the FastBuds Papaya Sherbet photoperiod! She finally finished her preflower stretch, ending up at a nosebleed height of 90" tall! It was such a great sight to look at her yesterday and see little flowers beginning to form. She's going to be a beautiful plant!
8/13- Our weather has cooled off after last weeks tropical system passed and it's nice to have a much needed break from the heat and humidity!
I am continuing to water daily with 5-8 gallons of well water from the garden hose. I also went ahead and removed two small branches that were at the very bottom of the Papaya Sherbet that would only take away nutrients from more beneficial areas of the plant.
8/15- Today, I top dressed the Papaya Sherbet with 3 cups of Gaia Green 2-8-4 Power Bloom which I watered in with well water from the hose. I then applied 1/2 gallon of a nutrient mix I made up in 2 1/2g of well water consisting of: 1/4 cup Neptune's Harvest Seaweed(kelp) plant food and 2 1/2 tsp. of Plantonics Amino Bliss.
8/17- There goes the first full week of flower for this incredibly stunning Papaya Sherbet photoperiod from FastBuds and I can not wait to see her transformation as this lady progresses through flowering!
Thank you for checking out my diary, your positive comments and support make it all worthwhile! 💚Growers Love!💚😎🙏
Likes
35
Share
@Da420Andi
Follow
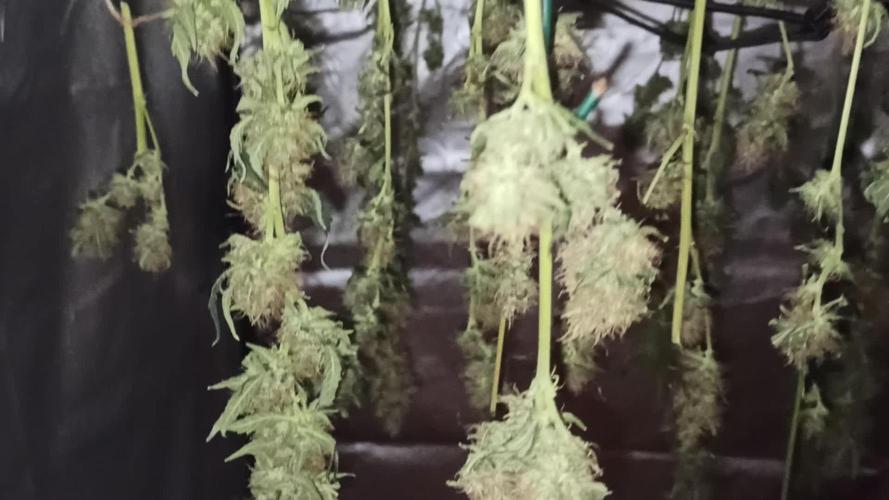
Howdy it is day 63 and in 2 days it is time to harvest. Since 2 weeks i feed clear Walter only. They get 16 hours darkness before harvest. All the plants are really🔥
My favourites are still 3G and Wedding Gelato. The smell and Look is crazy. You will see i guess Also North Thunderfuck and Hulkberry is good looking. The weight of North Thunderfuck for the dice is insane.
I wish everyone a nice Day and good time. Stay safe 💚
Likes
Comments
Share
@hoodzymids
Follow
had some lockout issues due to the pk booster.. i never use pk boosters. live and learn.
Likes
Comments
Share
@GreeneScene
Follow
She still hasn’t settled in nicely from her top dressed amendments. Shes growing but not flourishing like I’d like . Her leaves are all different funky shades . Her pots’ dried out a ways and her top soil is bone dry but I’m going to wait a couple/few more days before I offer her more water
Update: shes showing deficiencies, I haven’t been in the grow room for over a week and a half so I could begin to say what’s going on . I’ll have a look at the past data to try and gauge what may be the issue . I don’t fee she has began accessing her top dressed nutrients I could be wrong and perhaps she has an appetite larger than that 1gallon feeding schedule & wants more food . I’m working non-stop so when I get a second to myself I am not checking things out . I’ve been enjoying being on cruise control check back in later in the week .
Likes
1
Share
@StaresAtPlants
Follow
Trying to dial their veg in. Nutes may be too old or too high. Changed with 4ml CaMg per gallon of RO water. The rest is MaxiGrow.
Ever since adding rockwool to the grow, I have struggled. I don't have the dry back timed right yet. I moved my fan to dry the top of the pot surface instead of in the root zone or at the canopy height. After about 10 days I dumped out the rockwool and have replaced with hydroton.
My initial though on using rockwool was to give the roots more space during late life stages. My experience has been with hydroton and I notice that the roots eventually get bound because the hydroton is a durable material and will not crush or compact. Rockwool on the other hand will compress when squeezed so I was hoping that in the late life stages the roots would compress the rockwool and make more room in the pots. The issue was dryback. If I used chunks instead of croutons, this may help but the other reason I used them was because I had them here already. If anyone is trying to slow their dryback down, they should consider adding 10% volume of croutons to hold moisture in the medium a bit longer. Notice anything different?
They are starting to adapt to their new media. Hopefully by next week I can get them to perk up.
One plant has looked better than the other three. I have no idea what these plants need to “perk up”. Possibly a different grower. If a grape terpine wasn’t in the end results I would have culled these long ago. Hopefully they perk up when we get to flower.
3 look ,,,, meh, the fourth is descent. Trimmed all four back down to 12” tall. Flower next week.
Likes
Comments
Share


Likes
5
Share
@Ninjabuds
Follow
Lit marker from lit farms is going to be another winner from lit farms. I can really see the growth structure from the permanent marker plant I grew in the past. Also the plant has taken on the same bud structure as the gas cream Runtz and one of the bubble og phenos. You can really see the lit og bud structure show through in a lot of lit farms plants. Really tight round nugs with the most interesting curly hairs. Everything with this bud structure I’ve grown has a great gas smell under a candy smell. This plant is also starting to have the same kinda fade to the leaves as the permanent marker I grew b4.
Likes
34
Share
@Guit4Rpl4Y3R
Follow
Began flushing the colas are way bigger than I was expecting.......it's all green from here expect to harvest within the next two weeks
Likes
8
Share
@Sur_cannabico
Follow
Tienen muy buen color, me gusta la vegeta de estas nenas
Hace una semana se fueron de transplante de 1 a 7 litros
Y lo recibieron muy bien , ya estamos pensando en pasar a maceta textil de 15L.
¿Quieres ver las raíces?
Mira el último video 👀
Si trasplantó pongo la malla si o si, todo dependerá de cómo avancen
Likes
12
Share
@Michijardinero
Follow
Bueno por fin la cosecha ha salido bien aun que no ha salido realmente como quería pero a pesar de eso estoy contento con muchas ganas de probarla ya

Processing
Likes
19
Share
@Mission420
Follow
This week things seem to be progressing normally. Although not knowing what to expect, I can't say for sure, but no mishaps so far. I think they have stopped stretching, and are starting to get bigger buds, but that may be wishful thinking.
Watching the time lapse I am noticing that during certain parts of the day, the leaves are drooping still. At first I manually turned on the pump for their nutrients when I saw the leaves starting to sag, which was generally when I got up in the morning, but then watching the video, I decided to start doing it earlier. After watching last weeks video, I decided to set the pump to go on even earlier, and now I think I might do earlier still, or even perhaps set it to run twice a day. Time will tell... literally.. 😃
As you can see, I dropped the amount of Medi One this week, and upped the Bloom formulation with no big change in the results that I can see, but they do look healthy with green leaves and no unusual tips.

Likes
26
Share
@Ukfarmer420
Follow
So I am entering week 2 of the 12/12 flip, the ladys are showing sex so hopefully later in the week I will get actual pistils so I can start counting down flower days.
Day 9 seen pistils but I had to perform a major defoliation as under the canopy was bad and I didnt want powdery mildew due to leafs sweating ect.
Day 10 24 hours after defoliation, you could not tell I done a thing to them, im hoping its just a odd leaf now and then thru the rest of the flowering period.
Any advice is welcome guys 🙏
I will be adding more fans for airflow.
Day 12 of the flip and the girls are on there way to becoming ladys lol I think there's going to be a few nice kolas in there when done, ordered the new box fan for the floor to create more airflow to reduce the risk of pm and mold.
I need to top up soil as roots are showing so under the net I go again. Wish me luck.


Likes
2
Share
@High_Grade_Dadli
Follow
#1 is fully on her way to make life great can't complain no problem so far....just did a lil LST so she have more room to do her thing..
#2 problem has been solve to an extent..just have to watch her and see what up
Likes
2
Share
@thefrozenking
Follow
Day 56
these autos are running 12/12 because of the northern light being photo period

