The Grow Awards 2026 🏆 


Likes
Comments
Share
@pascal_dop
Follow
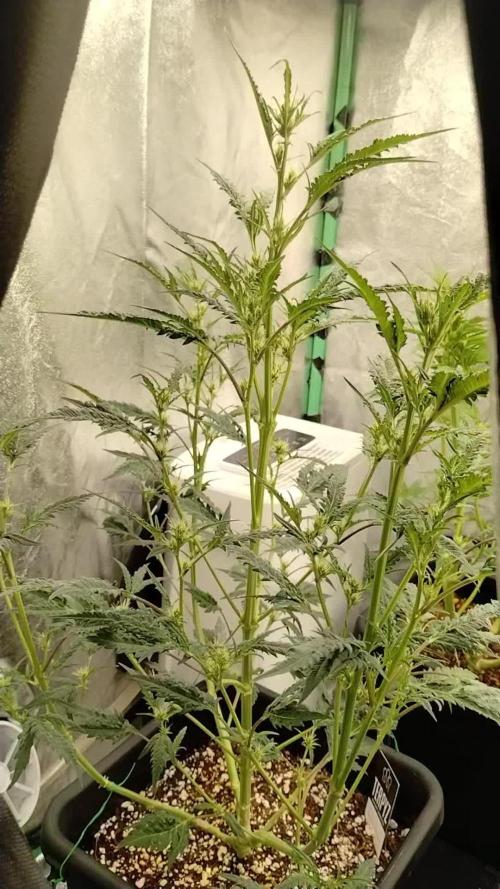
So meine kleine Kofferprinzessin befindet sich nun in der zweiten Blütewoche (im Video sage ich Growwoche, das ist natürlich quatsch) und ich glaub alles ist soweit gut. Ich habe die kleine ein bisschen mit Draht von der Lampe weggebogen und hoffe das hilft irgendwie. PS Ich benutz nie wieder so n whackn Growkoffer :/

Likes
29
Share
@Jjthejetplane79
Follow
This has been one of my better autoflower runs. Much love to fastbuds for hooking me up with these fine autoflower genetics. One love canna-fam

Likes
6
Share
@Superskunkoldskool
Follow
Swapped blue for the red CFL. Adding 1ml bloom per litre. Few tips are yellow think its having the light too close but only time will tell. All 3 plants have entered flowering stage. Due to the small grow space the plant that is directly under the LED is growing at a faster rate compared to the plant that's under the CFL

Likes
11
Share
@Paul_on
Follow
Well I had to harvest some buds from one plant of Blue Zushi as I got some bud rot I found some a wk ago and cut it away and an inch around it ,but it came back in one more cola I saved 50% of 3 colas I had to remove , I harvested the other Zushi too ,I ll show photos soon ,they are really frost after 30 hrs of darkness, I didn't want to risk any longer incase there was any mould from the bud rot still present in the plant/s ,well they smell really dank blueberry and cheese I smell so far ,with a fruity undertone. I will keep you updated on harvest and smoke

Likes
17
Share
@Northern_Ent
Follow
Oct 19: warm October continues and this plant will be harvested in a few days. Three days with snow starting 3 days from now so that’s it for the season.
Drilled a couple of holes in the trunk. Idea is to stress the plant to spur trichome production. Did this before and not entirely sure it helps, but why not?
Oct 20: these buds are getting stinkier and frostier just in time for the season here to end. Smell was quite noticeable this morning so I’ve bumped it up to Strong. All the buds are looking fairly frosty too so this Gelato is finishing strong. 👍👍
Oct 21: harvest day because in two days, Monday, it will be below zero all day and likely snow. Oh well, a longer than expected season allowed this gelato to finish fairly well. Trichomes are still white, and actually I rarely see amber trikes on my plants and I think that’s due the weak sunlight here in the fall. My best option here is to aim to harvest by the end of September. This plant was not billed as being fast flowering so I expected it to be a bit slow, plus it is a sativa pheno, so I feel lucky that it has finished as well as it did. The weather here was definitely good for cannabis this year with the only real hassle being wildfire smoke.

Likes
14
Share
@Mr_Pgrow
Follow
PART 3 of my vlog🌱
Don't forget I have single Diaries running with these beautiful Girls, Feel free to check them out !!!
Hope you enjoy, feedback welcome ✌️
Mr.PersonalGrow 🌱✌️
Likes
Comments
Share

Likes
23
Share
@Firepharmer
Follow
Flushed and chopped down!!
Vert impressed with the Futur vert flora max series led’s killer quality killer yield


Likes
Comments
Share
@MADMANk
Follow
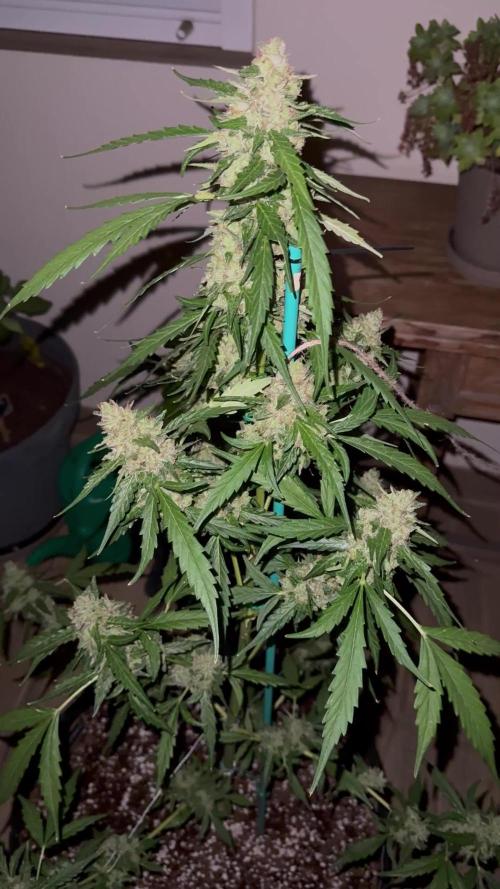
Slight defoliation of fans, as she has such a great natural structure, not much defoliation is needed!
Classic "christmas tree" / candilabra structure, super nice.
... Can see the buds on this are gunna be wild thick, along with the BBQ C GPP ✌️💚

Likes
3
Share
@NidoR420
Follow
Another disaster on day 2 of the week :pp previous one avoided as the repair held tho, but a huge storm roughened her up this time :( it snapped one of the upper branch, I was also able to repair it so let’s see. However, her soil was really dry and she was bending at more than 90 degrees, which probably broke a few if not all roots. I’m waiting to see how she evolves, she also lost a lot of stability since then. But at the end of the day she’s at the end of her flowering, around 20% ambers 80% cloudy and nearly no white pistils anymore. I still need to flush her so finger crossed
Final week!! She’s ready, will harvest somewhere during next week. Added additional pictures & videos :)) not super visible on the picture but she actually shows some purple trichromes! Look a bit maroon-ish on the video but I confirmed it’s not mold with a lens. I think we’re around 30% amber 70% cloudy now, probably will harvest it all at once.

Likes
20
Share
@420DeepGrow
Follow
"¡Finalmente llegó el momento de la cosecha de mi Lemon Mandarin de 420FastBuds! Esta planta ha sido un verdadero placer desde el inicio hasta el final. La genética autofloreciente mostró su resistencia, y no tuve mayores complicaciones durante todo el proceso de cultivo.
Las flores tienen una estructura densa y pegajosa, llenas de tricomas que dan un brillo impresionante. El aroma es increíblemente fresco, con notas cítricas que se combinan con un toque dulce a mandarina, ¡sin duda, una mezcla deliciosa!
Estoy muy satisfecho con los rendimientos y la calidad de la cosecha. El efecto es equilibrado, ideal para disfrutar tanto de día como de noche. ¡Sin duda volveré a cultivar Lemon Mandarin en el futuro! Un gran trabajo de 420FastBuds, como siempre."
Likes
29
Share
@Prilyfe13
Follow
May 10, 2024
A new week and more flushing. Both ladies look really good. Tropicana C is way too heavy for her branches. It's good and bad. It's bad because they are flopping all over. And it shows how weak these tops are. It had to be my nutrient regimen. It's good because it shows the buds are dense and heavy.
Tropicana Cookies has significantly stronger branches and can hold a lot of weight for the size of the buds. I could just be a tight fit with all the buds up and down each top. Who knows. They are starting to lean a little bit, but not too bad.
Her buds are almost all purple top to bottom and the leaves are getting lighter and lighter throughout the plant. She's covered in trichomes. From what I can see, there's not nearly enough amber trichomes on the buds. Very soon though.
I reactivated her wick system today. Her container was about half the weight as it was yesterday. Maybe now that it's not saturated anymore, the wick system will provide what it needs. We shall see later today I think.
The lighting for some of this week will stay the same. I'm just waiting for the other 2 plants in the tent to start their flush. Then I'll drop the power down some. Most likely to a DLI of 36 mol/m²/d. We shall see. I'm also curious if it will actually do anything. They are autoflowers and light doesn't really mean much. Just as long as it's on and the right DLI, it should be fine, right? Anyway, I'll drop it when the flush starts anyway. I want to see what happens.
The environment is looking a little better. The humidity is lower at 54%, but still way too high. At least it's below 60% finally. But 54% isn't much better. The temperature is pretty good at 76° during the day and 67° at night. I still can't get it down to 66° at night, so 67° will have to suffice. However, there is about a 10° difference between lights out and lights on.
Grow System Environment:
Temp: 74.1°
RH: 54.2%
VPD: 1.29 kPa
May 11, 2024
Watering day! Last watering of the grow. I'll let them dry out from now on. It should be like 4 days before they are dried out.
Tropicana Cookies looks so close to being done. Her fade is spreading and I'm guessing another 3 days? Maybe less. There is so much more purple now. Ite absolutely beautiful. She definitely will need a trichome check daily.
Tropicana C has started showing purple finally. I'd give her another 5 days, maybe a week. I honestly cannot tell. I'll check trichomes tomorrow and every day afterward. Her buds are definitely getting heavier and some even look fatter. She's definitely not quite ready, but super close.
The light power will be dropped in a couple days down to a DLI of 36 mol/m²/d. Not much else for that.
The environment is still kind of a mess. The temp is fine at 75°, but the humidity is still high at 55%. I even got the temp down to 66°. So that's good. I'd like to keep it there for the rest of the grow. I'll also try to drop the temp during the day to help bring out more color. It will also help with keeping the temp low during the drying period.
Grow System Environment:
Temp: 73.0°
RH: 53.6%
VPD: 1.27 kPa
Update: I ended up checking the trichomes anyway, and i think I know when they will be done. Just an estimate, but I think a good one. Anyway, Tropicana Cookies should be done in about 3 days while Tropicana C should take about 5 days. I may wait and harvest both at the same time. Or in between and harvest them in 4 days.
Tropicana Cookies just needs more amber trichomes. They are almost all cloudy. Very few clear, but only about 5% amber.
Tropicana C on the other hand, has a bit too many clear trichomes and no where near enough amber. 5 days should do it. 4 might be a little early, but that might be the only option. We shall see in 4 days.
May 12, 2024
Not much going on today.
Tropicana Cookies had a soaked bottom again, so I removed 1 of the wicks. So there should be about half the water going in now. She's definitely not thirsty. So very close. Anyway, she is fading quite nicely and I think she will have a whole bunch of beautiful colors. Lots of purple and some nicely fading fan leaves. Light greens, yellows a tiny bit of red. But not there yet.
Tropicana C did not have a soaked bottom today. She never does. It just tells me she is still thirsty. Which also tells me she still has some time left. Maybe 4 to 5 days, but I may harvest her in 3 to 4 days. It all depends on how she looks.
I got some trichome pics today. Just one for each plant, but they were the best I could get so there you have it.
Anyway, Tropicana Cookies looks very close. More amber trichomes, more cloudy and much less clear.
Tropicana C still has a bit too many clear, but definitely has more cloudy. Not too many amber, but more than yesterday.
I still plan to drop the DLI down to 36 mol/m²/d in a day or two. It won't really matter, but it's still important to note. It's for the other plants in the tent.
The environment is a lost cause. I can still control the temp, but the humidity is still at 57%. I have the temp at 77°, but I think I'm going to drop it down to 74°. I don't think the humidity will go up with the temp change. And if it does, back up to 77°. I'll probably get the 74° mark, so all good.
Grow System Environment:
Temp: 73.9°
RH: 55.6%
VPD: 1.25 kPa
May 13, 2024
Not much going on today. I checked trichomes and I think I'm going to harvest when Tropicana C is done. She should be done in a couple of days. Maybe 3 to 4? Maybe less? I'm supposed to be harvesting tomorrow, but I'm not sure I will. I'll check the trichomes again tomorrow, but both are there. Just a little bit more. Not too much longer though. I have 4 more plants ready to come in like ASAP.
Anyway, the trichomes on Tropicana C are mostly cloudy now, with a few clear and more amber. Maybe 8% to 10%. Just a bit more. Tropicana Cookies is a bit further with next to no clear trichomes and the same amber as her sister. Roughly 8% to 10%. She will definitely be done either tomorrow or the next day.
So I think it makes more sense to focus mostly on Tropicana C for harvest time. I really don't want to harvest an indica too early. Not to mention, the purple is coming through really quickly for Tropicana C.
Tropicana Cookies has almost all purple buds. The very bottom of the plant still has mostly green with purple coming through just a bit. It's more like pink than purple. But the majority of the bud is green. These are the underdeveloped buds. Not even worth of popcorn I think. That stuff will become concentrate.
The light intensity will be dropped tonight down to a DLI of 36 mol/m²/d. Kind of pointless for the last couple days, but it needs to be done.
The environment is driving me crazy. I can keep the temp at 74°, but then the humidity goes up to 58%. Much too high. Even opening the tent door only drops the humidity down to 52%. I'm going to need to drop the humidity in my room down to 35% somehow and maybe I'll get below 50%. This is ridiculous.
Grow System Environment:
Temp: 74.4°
RH: 56.2%
VPD: 1.24 kPa
Update: I ordered a new dehumidifier for grow tents today. It should be here tomorrow. I'm guessing a lot of my problem with the humidity is my current dehumidifier. It barely pushes air. Cheap and well used. The new one is from Vivosun. A much more reputable company.
May 14, 2024
Trichome day! Took a couple videos. The videos are kind of crappy. I hurt my back so I'm shaky.
I removed the wick system completely from both plants. Tropicana Cookies was yet again soaked. Not as bad with just the one wick, but still soaked. Anyway, I pulled the wicks and emptied the reservoirs. Maybe that will help with the humidity. They should both be dried out in a few days. Just in time for harvest.
Tropicana Cookies looks wonderful! Her buds are nearly black, with nearly black leaves. It's the darkest strain I've ever grown. Insane. She still has a day or 2 left to go. There's trichomes, but not enough. Hopefully 2 days will do it.
Trichomes are mostly cloudy, a little bit of clear and not enough amber.
Tropicana C is right behind her sister plant in the dark purple color. Her flowers and sugar leaves are getting super dark. Fan leaves are lights ing up, but not fading. I have a feeling she is going to need longer than I have been estimating. I also have a major issue with the side branches all around the plant. They are just laying down. Buds completely facing down. The branches are also super weak. I don't understand what happened. Back to trichomes. There's like 20% clear still and nowhere near enough amber.
The lower light intensity doesn't seem to being doing anything, but I'm sure it's preserving the trichomes. Maybe even helping along the plants to finish up.
The environment is still a nightmare. The temp is still fine, but the humidity is stuck at 60% again. The humidity in my room is higher than outside. I have the door open to help drop it, but it's not helping with the tent humidity. I have no idea how environmental science works. Lol.
I wonder if I defoliate both plants a couple days early, what will happen. Wouldn't it put all of its energy into the buds and increase trichome production, like a last push? I'll research this and decided what to do by tonight.
Grow System Environment:
Temp: 74.3°
RH: 59.2%
VPD: 1.15 kPa
May 15, 2024
Nothing going on today. Both ladies are about halfway there before completely drying out. I'd say another 2 days.
I was going to harvest tomorrow, but I checked the trichomes and they still aren't there yet. Plus, I think the other 4 waiting to get in the tent still have time to veg before they overwhelm their containers. One of them is very close, but I don't think she will be a problem in the next 2 days. Plus I can always train her down.
Tropicana Cookies is starting to lean more. Her branches aren't quite falling over, but they are definitely getting weighed down. She seems to have basically stopped fading. Still a lot of green leaves, but each top is essentially all dark purple. So this may be it for fading. Now I can only wait for her to ripen up. Hopefully 2 more days. I really can't push it that much further.
Tropicana C is still behind her sister by a bit. Not much, but enough for me to be concerned about harvesting them together in 2 days. I guess I'll see how the 4 other plants are doing in 2 days. Maybe I'll wait 3. Who knows at this point. It's been 7 weeks, so it should be any day.
I think the light intensity is making the smell stronger. Less intense light is keeping the trichomes nice and plump and filling with cannabinoids. So maybe it was a great idea to drop he intensity.
The environment is still kicking my ass. I can't get the humidity to drop below 60% and now I don't have much control over the temp
It's stuck at 73°. Not bad for this stage, but it's killing the VPD. It needs to be at like 1.5 kPa, but it's at 1.00 kPa. Super bad. No good. The night temp is still too high. The average last night was 69.1°. Much too warm for night temps. Maybe that's what is taking Tropicana C to turn purple. She's getting there definitely and should be the same color as her sister. They are the same phenotype after all.
Grow System Environment:
Temp: 72.9°
RH: 63.0%
VPD: 1.00 kPa
May 16, 2024
The final day of the week and I think I need to harvest these 2 tomorrow. The 4 Sour Diesels I have in my 2x2 tent are starting to get bigger and will need more space very soon. Not to mention, they are in my 2x2 tent I use for drying.
Tropicana Cookies is basically done. I didn't check her trichomes today, but all the buds top to bottom are purple. Lighter purple in the lowers, but those are popcorn and larf, so I'm not so worried. She also seems to have stopped fading. She's nearly dried out now. Probably tomorrow right when I need to harvest.
Tropicana C on the other hand has her trichomes looked at today. Made a video and took a pic from it. Anyway, the trichomes are much more cloudy now and maybe 7% amber. She should go a few more days, but I still have the dilemma of the other plants. I guess it all depends on how they look tomorrow I guess.
She hasn't started fading yet, but more purple is showing up everyday. That's another reason I think she could go a few more days. She still hasn't even begun to fade. She's about half dry, but if I have to, I'll add a half gallon of plain water tomorrow to see if she fades at all.
I may have to harvest Tropicana Cookies tomorrow and then Tropicana C a few days later. I should be able to fit 4 more 3 gallon containers in the 3x3 with just the one plant gone. It'll be tight and I'll need to Tetris the shit out of it, but I think I can manage.
One thing I haven't thought about until now is drying itself. If I have to harvest separately, the 2 to 3 day difference will mess up the dry for the first one harvested. I think? Maybe not. I have a plan. Instead of hanging them next to each other, I'm going to hang them on top of each other.
So the first will be Tropicana Cookies on top and later in Tropicana C on the bottom. Theoretically, with this setup, I could control the humidity a bit better. When Tropicana Cookies is nearly done and needs the extra humidity for that even dry, Tropicana C will have brought it back in and I should be able to hold it around 60% for the rest of the drying time for both plants.
Lighting doesn't matter anymore. It's served it's purpose and I could technically take one out now for a 2 day dark period before harvest. But if anything, I'll wait for tomorrow. I honestly didn't think about the dark period until now. Haha. Whoops. That may just solve problem entirely. I don't have to wait for harvest time.
My other plants won't get too big and I can put them in the 3x3 more comfortably. I can also harvest both plants at the same time. Or, if I have room, I can place Tropicana C in the dry tent on the bottom while Tropicana Cookies gets hung up. I don't think there's enough space though.
Anyway, I think the best course of action is to put Tropicana Cookies in the dry tent for a 2 day dark period and harvest both when Tropicana C is ready. Then I can see if there's a difference between lights all the way to harvest or dark for 2 days. Fun!
The environment is the bane of my existence. The new dehumidifier is definitely stronger than the old one and more compact. I even left the old one in there as well. Both running at the same time can only drop the humidity to a solid 60%, but my room is 63% and I can't do anything about it. I also have the tent completely sealed off. I think it's helping to keep the humidity from climbing to 65% or 70%.
I have the temp up a bit to 76° and 77°. Just to help a smidge with the DLI. The only thing I have an advantage with is my ari flow and spread canopy. There's 2 fans blowing around air and the exhaust. It should help prevent mold or bud rot, but with such high humidity for days, I can only imagine something bad is happening. Maybe not bud rot or mold, but the chemical composition of the buds? I dunno. I haven't learned that much.
Grow System Environment:
Temp: 74.8°
RH: 62.8%
VPD: 1.07 kPa
Likes
17
Share
@CanadianFillmore
Follow
Welcome growfessors to the harvest of Mandarin dreams! These 5 ladies got chopped down this week, the three pheno 1 strains have nice dense buds, very sticky! One pheno 2 is very fluffy, airy buds and the other pheno 2, is someplace in between, not rock hard, but close to it.
Last time I'll be growing this strain, she was easy to grow, but not a smoke I enjoy, the indica hits harder as the buds cure and I'm not that interested in couch lock.
Will update in 7-10 days with dry weight.


Likes
74
Share
@AsNoriu
Follow
Day 88. Girl down ;)
Think she will be in 70-80 g area, with about 50W light per plant - not bad ;)))
Presume all girls left will brake that plank ;)
Happy Growing !!!


Likes
18
Share
@Grower_Of_Persia
Follow
week intel:
we reached the peak of flowering stage and need to cause a little more e.c stress from this week so e.c stress is twice a week
i reduced the amount of Nitrogen and calcium and stopped feeding silicate in other hand i raised the amount of base nutrient and booster
short story version: more K & P - less N
stresses :
a little E.C stress around 1.6 and 1.7 twice a week from this week
feeding:
i feed them 3 times this week with this order :
day 1 : i feed them high with base nutrients(calcium & micros (half dose) + Bloom) about 822 ppm - 1.6 e.c to cause a little stress.
day 3 : i feed them low dose of Top-Max + B-52 around 525 ppm - 1 e.c to let them recover a little but not fully recover still a little stress will caused.
day 5 : i feed them high dose of Feeding Booster around 850 ppm - 1.7 e.c to cause e.c stress again
guide of the week :
from this week we can cause more E.C stresses.
e.c stress if done correctly is one of the very few ways to increase quality in all aspects ( color , aroma , taste , bud structure , resin contents ) but if you over do it , listen carefully brother : it can reduce quality in every aspect so always look for signs and never reach the red line.

Processing
Likes
17
Share
@greennug
Follow
grow room adjustments this week. plants are now more spread out under a total of 5 600w HPS lights. 3 fastbuds plants have an additional 45w LED light. by week 3/4 they will occupy my whole grow space and an additional 3 600w HPS lights will be added.
Plants are looking healthy and 10 or so have been topped for the first time on day 8. dinafem cookies are looking very good in structure. will upload pics every day until harvest! thanks for looking. UPDATE day 12 veg, they are looking beautiful better than i expected. there are 36 in 15litre pots now and i cant wait to make my final grow room upgrage next week and for my room to be looking like a forest! im hoping for 2-3kg off these girls and only time will tell. i will keep doing daily updates until harvest


Likes
Comments
Share
@Lushgaia
Follow
Some of the leaves starting to yellow slightly but as it’s coming to the end I think I will let it ride out might give a little pk booster but that’s about it
Processing
Likes
20
Share
@eldruida_lamota
Follow
Bueno ya tenemos limpita la raices de esta farm cheese y pronto tocará matarile , unas semanas más que aguante y pronto se podrá consumir.
Vaya ejemplar en serio muy recomendado todo lo que gira entorno a la genética cheese, y es que los olores son increíbles , y laplanta es brutal solo hay que ver que planta y que flores que saco ...
Ph regulado 6,5 quitamos productos ,procuramos no aumentar la humedad más de 45% , temperatura media de 26 grados .
Pronto nos vemos buenos humos fumetillas

Likes
8
Share
@eldruida_lamota
Follow
Última semana de floración de estas candy caramelo y es que vaya flores son como rocas muy compactas kio, de lo mejor que e visto también en mucho tiempo fumetillas.
Plantas pequeñas con un buen porte y un buen grosor de tallo, son bastante rápidas a la hora de florecer, os aseguro que las aguantaba una semana más pero por temas de virus y tal decido cortarlas ya que también están bien bastante contento en verdad con esta varieddd.
Mantuve ph hasta el final controlando humedad y temperatura pocas veces desvarío el asunto.
Muy muy contento zambeza hizo un fast bastante curiosa con olores dulces .


