
Likes
Comments
Share


@CanaryGrow
Follow
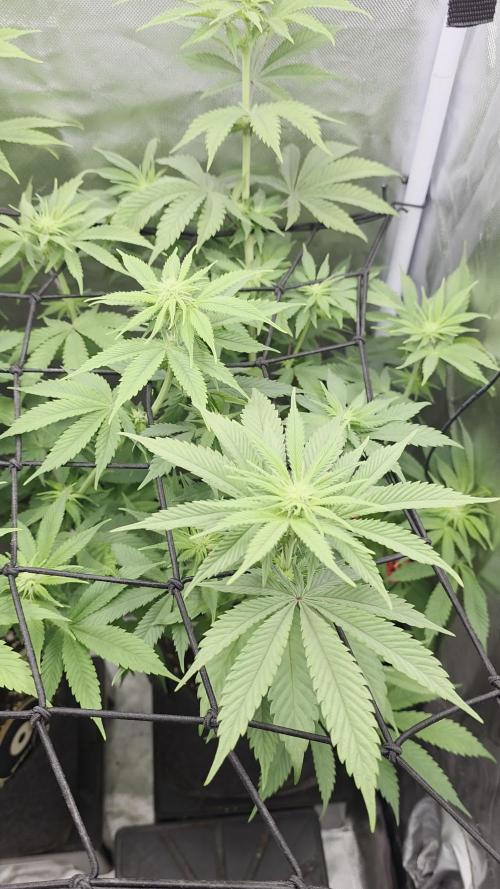
Big transformation in 1 week, plants are covered with buds, they didnt get a lot of stretch, the buds are just stacked. I did a massive defoliation on Sunday, removing more or less all the fan leaves i could safetly cut off without damaging bud sites. A lot of light for all the buds.
Some problems start to occur. First all the leaves got their tips dry and they twist up, i thought its nute burn but supposedly its cal-mag deficiency, so i am adding it to my nutrients now. I also got attacked by caterpillars, i found a couple but recent bites looks like there is more. Search and destroy mode + BT.


Likes
4
Share

@CheeRz
Follow
It's week three of flowering, and the ladies are doing really well. The net has been installed, and the plants have been moved into position. Fishmix has been removed, and Bio Grow fertilizer has been used for the first time. I also defoliated and lollipopped both plants. Small buds are forming, and you can start to smell them a lot. 💚💚💚💚

Likes
20
Share


@Wackytabacky_420
Follow
🚨 Northern lights week 8 update 🚨
🚨 week 5 of flower!! 56 days old!! 🚨
This lady is so heavy I had to add a support strap to hold up the main flower!! I have to give props 2 @growerschoiceofficial 4 this beauty!! She is maturing with every moment given under her beautiful light by...
💡light sponsor💡
@marshydro_amazonled
@marshydro12
#marshydro
#TSW2000
Low stress training clips-
@madmadameplant
@madmanplant
Www.madmanplant.com
Other companies in this grow-
@foxfarmsoilandfertilizer - 100% ffof
@acinfinityinc - fabric pots
@generalhydroponics - flora trio line
@vivosun.official - inline exhaust fan
@opulent_systems - 4x4x80 grow tent
@growerschoiceofficial - 2 Northern lights seeds
This was the feed schedule 4 this lady 4 the week...
2/9/2022
2ml cal mag
2ml micro
1ml gro
2ml bloom
1/4 ml ph down
Ph 6.44
563 ppm
Solution temp 72.4F
2/13/2022
2ml micro
4ml bloom
1/4 ml ph down
Ph 6.28
410 Ppm
Solution temp 73.2F
Well that's it 4 this week. Till next week Best of luck and Happy Growing!!🌱💚💨🔥🔥🔥

Likes
14
Share


@eldruida_lamota
Follow
Vamos familia septima semana de floración de estás Punch Pie de RoyalQueenSeeds .
Que ganas tengo de ver el final de progreso de esta variedad, las plantas están sanas, se ven con buen color.
La cantidad de agua cada 48h entre riegos, nutrientes de la gama Agrobeta.
Y entramos en la recta final, últimas semanas de floración ya, y como se están poniendo las flores.
Estas próximas semanas veremos cómo acaban.
Mars hydro:
Code discount: EL420
https://www.mars-hydro.com/
Agrobeta:
https://www.agrobeta.com/agrobetatiendaonline/36-abonos-canamo
Hasta aquí todo, Buenos humos 💨💨💨

Likes
Comments
Share


@TTerpz
Follow
One has a helmet hat gonna keep an eye out on her
Update: Helmet hat came off
2/16 update: all 3 doing well
Likes
18
Share


@Bread_n_Buds
Follow
We have passed the month and we are madly in love with all our autoflowering plants, we have two per strain, one worked with a mainlining adapted according to the characteristics of the plant and one that grows straight, we can't easily give up the main cola.
For now we will show you those worked with the techniques that are more interesting to see and later planted earlier to make them finish more or less together with those that will grow straight and fast.
Our Do SI Dos worked with the Main Lining is taking on a bonsai appearance that we don't mind at all. This is due to the fact that it is a plant with a low internodal distance, it tends to lignify very quickly because this distance is short and therefore you have to be very delicate. We have succeeded and the plant really looks good, it is small but in flower it will be really beautiful to see.
So topping at the third internode, main lining, no pruning until the third internode and topping them so we have multiplied the buds adequately.
The application of the techniques is a delicate moment also for fertilization. The topping slows down the growth of the plant a bit and does not make it require all that Grow fertilizer that is normally recommended. So you have to go really slow and understand when to reduce the nitrogen. Better to prepare the soil with fertilizers to mix with the soil probably. The problem is sweeping now that it is going into flowering, the plant has shown the first fluff, declared the sex, and the fertilizer will be of short use indeed. You have to swell.
In any case, everything is under control and I will demonstrate it to you during the flowering phase. Wait for the Uncle BreadandBuds and see what he does.
Remember the cold temperature makes the girls absorb food much more slowly than in summer so be careful to give the right amount and to dry the plant in maximum 2 days or you risk imbalances.
We are still using soil, feeding and all the recommended additives from Plagron 100& organic we have only lowered the amount of grow in this topping phase for the reasons above.
---- Decide on the right soil and calculate your fertilizer schedule based on the soil on the official website.
-- www.plagron.com
Try a seed of this strain that drives us crazy..
---- https://www.zamnesia.io/en/10664-zamnesia-seeds-do-si-dos-f1-automatic.html
Zamnesia Description // From the team at Zamnesia Seeds comes Do-Si-Dos F1 Automatic. Using consistent and reliable F1 genetics, this strain is not only incredibly easy to grow, but also offers potent and delicious buds. The plants remain small and offer a reliable growing experience that everyone will enjoy.
All the best that mother nature can offer is on ---- www.zamnesia.com

Likes
13
Share


Likes
20
Share


@ukterpdoc
Follow
LST DONE TODAY NEARLY ALL OF THEM 2 JUST SEEM POINTLESS TO PULL AROUND BUT

Likes
5
Share

@HOMEGROWBOOK
Follow
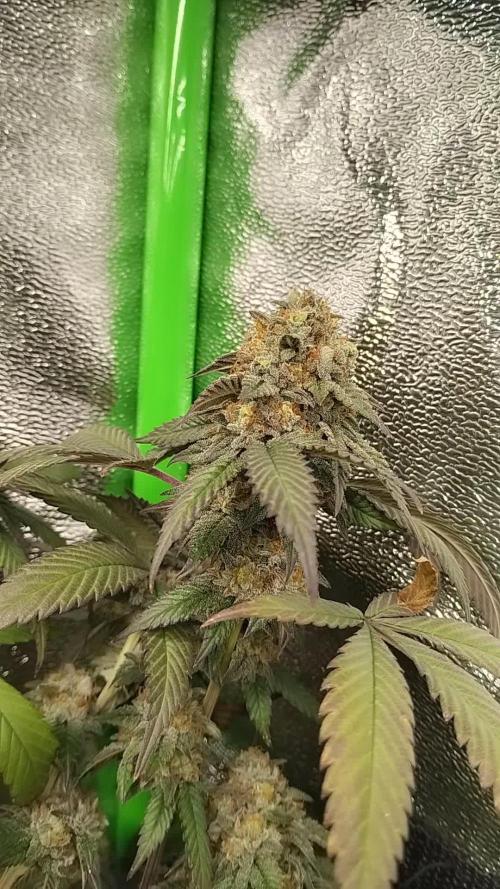
This week marks the long-awaited harvest of my 24K Gold.
After several close trichome inspections, she finally reached the perfect window: mostly cloudy heads, with the first amber trichomes appearing on the upper buds.
Perfect timing for maximum potency and terpene quality.
⸻
⚖️ Yield (Wet Weight)
📦 773 g wet (confirmed on scale)
This number includes the full plant with branches after a light wet trim.
Final dry weight will be added after 10–14 days of drying + curing.
⸻
✂️ Harvest Process
• Removed fan leaves only
• Performed a minimal wet trim to keep most trichomes intact
• Entire plant cut at the base
• Hung upside down on a full drying line
• Goal: slow drying for best flavor
⸻
🌬️ Drying Environment
• Temperature: 18–19 °C
• Humidity: 52–55%
• Airflow: Soft and indirect
• Estimated drying time: 10–14 days
This setup should bring out the full citrus-diesel profile 24K Gold is known for.
⸻
💎 Bud Quality & Aroma
24K Gold showed its signature traits strongly:
• Extremely frosty buds with thick trichome layering
• Long, twisted pistils turning orange/brown
• Tight, medium-large bud structure
• Sticky, resin-heavy trim work
• Strong smell: orange zest × diesel × kush
This pheno produced some of the frostiest buds of the whole run.
⸻
🌱 Plant Behavior
24K Gold stayed healthy from start to finish:
• No mold or late-flower issues
• Responded very well to training
• Thick branches, strong stretch
• Zero nutrient sensitivity in late flower
A very reliable and rewarding cultivar — definitely one to grow again.

Processing
Likes
70
Share


@CBD_Sweden
Follow
2017-09-11. Kl 12.00. Week 3 starts. I have cleaned the whole room for the new week and gave the girls water and nutes. Added videos and pics. Girl is 11 cm high.
---------------------------------------------------------------------------------------------------------
2017-09-12. Kl 10.00. New pics and video.
--------------------------------------------------------
2017-09-13. Kl 22.00. Added new video.
----------------------------------------------------
2017-09-15. KL 10.00. New pics and video. The girl is 14 cm high.
---------------------------------------------------------------------------
2017-09-16. Kl 10.00. The girl is starting to grow little better now and i hope she is picking up the pace. Added new videos.
Likes
46
Share


@Cannabeast40
Follow
Welcome back to my summer grow🙂
Everything is still in need for more, more light - more nutes - more airflow and last but not least, more ir/uv 😎
Also gaining alot of weight so that’s also great, might need to tie this one up asap😊
Hope to see you again next week 😎
-------------------------------------------------------------------------------------------------------
SpectrumX LED🔥 @medicgrow
880 Watt⚡️
2x UV/IR LED panels 💥
2.7 μmol/J🔥
Full Spectrum V1,F1,VS,FS🌈
Display with PPFD & Live spectrum
Light measurement: Apogee MQ-610 & Apogee DLI-600.
Fertiliser:
Organics Nutrients
https://www.organicsnutrients.com/en/
Green Buzz Nutrients
Discount Code: GD42025
Grants 25% with a minimum Order value at 75 Euro.
https://greenbuzzliquids.com/en/shop/

Likes
4
Share


@LittleBigTrees
Follow
I've been pulling the top fan leaves to stop the main stem growing any taller and repotted them into 4L pots, once they show roots I'll flip them over to flower.
They've all outgrown their mutations but the apple fritter has a slight varigation.


Likes
4
Share


@Donniedanko93
Follow
Harvested these girls at the 9 week Mark I could have pushed another week or so but there were amber trichomes and the temp were getting crazy in the wardrobe this time of year but everything had turned out sweet! The girls look and smell amazing frost everywhere. Forbidden runtz is still growing see how she goes. Fastbuds are reliable ❄️💣
Likes
11
Share


@Rangaku
Follow
Mad max is just full of buds now , couple of fingers thick and still chunking up , sticky as and loaded . Another bangs from Dutch Fem

Likes
2
Share

@AestheticGenetix
Follow
7/15/25 I'm super impressed with this plant. I kinda wanna try so sts spray to create some fem seeds from her.
She was labeled as sativa dominant but the bud structure is very indica style. Just chonky golf balls everywhere
Fed her for the last time before chop. 3tsp of bloom booster from roots organics and 2 tsp of microbe charge and 2 tsp of uprising foundation
Likes
27
Share

@eldruida_lamota
Follow
Vamos actualizar la tercera semana de crecimiento de estas Biscotti de RoyalQueenSeeds.
Están sanas pero tuve un error grande, la primera semana dejé desenchufada la extracción y se ahogaron un poco, me di cuentes pronto pero el daño está hecho, están más pequeñas de lo normal, lo bueno crecerán y se desarrollarán bien igualmente.
La humedad es perfecta, la temperatura me gustaría tenerla par de grados más abajo pero aún así es pasable.
Empiezo aplicar el flash root de Agrobeta y Blue line A de Agrobeta.
Esta semana añadí tucán y gold joker también de Agrobeta.
Mars hydro:
Code discount: EL420
https://www.mars-hydro.com/
Agrobeta:
https://www.agrobeta.com/agrobetatiendaonline/36-abonos-canamo
Hasta aquí todo, veremos como progresan pronto. Buenos humos 💨💨💨
Processing
Likes
7
Share


@420portois
Follow
Début d une nouvelle expérience j espère que je vais réussir

Likes
10
Share


@RandomStreetMerchant
Follow
This week was good, the girls are bulking up and looking good. The twisted sister looks like she is coming back around.
Going to veg these girls out for a while see how thicc we can get ‘em.
Until next time growmeis, best of luck ✌️ 06/26/23
