
Likes
Comments
Share


@rackstacked
Follow
Plants are going great, top dressed and been watering with 1 gallon for all plants. No problems flowering great, couldn’t be easier.


Likes
Comments
Share


@Trichoma
Follow
This week I topped plant , so we can traine it later on. Each plant hat now 4 main nodes.
I also noticed some Mg deficiency on the leaves not sure what result from likely some strain related issues. I added two times 1g Epsom Salt per liter water.

Likes
31
Share


@Pedrojuan
Follow
Bueno, en el inicio de la fase de floración, hemos cambiado la solución nutritiva con ml x ltr , metí la red scrog y he notado que esta cepa se estresa con facilidad, tras el cambio de agua y nutrientes y la red quedaron full stress, poverine... Empiezan el fotoperiodo con mucho olor a vegetal y esto me hace temer que tendrán mucho olor los futuros cogollos... esperemos tener suerte también en este cultivo. Estoy muy contento, no pensé que gracias a ZOE SPACECAKE me iba a apasionar tanto cultivar el cannabis.

Likes
9
Share


@Johan2
Follow
Pulled day 59 of flower could waited a week more.Reasonably happy with the outcome.
Very incense kind of smell but chocolate taste.
Made some bag shake hash , about
2gms - lots of cloudy trycs in the hash. It’s worth checking the quality of the shack hash with a microscope. have made 400gms of canna-butter for edibles.
Not a bad yield . I was expecting a bigger yield.
Looks good in the jar .

Likes
12
Share


@SHEESHinja
Follow
On the first day of the week 8 L of water 8 ml FF. It came out 350 ppm 👍 Next, drying.

Likes
9
Share


@High_Grade_Dadli
Follow
Transplant after week 1so far so go..jus a lil a bat guano no major feeding yet


Likes
17
Share


@Huntress007
Follow
Yea she looks beautiful can’t wait to see her flowers nice shape goin on! 🌸💕

Likes
12
Share


@Jays_Not_Here_Man
Follow
Nearing the finish line! OMG these ladies are blowing me away 😳 the Tricomes are carpeted, the buds are fat and dense. I’ve been. Tapering off all the nutrients and feeding ph’d water until I get 10-15% runoff from the pot to help break up the pockets left behind and to use up what’s left in the plant. Have some very distinct phenos, all of them are stellar but there are a few standouts… won’t be much longer 🇨🇦👊❤️

Likes
6
Share


@BudeCo
Follow
Semana terminou com mais uma poda e defoliação, feito preventiva.
Dia de aproveitar e guardar alguns clones.
Uma flor de Industrial Plant x Girl Scout Cookies F2 que fiz em 2014, sementes germinam muito bem. Ótima flor com perfil aromático old school, Kush, bem terroso e com nota de coca cola. Leve picancia e nada doce.


Likes
10
Share


@CanarianGrow92
Follow
Last week for our C-vibez grom dutch Passion! 🇳🇱
Awesome strain, fruity and citric smell with very hard and sticky buds, we see trichomes all over the plant and leaves!
This strain is close to one of my favorites so far.
This week we continue with water and in some days we will harvest!

Likes
35
Share


@IbeBryBry
Follow
Wow Gnome Autos, while I seem to not have grew the blue pheno, the response and multiple budsites just from lst is amazing. She's behind her colleagues in the tent but definitely the largest of them. Really excited about this strain and up and coming breeder.
✌️ ❤️ 🌳
P.s. Gnome autos if you see this hook a growmie up with an Anvil bean or 2, I can't find them anywhere 😅

Likes
15
Share


@GanjaFarmerGrow
Follow
Finishing up...
she is amazing...
HUGE buds...
amazing haze fruity smell...
She is in flushing so only water for the last days...
hope she goes good till the end ...
fingers crossed..
🙏


Likes
35
Share


@Kingseeds
Follow
The selection of Green crack was one of my best cultivation experiences.she obvious points can be noted that having high trichomes and resistance to disease and stress can be mentioned.flushing 7 days and Bringing ppm below 300.harvest in 65 days and drying in 17 ° C and humidity 55% a and curing in 21 ° and humidity 60

Likes
6
Share


@Hashishi
Follow
Lemon tree can endure pain, cold & hot weather, seedling is really a strong genetic, huge root mass for 2 week seedling, now I'm using Biobizz soil + dry leaves on top from past harvest

Processing
Likes
18
Share


@desijones
Follow
It's been a pretty interesting last couple of weeks. Gorilla Zkittlez have quite the stretch in early flower. So far they have tripled in height, but goddamn they're frosty. The Canuk Blueberry doubled in high and is now packing on a little bit of weight.


Likes
8
Share
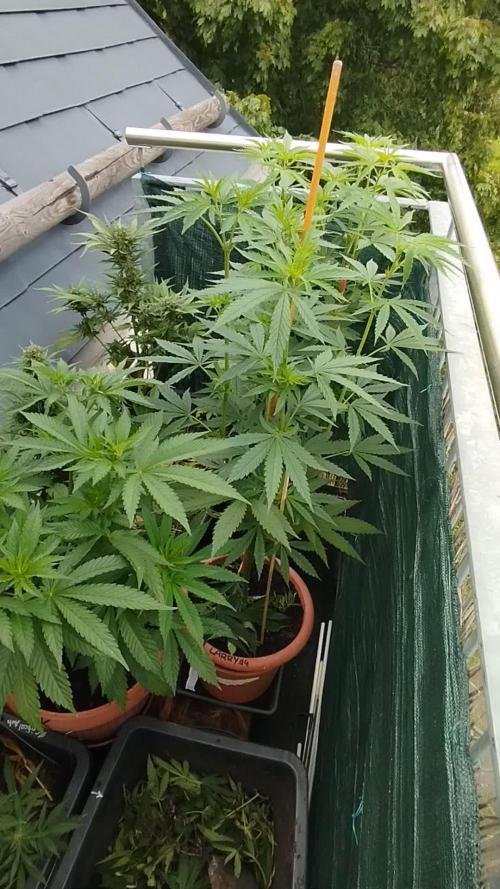

@GermanGrow182
Follow
Wetter war wieder sehr Abwechslungsreich. Die Photos wachsen weiter gut. Das Stickstoff Reservoir (hornspäne als Langzeit Dünger) ist noch nicht aufgebraucht. Larry Lemon und AK wachsen gleichermaßen gut und verzweigen schön.
Die automatischen sind in der vollblüte und stehen noch ca. 2 Wochen, wenn vorher kein Schimmel kommt... Soweit so gut 👍 bis nächste Woche ✌️


Likes
30
Share


@Virginia_Nugz_540
Follow
So this grow wasnt to bad considering it was my first indoor auto grow. For the most part I am satisfied with. However I will stick with the high end genetics from here on out as I want to grow the dankest of the dank and this is what I enjoy doing so why not do it the best way possible with the best names in the game. Stay tuned to see what 🔥 I’m growing next!!! Thanks for tuning in and as always stay Smokey my Friends!! 💨💨💨
