The Grow Awards 2026 🏆 


Likes
Comments
Share
@Northern_Ent
Follow
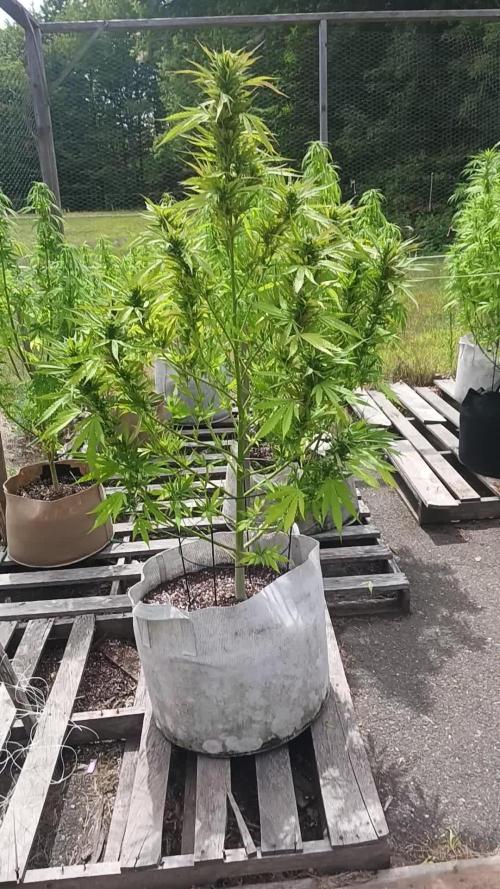
July 20: smoke arrived this morning to go with our heat wave. Awesome. Extra watering, misting air, and wetting the sides of the grow bags with hose water to keep things cooler and hydrated. So far so good in the heat.
Did foliar spray of Extreme Blend and potassium silicate.
Also note that for all my grows I use apple cider vinegar for pH adjustment and a Dr Bronners liquid soap as a wetting agent (surfactant).
Euphoria is doing great, but to ensure that it finishes early enough for this latitude (53N) where the UV light gets very weak after mid-August, I’m starting the force flowering tonight. Already starting to flower but I want a strong flower set and as much flower growth under strong sunlight as possible.
Force flowering schedule is 2-3 weeks of in dark garage at 9 pm followed by 730 nm far red light and then back out at 7 am. The light initiates dark mode 2 h faster so it’s like having a 26 h day. Good trick use as a bloom booster, also moves up the finish 2-4 weeks. So, 10+2 is 12 h dark and 14 h daylight. Might sound bogus but it works.
July 21: first night of force flowering caused a big stretch. Notably stretched after darkness in hot garage overnight. Hot outside overnight too but was much hotter inside garage and recorded here as 24 C. Seems okay and high overnight temperature might be ideal at this early flowering stage. Warm overnight temperatures continue for a few more days.
July 22: record hot overnight low forecast for tonight of 24 C and feels like 27 C with humidity. Wow, that is really incredible for here and 13 C above historic average.
July 26: six days into flowering and she is doing fine. 👍👍

Likes
11
Share
@SteffenX
Follow
18.10.2024
very humid and little sun on the west side
21.10.2024 day 187
Beautiful sunny day, then powdery mildew discovered and started the 3rd harvest.

Likes
2
Share
@TheBudWhisperer
Follow
End of the first official week of rooting for these WalkerBerry OG cuts. We’re down to 6 plants and 2 specimens of each. It’s been 4 days since initial cutting and they’re already showing small signs of rooting.
I’ve had nothing but success with this little home made aerocloner for years and it’s just so much easier and less hassle than all the humidity domes and mats etc. nothing against it - I’m just lazy and all that stuff is a pain in the ass.
As of now - all the leaves on the cuts have started to ball up in confusion as they shift focus to more root creation. They want to flower but know they can’t so I expect to see re-vegetation in another few days.
After that we’ll probably have to look at some sort of impromptu dwc system as this container likely can’t take even half of em through full term through pollination. We’ll look to re-initiate flower as soon as they’ve got some decent developed root growth. Alls good here👍.
***update - all clones showing good root growth in only 7 days. Upping to a full Rez in a couple days.
Likes
Comments
Share
@wizard_of_bel_air
Follow
3rd week, transplanted to 1 gallon containers. Adjusting light to coincide with southern California sunrise time.


Likes
25
Share
@Heady_McDank
Follow
Stressed out plant went from the branch straight into thé freezer, made some Nice icolator hash from it, 50 Nice grams hashies tried one of thé 25micron sift and damnright its à sativa 😁
All will be pretty fine for sure upcoming monts 🙃
#SeedStockers
#CNNBS
#MillsPaysTheBills
#cultureIndoor
#Indoorled
#MisterySativas2
#BubbleatorBQuick
#ZamnesiaWebShop
Likes
71
Share
@ClubRiot
Follow
Zkittlez Feminized by Club Riot Seeds ( www.clubriotseeds.com )
Week 1
0.5L Pot
LED: MIGRO 200 (210W) for Veg. Stage
Canna COCO
Seeds are put at germinated in wet paper towels for 72 hours
Name: Zkittlez Feminized
Genetic: Grape Ape x Grapefruit
Type: Feminized ( Indica Strain )
Indoor Yield: 80 ~ 140 grams/plant ( 15L Pot ) with LST growth technique.
Indoor Height: 70 ~ 110 cm
THC: Very High
CBD: Low
Flavour: Grape , Sweet , Berry .
Effect: Relaxed , Happy and Euphoric.

Likes
33
Share
@Mr_Pgrow
Follow
What an amazing auto to grow.
She gave no problems whatsoever.
She loved her weekly compost extraction watering and responded brilliantly after each.
Although slightly overshadowed by her growing room partner, she still managed a pretty good yield
Weighting in at 52.3g of flower, probably the dencest and hardest buds I've grown so far.
Also pulled 18g of trim for extraction.
Follow me here
https://www.theweedtube.com/user/Mr.PersonalGrow
Likes
21
Share
@hydroponicganja
Follow
nov 20th final defoliation.
week #6 starts 21st nov.
(1) Kush i didn't really do anything to, more of a natural grow so i can see what training vs non training will do. that's how you gain experience I would think.
(2) Kush - LST
(3) Kush -LST + Top
(4) AK Auto - LST + Top

Likes
14
Share
@JBalz
Follow
Pros: Well bouyz after 2 weeks of beasties and following a good flush the nugz are stacking up nice and dense. Blue dream have awesome, thick towering branches and no doubt will lead to some monster buds. White widow had some good growth but slower than the others but the trichrome production tops the others. The center gold leaf is still taking the lead on size and will most likely produce the most.
Cons: the behemoth gold leaf in the corner would not slow down and is now, I believe, rootbound and possibly suffering from some rot. Select leaves in the center are turning yellow with brown spots and falling off. It doesn't seem to be affecting flowering but I took precaution by giving it a shot of root doctor. The white widow in the center is showing similar signs but at a way lesser extent. Could just be me overreacting but a few of the leaves are yellowed and wilted with small black spots (usually a sign of root problems). I usually leave some foliage randomly hanging at the lower section of the plants to remedy any problems that may arise before it gets out of control. Hopefully these issues don't progress and I can reap the rewards of a bountiful harvest. 4-5 weeks remaining.

Likes
45
Share
@masterofsmeagol
Follow
7/3 Hot as fuck today. Japanese beetles were around. I killed a few. I'm going to have to go over and keep an eye on things. It reached 90° today for the majority of the day. I watered around 1pm as I noticed most of the bags were very light. I'm glad I held off on the BT. I've dealt with jpn beetles before so hopfully that won't be an issue. Things are getting big. It won't let me upload any pictures or the video I did. I may upload it to past week. Went back over at night and and plants looked dropy but it was after 7pm and they were just going to sleep.
7/4 Didn't take photos this morning. Found some jpn beetles. That's the damage I've been seeing. I went back over last night to hunt them but I only got two. There weren't any others. No biggie. I'll put some pics up from today after I get back
7/5 Didn't get a chance to check the plants out today. My intuition tingled around 1pm and I had just gotten home and I ran over to check them. They displayed minor signs of heat stress as seen in the pics (due to the super high humidity and 90° weather) and the bags were light. A few were REALLY light. I could see they needed water. I WATERED 4 1/2 GALLONS TO THE GARDEN. DO TO THE HIGH TENPS AND WINDS IVE HAD TO WATER THE LAST THREE DAYS IN A ROW. IVE SLOWLY STRARTED INCREASING VOLUME. I don't want to water until I get a shit ton of run off because I want to keep the nutes in my soil as long as possible. As you can see things are going great. Minor pests but notjing major. They're growing at a very rapid pace. I'll need to add another layer of supports soon and begin to LST some of these girls. I've got one seedling in a 10 gal and I'm pretty sure it's a feminized red runtz but it's in preflower and looks and SHOULD be a female but I haven't seen the white hair yet. Looks like a female preflower though. I do have one auto though in a 5 gallon tjats doing good too. I have a bunch of pics but the internet is too slow. I'll upload tomorrow. Started pouring around 6.
7/6 Poured sheet rain all night. After it had Bern super fucking hot and I watered my plants with 4 1/2 gallons. Oh well. If I didn't water we wouldn't have gotten the rain. The fabric bags makes watering easier. The wind will dry out the medium. We do have some rain in the forecast. A pallet fell over and knocked my 5 gal bucket with tje auto into a 10 gal seedling but it held the pallet up and didn't damage anything. Out of all the ways it coyldve landed it landed just right to not hurt anything. Everything is super healthy. I do have some random pest damage but it's minimal. I'll decide whether to use a spray or not. Didn't take pictures this morning. Was pressed for time.
7/7 Super hot even at 8a.m. Rained the majority of the day yesterday. Plants are getting HUGE. I'm going to have to build a second round of supports and should probably start some LSTing. They seem to like growing natural how they are (besides the original topping and FIMed. You can tell these are ALL very high % indicas. I'm seeing pistols spitting out everywhere. Event horizon and sherb cake seem to be in the lead. The seedlings have realky taken off. The one I put in the 50 has fan leaves the size of my hands.
7/8 Wow it has been extremely hot. It's going to be in the 90's again today. Checked my plants and it seems the GMOs seem to be using more water. Those bags were a little lighter. Seeing how there is no rain in for a few days I had to water. WATERED 3 1/2 GALLONS. LAST SEEDLING FINALLY SHOWED AS A FEMALE.
7/9 Bags are still heavy. Found ONE jpn beetle this morning. Plants seem to be bigger everytime I look.starying the stretch and spitting out some pistols. I took some pics of the pistles. I'll update
7/10 should've started a new week but I didn't. I'll make next week six days. Plants are starting ro stretch. Minor random pest damage but woth the heat they need lots of water. Noticed a couple dead interior leaves so I should probably go through everything and defoliate. I need to add another layer of supports as well.


Likes
22
Share
@Naujas
Follow
well, that day dawned :) growing in a suitcase was really difficult, temperature, humidity, plant growth, everything was very difficult to control, but I managed something, it was an extremely interesting experience :) 119 gr wet, I think it will be between 25-30 gr dry , which I think is really good from the suitcase :) it was something different than usual, and now I'm going to grow another begina, which is much bigger than this one :) good luck to everyone, and thank you.:)

Likes
134
Share
@BigDaddyK
Follow
Day 50 - Tuesday 4/12/18 - Today is my birthday I’m 47 , yeah great , as with all ladies dramas always lead onto further dramas , last night the power tripped again , and was off for 5 hrs , I opened up to see this ,FUCK , there was no water in the reservoir and she didn’t look great , my first thought was there must be a leak , but on further examination it became clear I forgot to plug the air pump s back on . I’m not sure if she will pull through , I fking hope she does , it shows you how quick things go Pete Tong in DwC , please all give me hopes and likes , because 1 like = 1 prayer .lol fingers crossed 🤞
I should add - first thing I did was add plain water , then after 30 mins I refilled the reservoir with fresh solution
So upon further investigation I found an air pump which had failed , subsequently the water sucked back and probably shorted in the night .
Day 51 - Wednesday - doesn’t look that great 😩 bottom is still lifeless , I sang I will survive to her , gave her a misting ,told her I’d buy her a Gucci handbag if she made it ,topped up with 1/2 litre of water
It’s touch and go here , it might look like it’s getting better but the leaves are yellowing quite drastically.. these next few days are critical
Day 52 - Thursday - she is not drinking or feeding much at all , I think I will have to remove some of the damaged sides ,leaves continue to yellow , this was a major trauma for her
Day 53 - Friday , I decided to take off the branches that haven’t recovered , she isn’t eating or drinking which is a worry , the Tangie and the gorilla look better.
Day 54 - Saturday - she looks like she might be improving , I showed the Tuesday picture to a fellow grower and he said that looks dead , if she can recover that will be a miracle ....... she had drunk about 500ml of water in the last 3 days , that’s why I’m so worried 😟
Day 55 - Sunday - I promise you all this is happening real-time , today is Sunday 9/12/18 , what is becoming apparent, this plant was so stressed , I mean we are talking catching you in bed with her sister stressed , I have reassured her this was the only time it’s going to happen , and she might just be showing some signs of recovery , I added 500 ml of water ,2ml A+B
Day 56 - Monday - Tangie and Gorilla are back eating and drinking , Lemon i think is recovering, she had not drunk a lot , maybe 500 ml but I think is looking healthier, also a weird double Bud has appeared .
Likes
15
Share
@masterofsmeagol
Follow
8/17 Watered everything but the 50. Found two leaves with sep markings on the pink kish in the 50. Definitely not using old soil again. I'm pretty sure THIS plant contracted it from the soil and not the way the others did with the lawn mower and birdseed hijinx. It's supposed to rain for the first time basically all summer. It's am 80% chance so I HELD OFF ON PLANT DOCTOR AND DID NOT APPLY as I'm supposed to have a clear day after. I'll apply the plant doctor in the morning. I'm hoping this rain will knock down a bunch of those thrips. They seem to be on a small branch on a plant or two. One or two leaves show damage and I'll pick them off. I figure I'll get them after I apply plant doctor. I'll use either citric acid or just my regular bt-k pillar treatment with Castille or liquid soap. That will kill them as well. I'm on really worried about it. I also might just buy a bunch of lady bugs and unleash them once things get further along.
EDIT: TOOK A QUICK VIDEO AND A COUPLE PICS. HOPEFULLY WE GET THIS RAIN. IF NOT IM GOING TO TREAT THE THRIPS THAT ARE ON TWO PLANTS NOW. I THINK IM GOING TO GO WITH BT-K FOR NY PILLARS AND HOPE THAT THE DISH SOAP IN THE MIX KILLS THE THRIPS. I HAVE LOTS OF DIFFERENT OPTIONS SO ILL FIGURE SOMETHING OUT. BUDS SEEM TO BE EXPLODING IN GROWTH. OH AND THANKS TO THE OUTDOOR GROWER THAT MESSAGED OFFERING TO HELP. I APPRECIATE THAT. THANKS.
8/18 We got the rain we were expecting. It was sheet rain for a few hourscand rained during the night. Everything was drenched and it was cold (50°F). I shook off the special kush that's way further in flower. I decided to use the leafblowrr despite the risk of spreading anything. I did it so that it wasn't ever blowing TOWARDS another plant but still. I was hoping it might blast off some thrips that might have survived that torrential rain. We've never had a dry summer like this. I'll moniter things. My water day is tomorrow so I assume that's when the girls will get their plant doctor dose. It's a great time of year for cannabis growers. We get to watch all the hard work we've put in literally pay off. It's very peaceful in the garden.
EDIT: Went over at about one to check things out and do some minor defoliation. I checked on the thrip situation and I dont know if I blasted them off with the leafblower or if the rain washed them away bit I doubt it. Ivecmade the decision to treat these little bastards. It's on one plant but it's started to spread to another branch on another plant. I probably just overlooked it but still. Seeing that it rained like he'll and I'm seeing like zero signs of septoria I'm going to treat everything. At least I think I am. I haven't decided what to use. I think I could just use bt and soap and I'd probably be alright. I'd feel better doing that as it's something I'm familiar with. Outdoor growing. It's always something.
8/19 In the 40's last night. Hopefully that will help with the thrips. I was hurried and since today tops at 72° I only watered the 10th planet big mk ultra and the chem dog with preventative plant doctor. I'm not seeing hardly any septoria and if I do itsca random leaf. I mixed up 3tsp of citric acid and some Dawn in a 2 quart hand sprayer and treated the 10th planet that I thought had heat stress and the Pink kush in the ten gal that has the damage. I also treated a branch on my good tenth planet. It was the only branch with markings so I think I've got it early enough. I'm just wondering the best way to tackle this. The pink kush I'm sure, could handle spinosad. That strain is much later flowering. I'll see how the citriccacid works and go from there. If the other girls need water they'll get it when I get home alongcwith plant doctor. I've got some work to do. I'll keep this updated. Opinions are always welcome.
UPDATE: THE PLANT IN THE TEN I SPRAYED LOOKS BETTER THAN WHEN I SPRAYED IT! I ALSO DIDNT WATER AS ITS UNDER 70° AND EVERYTHING I WATERED LOOKS WORSE THAN WHAT I DIDNT. WATERING NEEDS CHANGE QUICK WITH A 40° TEMP SWING. THESE THRIPS ARE GONNA HAVE A FEW MORE NOGHTS IN THE 40'S. THE CITRIC ACID SEENED TO KILL ON CONTACT. MY PROFESSIONAL BUDDY ADVISED TO ORDER GREEN LACEWINGS AS OPPOSED TO USING SPRAYS. HE SUGGESTED SPOT TREATMENT BUT AFTER MY RESEARCH ON THRIPS THAT WONT HE AS EFFECTIVE. I HAVENT DECIDED WHAT TO DO. I MAY ORDER THE LACEWINGS AND I MAY CONTINUE AND ROTATE TREATMENT. I DONT WANT TO OVERREACT (WHICHVI TEND TO DO) BUT I ALSO DONT WANT ALL MY LEAVES TO DIE. ILL KEEP THIS UPDATED. IM PLANNING TO GO OVER TONIGHT AND CHECK THINGS OUT. I MAY SPRAY A FEW MORE PLANTS AND WATER WHILE IM THERE. ITS TIME FOR THERE PLANT DOCTOR PREVENTATIVE.
8/20 I watered the two kush in the back WITH THE PREVENTATIVE DOSE OF PLANT DOCTOR as they were dry I assume due to the wind they get. The one in the 50 I found one sep leaf. Looking carefully arpund the garden I can tell that I have a thrip infestation. First time I've fought this and it seems most people don't really know what to do besides predators at the beginning of the season. I'm too far along for spinosad. At least thats what I've been told. My pro buddy said to try to spot treat it. It's not bad bit I'm afraid it might be worse than I think. The plants I treated with citric acid look MUCH better. I think I'll dial the dosage of citric acid down and start with that tonight and switch up treatments. I can get rid of them it's just going to take a ton of work. I think I've had them before and I attributed to something else. I so think that the very early pink kush plants could handle spinosad. I hope so. The plants I watered the other day look overwatered. The plants I didn't water look GREAT. The special kush in late flower looks happier than I've ever seen her. The difference being we went from 104° one day to 72 the next with 46° night Temps. This week is highs of 70's lows of high 40°'s. I've got a lot of work cut out for me. Didn't do a video as I didn't have time but I'll do one.
EDIT: Nothing needed to be watered at noontime and I'm trying to not overwater so I left them. The two I watered this morning are fine. I'm glad I caught this thrip bullshit when I did bit it sounds like it's going to be a HUUUGE pain in the ass to beat. One thing right after another. I've found those suction marks and the silvery shit they leave behind on pretty much every plant now. I'm thinking me using the leafblower (away from the other plants I THOUGHT) must have blown a bunch of them around. I'm not seeing a lot of bugs. Mainly feces. I did find a couple adults. Honestly, I've probably had these before and not known it or attributed it to something else. Literature I'd all about spinosad which of course I have on hand. AI told me I could use spinosad in early flower so MAYBE I could treat the pink kush plants with it but ill have to figure something else out for the other girls. I'm planning to treat tonight depending on where the research takes me. Not sure exactly what I'll be using but I'll keep this updated.


Likes
5
Share
@Msweedster
Follow
This past week I was out of town. However, I set up an auto watering system for two girls and one lived off the auto pot.
Seedling 1 - Largest in clear container
Seedling 2 - Autopot
Seedling 3 - The “Late Arriver”
I monitored the process and tent while away and was not let down. Came home to the nutrients finally being delivered, so the girls received fresh water with a first dose of “minerals and food.”
I’m just stoked they survived in my absence!
Likes
15
Share
@Springbokke
Follow
Доброе всем времени суток
Сорт Kerosene Krash от Dutch Passion
Это мой первый репорт за последние 7 лет. И так, с чего бы хотелось начать. Моей растишки сейчас ровно 48 дней, 34 дней как считаю вегу, планирую еще дней 10-14 продержать на веге. На двинатцтый день веги была сломана центровая ветьв(перегнул), стал отталкиваться от новых реалей и решил сформировать такую широкую клону. Для этого я все эти дни гнул боковые стебли, а вчера отрезал у всех боковых их центр(для того чтоб куст тал более широким и его боковые стебли стали более крепкими), кроме одного степбля, не трогал самый слабый. В дальнейшем буду ставить сетку.
Сейчас поливаю через день по 3 литра
Полил ( 607ppm )- 1л Carboload - 2мл/л; 1 день веги
Полил ( 576ppm )- 1л Carboload - 2мл/л; 3 день веги
Полил ( 493ppm )- 1л Carboload - 2мл/л; Piranha - 2мл/л; VooDoo Juice - 2мл/л; Tarantula - 2мл/л; 5 день веги
Полил ( 476ppm )- 1л Carboload - 2мл/л; B-52 - 2мл/л 7 день веги
Полил ( 535 ppm) -3л Carboload - 2мл/л 9 день веги
Полил 3л Cal-mag Xtra - 1мл/л; Sensizym -2мл/л; Carboload - 2мл/л 11 день веги
Полил ( 490ppm )- 3л Carboload - 2мл/л; Piranha - 2мл/л; VooDoo Juice - 2мл/л; Tarantula - 2мл/л; 12 день веги
Полил ( 386ppm )- 3л Carboload - 2мл/л; B-52 - 2мл/л 14 день веги
Полил ( 457ppm )- 3л Carboload - 2мл/л; 16 день веги
Полил 3л Cal-mag Xtra - 1мл/л; Sensizym -2мл/л; Carboload - 2мл/л 18 день веги
Полил ( 537ppm )- 3л Carboload - 2мл/л; Piranha - 2мл/л; VooDoo Juice - 2мл/л; Tarantula - 2мл/л; 20 день веги
Полил ( 688ppm )- 3л Carboload - 2мл/л; B-52 - 2мл/л 22 день веги
Полил ( 551 ppm) -3л Carboload - 2мл/л 24 день веги
Пролил 15 минут под душем 26 день веги
Полил ( 576ppm )- 3л Carboload - 2мл/л; Piranha - 2мл/л; VooDoo Juice - 2мл/л; Tarantula - 2мл/л; 28 день веги
Полил ( 613ppm )- 3л Carboload - 2мл/л; B-52 - 2мл/л 30 день веги
Полил ( 836 ppm) -3л Carboload - 2мл/л 32 день веги
Полил 3л Cal-mag Xtra - 2мл/л; Sensizym -2мл/л; Carboload - 2мл/л 34 день веги

Likes
27
Share
@eldruida_lamota
Follow
Vamos actualizar la séptima semana de floración de estas Biscotti de RoyalQueenSeeds.
Un SOG que empezó mal pero que se ven con un buen color y avanzan progresivamente, se marcan un color increíble y las flores van formándose, así que a estar atentos.
La humedad es perfecta, la temperatura la e podido corregir y ya la tenemos 22 grados.
Añadi la base, Blue line B de Agrobeta.
Esta semana añadí tucán, silver, mega Pk, tricoma, explotacogollos y terminator también de Agrobeta.
Estoy controlando el ph está alrededor de 6- 6,5. Normalmente riego cada 24 horas y más o menos cada planta está tragando 1 litro de agua en cada riego.
Vamos viendo cómo progresan estas últimas semanas.
Mars hydro:
Code discount: EL420
https://www.mars-hydro.com/
Agrobeta:
https://www.agrobeta.com/agrobetatiendaonline/36-abonos-canamo
Hasta aquí todo. Buenos humos 💨💨
Likes
119
Share
@Roberts
Follow
I harvested this plant about a week ago. Gd was suffering some update issues still, but appears to be resolved. The plant grew great. I am impressed with the results myself. Nice big colas of frosty goodness. She bounced around a bit in growing under different lights. The results were great. I was even running the flowering light lower since she stretched a little too close to it. That was probably my biggest issue during the grow. I am anxious to try it once I get it processed. Thank you Spider Farmer, and Divine Seeds. 🤜🏻🤛🏻🌱❄️
Likes
4
Share
@nijuana
Follow
I can tell you that it's rare but this variety smell so so so strong my god the odor pass though wall you can smell it from 50 meters around 😯unreal 😂😋

Likes
13
Share
@4F1M6
Follow
I started germination of 3 Sweet Zkittlez beans on 29/12/2020 (now sweet zenzation). I pre moistened my rockwool cubes with ph balanced water to 6.4. Made sure the plugs were just damp and not soaked. Using a small wooden dowel I increased the size of the plugs pre made holes. Than I sowed my beans into the holes. Ripped off a small piece of rockwool and mulched it up. Lightly filled the holes in with the mulched rockwool. Than stuck the plugs into a misted humidity dome, to complete germination.
Shouldn't take anymore than 4-5 days to see some sprouts. Once I see some cotlydon leaves bursting to the surface. I will get the plugs planted into some 1 gallon pots. Plus get these ladies situated into their home. Cant wait!
Some background information on my experience with Sweet Zkittlez. I've only grown this one out once. Did her up in a 1 gallon SOG grow. It had a very impressive main cola. With quality bud structre and trichome production. The plant had a very luring sexy odor. I was very satisfied with the results.
The variety got extra hungry for both p and k mid flower. A little bit needier but definitely worth the extra attention. Very excited to see the results in a full size plant. Giving thus a variety a chance to show me full swing.