
Likes
Comments
Share


@70x70
Follow
I wasnt home much for 3 weeks starting this week so i dont have any idea about the exact conditions meanwhile but in the end it was more humid and hotter since i dimmed the light to 100%.
Above/next to the lamp the maximum was 32C and at the leaves max 30C before adding airflow to the lamp. This brought it back down about 2C.

Processing
Likes
6
Share


@MissSolasolita
Follow
End of week 4
No sign of pre flowers yet
Looking healthy and strong

Likes
3
Share


@madcash
Follow
Trichs are getting frosty and buds stacking up. I wasn’t to let her go longer to see how much bulk she can pack on. Only day 66 after all
Likes
142
Share


@MadeInGermany
Follow
Hey everyone :-).
The last plants were also placed in the bloom chamber kammer.
Everyone has made great progress this week 🙏🏻.
There is not much to say about this week, I think videos and pictures say more like words 🙈😎.
I wish you all a good start into the week :-) Stay healthy and let it grow 🙏🏻👍


Likes
15
Share


@tokesly
Follow
Transplanted the pint cups into 1 gals after 1 day flush. The bigger pot with new medium allowed the roots to rejuvenate. Defoliated and topped for the start of a 4-branch manifold mainline. Used LST to tie down the baby branches with garden wire.

Likes
9
Share


@Mr_nugs_lover_David
Follow
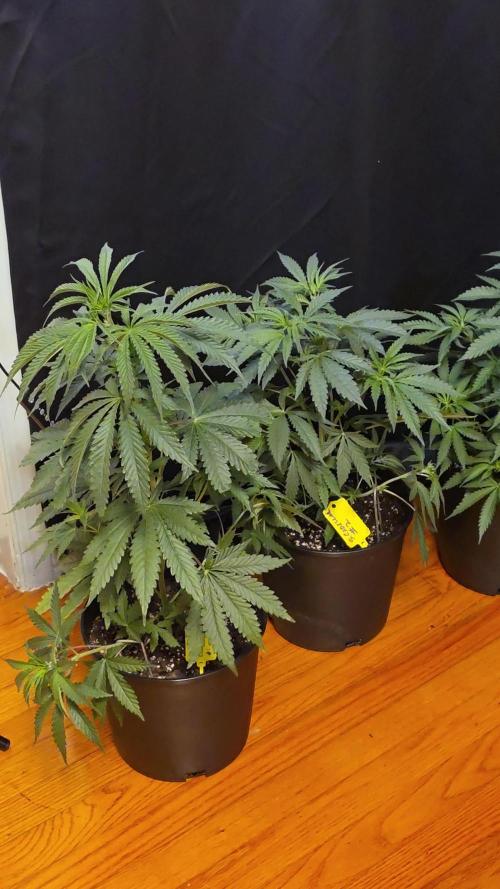
This ladies got pretty big for real, hands down the biggest autos I've ever had grown in 7l pots, excellent performance, and the flowers start to stink really strong, there is one pheno which is more developed than the other 2 phenos but the 3 have developed really good and they are producing a lot of sticky and stinky trichomes! Let's see how this will end up! Can't wait 🤤
Likes
5
Share


@SirBudAlotts
Follow
So this is what she looks like...
I am very impressed so far with the results...the smell and size of her buds are fabulous, skunky and chunky..
Will definitely have another run with more training and so forth...better nutes too..
But I enjoyed this run...no complications what's so ever..


Likes
8
Share


@Wackytabacky_420
Follow
🚨 Durbin thai/Cinderella week 6 update 🚨
🚨 week 6 of veg!! 29 days old!! 🚨
So this is a clone I received on Jan 31st. She has been transplanted from a solo cup 2 a 5 gal pot. She had 2 be topped in her second week of rooting do 2 the top frying from to much light in young clone stage. Since the topping this lady has come 2 life!! She has been defoliated 3 times and is ready 4 another go!! She spent her first month feeding just off nutrients in fox farm soil. On March 2nd I gave her her first Gaia Green trio feeding!! She has exploded with growth since!
Marshydro equipment--
Marshydro- 4x4 grow tent
Marshydro- Tsw2000
Marshydro- 6" inline exhaust fan with digital temp and humidity sensor
Marshydro- 6" carbon filter
Marshydro- 6" Black duct line
💡 Grow Sponsor💡
@marshydro_amazonled
@marshydro12
@marsnier
#marshydro
#TSW2000
Other companies in this grow-
@foxfarmsoilandfertilizer - 100% ffof
#rvagrown ,#rvagrower , #cannabisgrower , #homegrown , #hightimes , #weed4ptsd , #weed4veterans , #veterangrown , #tricomes , #ledgrown , #weedstrains , #indoorgrow , #indoorgrown , #tentgrown , #support local , #growlocal , #letsgrowrva , #weedismedicine , #420 , #veterangrower
Likes
24
Share


@DeepRootsGrowTrees
Follow
COLOMBIAN JACK by KANNABIA
Week #5 Overall June 23rd-30th
Week #4 Veg
This week she looking good she split evenly both tops are growing equally she doing great outside. Stay Growing!!
Kannabia.com COLOMBIAN JACK
Likes
30
Share


@Drgreenthumb627
Follow
white runtz seems to be holding its own in the center of the tent, really impressed with how well it has responded in flower after such a difficult veg phase

Likes
17
Share


@ArtisticGrown
Follow
Today is a great day here with the papaya bomb cotten candy! I have done a lot of work with this plant and she is lovingggggg it! let me tell you! with everytt branch topped and healed we are looking at a total of 34 coals in the 2x2 to fill her up! I might try to take some clones as she is a simi fast term. And I will be having to make the flip to a 12/12
It wwould be bad asss if I can get some clones from her!!!
But I am just excited to get some phat ole dank coals from her!!!
She wants to produce them haha letsssss goooo
any thoughts idewas comments questions im always here :)
MUCH LOVE HAPPY GROWING

Likes
2
Share


@CannaIGrow
Follow
Transplant week! Some of the girls in the tent started to droop but this one didn’t! She’s looking pretty good to me
Come hang out with us in the discord!
Likes
19
Share

@Natrona
Follow
Strawberry Cadillac
W5 12/7-13
Important dates
11/9 Germination
11/25 Transplant to 1.5 gal,
12/1 Topped, Pinned and removed 2 large center leaves
12/5 Repositioned pins and removed lowest fan leaves
Nutrients:
12/8 Aptus Regulator .75/gal
Aptus startbooster 2.5 /g
Molasses .5tbsp/g
Manuka Honey .5tbsp/g
Ph 6.44, ppm 275 62.7f
12/10Flora micro 5ml/g
Flora grow 5ml/g
Cal Mag 1.5ml/g
Recharge 2.5ml/g
5.97 ph, 539 ppm, 62.6f
12/13 Grow Time 8ml/g
Plant Juice 2 TBSP/g
Cal Mag 1.5ml/g
6.45ph, 537ppm, 62.4f
The Strawberry’s received 1 liter 2 times on 12/8, 11, 13. Cadillac 1 got an extra 500ml on 13th. All the gals bounced back after topping last week. The FIM I attempted on Cadillac1 did not work. I will let her grow out as is, maybe some LST. This gal already drinks more than the others and after I took pictures, 2 big fan leaves show nitrogen deficiency. So, she needs more food than the others. All the girls had 5-6 inches of growth this week.
Strawberry Cadillac #1 18” #2 14“
Strawberry Trop Cherry #1 12” #2 9”
Straw-Lectric Lemonade #1 11” #2 14
Stay green, growers love 💚🌿
💫Natrona💫
Likes
6
Share


@Xpie77
Follow
From the leftovers and plant cutting Ive managed to make some bubble hash. Its easy and fun to do. Thnx Seeds Genetics Co for the nice genetics and see you next time

Likes
2
Share


@High_Grade_Dadli
Follow
Had a bit of nute burn and potassium deficiency had to increase potassium to balance it out.....other than that she is doing well....u know it's getting closer to the end the stem along with the branches are showing there purple genetics
Likes
9
Share


@Godsgrower316
Follow
Not a fan of autos so I put it in garden soil but great for not having to do almost anything just started giving her food for flower was just giving her the run off from my other girls
Likes
54
Share


@Roberts
Follow
Gorilla Cookies is just about done. I checked the trichromes a few days ago and was starting to get the first amber ones. So I flushed with 5 gallons of ph water. I continue to pour 3 gallons more through every other day till next update which is harvest. Plus keeping it wet in between. Full of frost, and she is trying to fox tail. She is definitely ready to go. Just getting the nutrition out of the plant for a better quality bud, and better taste. Thank you Spider Farmer, and Pure Instinto Seeds. 🤜🏻🤛🏻🌱❄️🌱
Thank you grow diaries community for the 👇likes👇, follows, comments, and subscriptions on my YouTube channel👇. ❄️🌱🍻
Happy Growing 🌱🌱🌱
https://youtube.com/channel/UCAhN7yRzWLpcaRHhMIQ7X4g
Spider Farmer G300w: https://amzn.to/3S2zvsd
Spider Farmer 10X20 Heat Mat Kit - https://amz.fun/lsa0J
Spider Farmer Amazon Store: https://www.amazon.com/spiderfarmer
Spider Farmer Official Site: https://spider-farmer.com
Discount code: saveurcash (stackable)


Likes
43
Share


@Joni2017
Follow
the small ones take their rhythm😄 this week I start with bio-grow 2ml / l alternating day if not day. They begin to notice odor inside the closet, filter works ok👍😅
Likes
10
Share


@Elguacho420
Follow
Muy buenas noches muchach@s.... Bueno, comento!, segunda semana de crecimiento de las lemon cookies kush! 🌱 Cómo ven hoy fue día de selección de las q para mi, novato, fueron las mejores para trasplantar a estas macetas q ya son las definitivas, las regué con ½lts de agua c/u, prendí el otro led y ahora hay una fiesta ahi dentro q no saben, terrible!!.. 😎🕺🏻💡 Bueno, ya las ven, están re lindas... Así q ya no las molesto más... Ahí están trankilamente... La semana que viene les cuento más... Buen finde y buenos humos para tod@s... 🔥 💨💨💨
🇪🇸🤝🏻🇦🇷
