
Likes
Comments
Share


@DogDoctorOfficial
Follow
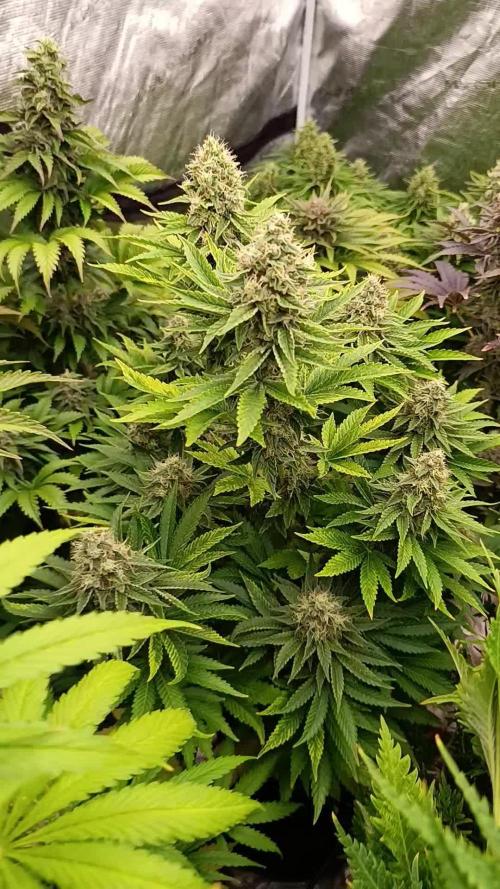
Hey fellow green thumbs! 🌿💚 It’s harvest time for our Auto Fat Pete’s Cookies from Super Sativa Seed Club! After an exciting journey, we’re thrilled to share the details of this unique plant’s final stage. Let’s dive into the harvest report!
🌟 Harvest Details:
Day 75: Harvest Day
• Harvest Date: Day 75
• Harvest Method: Our Auto Fat Pete’s Cookies was harvested yesterday. While the flowers turned out less dense than expected, the amazing smell has us super curious about the final product. 🌿🌸
• Preparation: Before hanging, we meticulously cleaned the plant, removing all leaves without trichomes to ensure a smooth drying process and to enhance the quality of the final product. 🌿✂️
Current Drying Process:
• Method: The entire plant is now hanging upside down to dry. This method helps maintain moisture levels within the buds, allowing for a slower and more even drying process. 🌿🔄
• Environment:
• Temperature: 18-22°C (65-72°F)
• Humidity: 50-60%
Maintaining these conditions is crucial for achieving a perfect dry and preserving the plant’s aromatic and flavorful profile. 🌡️💧
🌟 Plant and Bud Characteristics:
Auto Fat Pete’s Cookies:
• Bud Structure: The buds are not as dense as we’d hoped, but they are still sticky and resinous, showcasing a beautiful array of green hues with hints of purple and orange pistils.
• Aroma: The aroma is incredibly strong and delightful, filling the grow room with a sweet, cookie-like scent that hints at the strain’s name. 🌿🍪
• Trichomes: A generous layer of trichomes covers the buds, promising a flavorful and aromatic final product. 🌿✨
🌟 Care Tips:
• Drying Process: Patience is key. Allowing the plant to dry slowly will enhance the final quality, preserving both flavor and potency. Ensure good airflow around the hanging plant to prevent mold and mildew. 🌬️💧
• Trimming: Once the drying process is complete (typically 10-14 days), it will be time to trim the buds. This is where we’ll shape the final product and get it ready for curing. ✂️🌿
• Curing: After trimming, curing the buds in jars for at least 2-4 weeks will further enhance the flavor and smoothness. This final step is essential for achieving the best possible smoking experience. 🍁
🌟 Genetics Spotlight:
Auto Fat Pete’s Cookies:
• Characteristics: Known for its sweet and cookie-like aroma, this strain has shown remarkable aromatic qualities throughout the grow. Despite the less dense flowers, the strong scent and generous trichome coverage promise a high-quality final product.
• Harvest Expectations: Sweet, aromatic buds with a rich flavor profile. The slower drying process will ensure the best possible preservation of cannabinoids and terpenes.
🌍🌿 Fun Fact:
Did you know? 🌿✨ The aroma of a cannabis plant can be a strong indicator of its final flavor profile. Strains like Auto Fat Pete’s Cookies, with their unique and strong scents, often translate these aromas into delicious, flavorful buds.
For a detailed grow guide and to see this strain in action, head over to my YouTube channel! 🎥✨ I share tips, tricks, and in-depth reviews to help you get the best results from your grow. This week’s harvest has been particularly intriguing, and I’ll be explaining the reasons behind the less dense flowers in detail.
👉 Join me on YouTube Link in my profile 👈
🌟 Conclusion:
Harvesting Auto Fat Pete’s Cookies at Day 75 has been an interesting and rewarding experience. While the buds are not as dense as we hoped, the strong aroma and generous trichome coverage give us high hopes for the final product. With the plant now drying, we’re eagerly awaiting the final outcome.
Stay tuned for updates on the drying, trimming, and curing process, and get ready for a sweet and aromatic harvest!
Happy growing, and see you next time! 🌿💚✨
#SuperSativaSeedClub #HarvestReport #FatPetesCookies #PlantMagic #GardeningJoy #NatureLovers #PlantPower #InspireGrow #YouTubeJourney
Germination method 🌱 @thecannakan
Genetics @supersativaseedclub_official
Nutrition
@aptusholland 🌿
@aptus_world 🌎
@aptus_es 🌍
@aptusbrasil 🌱
@aptus_thailand 🌿
@aptus_portugal 🌳
@aptususa_official 🍀
@aptusplanttechnz 🌺
@aptusplanttechaus 🍃
Ambient controls🎮
@trolmaster.eu @trolmaster.eu.support @trolmaster.support @trolmaster.agro
Soil @promix_growers_eur @promix_cannabis
LED - @lumatekeu
Watering- @autopot_usa @autopot_global
Love and attention- @dogdoctorofficial
As always thank you all for stopping by, for the love and for it all , this journey of mine wold just not be the same without you guys, the love and support is very much appreciated and i fell honored and so joyful with you all in my life 🙏
With true love comes happiness 💚🙏 Always believe in your self and always do things expecting nothing and with an open heart , be a giver and the universe will give back to you in ways you could not even imagine so 💚
More info and complete updates from all my adventures can be found ⬆️link in the profile description ⬆️
Friendly reminder all you see here is pure research and for educational purposes only
💚Growers Love To you All 💚
Discount Codes :
@thecannakan DOGDOCTOR 15% off
@theneutralizer PORKIT7-DOGDOCTROSO 17% off
@kannabiaglobal DOGDOCTOR 30% off
@seedsmangenetics DOGDOCTOR 10%off
@terpyz.mutant.genetics DOCTOR 15% off

Likes
3
Share


@French__flair
Follow
Suivre les conseils semaine 1.
Une fois que les plantes ont colonisées le pot de 1L, les rempoter dans des pots de 3L (qu'on va arroser avec 3L). Cela doit prendre 4 à 7 jours en moyenne.
Surveiller l'aspect des plantes, les pointes des feuilles. Observer le haut et le bas. La couleur de la plante doit être uniforme entre chaque partie sinon c'est qu'elle a un manque ou un excès. Le plus souvent étant donné les engrais complet que nous utilisons il s'agit d'un excès. Dans ce cas il suffira simplement de faire un arrosage à l'eau au lieu de l'engrais et de reprendre les engrais à plus faible dose.
Les tiges sont un bonne indicateur de la santé des plantes, hors génétique spécifique, elles doivent être verte et tendre, pas dur.
On continue la FIM et la taille de certaines feuilles qui peuvent être gênante.
Likes
3
Share

@420DeepGrow
Follow
📆 Semana 7
La Monster Maker entra en su tramo final de floración mostrando todo su esplendor. Los cogollos se han compactado y endurecido, repletos de tricomas que dan un brillo casi plateado bajo la luz. Los pistilos comienzan a oscurecer ligeramente, señal de maduración, mientras el aroma se vuelve más denso y penetrante, llenando el ambiente con notas dulces, especiadas y un fondo terroso inconfundible.
El riego se ajusta con precisión para evitar exceso de humedad, manteniendo la planta firme y saludable. Cada día revela una evolución visible, dejando claro que está en su mejor momento antes del gran cierre.
🔥 Fase crítica de maduración: la potencia, el aroma y la resina se afinan al máximo.
¡Seguimos creciendo fuerte 💪!

Likes
18
Share


@CANNASIM
Follow
Flowers got really dense like bricks, also the lower ones.
Felt like starting the flush at the point I’m at to have the cleanest smoke possible.
Have around 2 weeks to go, or till i have strong yellowing.
Flushing with terpinator, flowers still getting bigger.


Likes
6
Share


Likes
7
Share


@hash_thetics710
Follow
Visual//. underwatering a bit - since flowering could of raised it a bit - I am
still feeding only 3 gal only for ALL eight and a half basically small plants _
genetics looking superb still and health is booming still!!
Casually been trimming couple smaller leafs on bottoms that form- very reserved trimming though -
also Low stress tugging them every night to help lower branches into nicer isolated grow areas - babying them during these phases, watching for pests

Likes
39
Share


@CURATI_DA_SOLO
Follow
In realtà ho coltivato 2 semi di questa pianta una l'ho raccolta e seccata mentre un altra è ancora in flush e verrà raccolta tra 5-6 giorni. I fenotipi sono quasi identici e predilige un odore di gas e og! L'effetto è devastante molto narcotica e a breve pubblichero qualche foto di qualche estrazione a freddo! Spero che piacciano a qualcuno i miei lavori e che qualcuno di voi si possa ispirare a tutto questo.
Ringrazio ogni singola persona che è passata di qui a lasciare il suo like o commento e ricordo a tutti voi che potete trovarmi anche su Instagram 😘
Likes
20
Share


@adam_pawloski87
Follow
We are in Flush !! Was giving them GH Flora series + rapid start + cal mag

Likes
10
Share


@Kardo
Follow
Die Cheese ist auch in 2 Wochen fertig sieht sehr buschig aus und hat dicke buds
Likes
16
Share


@nijuana
Follow
I'm mitigate from this experience , the grow was not optimal why ? Maybe because my main thing is not to grow auto flower but femenised , the #3 was hermaphrodite plant ...

Likes
2
Share


@Jokey4
Follow
This plant is my first real plant because the first one had a genetic mutation coming from the seed because I gave it exactly the same conditions as this one and therefore I will consider this plant as my first plant.
I am very proud of myself to have obtained such a yield (188g wet) with very few problems during the culture of this Steacky Beast Automatic from Zamnesia. This plant resisted very well to a nitrogen deficiency due to a too high ph because of my ph metter which was out of order but also to a small burn to the nutrient. I started rinsing on day 54 (it lasted 2 weeks and a half).
I couldn't put you pictures of the trichomes but they were perfect for the harvest and the pistils were also matching so here is why I waited until day 73
The heads are hung in the culture box with brown soft ties (I removed everything except the extractor and the filter), the box is plunged in the dark so it's perfect for drying
Thank you for your interest in my growing diary!
See you soon,
Jokey4

Likes
210
Share


@Rock_n_Roll_Randy
Follow
So this is the new setup I got👍🤘 i will be ending this diary and starting a new one with all my plants in it. This 8x8 tent is massive and the fc4800 is a bright as the sun beast 💪pretty heavy for the size but that's because it's built soild💪 PLEASE watch the video and leave a comment 🤘🎸🥁 rock n Roll a joint🤘


Likes
4
Share


@HIAZ_urbanbudfarmer
Follow
Hi Gromies all is well, just doing her thing, been training through the scrog net. This girl is ready to flower and will be changed over today . Pulling the 600W m/h - HPS out of retirement to flower this girl as I need the l.e.d. for an Auto grow that is just kicking off. Please give me a like & a comment thanks.
HI-AZ
Likes
18
Share


@Carmgrows
Follow
Deluxe sugar cane was amazing to grow from beginning to end. It’s an easy plant that recovers well. The smell gets strong after 2 weeks of cure. One of the best grows I’ve ever done.
Likes
10
Share


@Sunofa420
Follow
This week I top dressed my soul with bat guano thats all… plant is smelling great I never had any real northern lights that I know of this plant is smelling really strong so far a dank kind of og smell


Likes
15
Share


@Brianm420
Follow
Plants are growing good. I accidentally broke the tip off of the Norther light plant. Ahh 😱
