The Grow Awards 2026 🏆 


Likes
Comments
Share
@invinat9r
Follow
Day 55, 3 of the 4 are getting ready.
Those 3 got their last feeding yesterday. Only ph regulated water now. Harvesting in about 14 days.

Likes
43
Share
@inversi0n
Follow
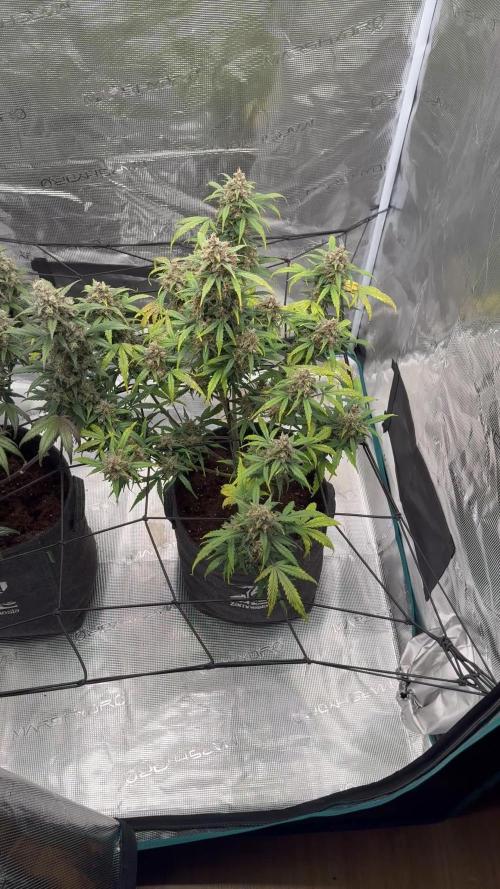
Hello, readers!
Growing pretty good in general.
She recovered from my precious accident, when I broke a brunch. But she also begin slowly falling sideways. Actually, she started it quiet long time ago, but now, I noticed it's progression day by day, so decided to tie her a little bit, so she'll be more straight.
I cannot upload some videos again. Idk what the problem is, at least I've uploaded video with roots. 😓
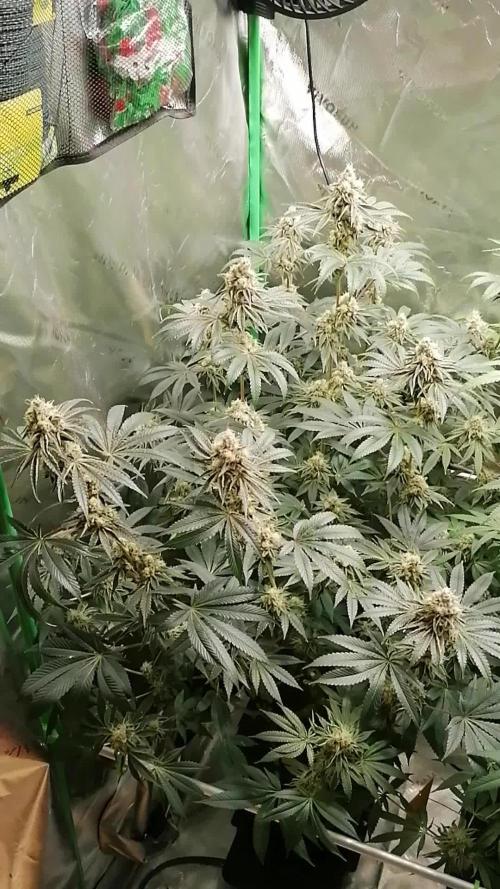
I like, that leaves doesn't continue getting burn tips, new leaves looks good, and the previous doesn't get worse, so the solution fits good now.
Want to mention that orthophosphoric acid turns out to be super stable compare to the citric acid.
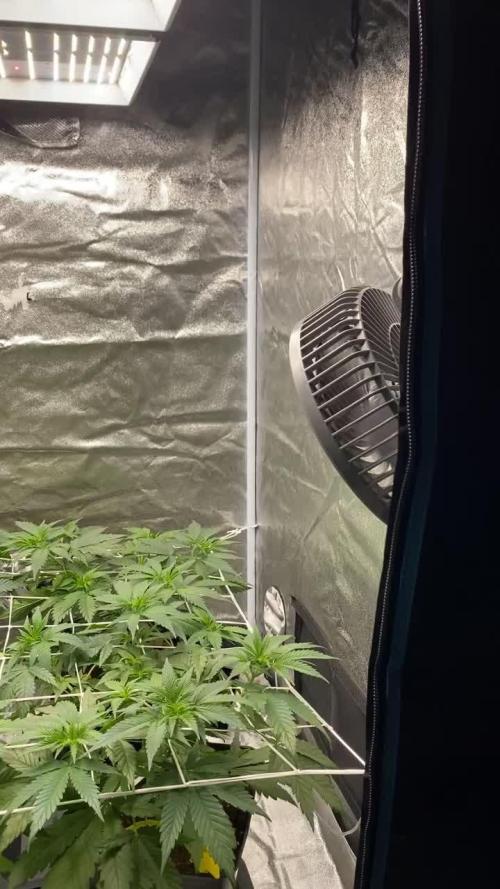
It may be hard to understand her size by photo, I wanna remind, that my tent is 1m*1m*2m(tall). And she kind of taking almost all of that place with maybe 0-5-10cm gap to the walls.
For the last 4 weeks smell didn't change that much. And now I start to smell something more than just grass or weed.
When I smell it, I feel dry ground->carrots->canned peaches-> skittles. But it's actually the same smell, depends on how long and strong would you inhale.
Feeding:
(Kinda Micro) NPK20, B 0.01, Cu 0.02, Fe 0.04, Mn 0.01, Mo 0.002, Zn 0.002 - 0.36 gr/liter.
(Kinda Grow) N 15.5 CaO 26 - 0.14 gr/liter.
(Kinda Bloom) NPK 0 0 51 + So3 34 - 0.22gr/liter
(Kinda Bloom) NPK 0 52 34 - 0.32 gr/liter.
Orthophosphoric acid 85%(H3PO4) - 0.06 ml/liter
TriPart Grow - 0.25 ml/liter. Added cause I needed Mg, which I doesn't have in a new crystal fertilizer
Sensizym - 1 ml/liter. It's empty now, don't think I'll buy it again.
Processing
Likes
12
Share
@Italianganya88
Follow
Letzten 7 tage unglaublich an masse und höhe gewonnen echt atemberaubend das anzusehen ,hab das zelt gut voll bekommen mit wenig plants bis jetzt alles super. Habe heute meine neue Led lampe bekommen bin positiv begeistert.Habe 600watt durch eine 1200watt ausgetauscht.


Likes
9
Share
@420DeepGrow
Follow
Gracias al equipo de Herbies Seeds, Marshydro y XpertNutrients sin ellos esto no seria posible.
💐🍁 Mimosa Shot:
Prepárate para una noche salvaje de embriaguez eufórica con esta cepa maravillosa de 30% de THC, Mimosa Shot de Herbies Seeds. Con cada bocanada de un apetitoso toque cítrico, te lleva a un emocionante viaje a través de niveles de felicidad que pensabas que nunca alcanzarías. La intensidad de la Mimosa Shot se equilibra con un glorioso color púrpura y unos rendimientos increíbles de hasta 800 g/m² (2,6 oz/ft²). Relájate y disfruta del viaje.
🚀 Consigue aqui tus semillas:
https://herbiesheadshop.com/es/semillas-de-marihuana/mimosa-shot-herbies-seeds
💡FC6500: Eficiencia líder en el mercado: la lámpara de cultivo LED FC-E6500, que ostenta un estatus líder en el mercado, es una solución rentable con un PPE de 2,8 µmol/J y un rendimiento máximo de 2,5 g/vatio. Ofrece un PPF alto de 2026 umol/S y es adecuada para una cobertura de vegetación de 1,50 m x 1,50 m y una cobertura de flores de 1,20 m x 1,20 m.
Iluminación versátil y uniforme.
https://marshydro.eu/products/mars-hydro-fc-e-6500-730w-commercial-led-grow-light/?gad_source=1&gclid=Cj0KCQjw1qO0BhDwARIsANfnkv9IIrYSbmJqz8PqpJOIyWwJfp5bc3SGJgUV68USLQ4tjmXDYwoBuAsaAue3EALw_wcB
🚥 MarsHydro ADLITE UV/IR/RED:
Para lograr un crecimiento óptimo de las plantas y maximizar los rendimientos es un arte simple que depende en gran medida de las condiciones ambientales adecuadas. Reconociendo las limitaciones de la iluminación natural y las soluciones de iluminación tradicionales para satisfacer estas necesidades únicas, lanzamos ADLITE. Estas luces especiales UV, IR y roja están diseñadas para llenar áreas del espectro, proporcionando las altas longitudes de onda que las plantas necesitan para un crecimiento y desarrollo óptimos.
🚀 Consigue aqui tu Adlite:
https://marshydro.eu/collections/adlite-supplemental-lights/
🏠 : Marshydro 1.50 x 1.50 x 1.80, carpa 100% estanca con ventanas laterales para llegar a todos los lugares durante el grow
https://marshydro.eu/products/diy-150x150x200cm-grow-tent-kit
🌬️💨 Marshydro 6inch + filtro carbon para evitar olores indeseables.
https://marshydro.eu/products/ifresh-smart-6inch-filter-kits/
🍣🍦🌴 Xpert Nutrients es una empresa especializada en la producción y comercialización de fertilizantes líquidos y tierras, que garantizan excelentes cosechas y un crecimiento activo para sus plantas durante todas las fases de cultivo.
Consigue aqui tus Nutrientes:
https://xpertnutrients.com/es/shop/
📆 Semana 11:
Por fin los cogollos están gordos como puños, le voy a aplicar un riego mas con nutrientes y el resto de riegos a agua.
Ha quedado una planta enorme llena de resina, el aroma no alcanzo los cogollos para poder decir como huele, pero la carpa en general apesta

Likes
21
Share
@greenthumbartisan
Follow
Day 68 - April 18, 2021 (Day 1 - Week 3 Flower)
Kicking off day 1 of week 3 in flower.
Worked on Canopy for F1, F4, F5, F8 most of the day. Ladies were thick. Starting to see some flowers forming. :)
Inspected each closely and all are female with no signs of hermis.
Remounted camera for timelapses and shouldn't have anymore movement on future videos.
Foliar Spray (9:00PM):
* ~1 Gallon RO Water (EC 0.05)
* 5ML Liquinox Iron & Zinc
* 5ML CalMag+ per Gallon
* 0.5ML Mills Nutrients Vitalize per gallon
* PH 5.85
* EC 0.64
Watering:
010:00AM-10:08AM
~0.25 gallons per pot
02:00PM-02:08PM
~0.25 gallons per pot
6:00PM-6:08PM
~0.25 gallons per pot
8:00PM-8:08PM
~0.25 gallons per pot
Reservoir:
* tested 8:45PM
* 1.87 EC
* 6.05 PH (Reducing PH ~6.0)
* 73.22F
Lights:
* Gavita LEDs On 12-hours (10:00AM - 10:00PM)
** 10:00AM Lights On (100%)
* Gavita LEDs Off 12-hours (10:PM - 10:00AM)
* UV Bars On 8-hours (12:00PM - 8:00PM)
Air control:
70F-82F (79F AVG) (Lights On)
66F (Lights Off)
65%-70% (69% AVG) humidity (Lights On)
65%-80% RH (Lights Off)
~1353PPM CO2 (Lights On)
~680PPM CO2 (Lights Off)
Day 69 - April 19, 2021
Watering:
010:00AM-10:08AM
~0.25 gallons per pot
02:00PM-02:08PM
~0.25 gallons per pot
6:00PM-6:08PM
~0.25 gallons per pot
8:00PM-8:08PM
~0.25 gallons per pot
Reservoir:
* tested 8:45PM
* 1.49 EC
* 6.19 PH
* 73.94F
Lights:
* Gavita LEDs On 12-hours (10:00AM - 10:00PM)
** 10:00AM Lights On (100%)
* Gavita LEDs Off 12-hours (10:PM - 10:00AM)
* UV Bars On 8-hours (12:00PM - 8:00PM)
Air control:
70F-82F (79F AVG) (Lights On)
66F (Lights Off)
65%-75% (72% AVG) humidity (Lights On)
65%-80% RH (Lights Off)
~1269PPM CO2 (Lights On)
~720PPM CO2 (Lights Off)
Day 70 - April 20, 2021
Watering:
010:00AM-10:08AM
~0.25 gallons per pot
02:00PM-02:08PM
~0.25 gallons per pot
6:00PM-6:08PM
~0.25 gallons per pot
8:00PM-8:08PM
~0.25 gallons per pot
Reservoir:
* tested 8:45PM
* 1.87 EC
* 6.19 PH
* 73.40F
Lights:
* Gavita LEDs On 12-hours (10:00AM - 10:00PM)
** 10:00AM Lights On (100%)
* Gavita LEDs Off 12-hours (10:PM - 10:00AM)
* UV Bars On 8-hours (12:00PM - 8:00PM)
Air control:
70F-82F (79F AVG) (Lights On)
66F (Lights Off)
65%-75% (72% AVG) humidity (Lights On)
65%-80% RH (Lights Off)
~1260PPM CO2 (Lights On)
~700PPM CO2 (Lights Off)
Day 71 - April 21, 2021
Pushing on the envelope on humidity. Dumidifier should be ready for pickup mid next week at the lastest barring any delays. In a worst case scenario, I'll turn off co2 and exchange air in the room until I can get dehu setup.
Overall, been busy and haven't done much in the room. Just watching the growth, think we should be at the end of stretch, maybe one or two days to go. F7 has really been reaching up.
Also recived my Jack's Nutrients today. Will finish out this grow with Mills Nutrients and will give Jack's a go on next run. Pretty excited to compare.
Mixed 50-gallons nutrient solution:
** 40-gallons RO Water
** 10-gallons Tap Water (In replace of Cal-Mag+)
*** RO + TAP water base ~0.38 EC
** 0.5 ML Mills Nutrients Vitalize (per gallon)
** 10.0 ML Mills Nutrients Basis A & B (per gallon)
** 8.0 ML Mills Nutrients C-4 (per gallon)
** 1.73 EC
Watering:
010:00AM-10:08AM
~0.25 gallons per pot
02:00PM-02:08PM
~0.25 gallons per pot
6:00PM-6:08PM
~0.25 gallons per pot
8:00PM-8:08PM
~0.25 gallons per pot
Reservoir:
* tested 8:45PM
* 1.89 EC
* 6.26 PH
* 73.94F / 23.3
Lights:
* Gavita LEDs On 12-hours (10:00AM - 10:00PM)
** 10:00AM Lights On (100%)
* Gavita LEDs Off 12-hours (10:PM - 10:00AM)
* UV Bars On 8-hours (12:00PM - 8:00PM)
Air control:
70F-82F (79F AVG) (Lights On)
66F (Lights Off)
65%-75% (72% AVG) humidity (Lights On)
65%-80% RH (Lights Off)
~1288PPM CO2 (Lights On)
~710PPM CO2 (Lights Off)
Day 72 - April 22, 2021
Watering:
010:00AM-10:08AM
~0.25 gallons per pot
02:00PM-02:08PM
~0.25 gallons per pot
6:00PM-6:08PM
~0.25 gallons per pot
8:00PM-8:08PM
~0.25 gallons per pot
Reservoir:
* tested 8:45PM
* 1.89 EC
* 6.19 PH
* 73.94F
Lights:
* Gavita LEDs On 12-hours (10:00AM - 10:00PM)
** 10:00AM Lights On (100%)
* Gavita LEDs Off 12-hours (10:PM - 10:00AM)
* UV Bars On 8-hours (12:00PM - 8:00PM)
Air control:
70F-80F (78F AVG) (Lights On)
66F (Lights Off)
65%-75% (72% AVG) humidity (Lights On)
65%-80% RH (Lights Off)
~1325PPM CO2 (Lights On)
~660PPM CO2 (Lights Off)
Day 73 - April 23, 2021
Watering:
010:00AM-10:08AM
~0.25 gallons per pot
02:00PM-02:08PM
~0.25 gallons per pot
6:00PM-6:08PM
~0.25 gallons per pot
8:00PM-8:08PM
~0.25 gallons per pot
Reservoir:
* tested 9:30PM
* 1.77 EC
* 6.19 PH
* 73.58F
Lights:
* Gavita LEDs On 12-hours (10:00AM - 10:00PM)
** 10:00AM Lights On (100%)
* Gavita LEDs Off 12-hours (10:PM - 10:00AM)
* UV Bars On 8-hours (12:00PM - 8:00PM)
Air control:
70F-88F (75F AVG) (Lights On)
66F (Lights Off)
65%-75% (72% AVG) humidity (Lights On)
65%-80% RH (Lights Off)
~1300PPM CO2 (Lights On)
~730PPM CO2 (Lights Off)
Day 74 - April 24, 2021
Watering:
010:00AM-10:08AM
~0.25 gallons per pot
02:00PM-02:08PM
~0.25 gallons per pot
6:00PM-6:08PM
~0.25 gallons per pot
8:00PM-8:08PM
~0.25 gallons per pot
Reservoir:
* tested 9:30PM
* 1.77 EC
* 6.19 PH
* 73.94F
Lights:
* Gavita LEDs On 12-hours (10:00AM - 10:00PM)
** 10:00AM Lights On (100%)
* Gavita LEDs Off 12-hours (10:PM - 10:00AM)
* UV Bars On 8-hours (12:00PM - 8:00PM)
Air control:
70F-82F (79F AVG) (Lights On)
66F (Lights Off)
65%-75% (72% AVG) humidity (Lights On)
65%-80% RH (Lights Off)
~1350PPM CO2 (Lights On)
~680PPM CO2 (Lights Off)

Likes
4
Share
@cangrowz
Follow
So wir neigen uns dem Ende von diesem Grow, Denke eine Woche lasse ich sie noch stehen. Dachte nicht die beiden bauen nochmal so auf. So im großen und ganzen bin ich sehr zufrieden mit dem Grow gewesen. Einen letzten Nachtrag nach der Ernte mache ich noch. Der nächste Run wird Lemon Haze :)

Processing
Likes
32
Share
@Teamdirtbag2
Follow
Plants are going into flower. I took night time pics so you can see them sleep. They are a all looking great. This girl is shorter at the moment at 18 inches. Very nice branching on all three plants. I should defoleate and remove some of the bottom branches now.

Likes
5
Share
@LittleBigTrees
Follow
Trichomes we're cloudy with almost no amber so I took the opportunity to harvest before they started to turn amber.
The smell from them all is unique, all four are different from one another in both smell and appearance.


Likes
2
Share
@regionallystoned420
Follow
Didn’t record footage of veg stage but it was in veg for just over 7 weeks and flowered at just spot on 8 weeks . Nice tight buds. Heavy stone but won’t make you too lazy to get about your day like a cheese almost


Likes
29
Share
@GrownwithLED
Follow
The KRITIKAL-K from Kannabis Seeds grew very well with lots of side-branching and developed HUGE buds. The plant KK#1 had the BIGGEST harvest amount from any single plant, this one plant harvested 92,1 gram of dry bud! Unfortunately the plants also develop a huge amount of leaves on the buds, therefore she is lot of work during harvest time. The dried buds have mildly spicy aroma to it and smoke very smoothly. The potency is above average and helps well against my back-pain. All in all a nice daytime smoke and a HUGE HARVESTER!


Likes
6
Share
@AlbasDiary
Follow
Buenos humos jardineros!!!
Una semana más!
Como podéis ver crecen sanas.
Ya las podé y voy a abonarlas esta noche.
Estamos sufriendo un poco el calor, pero vamos bien💪💪
Hasta la semana💚💚

Likes
39
Share
@Hazecat_420
Follow
Las altas temperaturas han persistido es por esto que el riego ha sido más seguido variando siempre entre fertilizante y agua. Esta vez ya se utilizó Flawless Finish para este último proceso, una vez secándose el sustrato se comienza con la cosecha. Ha sido un buen cultivo. Veremos como termina esto. Seguimos ! 👽💪
Likes
4
Share
@pzwags420
Follow
gsc is about a week away from harvest blueberry will be shortly after and og kush plus blueberry muffin are a little longer still, they were slow to start flowering.


Likes
58
Share
@pifflestikkz
Follow
Day 78
Day 28 flower
19/07/24 Friday
Started the week with a good watering as she had a double feed end of last week. She took 4L de-chlorinated tap water pH 6 and no run off, added another 1L and see run off forming on all sides.
She is a happy, strong 💪 plant !!
The buds development is nice on this strain! I like to see the calyxes stacked like this, I'll get some macros tomorrow.
Smelling like lemon sherbet it's insane 🤯 or a old school sweety shop.
Day 79
Day 29 flower
20/07/24 Saturday
Nothing to report.
Day 80
Day 30 Flower
21/07/24 Sunday
Big feed again, de-chlorinated tap water pH 6 added nutrients.
Seeing her stack now 🤩
Smells getting stronger daily 🙌 💚
Added a short video.
Day 81
Day 31 Flower
22/07/24 Monday
De-chlorinated tap water only today pH 5.9 and watered in 5L had a little run off. She is getting so thirsty it's awesome!
She is starting to stack them calyxes.
Update on pictures and video 📸🤩
Day 82
Day 32 Flower
23/07/24 Tuesday
FEED again today , De-chlorinated tap water pH 6. Full 5L had about 300ml run off.
She is so thirsty !! 5L a day now.
But it's showing, calyxes are stacking beautifully, the trichomes production is nice and starting to have a magical effect with flash 📸 🤩
Day 83
Day 33 Flower
24/07/24 Wednesday
De-chlorinated tap water pH 6. Did 4L and started to see run off so left at that.
Day 84
Day 34 Flower
25/07/24 Thursday
END OF WEEK
She really has packed on weight this week, thirst and hunger is hard to keep up 😅
Smells phenomenal, looks insane.
Pic+Vid update

Likes
18
Share
@Grower_Of_Persia
Follow
week intel:
im felling in love with them everything is good . this week was time of second net layer , the first layer was for spreading the branches and doing LST now the second layer is for supporting branches for later weeks when the buds gain weight and gets heavy the net will hold branch stand up without benting.
stresses:
im just gonna cause a little E.C stress to raise the terpens. i found their max tolerance is 1.9 E.C so im not gonna reach or get close to that amount again and beside this wont cause any more streses untill week 6 that will do second pruning and we are done with trainings then.
feeding:
as always im feeding plants 3 times per week with nutrients , no plain water at all, just with nutrients with adjusted p.h at this order :
day 1 : i feed them heavy with silicate +base nutrients(calcium & micros + Bloom) and karbo about 950 ppm - 1.8 e.c to cause a little e.c stress.
day 3 : i feed them low dose for start of Green House Feeding Booster around 267 ppm - 0.6 e.c alone cuz this bad boy is very strong.
day 5 : i feed them with medium dose of Top-Max around 160 ppm - 0.3 e.c to let them recover the stresses and eat the previous nutrients untill next feed at next week
and the next 2 days will rest and eat :D
just remember never feed them plain water besides the first week of germination always feed water with nutrients to feed them right p.h every time and to avoid excess water problems, and let them eat the previous meal for 24 hours and dry the soil, so at total only feeding nutrients 3 times a week other days let them dry and rest

Likes
Comments
Share
@Organic_bud21
Follow
In der 6ten Woche Lag der Fokus auf Erholung von umtopfen, damit ich vor der Blüte Blätter und Triebe entfernen kann, die ich nicht benötige. Zum Ende der Woche habe ich dann das Erste Netz eingezogen und mich geärgert, warum ich es nicht schon früher gemacht habe. Naja man lernt jedes Mal dazu. Den Abstand zur Lampe habe ich auf 60cm verringert.
Likes
50
Share
@SolitudeCorners
Follow
Sapphire scout og bred by Humbold this phenotype surprise me a lot, frosty resins the amazing bud shape and dense. Intense flavor and aroma of pines,flower.
Sadly humboldt not available in seedcity now so I purchase ripper seed to grow next season instead. Enjoy growing mate🎉

Likes
37
Share
@Brujha77
Follow
Beginn Woche 7 Blüte
Langsam legen die Buds an Masse zu.
Außer Tank füllen ist nix zu tun als Abwarten😉
Die 50l reichen so 4-5 Tage dann muss wieder nachgefüllt werden.
Tag 47 Blüte
Bei der rechten und mittleren scheint es Herbst zu werden🥀🥀
Die linke steht noch in einem recht Satten Grün.
Likes
65
Share
@Dendegrow
Follow
Woche 4 bricht an und es läuft hervorragend! Die Orange Sherbet bekommt diese Woche frischen Boden: eine Mischung aus Bio-bizz All-Mix und Greenhouse-Feeding, perfekt für die letzten Vegetationswochen und blüte. Zudem hat sich die Orange Sherbet sehr gut mit dem Backhefe-Buttermilch-Melasse-Experiment entwickelt, was zu einem starken CO2-Anstieg auf bis zu 1500 ppm geführt hat. 💨 Ich bin gespannt, wie sie sich in der neuen Umgebung entwickeln wird. Auf der anderen Seite explodieren die Frozen Black Cherries förmlich in der Hydroponik! 🌱 Die Entwicklung ist beeindruckend, und ich könnte nicht zufriedener sein mit ihrem Fortschritt. Die Blütephase rückt näher, und ich bin gespannt, wie sich alles weiterentwickelt! Ich halte euch auf dem Laufenden! 🚀
Week 4 is here, and things are going great! The Orange Sherbet is getting new soil this week—a blend of Bio-Beth All-Mix and Greenhouse-Feeding, setting her up perfectly for the final weeks of vegetation and . Additionally, the Orange Sherbet has responded well to the back yeast-buttermilk-molasses experiment, resulting in a significant CO2 increase of up to 1500 ppm. 💨 I'm excited to see how she adapts to her new environment. Meanwhile, the Frozen Black Cherries are absolutely thriving in hydro! 🌱 Their growth has been phenomenal, and I couldn't be more impressed with their progress. The flowering phase is getting closer, and I can't wait to see how everything unfolds! I'll keep you updated! 🚀