
Likes
Comments
Share


Likes
59
Share


@Ganjagrandaddy
Follow
Day 56 (flowering day 16): My stars of the show right here. These plants are beasts. I can only imagine how they would grow outside.
I managed to get #1 as she had just gone to sleep. Her wilted look is due to having enough light for the day so she has dropped off like granny after Christmas Dinner while the kids carry on .lol The structures on these are amazing. They have een slower to flower and I expect a mid Jan 2020 harvest.
#1 Sleeping beauty has not missed a beat the whole grow. She continues to wring every last morsel of nutrition from her soil. Tons of bud sites and each branch is looking like a mini version of a whole plant!!.
#2 has een moved to the outside for more ligjt and so I can watch her more. she has shown signs of calmag issues so I have made sure to keep that up with the mega crop too.
#3 while a lot less wide , has a very thick under belly to her branching. she should support a lot of weight.
These ladies will benefit from the earlier harvested strains by getting a light each it seems. let's see what 300w each can do for their lady two weeks.
Merry Christmas all

Likes
210
Share


@Rock_n_Roll_Randy
Follow
• This is what's in the box. The new fce6500 👍. Now i got the fce6500, the fc4800 and the tsw2000 that will be in the 8x8 Grow Tent 🤘🤘🤘🤘. Its so bright now I can probably get a nice tan in the tent🤣🤣🤣🤣👍. Next grow will be awesome so stay tuned for my next new diary that will have almost 50 strains🤯👍🤘. I will be keeping the drivers for the fce6500 and fc4800 outside the tent to keep the heat down. They don't get that hot but it will be better outside and I won't worry about extra heat.
• New FC-E6500 Led Grow Light-FC-E6500 grow light with 3978pcs OSRAM BridgeLux Diodes & Moso Driver, market-leading PPF 2.7 µmol/J, Max 2.5g yield/watt with 30% higher Average PPE, more cost-effective compared with other same type lights.Only consumes 650W, perfectly cover 5x5ft (personal), 4x4ft (commercial) grow space.
• Innovative Precise Uniform Lighting-Built-in removable bars interval & dimmability enable the exact & dynamic PPFD control over each of the plant growing stages, FC-E6500 detachable bars deliver
• Superior Heat Dissipation: Real Aluminum heatsink together with 6 slim profile passive cooled bars (THINNER & LARGER surface) and detachable Meanwell Driver, create less heat, save 50% energy than other old grow lights! Driver can be mounted remotely on the side of a grow tent/rack or on an adjacent wall to remove heat from grow space.
• Full Spectrum UV IR LED: With Yield Max spectrum (660nm Osram enhanced Deep Red,2800k-5000k,730-740nm IR,380-410nm UV LEDs), Average PPFD FC-E6500 LED grow lamp enable cultivators to produce Density Buds, perfect for full-cycle hydroponic,soil,grow tent/room growing.
Dimmable Commercial Grow Light: Cost-efficient,easy dimming & daisy chain max up to 20 lights, IP65 Waterproof, master light easily controlled for commercial & home horticulture.
FOR EVERYTHING MARS HYDRO VISIT:
www.mars-hydro.com
PROMO CODE: rocknroll
VISIT THE ALIEXPRESS STORE:
@marshydro_aliexpress2
Instagram: @marshydropenny
GET THE BEST FERTILIZER ON THE MARKET👍 GREEN BUZZ
https://greenbuzzliquids.com/
#greenbuzzliquids
@GreenBuzzLiquids
https://youtube.com/channel/UChU5ZWwNi-DvnO3oWVU3ceA
https://greenbuzzliquids.com/en/shop/
PROMO CODE: rocknroll FOR 15% OFF
https://www.youtube.com/watch?v=8hEqyS1jPpI
https://growdiaries.com/diaries/112437-grow-journal-by-rock-n-roll-randy/week/593118
GET THE MAX FROM MARS👍: Welcome one of the newest members of the Mars Hydro family🤜🤛🤘. The Mars Hydro FC 4800 480W LED Grow Light can accommodate up to a 4' x 4' area for flowering. It has OVER 2000 LED chips consisting of the best selling Samsung LM301B diodes which has a Luminous Efficacy of: 220 lm/W
0.2 W, 3 V mid power,
Osram 660nm Diodes, Infrared light and UV LIGHT👍. It boasts the incredible efficiency of 2.8 µmol/J, maximum 2.5gram yield per watt with 30% higher Average PPFD. This High-intensity spectrum is beneficial for plants at all stages - from veg to bloom, and creates Big dense Buds👍. achieve 50% higher yields & quality compared with the old lights! Only consumes 480W for 4x4ft personal grows, and 3x3ft for commerical grow. It comes with a dimmer and daisy chain function with a maximum of up to 15 lights, the master light controls the rest👍. Wide 6-bar design offers even & wide canopy coverage and can maximizes your grow space. slim 180° FOLDABLE DESIGN... YES I SAID FOLDABLE🤘🤣 , making it compact and easy to install, it's IP65 WATERPROOF and will give you no worries while growing in a humid environment and makes it a flexible high performance commercial grow light for enormous SUPER FROSTY yields.😛😛😛. MARS GETS EM FROSTY BOYS👍
AWESOME HEAT DISSIPATION: The Low energy consumption FC4800 growing light has 6 passive-cooled bars and an aluminum heat-sink a removable driver you can upgrade later or have it outside your tent. with zero noise you can save up to 50% in your electricity bill compared to HID's or HPS lights!
It also has a removable driver so you can upgrade it in the future or have it outside your grow space for better heat control in your growroom👍
UPGRADED FULL SPECTRUM: Yield Max Spectrum with enhanced red (Top-Bin Samsung 3000k-5000knm, Osram 660nm Deep Red), speed up blooming & fruiting, perfectly suited for full-cycle growing. The FC4800 LED grow lamp was born for Big Buds, perfect for commercial, grow tent, grow room, hydroponics, and all soil grows.👍
THE BEST SAMSUNG DIODES: THE FC4800 has Top Bin genuine Samsung Osram Diodes, combined with remarkable 2.8 µmol/J Efficacy, 30% higher Average PPFD, 50% less energy consumption, to maximize your yields. They give you a TRUSTED 3 years warranty 100% Satisfactory guaranteed!!!
The MARS HYDRO 8x8 Grow Tent interior is made of a unique diamond design mylar which is highly reflective. (Other companies mylar and reflective rate is as low as 50%, and it won't provide efficient light. They use thick 1680D oxford canvas, and being double stitched, it is tear proof and perfect for locking in the light. Their grow tent keeps 100% of the light inside the tent and helps your plants absorb more light. EXTRA-THICK material means No light leaks or rips at all.👍
Strong Stable metal corner adapters and poles are the trustful supporters of the tent. It's very sturdy, neither rusting or paint flaking off. quick and easy tool-free setup. They use heavy-duty metal zippers, with double layer black lining, by far the best on the market which creates a light-proof seal.
The Easy observation windows are made by double layers of cloth. Observe the growing conditions of your plants without opening the tent and avoid disturbing your plants. The observation windows also serves to dissipate heat and ventilate the air.
The tent includes 2 removable waterproof floor trays to hold soil and water. The removable tray can be taken out to wash easily.
They guarantee the grow tents are easy to install even if you've never done something like this before. Clear Instructions and no tools needed! They also offer 30-day unconditional refunds for quality problems. Just contact their friendly 24 hours customer service 👍
Processing
Likes
6
Share


@Silverback_Guerilla
Follow
TUESDAY 9/3:
A the trichs on a couple of them are getting pretty cloudy, but they still have at least another week of flushing ahead of them. The rest have a couple weeks left to go I think.
WEDNESDAY:
I was out at the property for awhile today, hosed off the horsies and cleaned their hooves really well. I was there long enough that I was able to move the plants into direct sunshine for an extra couple hours. I fed everybody with a half-gallon of water including bembe, terpinator, tiger bloom, beastie bloomz, armor si, and big bloom...just enough to wet their whistles.
THURSDAY, FRIDAY, SATURDAY, SUNDAY:
I was sick as a dog . 2-day stomach virus, followed by an acute pancreatitis attack...
😷
MONDAY:
I gave them all about a half-gallon of aquarium water with some bembe, beastie bloomz, and tiger bloom.
Likes
2
Share

@TheOhioGrowRoom
Follow
(Week 4)in 5 gallon pots, I’m Lst training with bud trainer (bud huggers) to keep the canopy even. I’ll add a scrog net next week.

Likes
12
Share


@Lac78
Follow
Last week before the chop, girl is looking pretty 😎
😳 last few days left and she is getting much more chunkier 🤤
Likes
5
Share


@RastaRick
Follow
Blackberry Gum Auto looks real hungry signs of deficiency... Bio Pk 5-8 dosage upped to 15ml in 1 liter per week for everyone
Buds starting to gain some weight


Likes
22
Share


@MrsGreen_98
Follow
1st March Mon -
So it’s been 3 weeks since I planted her and coming into the 2nd week of veg. I’m happy to say she’s doing well we have now got 2 more leaves so she’s growing well.
2nd March Tue -
Updated grow diaries today put out a question on her leaves so will update what I find out. Think I will start giving nutes in a few days but not too sure how to go about that? Will record what I find out, any comments appreciated!!!
3rd March Wed -
Nothing new to update today just letting soul dry a little before I add nutes tomorrow.
4th March Thur -
First day on nutrients!! Got some fresh ph balanced water at 6.5. Added 4 drops each of Dutch pro soil A+B and 3-4 drops of cal mag. This was added to 2 pints of water gave enough to the plant for it to be damp. Very excited to be moving on with the grow!!
5th March Fri (day 14 since sprout)
Very excited to see the plant is responding well to nutrients the leaves are getting much bigger looking forward to see what she has to offer in the 3rd weed of veg.
....disaster struck when I was lowering the light it completely broke off and squashed the plant for no longer than 2 seconds. Only break I can see is on one of the lower leaves but hopefully it’ll bounce back!
6th March Sat -
Very very disheartened today! :( but I can only try and see what happens! So I had to take a few hours away after the incident happened because I was ready to go hulksmash on the whole grow tent 😂 but with some advice from a lot of growers on here I’ve got a little motivation to continue! So I’ve tied the plant up with a stick and some thread I’ve very loosely tied it to the stalk so she straightens out. Gave her a little more water with some nutes so hopefully aid her. Will keep everything updated on how she grows with the incident in mind. Any advice at all would be very much appreciated!
7th March Sun -
So we’re at the end of “week 2” after the incident I think my girls doing well. I’ve put soil upto her bottom leaves to give her more support as advised!! Gave her some water with nutes hope she picks back up this week. Excited to see how she transforms and grows!! Happy weekend guys!
Likes
42
Share


@DrLaggis
Follow
🌱 Day 43 - Beginning of the Third Flowering Week 🌱
Hello grow friends! 🌿 Today marks the start of the third week of the flowering phase. This week, I’m trying to adjust my nutrients a bit. I plan to slightly increase BioBizz Grow, as well as BioBizz Bloom, according to the feeding schedule. 🌱💧
I’m continuing to prune and thin out the plants a little each day, aiming to keep them stress-free. ✂️😊 The terpenes and buds are developing wonderfully so far, but I’m still struggling with very high humidity levels. 🌡️💦
Since my grow setup is on the second floor and we’re currently experiencing humid temperatures here in Germany, it’s been a challenge. I’m trying to reduce the humidity from 62% down to 50% during the day, but it’s proving difficult. 🌬️📉
I’ll keep you updated on how things progress! 🌿✨
🌱 Day 47 - Everything is Going Well 🌱
Watering and Nutrients
Today, I watered and fed the plant again. 🌿💧 Each plant received 1 liter, which is about 10% of the pot's volume. The plant is responding well to the nutrients, and growth is steady.
Defoliation and Light Exposure
I’ve done some light defoliation to ensure that every part of the plant gets proper light exposure. ✂️💡 My goal is to avoid any shadowed areas, allowing the buds to develop fully.
Temperature Management
The temperature is still quite high, reaching 27-28°C during the day. 🌡️🔥 I’m finding it difficult to bring it down, but the plant seems to be handling it well. To maintain a healthy environment, I keep both the fan and the exhaust system running on the highest setting, ensuring good air circulation. 🌬️🔄
Humidity Control
Currently, the humidity is sitting at around 45-50%. 💧 It’s not perfect, but I’m monitoring the plant closely and making adjustments as needed.
Careful Defoliation
I continue to remove one or two leaves each day to minimize stress on the plant. 🍃🌿 This slow, careful defoliation ensures that the plant stays healthy while making sure all buds have access to light.
Guard Dogs on Duty
My dogs took a peek into the grow tent today and are now keeping a watchful eye over the plant. 🐕🌱 They’re doing a great job of “guarding” it! 🐾
I hope you enjoyed this update! I’ll continue to keep you all informed, and don’t forget—I post daily update pictures of the plant! 📸🌿 Stay tuned for more!
Likes
19
Share


@Naujas
Follow
everything turned out very well :) and it's only with 50w and with 40x40cm space :) It was an interesting journey with her, a slightly different cultivation and old mistakes were discovered :) the flowers are not dense, but they are really very, very sticky :) I'm happy:)
Likes
17
Share


@Nicogreen
Follow
Kunne ikke være bedre og har vist fundet ud af en del siden sidst år må man sige,, jeg skal starte på vækst hus gartneri skole 🚸 til september 👌 😇 💪 🇩🇰 🤞 🙏🏼 💚 💚 ❤️
Likes
15
Share


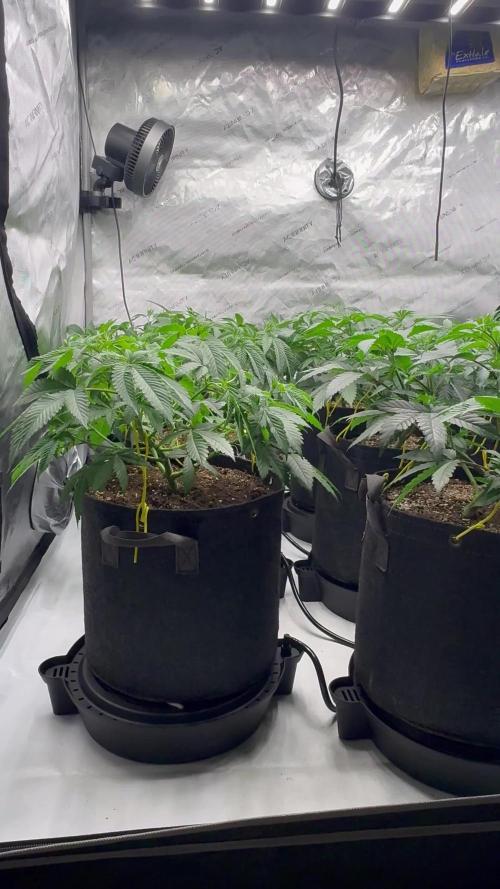
@SouthernOnions
Follow
Lots more stretching in week 7.
Plant #1: has finally shown some improvement and has hit the trellis. She's at 16 inches.
Plant #2: looking beautiful she's second tallest at 28 inches.
Plant #3: getting thicker than other but slowing in stretch she's 3rd tallest in the tent at 25 inches.
Plant #4: stretching for the sky! She's stacking bud sites everywhere and absolutely stretching her days away. She's at 34 inches!
Still performing a good Defoliation twice a week to upkeep light penetration through the canopy. Still using 1tbsp(3tsp) per 5 gallons of solution(or about 0.6tsp/gal) which is approx. 3 grams per gallon, of both the B1&B2 nutrients from FloraFlex. This is much lower dosing than most feeding schedules but they have responded amazingly well to this schedule. They're sucking down my 12 gal res in about 5-6 days now.

Likes
11
Share


@Kirsten
Follow
18.1.25:
Gorilla 🦍 Cookies 🍪 is firmly in week 2.
The plant is looking very good, sturdy.
I have been feeding with about 200 ml of dechlorinated water PH'd to 6.3 with the following nutrients;-
♡ 4ml Biobizz Bio-Grow
♡ 4ml Biobizz Fish Mix
♡ 2ml Cal-Mag and
♡ 1/4 g sprinkling of Ecothrive Biosys.
Trying to give the extra boost of Nitrogen to keep vigorous growth, and maintaining the nice lush green 💚 Cal-Mag was used from the beginning of this week.
Thanks for checking out my diary 🍃 ✌️
Likes
17
Share


@Cultivandomedicinanatural
Follow
Bueno esta semana es la última de vida de nuestras pequeñas, un tamaño reducido y muchas juntas... pero una calidad.. dureza y resina... envidiables.. Esta semana usamos solamente agua con un ph de 6,2 y líquido solo usamos la final solution de b.a.c para limpiar nuestras raíces, al igual que aumentamos la cantidad de agua por riego para ir lavando bien nuestras raices. El olor es muy fuerte pero un aroma apetecible a más no poder... en cuanto abro el armario para los riegos y cuidados sale un olor... que si no fuera por el generador de ozono apestaría la casa!😍😋 En grandes rasgos una variedad de floración relativamente corta.. y con unos resultados impecables.. Hay una media de 5 puntas por planta y algunas incluso más!😍

Processing
Likes
1
Share


@Lifted
Follow
3rd week,not much has changed. It's starting in its 3rd node and depending on how much growth there is this week I may start LST

Likes
1
Share


@DeeDeeKushner
Follow
Overall, I would definitely grow this strain again and probably will to see if I can do better a second time around.

Likes
4
Share


@S2993
Follow
the bud sites are getting lots of white hairs and are growing quite big almost too fast.


Likes
6
Share


@High_And_Hydro
Follow
- Ich hab die erste Woche des Biobizz Allmix Düngeschemas gestartet und gebe wie immer erstmal vorsichtige 100%, da meine Erde an sich durch den Kompost recht potent sein sollte.
- Außerdem hab ich mit meinem Calmag-Rechner mein Leitungswasser angepasst. Die Werte könnt ihr auf den Bildern sehen.
- Den PH-Wert passe ich ebenfalls auf 6,5 an.#
- Die Lampe bringt zur Zeit etwa einen PPFD-Wert von 350 - 360 µmol/s/m² bei 18 Stunden Beleuchtungszeit (DLI von 22 - 23 mol/d/m²). Sie wird aber nur eingesetzt bis es warm genug draußen bleibt. Tagsüber stehen sie jetzt schon draußen, sofern es nicht regnet oder stürmt.
Die Guava macht sich hervorragend und sie ist sehr uniform mit den anderen Fastbuds Strains bis jetzt. Sieht gut aus finde ich 💪😁👍
Likes
5
Share


@Rko41
Follow
Elle a tous vécu plantation tardive dernière semaine de juin , météo pourrie, chenille ect.. et à fini en indoor


