The Grow Awards 2026 🏆 


Likes
Comments
Share
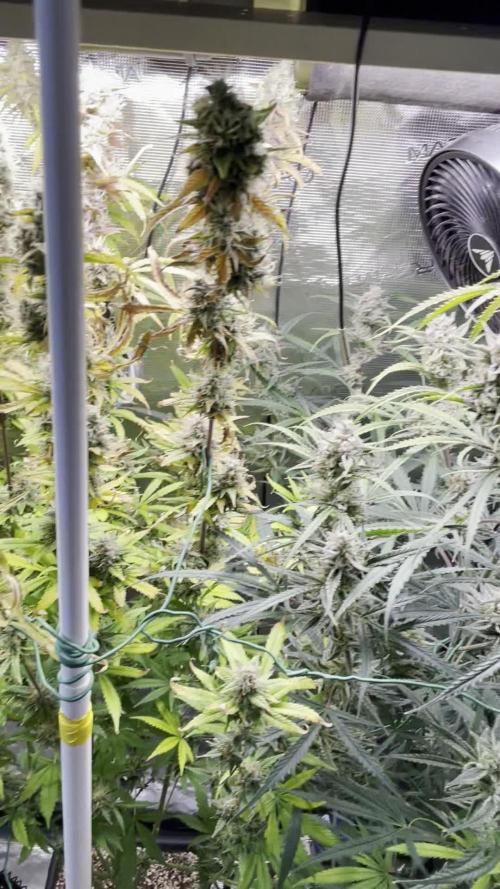
@Piro420
Follow
Finally the stretched stopped.
Cut about 10 tops bent about 20 with 90s. Still right in the lights. They are looking very happy even though they are so close to the light ( thanks to high c02 levels most likely.)
Another week or 2 before I cut the temps and co2 levels down.
Been trimming all leaves below light line.
Stinky and brutally sticky I feel like Clark griswold with pine sap when ever I am bending the tops and such..
I think even with them being in the lights I will still get a few pounds of premium flower to smoke :)
Likes
16
Share
@eldruida_lamota
Follow
Vamos familia, actualizamos la segunda semana de vida de estas Panty Punch de Seedstockers, salieron 3 una se resiste a tirar adelante, veremos cómo progresan.
Empezamos añadiendo varios productos de la gama de Agrobeta.
Temperatura y humedad dentro de los rangos correctos.
Muy pronto realizaré el trasplante correspondiente a 7 litros.
Vamos viendo cómo avanzan estas próximas semanas.
Agrobeta:
https://www.agrobeta.com/agrobetatiendaonline/36-abonos-canamo
Hasta aquí todo, Buenos humos 💨💨💨


Likes
24
Share
@3lementa1
Follow
Growing well. Just fed 12 cups Ph'd water (6.3). Lots of cold humid air coming in from outside, plus with the half soil half coco mix I think they're holding water a long time. They're only needing water once a week right now.
They were not impressed with the water-only feeding. Some leaves got burnt tips, some got small yellow dots that look like spores or insects but I don't think are either. I think it's some kind of nutrient or pH unhappiness. I only gave 2/3 of the amount of water I normally would, hoping that they will dry out soon and I can give a proper feeding and check runoff pH.
I left them alone for a couple days and boosted the 1000w back up to 100% to dry things out a bit more. The buds loved it but I think it's damaging the leaves a bit. I put it back down to 75% just now.
I forgot to adjust the intake fan from outside down to low overnight from medium during the day and leaf temp was down to 13.3c when I woke up. Can't be doing that either.

Likes
6
Share
@mk420
Follow
49 days from planting seed.
All 4 plants are now flowering
The runt has grown a little this week and is now flowering, I am starting to think that it could be a different strain? look at the difference in appearance compared to the others. It is now 17 inch. looks more like an indica strain?
The other three are looking good, 2 measure at 30 inch and the third is slightly behind at just under 26 inch. All three look healthy. lots of flowers appearing.
No changes to my setup this week other than moving my light up a few inches, starting to run out of head room in my short tent, will have to consider moving the fan and filter outside my tent if they get any taller.
No rhizotonic in my reservoir now but I have increased my A & B to 3ml per litre.
Likes
38
Share
@PapaNugs
Follow
This was a week. The drama at the beginning was one of the fans falling down onto my gorilla cookies. It snapped a branch off really bad but the girl hung onto it by threads. I duct taped her up and somehow took. 😎😢
I defoliated and did a little lst on a couple of the girls. Nothing major. Also increased the light to 80% now. I think I'll stay there until late flower when I switch to 12/12.
I also added blocks to a couple of the girls to make the canopy level. That put the light at 15" as recommended by Medic Grow.
This Gorilla Cookie is a beast. Even took a beating from a falling fan but kept going. She'll do the best out of the group I bet.
Dimmed to 80%
Here are the lights details:
Medic Grow Mini Sun-2 150W LED
Model: MN150-022
Spectrum mode: V1
Efficacy: 2.8 umol/J
Thanks for stopping by!
You can find the light on Grow Diaries:
https://growdiaries.com/grow-lights/medic-grow/mini-sun-2-150-watts
You can find the light on Medic Grow's website:
https://medicgrow.com/
Processing
Likes
15
Share
@donovanliam
Follow
Just topped it couldnt wait for it to get to 5-6 nodes. Was getting big looking healthy and at 4. So I topped it at the 3rd node the 4th was big enought to use as a cutting got 5 all together gave them to my dad he likes gardening not smoking. And there is a picture of all the plants in my tent the royal gorilla. Two mango sapphire in the darker pots. A chocolate haze is the more mature of the lighter pots. The seedling is a white widow that's going outside probably not the late June early July.

Likes
14
Share
@ParadiseGrower
Follow
Okay guys here my total review.🍭
I state that this is my first indoor plant so my skil ls are still basics, but i will learn 😇
Genetisc quality: IS TOP, Fastbuds is a guarantee of quality for autoflowering strains. (Goodjobs fastbuds❤️).
The effects and the quality of the smoke is sometimg that need head processed, so let my some time😉.
IN THE END, a valid strain.💪
Likes
4
Share
@CalGonJim
Follow
1/4/26 1:26 AM. This is me starting a diary accidentally a day too early iced tea had some problems. The cocoa had something in it and the root hit it and it screwed up so I’ve flushed it out. I put another seed in and she’s doing just great. I’ve never had this happen before so I must’ve. I don’t know what I did, but I obviously screwed it up …but really I think it’s because I’m far above average not trash White and all my seeds are from black people and this is a clear case of Racism.😡😂😂😂 I’m gonna write a book about my struggles. I think you’re all gonna really enjoy it.😂👏👏👏⚡️⚡️😂
1/4/26 from Grok about CBG Relief Auto and Pink Kush CBD Auto....
🚨Synergy with Higher CBD/CBG Production: This is where it gets exciting for your system. CBD and CBG plants (low-THC by nature) respond well to biostimulants like 👨🔬aminos because they emphasize therapeutic/terpene-focused traits over high-THC⚡️ potency. Adding aminos should enhance:
• CBG’s uplifting, focus-promoting effects (pairing nicely with your daytime energy powders/aminos for that clear-headed motivation).
• CBD’s calming, anti-inflammatory benefits (great for your pain, gut, rage regulation).
• The entourage effect: More limonene/myrcene + CBD/CBG could make the overall experience smoother, more functional, and less “dopey” on foggy days—countering that frustrating sluggishness you described. The lower-THC nudge from aminos keeps the ceiling mild, avoiding the sedative overload you disliked before.
• Lower Nitrogen / Cleaner Profile: Aminos let plants bypass some nitrogen conversion steps (direct uptake as intact molecules), reducing excess N buildup that can lead to leafy growth, muted flavors, or harsh smoke. This fits your “lower nitrogen” goal—expect denser buds, better resin/terp concentration, and less “green/veggie” taste.🚨
1/4/26 2:42AM The tub in 237 is clogged, AGAIN ..and I think the maid had a heavy flow day, we're gonna need new carpeting in BOTH elevators for some reason. And keep the butler out of the dogs room, he'll get carpel tunnel again!!


Likes
13
Share


Likes
2
Share
@viggagrow
Follow
After a few days of supplementing with co2, the plants grew very quickly
Likes
6
Share
@punktkomma
Follow
So far I kinda messed up getting everything done on time. Plants are harvested and in cure now. All in all, the plant would’ve had around 86g dry if I kept it all.

Likes
25
Share
@420DeepGrow
Follow
🍁💐 Runtz:
La Runtz de Zamnesia 🌱🔥 es una variedad de cannabis de alta calidad, resultado del cruce entre las legendarias Zkittlez 🍬 y Gelato 🍦. Este híbrido perfectamente equilibrado, con un 50% índica 🛋️ y un 50% sativa 🌞, combina lo mejor de ambas genéticas para ofrecer una experiencia intensa 💥, sabrosa 😋 y completa. Su nivel de THC puede alcanzar el 27%.
El TS1000 de Mars Hydro es una lámpara LED increíble para el cultivo interior 🌱💡. Ofrece una excelente combinación de potencia y eficiencia, perfecta para espacios pequeños y medianos. Su espectro completo simula la luz solar 🌞, ideal para todas las etapas del cultivo, desde la germinación hasta la floración. Además, el consumo energético es súper bajo ⚡, pero la producción es impresionante 🌿🔥. La distribución uniforme de la luz asegura plantas sanas y cosechas abundantes. Definitivamente es una gran inversión.
Para este Concurso usaré la gama de fertilizantes de Plagron tal como mandan las reglas
📆 Semana 2:
Se ajustó ligeramente el riego para evitar el exceso de humedad, ya que el sustrato tiende a mantenerse bastante húmedo debido a las temperaturas más bajas, pero no ha habido signos de estrés en las plantas hasta ahora. La circulación de aire también parece ser óptima, ya que no se observa ningún signo de moho o hongos. A nivel de nutrientes, él comenzó a aplicar una dosis suave de fertilizantes, ya que las plantas están comenzando a establecerse bien en su etapa vegetativa.
En cuanto a plagas, no he tenido problemas de ningún tipo hasta ahora, lo que me deja tranquilo.
Lo que más me sorprende es lo rápido que se están desarrollando, y creo que la genética de este Runtz realmente se adapta bien a mi configuración.
Este comentario incluye detalles sobre el crecimiento, el ajuste del riego y nutrientes, el manejo del ambiente, y el estado general de las plantas, proporcionando un informe completo y detallado. Si hay algún aspecto que te gustaría añadir o modificar, házmelo saber.


Likes
3
Share
@Chubbs
Follow
Weekly update on these beautiful ladies. Did another defoliating this week as well as lollipopped them up another node. I feel it helps mature the lower flower sites and allows plenty of airflow though the leafs. I introduced bloom nutes as well as P&K.
All in all Happy Growing
Processing
Likes
9
Share
@Mr_nugs_lover_David
Follow
She looks very good,she ended up being very small very different to her sister lemon pie #2 plus my freaking dog took her off some leafs 😑🙄
She smell like gods vagina, such a very sweet and powerful lemony aroma,just so you can imagine,smell like moby dick but much more sweet. She's producing a hole lot of resin, unfortunately she's not going to be very productive due to his very small size, wish I could grow her again man 😔😣 I'm in love with this genetic
Likes
12
Share
@captaincondor
Follow
done some defoliation to expose bud sites getting ready to flip to flower shortly


Processing
Likes
6
Share
@field_nigga
Follow
A day late but
Yes looking good. You can observe the new set of leaves.
She's adapted nicely into a bigger container.