
Likes
Comments
Share


@nonick123
Follow
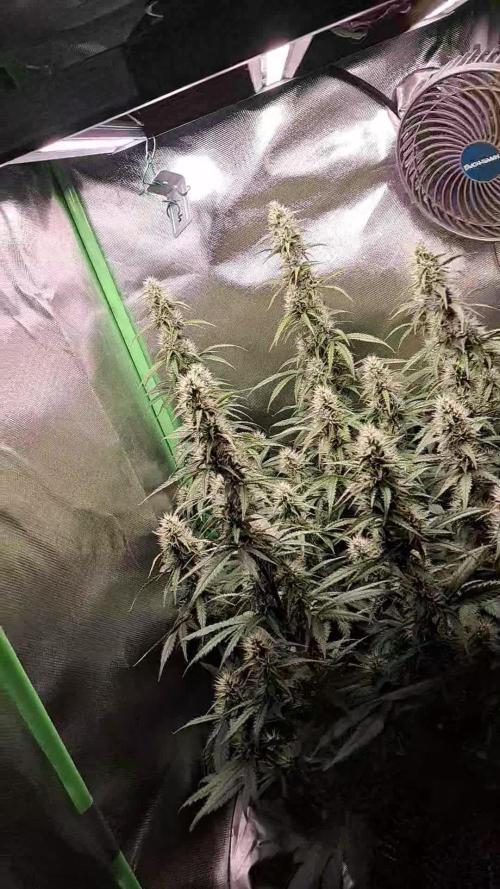
Día 66 (05/08) Cerrado por vacaciones
Día 67 (06/08) Mi amigo viene a casa a hacer un riego con 1 Litro de H2O pH 6,5
Día 68 (07/08) Cerrado por vacaciones
Día 69 (08/08) Vuelta de vacaciones! A ver como están después de 5 días sin verlas... 😱
Riego con 1 litro de H2O pH 6,5
Añado 3 cm de sustrato nuevo porque se ha compactado y se ven las raíces! 😢
Día 70 (09/08) Riego 500 ml H2O pH 6,55
Eliminación de algunas ramas bajas
Día 71 (10/08) Riego 500 ml H2O pH 6,55
Sesión de fotos semanal!
Día 72 (11/08) Riego con 1 Litro de Té Vegetativo de Lurpe Solutions. Preparación: 24 horas con bomba de aire (oxigenación) con ingredientes:
Green Sunrise 8 ml/L + Insect Frass 16 ml/L + Hummus Lombriz 8 ml/L + Melaza 1 ml/L + Kelp Hidrolizado 0,25 g/L
Aplicación foliar Kelp hidrolizado de Lurpe Solutions a 0,25 ml/l
💦Nutrients by Lurpe Solutions - www.lurpenaturalsolutions.com
🌱Substrate PRO-MIX HP BACILLUS + MYCORRHIZAE - www.pthorticulture.com/en/products/pro-mix-hp-biostimulant-plus-mycorrhizae


Likes
1
Share


@Elguacho420
Follow
Buenas a tod@s! Terminamos la quinta semana de floración de estás red cookie gelato. La variedad está bien, estás 3 son muy diferentes entre si, aún asi están lindas, a mí me gustan se q hay algunos "fallos" x lo q veo, x lo q leí... Pero se que hubo unos fallos de novato desde el principio, que para el próximo no pasarán, de a poco voy a ir mejorando en mis cultivos y sacar buenas y hermosas flores... Y nada, van bien... Vean las fotos... Buen finde para tod@s... Buenos humos.. 💨💨🇦🇷🤝🏻🇪🇦😎
Likes
17
Share


@DETOX
Follow
Empezamos su día 16 de floración con un buen puñado de nutrientes repartidos en dos tomas. Las plantas ya desprenden un ligero olor generalizado, hora de encender filtro y más potencia al extractor.
Dentro de unos días dejarán de estirarse para centrarse en la producción de las colas, hasta entonces, haremos la última defoliación de bajos para dirigir la ventilación en ese punto, así, por mucha humedad que tengamos, jamás tendremos hongos.
Feliz semana, buenos humos.

Likes
5
Share


@Ensign420
Follow
Greetings fellow growers 🖖 and welcome to my first grow ever. This adventure actually started several months ago when I decided to stop buying flower from dispensaries and just grow my own bud. How hard can it be!?
This is actually my second seed of this strain. The first bean sadly died due to over watering (sorry girl, RIP). I was literally watering the cube to the point where water was dripping from the bottom, then heavily sprayed the humidity dome and tray with the vents completely closed. Everyday. Multiple times. I never let the dome or try dry out. So after about 8 days of not sprouting, there was a funky smell of rot. So that was that.
Later I learned that rockwool retains a lot of water and can easily drown seeds. So a wet/dry cycle is best for rockwool germination.
So even after hours of researching and digging through forums and tutorial videos, I was still under prepared for this journey. Did not consider how delicate the germination phase is. Oh well. Lesson learned. Reset and try again!
I hope everyone is safe and stoned during this corona crisis. Just like everyone else in the world, I want this pandemic to be over with. But in the meantime, let's grow some weed! 🖖
[START OF WEEK 01]
Day 01 - Monday - 08/03/20 - Total Days: 001
-----------------------------------
- [0830]: Light Schedule: 24Hrs/0
--- Soaked cube in 5.5 PH water for 10 min. Did not shake water out.
--- NO NUTES! Only PH'd down to control the PH levels.
--- Did not use the default hole (way too deep).
--- Flipped cube upside down and made a shallow hole for the seed (less than 0.25" deep).
--- Placed seed in and pinched hole close. No additional water added.
--- Sprayed the tray and dome with straight water (5.5 PH).
--- Vents are cracked opened a for ventilation (about 1/4 opened each).
--- Distance between the light and tray was 53"
--- AC was set to 80 °F
--- Exhaust fan was set to 86 °F
--- Room average temp was at 85 °F
--- Dome humidity was at 85-99% when sprayed.
--- Allowing to completely dry before respraying.
- [2200]: Dome and tray were completely dry! Sprayed only tray and dome with more water.
Day 02 - Tuesday - 08/04/20 - Total Days: 002
-----------------------------------
- [0845]: Sprayed dome and tray in the morning. Everything was dry.
--- Hoping for the best!
- [2130]: Everything was dry again, so sprayed dome and tray at night along with a light spray on the cube.
Day 03 - Wednesday - 08/05/20 - Total Days: 003
-----------------------------------
- [0830]: Everything was dry again. Resprayed dome and tray. Slightly sprayed cube.
- [2125]: Hooo damn!! She popped! Am little stub is visible! Resprayed dome and tray again.
--- Still going 24/0 for lights.
- [+0033]: Just checked up on her and I swear she grew a bit taller! Getting excited!
Day 04 - Thursday - 08/06/20 - Total Days: 004
-----------------------------------
- [0845]: Wow! Went from a little stub to fully sprouted overnight! Everything was pretty dry again so resprayed dome and tray.
- [2200]: Tap root is visible! Over 1" long too! Just resprayed dome and tray again.
-- Going to prep for hydroton transplant tomorrow!
Day 05 - Friday - 08/07/20 - Total Days: 005
-----------------------------------
- [0930]: She keeps growing!
-- Added a bit of CalMag to the spray bottle (8 drops to 650ml of distilled water). Resprayed dome and tray. Water was at a 5.4 PH with 141 PPM.
- [1045]: Prepped the bubble bucket with 4.5gal of water. Water is high enough to reach about 0.25" above the bottom of the net pot.
--- Added 3 drops of Superthrive
--- Added 3.5ml of CaliMagic
--- Added 2ml Hydroguard
--- Then PH'd down to 5.6
--- Solution Strengh: 120 PPM
--- Water chiller is set to 20 °C
- [1100]: Transplant time!
--- Filled the net basket 1/3 with hydroton. When placed in the bucket, air bubbles are not visible, but are slightly below the surface (slight digging will reveal the water/bubbles below).
--- Removed plastic on rockwool cube and placed in basket, then filled around and covered with hydroton. Making sure to block any light from passing through the net pot and into the nutrient solution.
--- Covered with a half-bottle dome sprayed with the CalMag water from earlier.
--- Hoping for the best!
- [1300]: Raised Bucket 5" higher. Now light distance is 48" to top of bucket.
- [1820]: Lowered tent exhaust temp to 76 °F
--- Lowered AC to 75 °F
--- Raised bucket even higher so light distance is 30" to top of bucket.
- [2300]: Looking good!
--- Sprayed dome and surrounding hydroton with more CalMag water.
--- Attached timer to light! So new 18 Hrs On/6 Hrs Off light schedule.
--- Lights On: [1600] (4pm)
--- Lights Off: [+1000] (10am the next day)
--- Decided to go with lights on during the evening/night and off during the later mornings/afternoon (the hottest part of the day) to see if temps can be controlled better.
--- Please survive girl!
Day 06 - Saturday - 08/08/20 - Total Days: 006
-----------------------------------
- [0800]: Everything was dry. Resprayed hydroton and dome.
- [2000]: Here first night cycle seemed to go well! Get'n taller!
--- Dry again. Removed the dome.
--- PH went up to 6.5 so PH'd down to 5.7
--- Ran the top feed drip ring for a bout a minute to wet the hydroton and rockwool with the nutient solution.
---Too scared to leave the top feed on 24hrs (I don't want over water her and cause dampening-off). Will let dry before re-watering.
- [2100]: After closer inspection, I think she's looking a bit yellow.
--- Decided to add a bit of grow nutes to the bubbler solution.
--- Added 2ml of Sensi Grow A
--- Added 2ml of Sensi Grow B
--- Solution strength after adding more nutes: 176 PPM
--- PH went up to 6
--- I hope that the extra chelating properties of the 'PH Perfect' solution is enough of a buffer for proper nutrient uptake.
Day 07 - Sunday - 08/09/20 - Total Days: 007
-----------------------------------
- [0800]: Water dropped a bit (mostly due to evaporation) so solution strength was at 190.
--- Checked PH again. Was still at 6, so PH'd down to 5.4
--- Ran the top feed for a minute to wet the hydroton a bit.
- [0915]: Since she's looking perky but still a bit yellow. So decided to up the nutrient concentration even more before lights out.
--- Added 2ml more of Sensi Grow A
--- Added 2ml more of Sensi Grow B
--- Solution strength after adding more nutes: 199 PPM
--- PH went up to 5.8
- [1700]: Checked nutrients.
--- PH: 5.9
--- Solution strength: 202 PPM
--- Added 4ml of Voodoo Juice
--- Added 4ml of B-52
--- PH after adding more nutes: 5.9
--- Solution strength after adding more nutes: 238 PPM
- [2130]: Decided to make a new foliar spray to address the continued yellowing.
--- Started with 500ml of distilled water.
--- Added 3 drops of CaliMagic
--- Added 3 drops of Sensi Grow A
--- Added 3 drops of Sensi Grow B
--- Added 3 drops of B-52
--- Added 1 drop of Superthrive
--- Solution strength: 164 PPM
--- PH was at 5.9 and did not adjust.
--- Gave her one spray.
--- Also sprayed the surrounding hydroton.
[END OF WEEK 01]


Likes
28
Share


@Bread_n_Buds
Follow
Time flies, we have arrived in a flash at day 16, it seems like the other day that the first young ladies were appearing on September 1st. "Do you remember.....nanannana Septermber"
She is the Karen Kush, a brand new strain with almost no previous cultivation,
it has a crazy name and from the first weeks of growth it actually seems a bit crazy. Low internodal distance, regular growth. I made a small mistake, I personally went a bit easy with the growth fertilizer and there is a slight beginning of nitrogen deficiency, but we solve it immediately by giving the normal doses, don't worry. Usually I am in line with the table now I was slightly under with the grow and I did wrong. Let it be clear that if you see a slight fading, next week you will not see it anymore.
--- feeding program - As I mentioned I was shy with fertilization and the seedlings are slightly, very slightly faded, let's learn to notice these small signs and with the normal doses after two or three waterings we should be fine. You have to look at the plants guys.
- Power Roots - 1ml/l
- Alga Grow - 2 ml/l (instead of 4 ml/l I made this mistake)
- Pure Zym - 1 ml/l
- Sugar Royal - 1ml/l
- Vita Race - 0.5 ml/l
- The 100% Organic pack by Plagron can be found on Zamnesia at the link: https://www.zamnesia.io/it/11457-plagron-easy-pack-natural.html We are giving a lot of humidity with a humidifier and we oscillate between 65% and 70%.
// Site Strain Description // Formidable genetics: These seeds contain the genes of Monster Bud Kush and White Widow. High THC content: With 24%, the effects are pronounced and intense. Fast flowering: This indica-dominant hybrid needs just 8–9 weeks to reach harvest. Excellent yield potential: This plant is very generous, if grown in the right way!
- Get a seed of this fantastic strain --- https://www.zamnesia.io/it/10780-zamnesia-seeds-karen-kush.html
- Soil and Fertilizers entirely organic --- https://plagron.com/en buy on www.zamnesia.io
- Growbox and air sistem --- https://www.secretjardin.com/
- Music and sound --- I made my girls listen to 432hz frequencies and music from www.radionula.com
- Light - Sp3000 - https://marshydro.eu/
- Z --- You can find these seeds, much more from the world of cannabis, mushrooms and an incredible series of accessories and gadgets on the reference site not only mine but of many growers ---- https://www.zamnesia.io


Processing
Likes
58
Share


@DailyDabs
Follow
Going into week 8 she is looking great. I just added some cha ching and it looks like she doubled in frostyness over night. Its been a little longer than I thought since I last took some close up pics but I still think it shows a difference,
Likes
23
Share


@adam_pawloski87
Follow
This week has been great ,today is day 78 and the girls are just doin their thang , 1 looks ready for flush already and the rest look about another longer then flush for them aswell,, can’t wait to see how these girls finish out over the next couple of weeks 😍!! Y’all keep them eyes peeled an stay tuned for next week! Peace love an positive vibes to y’all Cheers.💨💨💨
Likes
9
Share

@Grow4ever
Follow
Week 8.
The buds are getting bigger and the smell stronger.
Overall she has some great main colas and a lot of other big buds coming up. Think it will be one of the biggest auto harvest for me so far. I noticed some brown necrotic spots on some upperleafs and gave some biobizz cal/mag, because my guess is, the Ca could be little low.
Likes
11
Share


@Mo_Powers
Follow
we are entering the 3rd week of flowering. she looks healthy and continues to feel well. the buds are getting thicker and thicker. this week she was given a homemade fertiliser made from aquafaber, coffee grounds and bannan peel. she really liked it. and in addition to the biobizz fertiliser schedule, she is given biobizz topmax once a week.💪😋 i did a bit of lollipopping.
Processing
Likes
2
Share


@XoticGROW666
Follow
GSC 4/5wk in flower
COVERED IN CRYSTALS
LOOK AT THE CRYSTAL DANCIN
NO BOTTLES NO NUTES
ALL ORGANIC COMPOST TEA N SST TEA


Likes
28
Share


@eldruida_lamota
Follow
Que hay familia, vamos con la cuarta semana de floración de estas Apple Fritter de Zamnesia.
La temperatura está entre los 21/24 grados, la humedad está entorno al 55%, y el ph lo mantengo ahora al principio en 6.2, el foco por supuesto está enchufado 12 horas , tener tienen que crecer fuertes.
Y aparte añadimos nutrientes de Agrobeta, que no puede faltar semejante gama.
Todo correcto hasta ahora, ya cara a la floración veremos cómo avanzan las próximas semanas.
Os comento que tengo un descuento y para que compréis en la web de Zamnesia de un 20%, el código es ZAMMIGD2023
The discount 20% and the code is ZAMMIGD2023
https://www.zamnesia.com/
agrobeta: https://www.agrobeta.com/agrobetatiendaonline/36-abonos-canamo
Mars hydro:
Code discount: EL420
https://www.mars-hydro.com/
Hasta aquí es todo, buenos humos 💨💨💨.
Likes
17
Share


@Lazuli
Follow
Shes about to fatten up now ill turn on the dehumidifier in 5 days i got to save on the bill.

Likes
6
Share


@GreenForMiles
Follow
This strain absolutely took off! The plant I super cropped is absolutely covered in trichomes. One plant matured a little quicker and yielded 2 ounces!

Likes
10
Share


@HerrnLubitz98
Follow
We’re done! Thanks a lot again to Zamnesia and Greenhouse, next big shoutout to Spiderfarmer and Biobizz.
For further updates and more stuff hit me up with a follow on IG @herrnlubitz88
Stay tuned for next run!

Processing
Likes
10
Share


@Dunk_Junk
Follow
She grew well this week! 14cm vertical growth!
I've not done a thing to her apart from feed/water and turn her pot 180 degrees through the week.

Likes
30
Share


@TightNugs
Follow
Plant 2 still in flower,gonna give her another week or 2.
Split her to get some light in,only feed overdrive for another 5 days.
🤞🏴🍁
Light-Voost VST 120 veg,VST 240 flower.
https://voost.com/
🍁🍁🍁🍁
Breeder- white label purple bud auto

Likes
5
Share


@Barksman
Follow
This is the current week which I decide to update from, so I will definitely keep it up as I recovered my account now 😅
This plant taught me never to allow nitrogen deficiency near a flowering plant😔